1. Introduction
This manual provides instructions for the safe and efficient use of your Generic 300W 6-Pin Power Supply Unit. Please read this manual thoroughly before installation and operation to ensure proper functionality and safety.
Safety Precautions:
- Always disconnect power from the wall outlet before installing, removing, or performing any maintenance on the power supply unit.
- Do not open the power supply casing. There are no user-serviceable parts inside, and opening it may expose you to dangerous voltages.
- Refer all servicing to qualified personnel.
- Ensure proper ventilation around the power supply unit to prevent overheating.
- Avoid exposing the unit to moisture, extreme temperatures, or corrosive environments.
2. Product Overview
The Generic 300W 6-Pin Power Supply Unit is designed to provide stable and reliable power for desktop and server computer systems. It features an efficient design suitable for various computing needs.
Key Features:
- Output Wattage: 300W
- PFC Type: Active Power Factor Correction for improved efficiency.
- Cooling: Equipped with a single fan for effective air cooling.
- Design: Non-modular cable design.
- Efficiency: 80 PLUS BRONZE certified for energy efficiency.
- Input Voltage: Supports a wide input voltage range of 100V-240V AC.
- Connectors: Includes a 4-pin CPU power connector and a 6-pin connector.

This image displays the top view of the power supply unit, highlighting the cooling fan and the product's model identification labels.
3. Setup and Installation
Follow these steps to properly install the power supply unit into your computer system:
- Preparation: Ensure your computer system is completely powered off and disconnected from the main power outlet. Open your computer case.
- Remove Old PSU (if applicable): If replacing an existing power supply, disconnect all cables from the motherboard and components, then unmount and remove the old unit.
- Install New PSU: Carefully slide the new power supply unit into the designated power supply bay in your computer case.
- Secure PSU: Secure the power supply unit to the computer case using the provided screws.
- Connect Cables: Connect the necessary power cables to your motherboard and other components. Ensure the 24-pin main power connector is securely attached to the motherboard. Connect the 4-pin CPU power connector to the appropriate socket on your motherboard. Connect any other required cables (e.g., SATA for drives, PCIe for graphics cards if applicable) to your components.
- Final Check: Double-check all connections to ensure they are firm and correctly seated. Ensure no cables are obstructing fans or airflow.
- Close Case: Close your computer case and secure it.

This image shows the various power cables extending from the unit, including the 6-pin and 4-pin connectors, which are essential for connecting to the motherboard and other components.
4. Operating Instructions
After successful installation, follow these steps to operate your power supply unit:
- Connect to Power: Connect the power supply to a wall outlet using a compatible AC power cord.
- Power On: Locate the power switch on the back of the power supply unit and flip it to the 'ON' position (usually indicated by 'I').
- System Start-up: You can now power on your computer system using its main power button.
The unit supports an input voltage range of 100V to 240V AC, automatically adjusting to the local power grid within this range.

This image displays the rear of the power supply unit, showing the AC power input socket and the exhaust fan grille, which is crucial for heat dissipation.
5. Maintenance
Proper maintenance ensures the longevity and optimal performance of your power supply unit.
Cleaning:
- Periodically inspect the power supply's fan and ventilation grilles for dust accumulation.
- With the computer powered off and unplugged, use compressed air to gently clear dust from the fan blades and grilles. Do not use liquid cleaners.
- Avoid inserting any objects into the fan or ventilation openings.
Environmental Conditions:
- Operate the power supply in a well-ventilated area to prevent heat buildup.
- Keep the unit away from direct sunlight, excessive heat sources, high humidity, and corrosive chemicals.
6. Troubleshooting
If you encounter issues with your power supply unit, refer to the following troubleshooting guide:
No Power to System:
- Power Cord Check: Ensure the AC power cord is securely connected to both the power supply unit and a functional wall outlet.
- Power Switch: Verify that the power switch on the back of the power supply is in the 'ON' (I) position.
- Internal Connections: Confirm all internal power connections (24-pin motherboard, 4-pin CPU, etc.) are firmly seated.
- Wall Outlet: Test the wall outlet with another device to ensure it is providing power.
System Instability or Random Shutdowns:
- Wattage Sufficiency: Ensure the 300W output of the power supply is sufficient for all connected components. An underpowered system can lead to instability.
- Ventilation: Check for proper airflow within your computer case to prevent the power supply or other components from overheating.
- Component Check: Temporarily disconnect non-essential components to see if the issue persists, which might indicate a faulty component drawing too much power.
If issues persist after performing these checks, it is recommended to consult a qualified computer technician.
7. Specifications
Below are the detailed technical specifications for the Generic 300W 6-Pin Power Supply Unit:
| Feature | Specification |
|---|---|
| Product Dimensions (L x W x H) | 15 x 8.2 x 6.5 cm |
| Item Weight | 1 kg |
| Brand | Generic |
| Compatible Devices | ATX form factor desktop and server systems |
| Connector Type | ATX, 24 Pin System Bus, 4 Pin CPU, 6 Pin |
| Output Wattage | 300W |
| Form Factor | ATX |
| Cooling Method | Air (1 Fan) |
| Input Voltage Range | 100V - 240V AC |
| PFC Type | Active |
| 80 PLUS Certification | 80 PLUS BRONZE |
| Certifications | CE, DOT, EAC, EPA, FCC, GMP, RoHS, TGA, UL, KC, pse, WEEE |
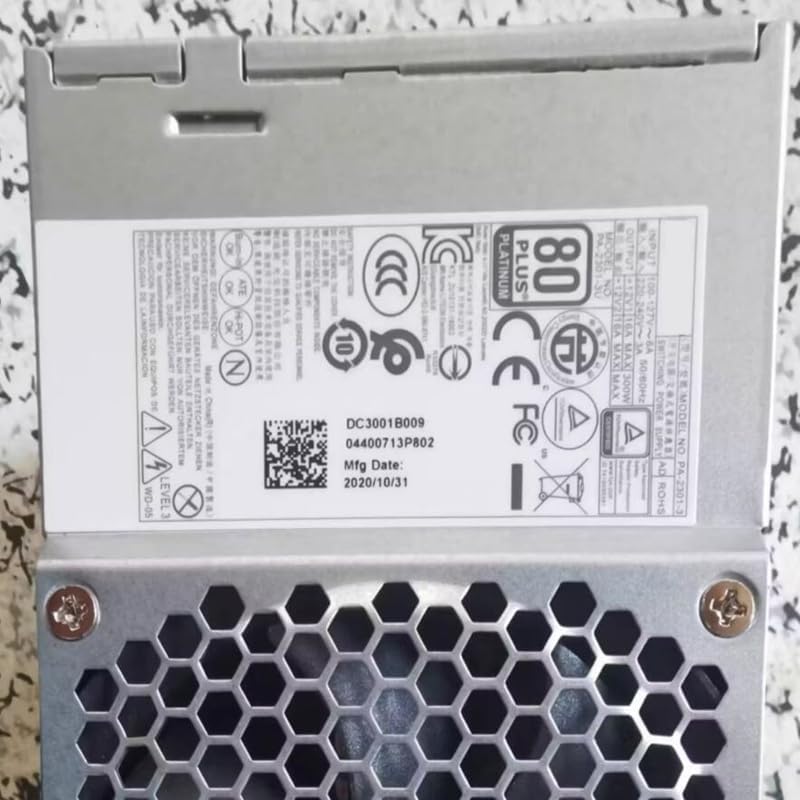
This image displays the product label, which includes important regulatory certifications, electrical specifications, and manufacturing details.
8. Warranty and Support
For specific warranty information regarding your Generic 300W 6-Pin Power Supply Unit, please refer to the retailer from whom you purchased the product or consult your purchase documentation.
For technical support or further assistance, please contact the vendor or a qualified computer technician. Do not attempt to repair the unit yourself.