1. Introduction
This manual provides detailed instructions for the assembly, operation, and maintenance of your Generic Mythos 6x8 Ft. Walk-in Greenhouse Kit. Designed for both novice and experienced gardeners, this greenhouse creates an ideal environment for extending your growing season, starting seedlings, growing vegetables, or protecting delicate plants. The kit features twin-wall polycarbonate panels for insulation and light diffusion, and a heavy-duty aluminum frame for durability.
2. Safety Information
- Always wear appropriate safety gear, including gloves and eye protection, during assembly.
- Assembly requires at least two people for safe handling of components.
- Ensure the assembly area is clear of obstructions and level.
- Do not assemble in strong winds.
- Securely anchor the greenhouse to the ground immediately after assembly to prevent wind damage. Anchors are not included.
- Keep children and pets away from the assembly area.
3. Package Contents
Verify that all components are present before beginning assembly. Refer to the parts list provided in your packaging for specific item counts.
- Aluminum Frame Components (Green Frame)
- Twin-Wall 4mm Polycarbonate Panels
- Galvanized Steel Base Kit
- Single Hinged Door (can be assembled as right or left opening)
- Lockable Door Latch with Magnetic Catch
- Adjustable Roof Vent
- Integrated Gutter System Components
- Fasteners and Connectors
4. Setup and Assembly
The greenhouse features a sliding panel assembly system designed for homeowner installation. Follow the step-by-step instructions provided in the included assembly guide for detailed diagrams and procedures.
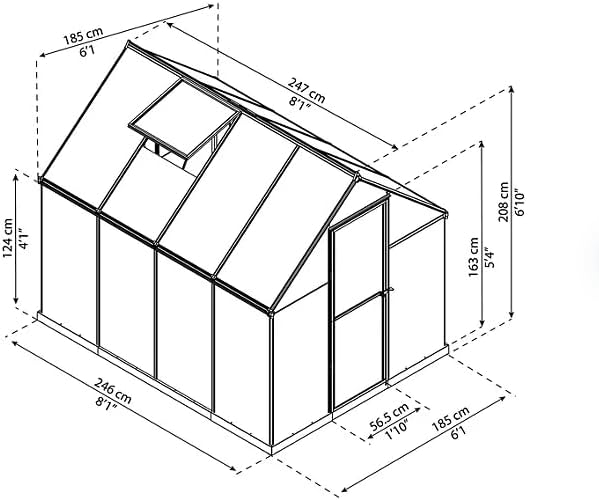
Figure 4.1: This diagram illustrates the overall dimensions of the greenhouse, including length (246 cm / 8'1"), width (185 cm / 6'1"), peak height (208 cm / 6'10"), and side wall height (124 cm / 4'1").
4.1. Base Installation
Begin by assembling the galvanized steel base kit on a level surface. Ensure the base is square and securely fastened. The base includes designated holes for anchoring (anchors not included) to provide additional structural stability. It is crucial to anchor the greenhouse to prevent movement due to wind.
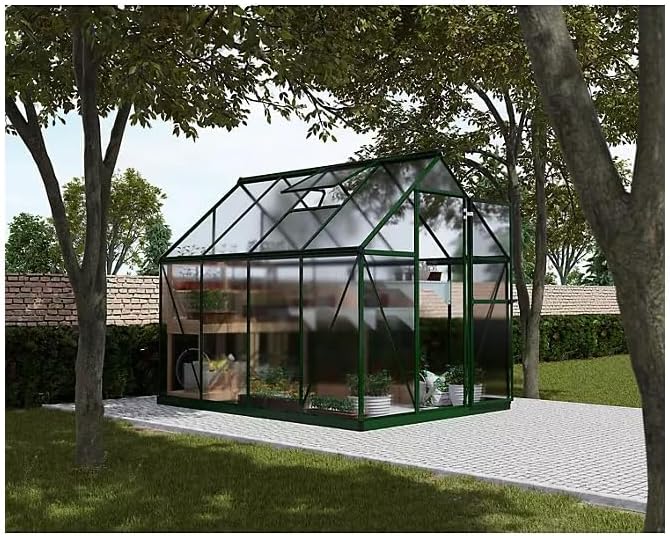
Figure 4.2: A view of the galvanized steel base corner, showing the sturdy foundation and designated holes for anchoring the greenhouse to the ground (anchors not included).
4.2. Frame Assembly
Assemble the aluminum frame sections according to the provided instructions. Pay close attention to the corner joints and ensure all connections are tight and secure.

Figure 4.3: A detailed shot of a corner joint, highlighting the robust connection points of the aluminum frame, ensuring structural integrity.
4.3. Panel Installation
The twin-wall polycarbonate panels slide into the channels of the aluminum frame. Ensure the correct orientation of the panels for optimal UV protection and insulation. The sliding system simplifies the installation process.

Figure 4.4: This image shows how the twin-wall polycarbonate panels slide securely into the aluminum frame channels, illustrating the easy assembly system.
4.4. Door and Vent Installation
Install the hinged door, which can be configured for either right or left opening. Attach the lockable latch and magnetic catch. Install the roof vent according to the instructions to allow for ventilation.
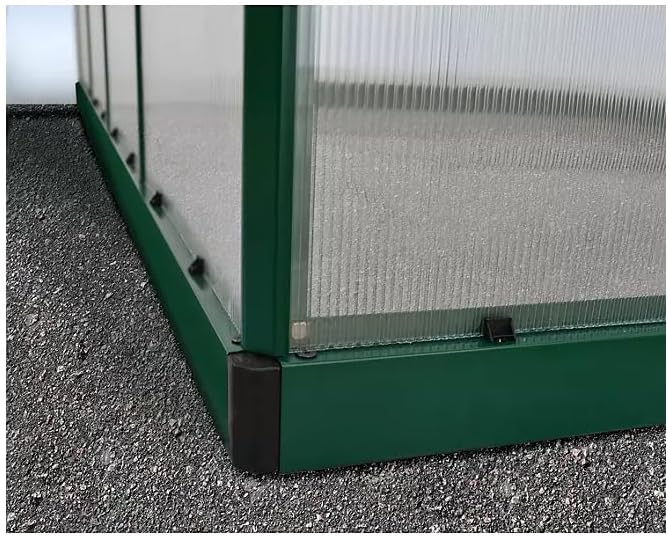
Figure 4.5: This image displays the lockable door latch, providing security and ensuring the door remains closed when desired.

Figure 4.6: A detailed view of the adjustable roof vent, demonstrating its mechanism for opening to allow air circulation and temperature regulation within the greenhouse.

Figure 4.7: An exterior view of the assembled greenhouse, showcasing its green aluminum frame, clear polycarbonate panels, and roof vent. The door is open, revealing plants inside.
5. Operating Instructions
5.1. Ventilation
Utilize the adjustable roof vent to control the internal temperature and humidity. Open the vent during warmer periods to release excess heat and improve air circulation. Close it during cooler periods or when higher humidity is desired.
5.2. Door Operation
The single hinged door provides easy access. Use the lockable latch for security when the greenhouse is unattended. The magnetic catch allows the door to remain open for extended periods, facilitating airflow and access.
5.3. Water Management
The integrated gutter system is designed for effective water drainage and collection. Consider connecting a rain barrel to the gutters to collect rainwater for your plants, promoting sustainable gardening practices.
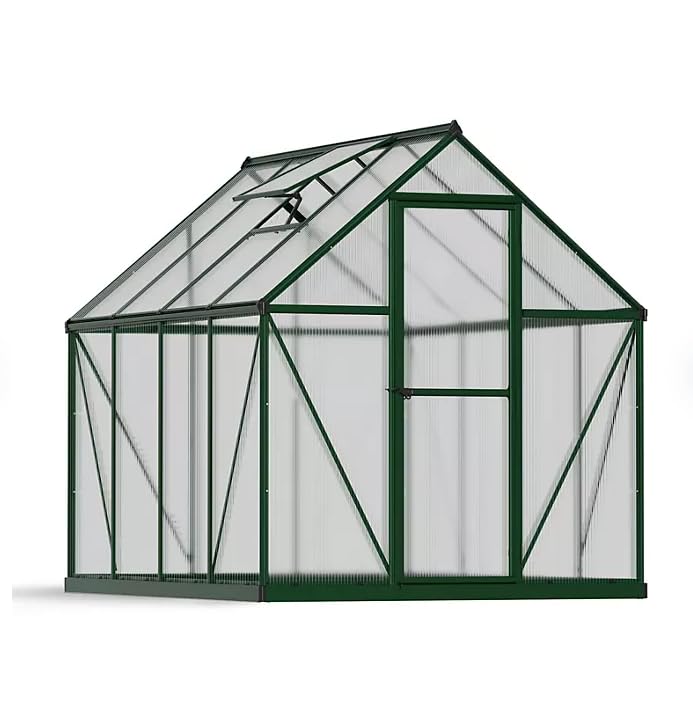
Figure 5.1: An interior perspective of the greenhouse, demonstrating the ample space for growing plants, accommodating shelving, and allowing comfortable movement.
6. Maintenance
This greenhouse is designed for low maintenance, ensuring a lifetime of use with proper care.
- Cleaning Panels: Clean the polycarbonate panels periodically with mild soap and water using a soft cloth or sponge. Avoid abrasive cleaners or brushes that could scratch the surface.
- Frame Inspection: Regularly inspect the aluminum frame for any loose fasteners or signs of wear. Tighten as necessary.
- UV Protection: The polycarbonate panes are 100% UV protected to resist discoloration, fracturing, or shattering, requiring no special UV treatment.
- Gutter Cleaning: Ensure the gutter system is free of debris to maintain effective water drainage.
7. Troubleshooting
- Excessive Condensation: Increase ventilation by opening the roof vent and door. Ensure proper air circulation around plants.
- Temperature Fluctuations: Adjust the roof vent opening based on external weather conditions. Consider adding a shade cloth during intense summer heat or a small heater during extreme cold.
- Panel Instability: Re-check all frame connections and ensure panels are fully seated in their channels. Verify that the greenhouse is securely anchored to the ground.
- Door Not Closing Properly: Inspect the door hinges and latch for any obstructions or misalignment. Adjust as needed.
8. Specifications
| Feature | Detail |
|---|---|
| Brand | Generic |
| Color | Green Frame |
| Product Dimensions (L x W x H) | 96.75"L x 72.75"W x 85"H (246 cm x 185 cm x 216 cm) |
| Item Weight | 90 Pounds (40.8 kg) |
| Cover Material | Polycarbonate (PC) Twin-Wall, 4mm nominal thickness |
| Frame Material | Aluminum |
| Closure Type | Lockable Door |
| Number of Doors | 1 |
| Number of Vents | 1 (Roof Vent) |
| Door Style | French Door (Hinged) |
9. Warranty and Support
Parts and service are available for year-round support. For any questions regarding assembly, operation, or maintenance, please refer to the contact information provided with your purchase documentation or reach out to the seller directly.