Introduction
This manual provides detailed instructions for the installation, operation, and maintenance of your YI53ZX0 KCEVE-8202 8K HDMI Dual Monitor KVM Switch. This device allows two computers to share two HDMI monitors and four USB 3.0 peripherals, such as a keyboard, mouse, and printer, enabling efficient workspace management and seamless switching between systems.
Package Contents
Please verify that all items listed below are included in your package:
- 1 x YI53ZX0 KCEVE-8202 8K HDMI Dual Monitor KVM Switch
- 2 x HDMI 2.1 Cables
- 2 x USB 3.0 A-to-B Cables
- 1 x Wired Remote Control
- 1 x DC 12V Power Adapter (UK Plug)
- 1 x User Manual (this document)

Image 1: Contents of the KVM Switch package, including the KVM unit, cables, remote, and power adapter.
Product Overview
Familiarize yourself with the ports and indicators on the KVM switch.
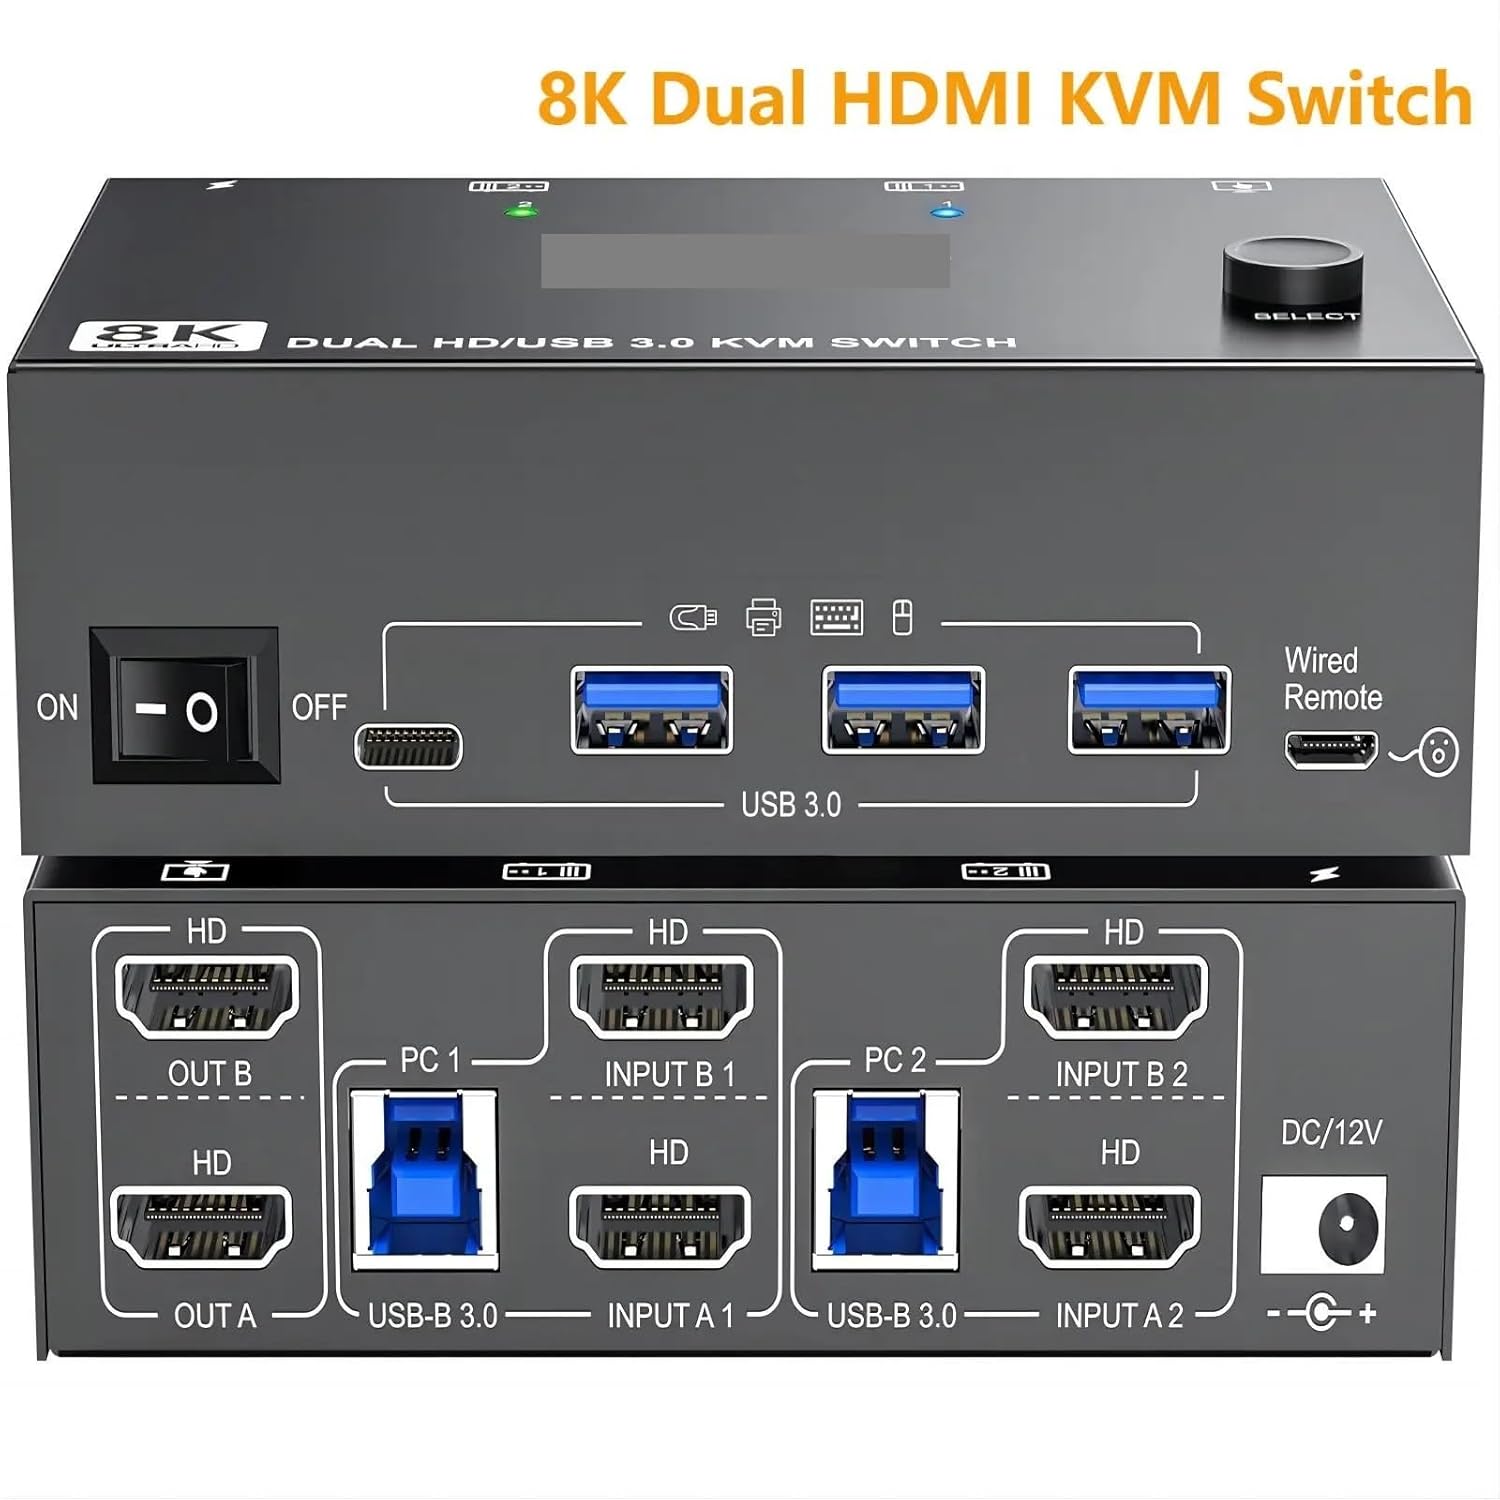
Image 2: Detailed view of the KVM switch's front and rear panels, showing all input and output ports.
Front Panel:
- Power Switch: On/Off toggle for the device.
- USB 3.0 Hub Ports (4x): Connect USB peripherals such as keyboard, mouse, printer, or USB flash drive.
- Wired Remote Port: Connect the included wired remote for switching.
- Select Button: Manually switch between connected computers.
- LED Indicators: Show which computer is currently selected.
Rear Panel:
- HDMI Output Ports (OUT A, OUT B): Connect to your two monitors.
- PC Input Ports (PC 1, PC 2): Connect to your two computers. Each PC requires two HDMI inputs (Input A, Input B) and one USB-B input.
- USB-B 3.0 Input Ports (2x): Connect to the USB 3.0 ports on your computers for peripheral sharing.
- DC 12V Power Input: Connect the provided power adapter.
Setup Instructions
Follow these steps to connect your KVM switch:
- Power Off Devices: Ensure all computers and monitors are powered off before making connections.
- Connect Monitors to KVM: Use HDMI 2.1 cables to connect your two monitors to the KVM's OUT A and OUT B ports.
- Connect Computers to KVM:
- For PC 1: Connect two HDMI 2.1 cables from PC 1's video outputs to the KVM's INPUT A 1 and INPUT B 1 ports. Connect one USB 3.0 A-to-B cable from PC 1's USB 3.0 port to the KVM's USB-B 3.0 (PC 1) port.
- For PC 2: Connect two HDMI 2.1 cables from PC 2's video outputs to the KVM's INPUT A 2 and INPUT B 2 ports. Connect one USB 3.0 A-to-B cable from PC 2's USB 3.0 port to the KVM's USB-B 3.0 (PC 2) port.
Important Note: Each PC requires two HDMI cables and one USB 3.0 A-to-B cable for proper dual monitor display and USB peripheral sharing. Ensure the USB cable is connected directly to the KVM, not cross-plugged.
- Connect USB Peripherals: Connect your keyboard, mouse, printer, or other USB 3.0 devices to the USB 3.0 Hub ports on the front panel of the KVM switch.
- Connect Wired Remote: Plug the wired remote control into its dedicated port on the front panel.
- Connect Power: Plug the DC 12V power adapter into the KVM's power input and then into a power outlet.
- Power On: Turn on the KVM switch using the front panel power switch, then power on your monitors and computers.
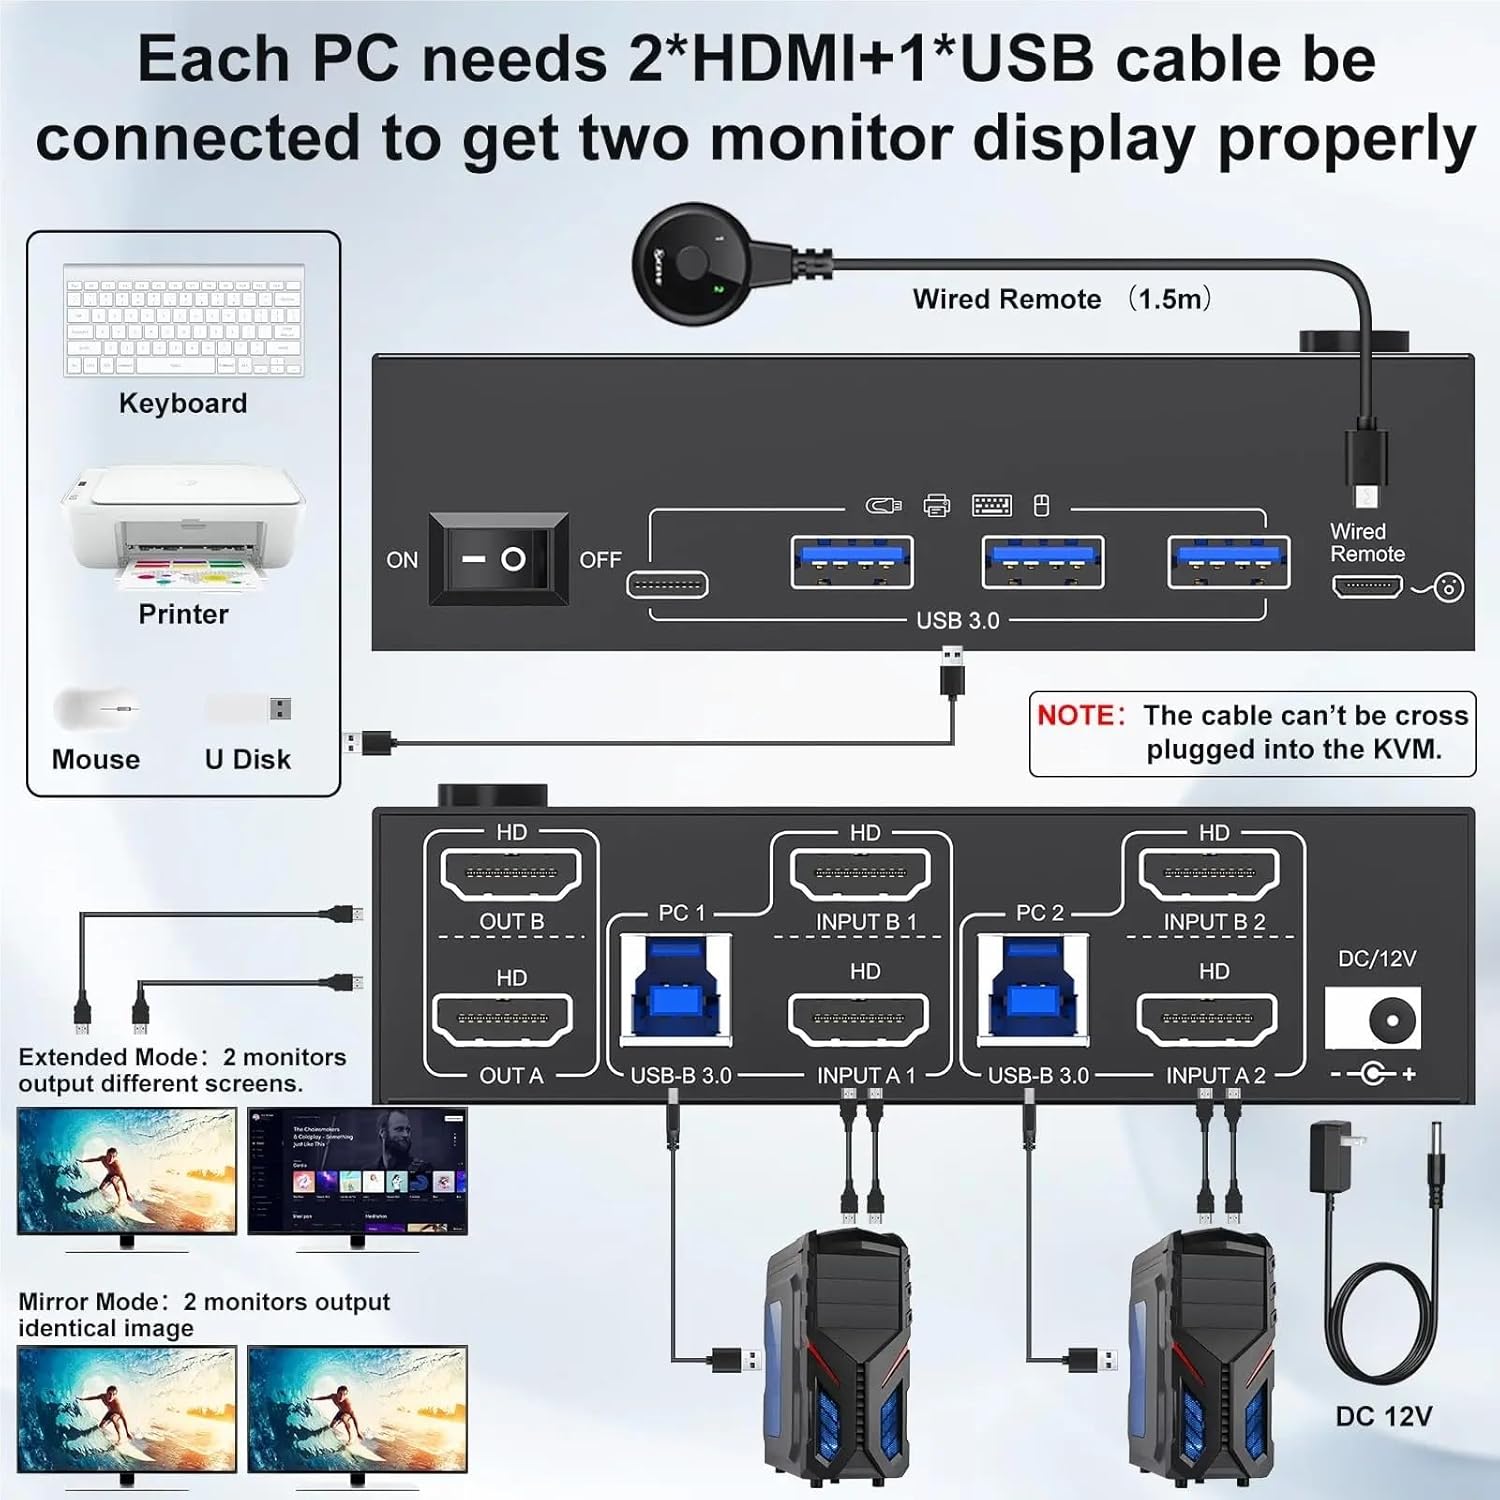
Image 3: Visual guide demonstrating how to connect two computers, two monitors, and USB peripherals to the KVM switch.
Operating Instructions
Switching Between Computers:
You can switch between connected computers using one of the following methods:
- Front Panel Button: Press the SELECT button on the front panel of the KVM switch.
- Wired Remote Control: Press the button on the wired remote control.
The LED indicators on the front panel will illuminate to show which computer is currently active.
Display Modes:
The KVM switch supports two primary display modes for your dual monitors:
- Extended Mode: Each monitor displays a different part of your desktop, extending your workspace. This is the typical setup for increased productivity.
- Mirror Mode: Both monitors display the identical image. This can be useful for presentations or sharing content.
You can configure these display modes through your computer's operating system display settings (e.g., Windows Display Settings, macOS System Preferences).

Image 4: Illustration showing the difference between Extended Mode (two distinct displays) and Mirror Mode (identical displays) on dual monitors.

Image 5: A screen displaying content in Ultra HD 8K resolution, highlighting the KVM's capability. Ensure 8K HDMI 2.1 cables are used for optimal performance.

Image 6: Close-up of the KVM's USB 3.0 ports, demonstrating high-speed 5Gbps data transfer when connected to a laptop.
Troubleshooting
If you encounter issues, please refer to the following common problems and solutions:
- No Display on Monitors:
- Ensure the KVM switch is powered on and the power adapter is securely connected.
- Verify all HDMI cables are securely connected between computers, KVM, and monitors.
- Check that the correct input source is selected on your monitors.
- Confirm that your computer's display settings are configured for dual monitors (Extended or Mirror mode).
- Try restarting the KVM switch and then your computers.
- Keyboard/Mouse Not Responding:
- Ensure the USB 3.0 A-to-B cables are securely connected from each computer to the KVM.
- Verify that your keyboard and mouse are plugged into the USB 3.0 Hub ports on the KVM's front panel.
- Try connecting the keyboard/mouse directly to the computer to confirm they are functional.
- Some specialized gaming keyboards/mice with high power consumption or custom drivers may not function optimally through a KVM. Try a standard keyboard/mouse for testing.
- Poor Video Quality or Flickering:
- Ensure you are using high-quality HDMI 2.1 certified cables, especially for 8K@60Hz or 4K@144Hz resolutions.
- Check cable lengths; excessively long cables can degrade signal quality.
- Reduce the display resolution or refresh rate in your computer's display settings to see if the issue resolves.
- KVM Not Switching:
- Confirm the KVM is powered on.
- Ensure the wired remote is properly connected.
- Try pressing the SELECT button on the KVM's front panel.
Specifications
| Feature | Detail |
|---|---|
| Model Number | KCEVE-8202 |
| Brand | YI53ZX0 |
| HDMI Version | HDMI 2.1 |
| Max Resolution | 8K@60Hz, 4K@144Hz |
| USB Ports | 4 x USB 3.0 Hub Ports |
| Input Ports | 4 x HDMI (2 per PC), 2 x USB-B 3.0 (1 per PC) |
| Output Ports | 2 x HDMI |
| Power Supply | DC 12V (UK Plug Adapter) |
| Item Weight | 50 Grams (approx. 1.76 ounces) |
| Dimensions | 1.18 x 0.79 x 0.39 inches (Package Dimensions) |
Maintenance
To ensure the longevity and optimal performance of your KVM switch, follow these maintenance guidelines:
- Cleaning: Use a soft, dry cloth to clean the exterior of the device. Avoid using liquid cleaners or aerosols, which may damage the unit.
- Ventilation: Ensure the KVM switch is placed in a well-ventilated area to prevent overheating. Do not block any ventilation openings.
- Cable Management: Keep cables organized and avoid sharp bends or excessive tension, which can damage cables or ports.
- Power Off When Not in Use: If the device will not be used for an extended period, consider powering it off and disconnecting the power adapter.
Warranty and Support
For warranty information or technical support, please refer to the documentation provided with your purchase or contact your retailer. Keep your proof of purchase for warranty claims.
For further assistance, you may also visit the manufacturer's website or contact their customer service department. Contact details are typically found on the product packaging or the official brand website.