INXING TF-100
INXING TF-100 5-Pin Electric Scooter LCD Instrument Throttle Controller User Manual
Model: TF-100 | Brand: INXING
1. Introduction
This manual provides detailed instructions for the installation, operation, and maintenance of your INXING TF-100 5-Pin Electric Scooter LCD Instrument Throttle Controller. Please read this manual thoroughly before use to ensure proper function and safety.
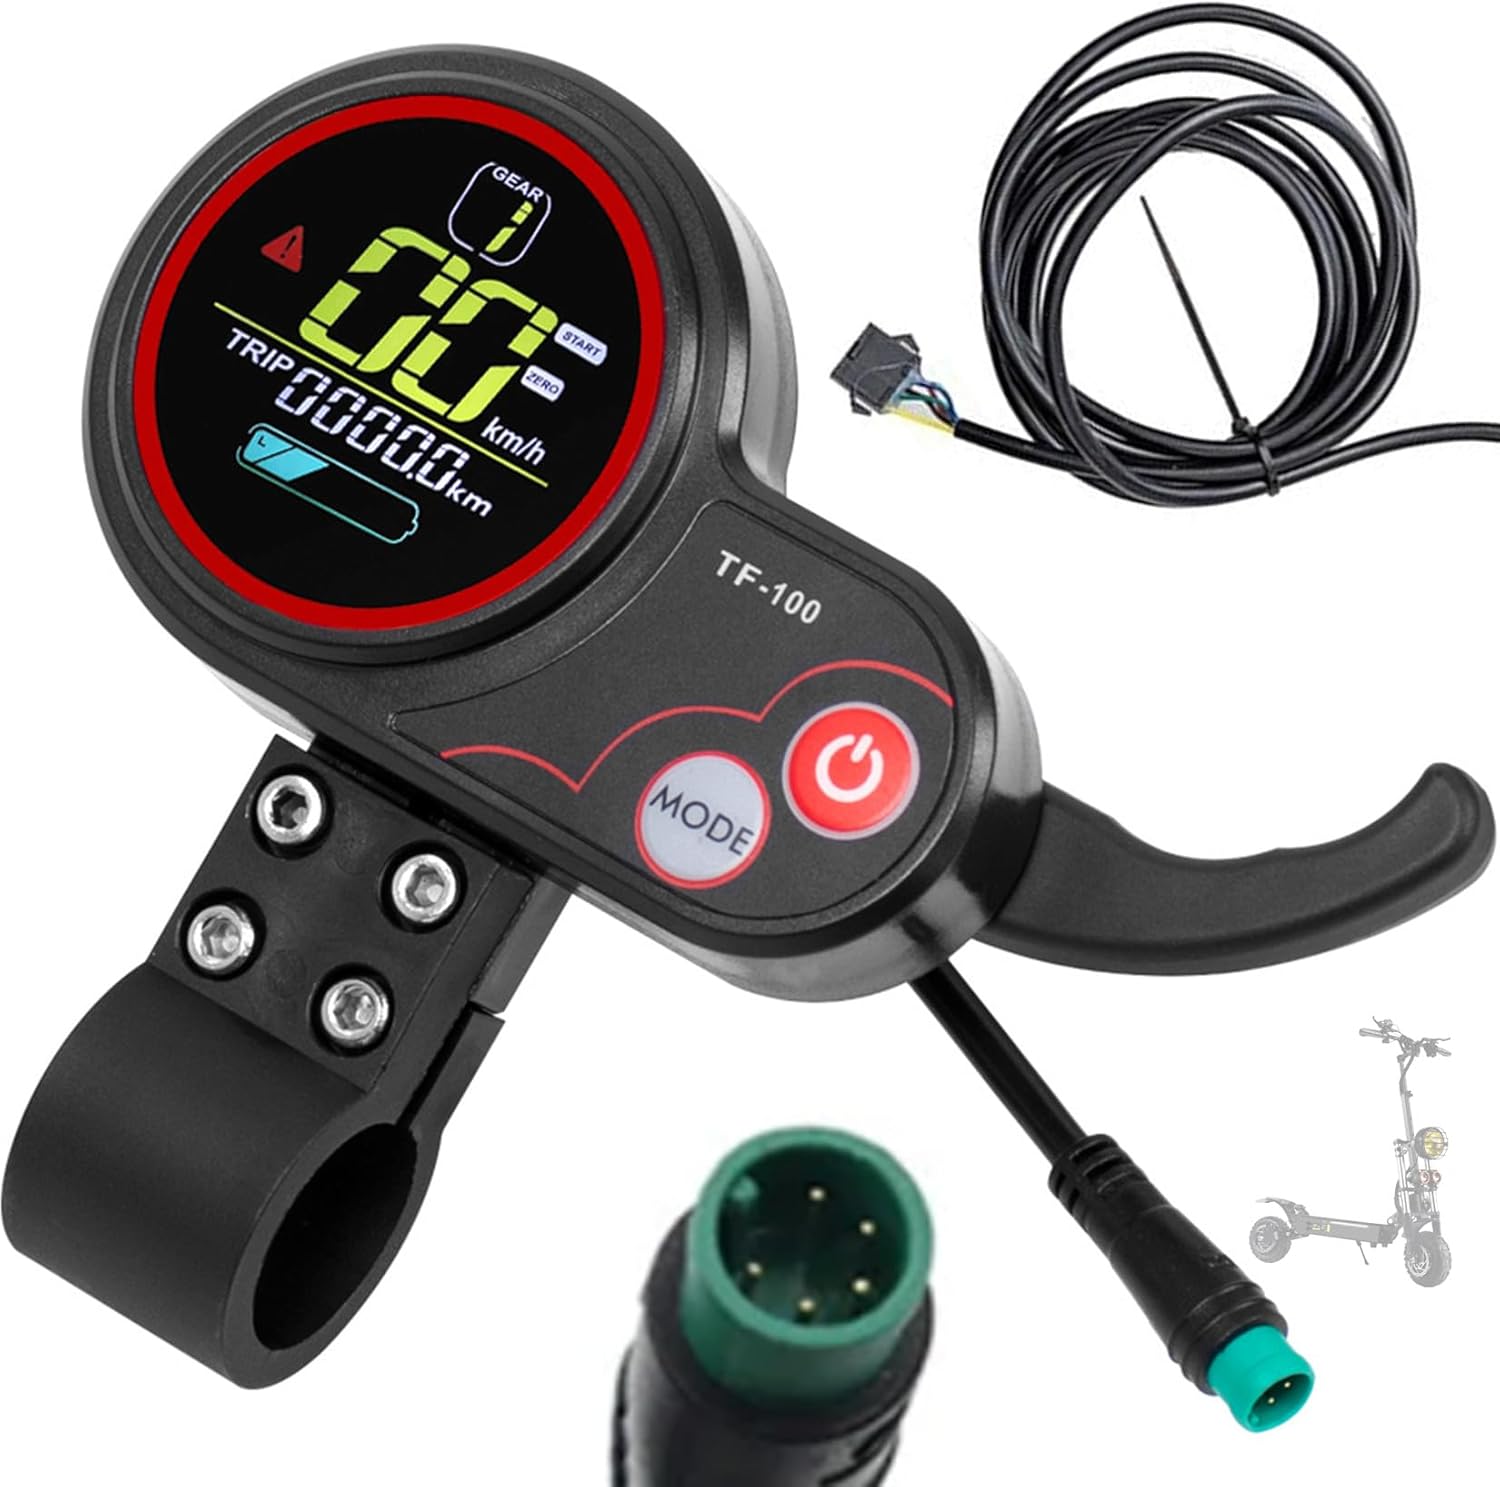
Figure 1: INXING TF-100 LCD Instrument Throttle Controller with wiring and extension cord.
2. Product Features
- Compatibility: Suitable for electric scooters from brands such as KUGOO, INXING, and BOYUEDA.
- Integrated Display: Features a TF-100 LCD dashboard display screen.
- Waterproof Design: Constructed from durable ABS material for good toughness and waterproof performance.
- USB Charging Port: Discreet USB port on the back for convenient phone charging.
- Adjustable P-Settings: Allows customization of mileage unit (KM/Miles) and start mode (zero start/non-zero start).
- Communication Protocol: Operates on Protocol 2, compatible with Protocol 2 controllers.
- 5-Pin Connector: Equipped with a 5-pin waterproof plug and an extension cord (55 inches).
3. Package Contents
- 1 x TF-100 Electric Scooter Throttle (with waterproof cable)
- 1 x Extension Cord (length: 55 inches)
Note: The electric scooter itself is not included.
4. Installation
4.1 Mounting the Throttle
- Identify a suitable position on your scooter's handlebar for the TF-100 throttle. Ensure it is within comfortable reach for operation.
- Loosen the mounting screws on the throttle clamp.
- Place the throttle onto the handlebar and tighten the screws securely. Do not overtighten.

Figure 2: TF-100 throttle mounted on an electric scooter handlebar, showing the display and thumb lever.
4.2 Wiring Connection
The TF-100 throttle uses a 5-pin waterproof connector. Connect this to the corresponding 5-pin port on your electric scooter's controller. If an extension cord is needed, connect it between the throttle and the controller.

Figure 3: 5-Core Wire Instrument Diagram. Red is Positive, Black is Negative, White is TX (Instrument), Green is RT (Instrument), Blue is DS (Lock).
Ensure the connection is secure and the waterproof plug is properly seated to prevent moisture ingress.
Video 1: Electric bike thumb throttle 130XSM plug installation. This video demonstrates the process of connecting the wires to the plug, which is similar to the TF-100's wiring.
Video 2: Product installation display. This short video shows the physical installation of a similar throttle unit on a handlebar.
5. Operation
5.1 Power On/Off
Press and hold the Power button (red button) to turn the display and throttle on or off.

Figure 4: Close-up view of the TF-100 display showing the Power (red) and Mode buttons.
5.2 Adjusting Speed Gears (P1-P2-P3)
The TF-100 display allows adjustment of speed gears (P1, P2, P3). These typically correspond to different speed limits or power outputs. Consult your scooter's main controller manual for specific gear definitions.
Video 3: TF-100 Electric Scooter Throttle operation. This video demonstrates the display turning on and the throttle being engaged, showing speed changes and gear adjustments.
5.3 P-Settings Configuration
To access P-settings, typically you need to press and hold both the Power and Mode buttons simultaneously for a few seconds while the unit is powered on. Navigate through settings using the Mode button and adjust values using the throttle lever or power button.
- P02: Mileage Unit
- 0: Kilometers (KM)
- 1: Miles (MPH)
- P09: Start Mode
- 0: Zero Start (throttle activates from a standstill)
- 1: Non-Zero Start (scooter must be moving before throttle activates)
Refer to your scooter's specific manual for a complete list of P-settings and their functions, as these can vary.
5.4 USB Charging Port
The TF-100 features a discreet USB charging port on the back of the display unit. This allows you to charge compatible devices while riding. Locate the rubber cover on the back of the unit, open it, and connect your USB charging cable.

Figure 5: Side view of the TF-100 throttle, highlighting the USB charging port with its protective cover.
6. Maintenance
- Cleaning: Wipe the display and throttle unit with a soft, damp cloth. Avoid using abrasive cleaners or solvents.
- Connections: Periodically check all electrical connections, especially the 5-pin waterproof plug, to ensure they are secure and free from corrosion.
- Storage: When not in use for extended periods, store the scooter and its components in a dry, cool place away from direct sunlight.
7. Troubleshooting
| Problem | Possible Cause | Solution |
|---|---|---|
| Display does not power on. | Loose connection, power issue from controller, faulty unit. | Check all 5-pin connections. Ensure the scooter's main power is on. If issues persist, contact support. |
| Throttle not responding. | Incorrect P-setting (e.g., non-zero start without movement), loose connection, faulty throttle. | Verify P09 setting. Check 5-pin connection. Ensure the throttle lever moves freely. |
| Inaccurate speed/mileage readings. | Incorrect P-setting (e.g., P02 unit), sensor issue. | Check P02 setting for correct mileage unit. Consult scooter manual for wheel diameter settings if applicable. |
8. Specifications
- Model Name: TF-100 Electric Scooter Throttle
- Brand: INXING
- Material: ABS Plastic
- Connector Type: 5-Pin Waterproof Plug
- Extension Cable Length: 55 inches (approx. 140 cm)
- Compatibility: 24V, 36V, 48V Electric Scooter Controllers (Protocol 2)
- Dimensions (L x W x H): 5.1 x 4.7 x 1.59 inches (approx. 13 x 12 x 4 cm)
- Weight: 0.44 Pounds (approx. 200 grams)
- Color: Black

Figure 5: Dimensions of the TF-100 throttle unit, showing measurements in centimeters and inches.
9. Warranty and Support
This product does not come with an explicit warranty description from the manufacturer as per available information. For any technical support or inquiries, please contact the seller directly through your purchase platform.
For further assistance, you may refer to the official INXING website or contact their customer service if available.
Ask a question about this manual
Ask about setup, troubleshooting, compatibility, parts, safety, or missing instructions. Manuals+ will review the question and use this page’s manual context to help answer it.