1. Introduction
The Ingenuity The Doorway 36S Series Custom Collection Safety Gate provides a secure barrier for children and pets within your home. This gate is designed with customizable wood panels that can be painted or stained to complement your interior decor. It offers versatile installation options, including pressure mounting for temporary use without tools or hardware mounting for a permanent, swinging door functionality.
This manual provides detailed instructions for the assembly, installation, and safe operation of your Ingenuity safety gate. Please read all instructions carefully before installation and retain this manual for future reference.
2. Key Features
- Customizable Design: Wood panels are paintable and stainable, allowing for personalization to match home decor. No prior preparation is required for painting or staining.
- Adjustable Width: Fits doorways 30-36 inches (76.2-91.4 cm) wide.
- Standard Height: Stands 28 inches (71.1 cm) tall.
- Dual Mounting Options:
- Pressure Mount: Features damage-free adhesive for easy, tool-free installation and removal, ideal for temporary use.
- Hardware Mount: Allows the gate to function as a full-swing door for convenient passage. Hardware for this option is included.
- Safety Standards: Meets stringent ASTM and European safety standards; CARB compliant.
- Durable Construction: Made from sturdy wood to safely contain children and pets.
3. Components and Parts List
Before beginning assembly, ensure all parts are present and undamaged. Refer to the included instruction booklet for a complete list of components. Typical components include:
- Gate panels (wood slats and frame)
- Mounting cups (for pressure mount)
- Hardware for swing door mount (hinges, latches, screws)
- Extension pieces (if applicable for wider openings)
- Instruction manual

Image: Unpacking the gate components for assembly. Ensure all parts are accounted for before proceeding with installation.
4. Setup and Installation
The Ingenuity Doorway 36S Series gate offers two installation methods: Pressure Mount and Hardware Mount. Choose the method that best suits your needs and doorway type.
4.1. Measuring Your Doorway
Before installation, accurately measure the width of your doorway. This gate is designed for openings between 30 and 36 inches wide.

Image: Visual guide showing the two installation options: Pressure Mounted (top) and Hardware Mounted (bottom).
4.2. Pressure Mount Installation
The pressure mount option is ideal for temporary use and requires no drilling or tools. It uses damage-free adhesive for easy release.
- Ensure the doorway surface is clean and dry.
- Attach the pressure mounting cups to the gate according to the detailed instructions in the included manual.
- Position the gate in the doorway and apply pressure to secure the adhesive cups to the wall.
- Verify the gate is firmly in place and cannot be easily dislodged.
4.3. Hardware Mount Installation
For a more permanent solution that allows the gate to swing open, use the hardware mount option. This requires tools for installation.
- Identify the desired location for the gate and mark the positions for the hinges and latch on the door frame.
- Drill pilot holes as indicated in the detailed instruction manual.
- Secure the hinges to one side of the doorway and the gate using the provided screws.
- Attach the latch mechanism to the opposite side of the doorway and the gate, ensuring smooth opening and secure closing.
- Test the gate's swing and latching mechanism to ensure proper function and security.
Video: An official video demonstrating the installation process and features of the Ingenuity The Doorway 36S Series Custom Collection gate.
5. Operating Instructions
5.1. Using the Pressure Mounted Gate (Barrier Mount)
When installed with the pressure mount method, the gate acts as a barrier that can be easily removed for passage.
- To open: Gently lift the gate from the wall cups to disengage it from the opening.
- To close: Align the gate with the wall cups and press firmly to re-secure it in place.

Image: A person demonstrating how to lift and remove the pressure-mounted gate from its wall cups to create an open passage.
5.2. Using the Hardware Mounted Gate (Swing Door Mount)
The hardware mounted gate functions as a traditional swinging door, opening in both directions for convenient passage.
- To open: Disengage the latch mechanism and push the gate in the desired direction.
- To close: Swing the gate back into the closed position and ensure the latch engages securely.

Image: A person demonstrating the full-swing functionality of the hardware-mounted gate, which opens in both directions.
6. Customization
The natural wood panels of your Ingenuity gate are designed for customization. You can paint or stain them to match your home's aesthetic.
- Painting/Staining: The panels are ready for your creative touch without any prior preparation.
- Baby-Safe Products: For safety, it is recommended to use baby-safe paints and stains. Scan the QR code on the product packaging for recommendations.
- Alternatively, the gate looks great left in its natural wood finish.

Image: A person painting the wooden slats of the gate, demonstrating the customization feature. The inset shows a fully painted gate installed.
7. Maintenance
Regular maintenance will ensure the longevity and safe operation of your safety gate.
- Cleaning: Wipe down the gate with a damp cloth and mild soap. Avoid abrasive cleaners or harsh chemicals that could damage the wood or finish.
- Inspection: Periodically check all components, including mounting hardware, hinges, and latches, for wear, damage, or loosening.
- Tightening: If any hardware appears loose, tighten it immediately to maintain the gate's stability and security.
- Wood Care: If the gate is painted or stained, inspect for chips or fading and reapply finish as needed, using baby-safe products.
8. Troubleshooting
If you encounter issues with your Ingenuity safety gate, refer to the following common troubleshooting tips:
- Gate feels unstable: Ensure all mounting points are securely fastened. For pressure-mounted gates, re-apply pressure to the adhesive cups. For hardware-mounted gates, check that all screws are tight.
- Gate does not fit opening: Re-measure your doorway. Ensure you are using any necessary extension pieces for wider openings. Refer to the specifications section for width ranges.
- Latch not engaging: Check for any obstructions preventing the latch from closing properly. Ensure the gate is aligned correctly within the opening. Adjust hinges or mounting points if necessary.
- Damage to wall from pressure mount: While designed to be damage-free, improper removal or prolonged excessive pressure can sometimes affect surfaces. Follow removal instructions carefully.
If problems persist, contact customer support for further assistance.
9. Specifications
| Feature | Detail |
|---|---|
| Brand | Ingenuity |
| Model Number | 17271-004 |
| Age Range Description | Baby |
| Material Type | Wood |
| Color | Natural (customizable) |
| Mounting Type | Pressure Mount, Hardware Mount |
| Target Species | Dog, Baby |
| Closure Type | Latch |
| Item Weight | 9.24 Pounds (4.19 kg) |
| Gate Height | 28 inches (71.1 cm) |
| Barrier Mount Width (without extension) | 30-32 inches (76.2-81.2 cm) |
| Barrier Mount Width (with extension) | 34-36 inches (86.3-91.4 cm) |
| Swing Door Mount Width (without extension) | 31-32 inches (78.7-81.2 cm) |
| Swing Door Mount Width (with extension) | 35-36 inches (88.9-91.4 cm) |
| UPC | 074451172715 |

Image: Diagram showing the dimensions for the Barrier Mount installation, including height and width ranges with and without extensions.
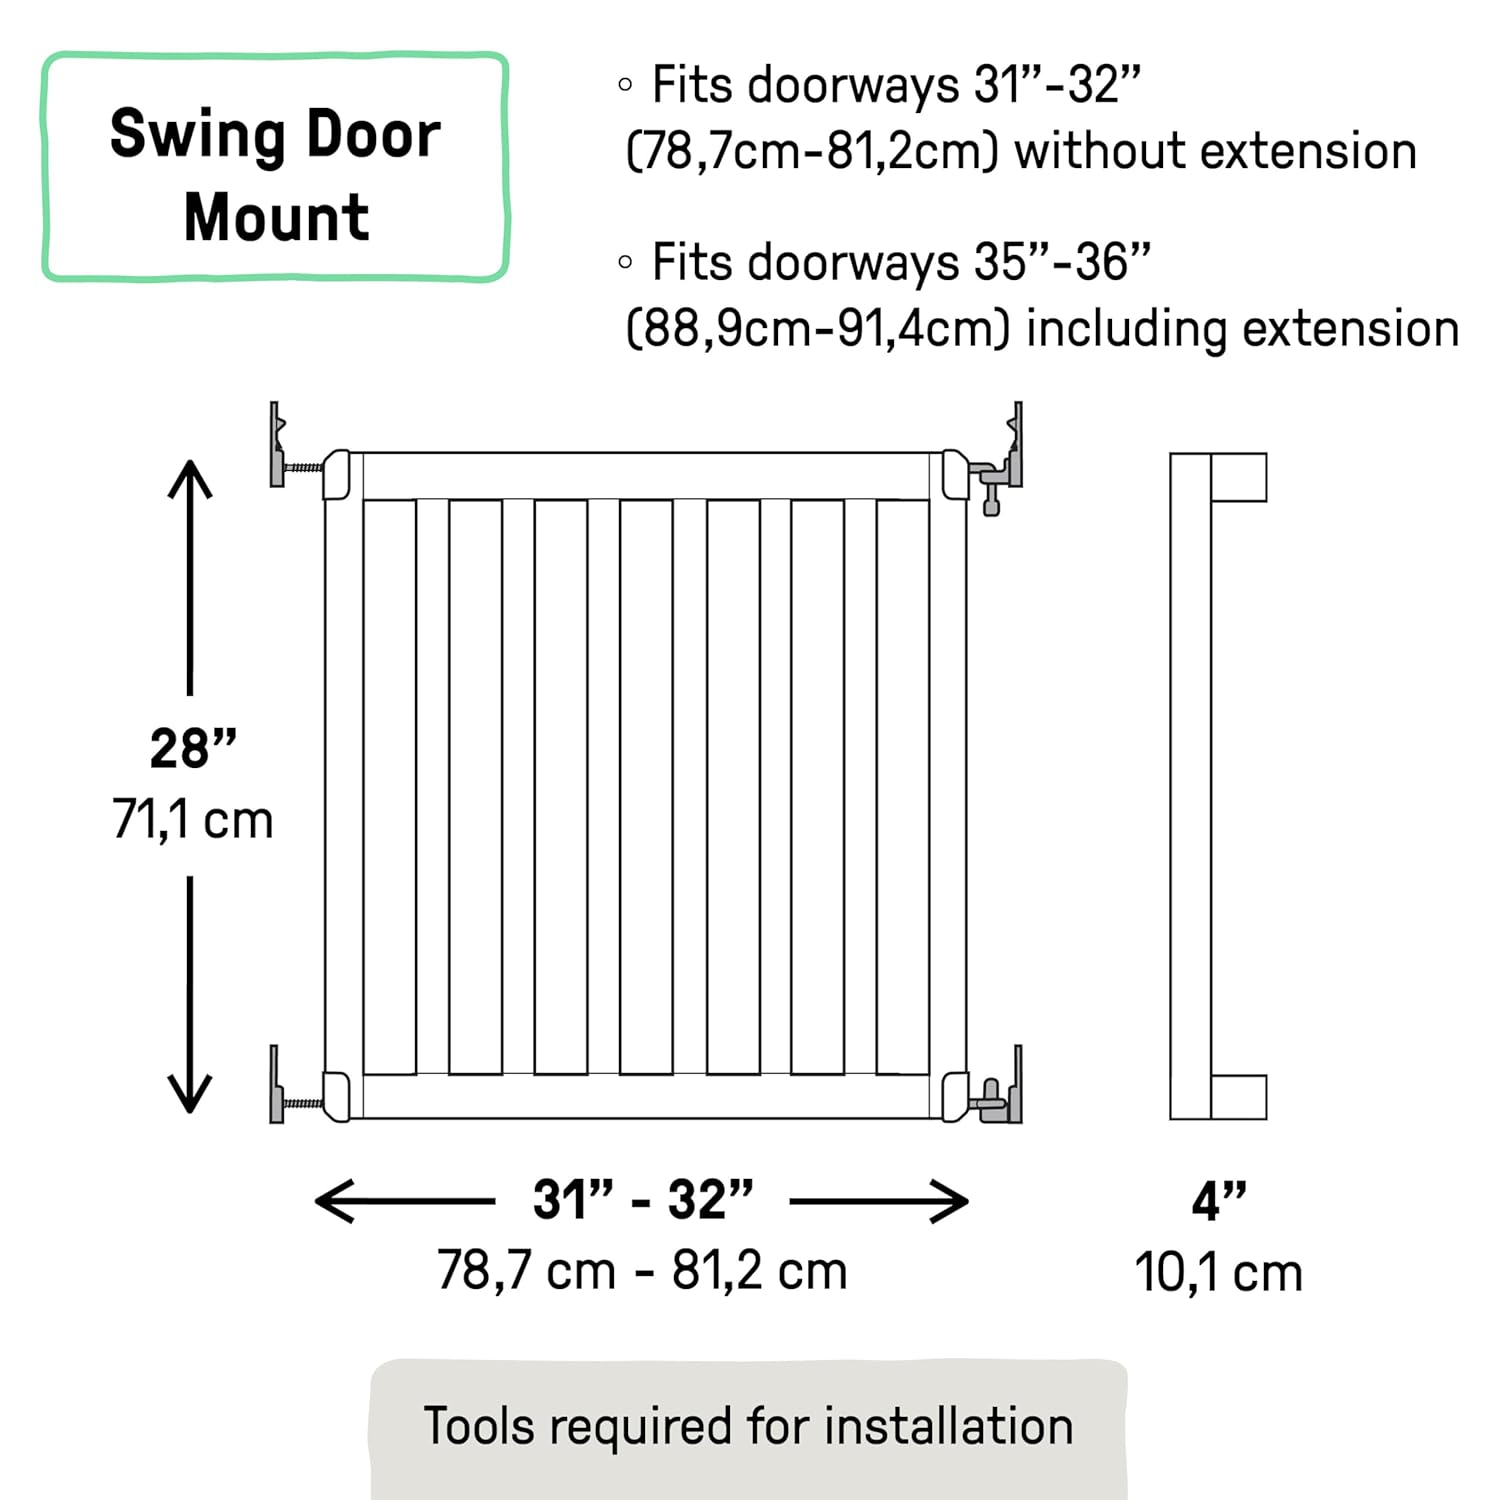
Image: Diagram illustrating the dimensions for the Swing Door Mount installation, detailing height and width ranges with and without extensions.
10. Warranty and Support
For information regarding product warranty, please refer to the warranty card included with your purchase or visit the official Ingenuity website. If you require assistance with assembly, installation, or troubleshooting that is not covered in this manual, please contact Ingenuity customer support.
Customer Support Contact: Refer to the product packaging or the official Ingenuity website for the most current contact information.


