1. Introduction
This manual provides essential information for the safe installation, operation, and maintenance of your EGGKITPO Commercial Natural Gas Fryer, Model ECF4-NG. Please read all instructions thoroughly before using the appliance. Retain this manual for future reference.

Image 1.1: The EGGKITPO Commercial Natural Gas Fryer (ECF4-NG) in a commercial kitchen environment.
2. Important Safety Information
WARNING: Improper installation, adjustment, alteration, service, or maintenance can cause property damage, injury, or death. Read the installation, operating, and maintenance instructions thoroughly before installing or servicing this equipment.
- This appliance is designed for commercial use only.
- Ensure the fryer is installed by a qualified technician in accordance with all local codes and regulations.
- Do not store or use gasoline or other flammable vapors and liquids in the vicinity of this or any other appliance.
- Keep the area around the fryer clear and free from combustible materials.
- Never attempt to move the fryer when it is filled with hot oil.
- Always ensure proper ventilation in the kitchen area.
- The fryer is CSA certified, indicating compliance with North American safety standards.

Image 2.1: Product label showing model ECF4-NG, gas type, BTU, and CSA certification.
Clearances for Combustible and Non-Combustible Construction:
| Side | Combustible Construction | Non-Combustible Construction |
|---|---|---|
| Back | 12 inches | 0 inches |
| Right Side | 8 inches | 0 inches |
| Left Side | 8 inches | 0 inches |
Table 2.1: Required clearances from the fryer to combustible and non-combustible surfaces.
3. Product Overview
The EGGKITPO Commercial Natural Gas Fryer (Model ECF4-NG) is a robust, floor-standing deep fryer designed for high-volume commercial use. Constructed from durable stainless steel, it features a 50 lb oil capacity and is equipped with four high-efficiency cast iron burners, delivering a total of 120,000 BTU/hr for consistent and rapid heating.
Key Features:
- Model: ECF4-NG
- Fuel Type: Natural Gas (NG)
- BTU Output: 120,000 BTU/hr (4 x 30,000 BTU/hr burners)
- Oil Capacity: 50 lbs
- Material: Stainless Steel construction
- Temperature Range: 200°F to 400°F (93°C to 204°C)
- Baskets: Includes two frying baskets with cool-touch handles
- Mobility: Equipped with 4 casters, 2 of which are locking for stability
- Safety: CSA Certified for commercial standards
- Dimensions: 14"W x 32.88"D x 45"H

Image 3.1: Dimensional view of the fryer, indicating width, depth, and height.
4. Setup and Installation
Proper setup is critical for safe and efficient operation. This appliance must be installed by a licensed gas technician.
4.1 Unpacking and Inspection
- Carefully remove the fryer from its packaging.
- Inspect the unit for any shipping damage. Report any damage immediately to the carrier and supplier.
- Ensure all components are present: fryer unit, frying baskets, and user manual.
4.2 Placement and Leveling
- Position the fryer in a location that meets the required clearances for combustible and non-combustible materials (refer to Table 2.1).
- Ensure the floor is level and capable of supporting the weight of the fryer when filled with oil.
- Lock the two front casters to prevent accidental movement during operation.

Image 4.1: Detail of a locking caster, essential for securing the fryer in place.
4.3 Gas Connection
- The fryer requires a 3/4-inch NPT gas supply connection.
- Connect the fryer to the natural gas supply using appropriate gas-rated fittings and flexible connectors, ensuring all connections are tight and leak-free.
- A gas shut-off valve must be installed upstream of the fryer for emergency shutdown.
- After connection, perform a gas leak test using a soap solution. Never use an open flame to check for leaks.
Video 4.1: This video demonstrates the startup and inspection process for the gas fryer, including checking for gas leaks.
4.4 Initial Cleaning
Before first use, clean the fryer tank and baskets with warm water and a mild detergent. Rinse thoroughly and dry completely to remove any manufacturing residues.
5. Operating Instructions
5.1 Filling with Oil
- Ensure the drain valve is closed.
- Fill the fryer tank with cooking oil to the indicated "MIN" fill line, but not exceeding the "MAX" fill line.
5.2 Ignition Procedure
- Open the main gas supply valve to the fryer.
- Locate the pilot light assembly inside the fryer cabinet.
- Turn the temperature control knob to the "PILOT" position and push it in.
- While holding the knob in, light the pilot flame with a long match or lighter. Continue to hold the knob for approximately 30-60 seconds after the pilot lights to allow the thermocouple to heat up.
- Release the knob. If the pilot flame extinguishes, repeat the process.
- Once the pilot is stable, turn the temperature control knob to the desired frying temperature (between 200°F and 400°F). The main burners will ignite automatically.

Image 5.1: Internal view of the fryer cabinet, showing the gas valve and pilot lighting instructions.
5.3 Temperature Control
The fryer's temperature can be adjusted from 200°F to 400°F (93°C to 204°C). The integrated temperature probe senses oil temperature changes and activates the burners to maintain the set temperature, ensuring consistent cooking results.
5.4 Frying
- Place food items into the frying baskets. Do not overload baskets, as this can lower oil temperature and result in soggy food.
- Carefully lower the baskets into the hot oil.
- Fry until food reaches desired crispness and internal temperature.
- Lift baskets and hang them on the basket hanging board to drain excess oil.

Image 5.2: Fryer in operation with two baskets of french fries.
5.5 Shutting Down
- Turn the temperature control knob to the "OFF" position.
- Close the main gas supply valve to the fryer.
6. Maintenance
Regular maintenance ensures the longevity and safe operation of your fryer.
6.1 Daily Cleaning
- Allow oil to cool completely before draining.
- Open the drain valve to empty the oil into a suitable container.
- Scrape food particles from the tank bottom and sides.
- Clean the tank interior with warm water and a mild, non-abrasive detergent. Rinse thoroughly and dry completely.
- Clean frying baskets and exterior surfaces with a damp cloth and mild detergent.

Image 6.1: View of the oil drain valve for easy oil removal.
6.2 Oil Management
The fryer features an oversized cooling area at the bottom of the tank to trap food particles, which helps keep the oil cleaner and prolong its life. Regularly filter or replace cooking oil as needed to maintain food quality and extend oil life.

Image 6.2: Internal view of the fryer tank, highlighting the heat exchange tubes and the cool zone below them.
6.3 Burner and Component Inspection
Periodically inspect the burners, gas lines, and connections for any signs of wear, damage, or leaks. Ensure the Robertshaw gas valve operates correctly. Any issues should be addressed by a qualified service technician.

Image 6.3: The Robertshaw gas valve, a key component for gas flow and temperature regulation.
7. Troubleshooting
This section provides solutions to common operational issues. For problems not listed here, contact customer support or a qualified technician.
| Problem | Possible Cause | Solution |
|---|---|---|
| Pilot light won't stay lit | Thermocouple not heating sufficiently; gas supply issue. | Hold pilot knob longer; check gas supply valve; contact technician if issue persists. |
| Main burners won't ignite | Pilot light out; temperature knob not set correctly; gas valve issue. | Relight pilot; ensure temperature knob is turned past 'PILOT'; contact technician. |
| Fryer not heating to set temperature | Low gas pressure; faulty thermostat/probe; excessive food load. | Verify gas pressure; reduce food load; contact technician for component check. |
| Uneven frying | Overloading; improper oil level; burner issues. | Do not overload baskets; ensure oil is at correct level; contact technician for burner inspection. |
8. Specifications
| Feature | Detail |
|---|---|
| Model Name | ECF4-NG |
| Brand | EGGKITPO |
| Material | Stainless Steel |
| Product Dimensions (D x W x H) | 32.88" x 14" x 45" |
| Oil Capacity | 50 lbs |
| Gas Type | Natural Gas (NG) |
| Total BTU | 120,000 BTU/hr (4 burners) |
| Gas Connection Size | 3/4-inch NPT |
| Temperature Range | 200°F - 400°F (93°C - 204°C) |
| Certifications | CSA Certified |
| Approximate Weight | 187 lbs |
9. Warranty and Support
EGGKITPO is committed to providing quality products and support. This product includes a warranty and support services. For specific warranty details, please refer to the documentation provided with your purchase or contact EGGKITPO customer service.
EGGKITPO offers 24-hour free on-site maintenance service for this product. For technical assistance, service requests, or parts inquiries, please contact EGGKITPO customer support through their official channels.
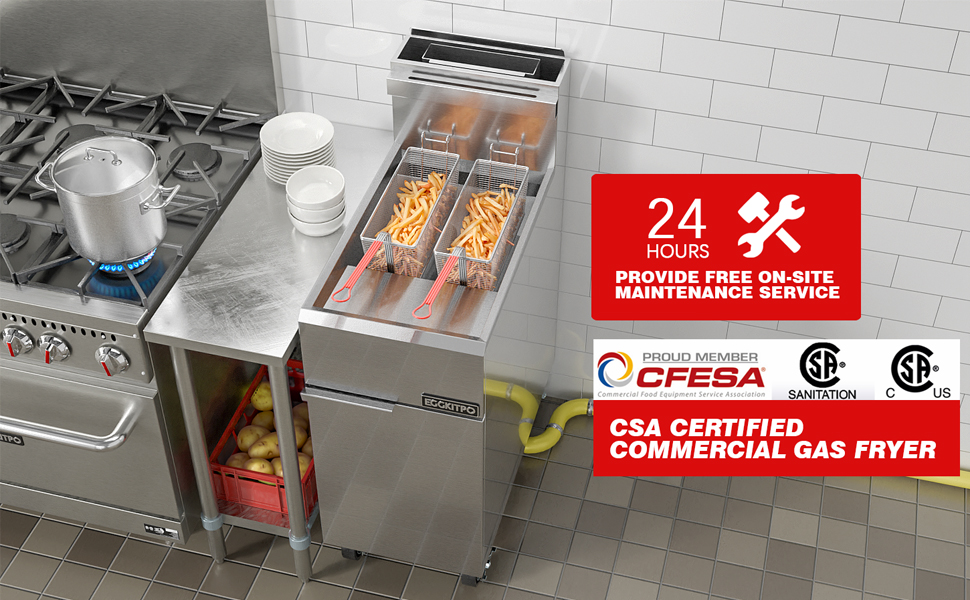
Image 9.1: EGGKITPO highlights its 24-hour free on-site maintenance service.