1. Product Overview
This document provides instructions for the proper installation and maintenance of the Generic replacement foam and felt filter set, designed for various Shark upright vacuum cleaner models. Regular replacement of these filters is crucial for maintaining your vacuum's suction power and air filtration efficiency.

Image 1.1: Four complete sets of Generic replacement foam and felt filters, each set including one foam filter, one felt filter, and one pre-motor foam filter.
1.1. Compatibility
This filter set (Parts XFF450 & XFL100) is compatible with the following Shark upright vacuum models:
- Shark Navigator Light: NV100, NV100 26, NV100C, NV105, NV105 26, NV106, UV300, UV300 26
- Shark Rotator Professional: NV450, NV451
- Shark Rocket Professional: NV472, NV480, NV480 26, NV481, NV482
- Shark DuoClean Slim: NV200, NV200C, NV200Q, NV201, NV202, NV202C
Please verify your vacuum's model number before purchasing and installing. The model number can typically be found on the vacuum's main body, on the original packaging, or in your vacuum's instruction manual.

Image 1.2: Visual guide illustrating compatibility with various Shark vacuum series.
2. Installation Instructions
Follow these steps to replace the foam and felt filters in your Shark upright vacuum. Always ensure the vacuum is unplugged before performing any maintenance.
- Power Off and Unplug: Disconnect your vacuum cleaner from the power outlet to prevent accidental startup.
- Locate Filter Housing: Refer to your specific Shark vacuum model's manual to locate the pre-motor filter housing. This is typically found beneath the dust cup.
- Remove Dust Cup: Detach the dust cup from the vacuum cleaner.
- Remove Old Filters: Carefully remove the old foam and felt filters from their housing. Note their orientation for correct installation of the new filters.
- Clean Filter Area: Wipe down the filter housing area to remove any accumulated dust or debris.
- Install New Filters: Place the new felt filter first, followed by the new foam filter, into the designated slots. Ensure they are seated correctly and flat.
- Reattach Dust Cup: Securely reattach the dust cup to the vacuum cleaner.
- Power On: Plug in your vacuum cleaner and test its operation.

Image 2.1: A single set of replacement filters, showing the felt filter (left), foam filter (middle), and pre-motor foam filter (right).
3. Maintenance
Proper maintenance of your filters ensures optimal performance and extends the life of your vacuum cleaner.
- Regular Cleaning: The foam and felt filters can be washed and reused. Rinse them under running water until the water runs clear. Squeeze out excess water and allow them to air dry completely for at least 24 hours before reinstalling. Do not use a washing machine or dryer.
- Replacement Frequency: For optimal performance, it is highly recommended to replace your foam and felt filters every 3 to 6 months, depending on usage.
- Benefits of New Filters: New filters improve the vacuum's efficiency, enhance its ability to absorb and filter tiny particles from the air, and contribute to a longer lifespan for your vacuum cleaner.

Image 3.1: Visual representation of the benefits of using clean and new filters, including ease of installation, washability, improved filtration, enhanced vacuum efficiency, and extended vacuum life.
4. Troubleshooting
If you experience issues with your vacuum cleaner, consider the following filter-related troubleshooting steps:
- Reduced Suction: A common cause of reduced suction is clogged or dirty filters. Ensure your filters are clean and properly installed. If cleaning does not restore suction, it may be time to replace them.
- Unusual Odors: Old, dirty, or damp filters can cause unpleasant odors during vacuum operation. Clean or replace filters as necessary. Ensure filters are completely dry before reinstallation.
- Dust Escaping: If dust is escaping from the vacuum's exhaust, check that the filters are correctly seated and not damaged. Damaged filters should be replaced immediately.
5. Specifications
| Product Type | Replacement Foam and Felt Filters |
| Part Numbers | XFF450 & XFL100 |
| Material | Foam, Felt |
| Package Contents | 4x Foam Filters, 4x Felt Filters |
| Manufacturer | Eztronicscorp |
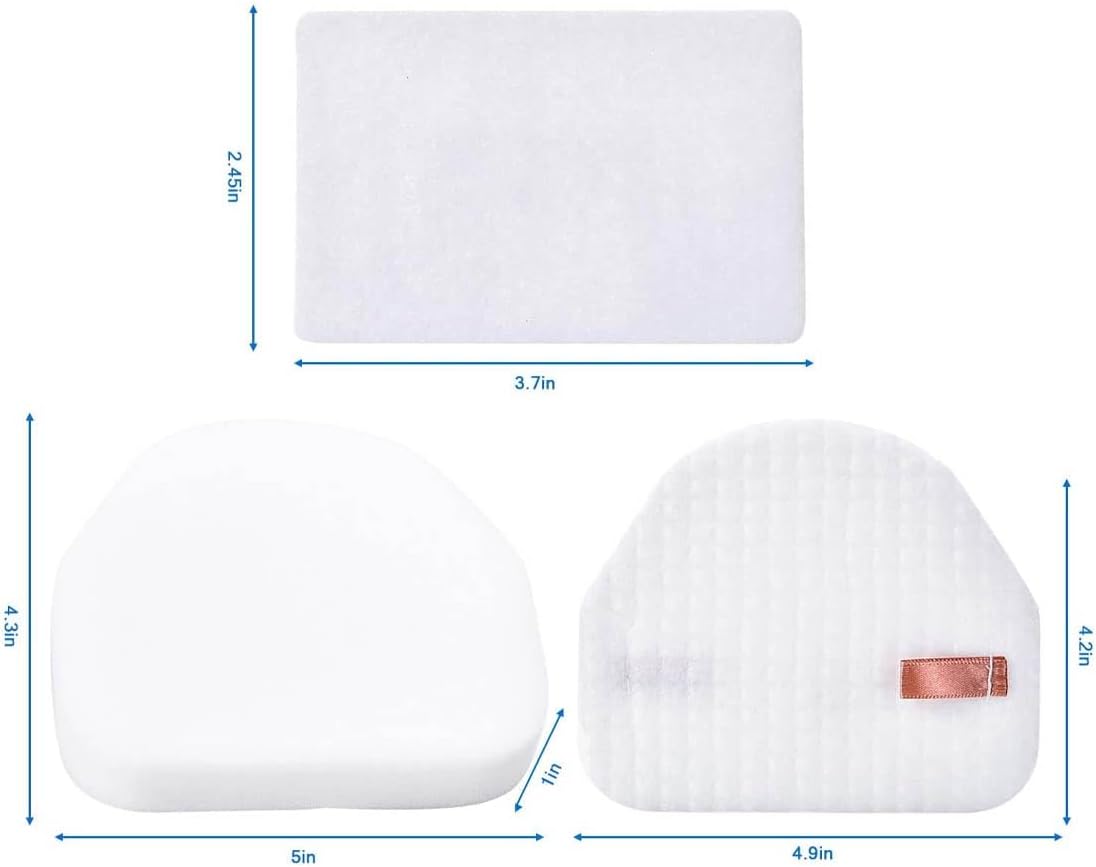
Image 5.1: Detailed dimensions of the foam and felt filters for reference.
6. Warranty and Support
This product is manufactured by Eztronicscorp. For any questions regarding product compatibility, installation, or performance, please contact the seller directly through the platform where the purchase was made. Specific warranty details are not provided in this manual; please refer to your purchase documentation or contact the seller for warranty information.