
1. Introduction
Thank you for choosing the Nuttii OX Burr Coffee Grinder. This electric, portable conical burr coffee mill is designed to provide consistent and precise grinding for various coffee brewing methods. With 20 adjustable settings, it caters to espresso, pour-over, French press, and Moka pot preparations. Its compact design, quiet operation, and extended battery life make it ideal for both home and travel use.

Figure 1: Nuttii OX Burr Coffee Grinder (Tangerine Orange)
2. Safety Information
- Read all instructions before use.
- Do not immerse the grinder in water or any other liquid. Never wash with water to avoid damaging the circuit board.
- Keep out of reach of children.
- Ensure the lid is securely closed before operating.
- Avoid continuous grinding for extended periods to prevent motor overheating. If overheat protection is triggered, allow 15 minutes for cooldown.
- Use only the provided USB Type-C cable for charging.
3. Package Contents
Verify that all items are present in your package:
- Nuttii OX Burr Coffee Grinder
- USB Type-C Charging Cable
- Cleaning Brush
- User Manual (this document)
4. Product Overview
The Nuttii OX Grinder features a minimalist design with robust functionality. It incorporates patented 420 stainless steel pentagonal burrs for consistent grinding results.

Figure 2: Key components and features of the Nuttii OX Grinder, including the Type-C port, non-slip silicone base, smart anti-jamming rotation, and soft-touch silicone handle.
Components:
- Bean Hopper: Located at the top, for holding whole coffee beans.
- Grind Adjustment Dial: Located at the bottom, for selecting grind size.
- 'O' Button: Power On/Start Grinding.
- 'X' Button: Pause/Stop Grinding.
- LED Indicators: Display battery level and grinding status.
- Grinds Cup: Detachable bottom cup for collecting ground coffee.
- USB Type-C Port: For charging the internal battery.

Figure 3: 'O' (Start) and 'X' (Stop) buttons with LED indicators.
5. Setup
5.1 Charging the Grinder
Before first use, fully charge the grinder. The device is equipped with two built-in 800mAh lithium batteries.
- Locate the USB Type-C charging port, usually protected by a silicone cover.
- Plug the provided USB Type-C cable into the port and connect the other end to a suitable power source (e.g., USB wall adapter, computer).
- The LED indicators will show charging status. A full charge can provide 30-50 grinds for pour-over or 15 grinds for espresso.
Video 1: Demonstrates charging the Nuttii OX Burr Coffee Grinder using the USB-C port.
5.2 Adjusting Grind Settings
The grind adjustment dial is located at the bottom of the OX grinder. It offers 20 precision settings.
- Tightening the Dial: Gently twist the dial towards the "FINE" direction. Use moderate force; avoid excessive pressure to prevent damage.
- 0 Setting: When the dial is turned to the tightest position (towards FINE), this is the 0 setting, suitable for the finest espresso grind.
- Adjusting to Coarse: After the dial is fully tightened, adjust to your desired grind setting by turning it towards the "COARSE" side. Each 'click' represents one setting. For example, 1 click = setting 1, 2 clicks = setting 2, and so on.

Figure 4: Visual guide for adjusting the grind settings.
Video 2: Demonstrates the process of adjusting the grind settings on the Nuttii OX Grinder.
Grind Setting Table:
| Brew Method | Grind Setting (Clicks from Fine) | Grind Type |
|---|---|---|
| Espresso | 0-4 | Fine |
| Moka Pot | 5-8 | Medium Fine |
| Pour-Over | 12-17 | Medium Coarse |
| French Press | 18-20 | Coarse |
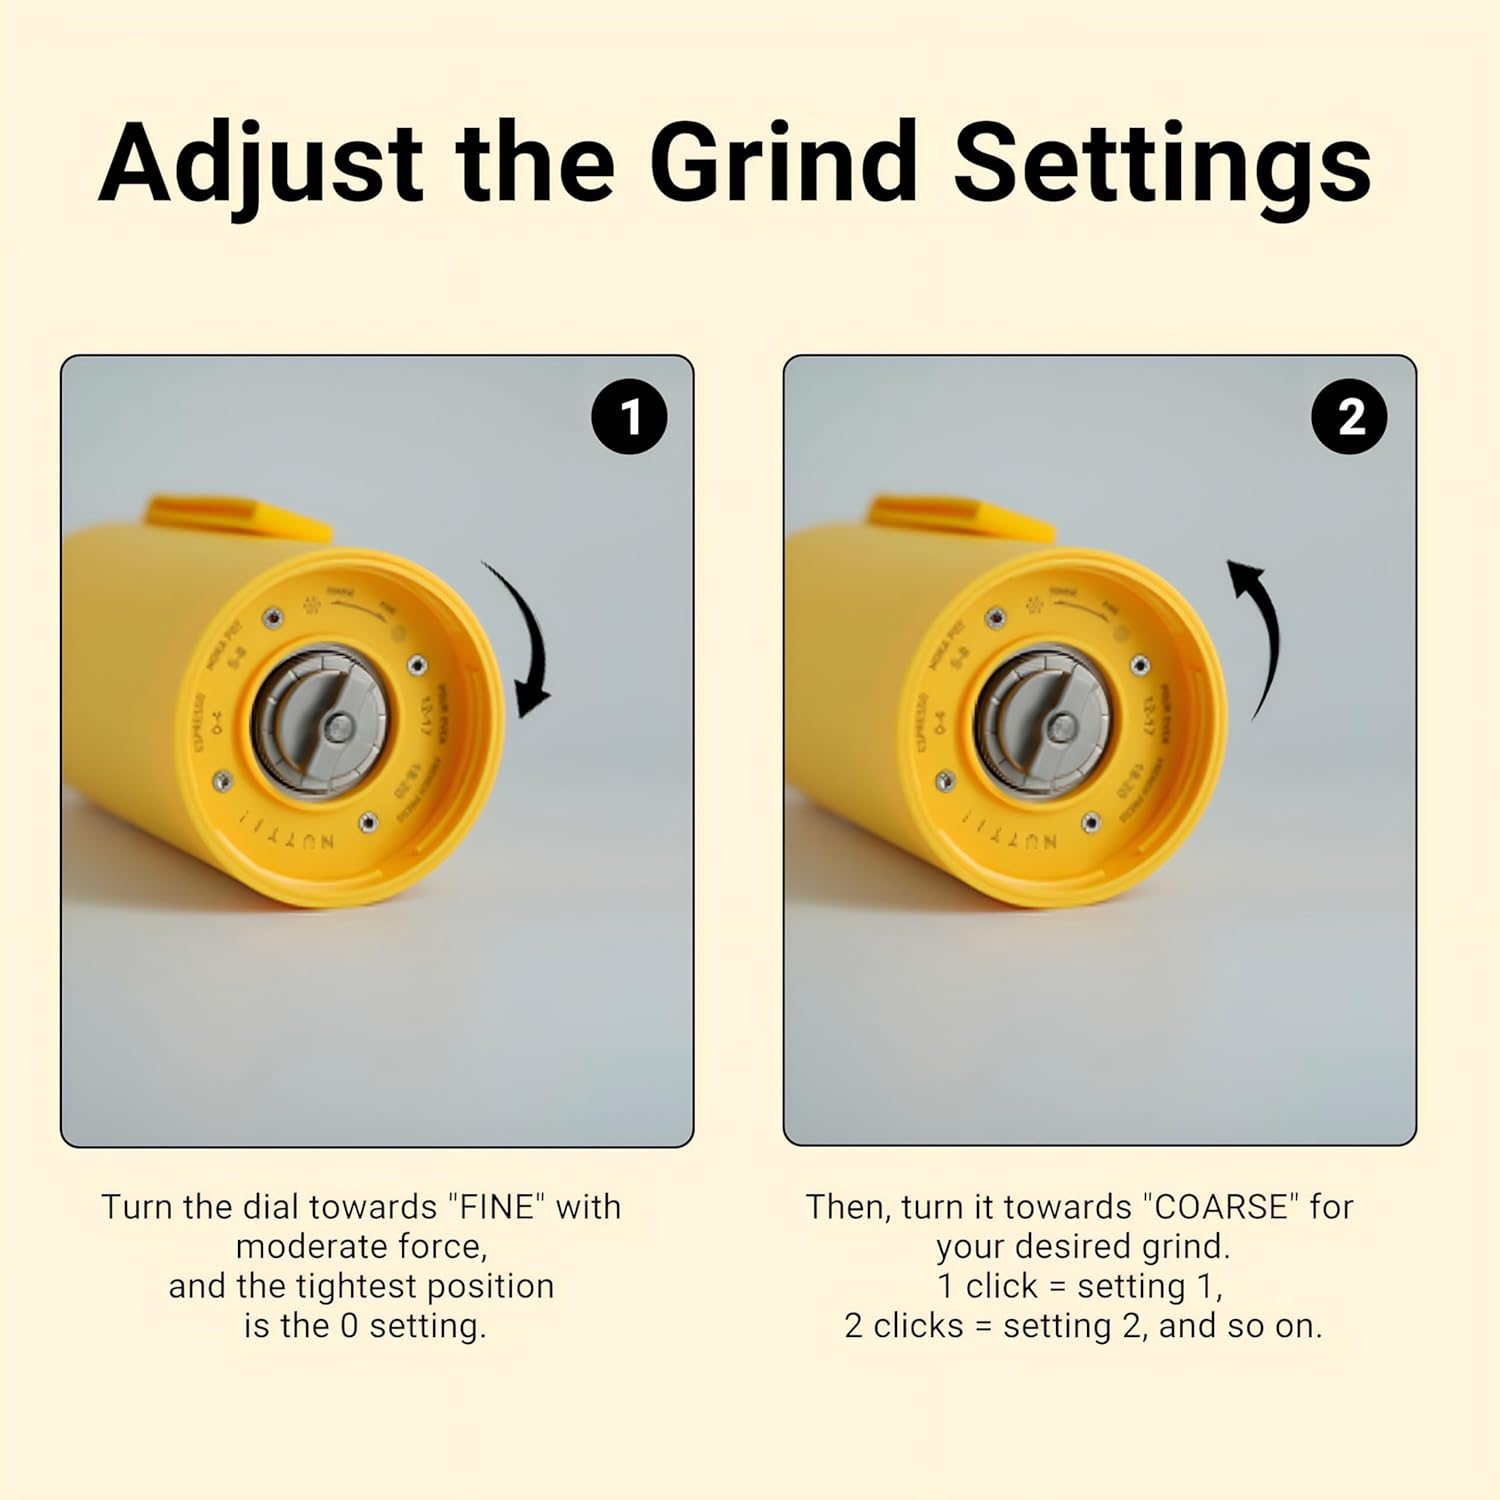
Figure 5: Visual representation of grind sizes for different brewing methods.
6. Operation
6.1 Adding Coffee Beans
- Remove the top lid of the grinder.
- Pour whole coffee beans into the bean hopper. The maximum capacity is 60g, but 30g is recommended for light roasts or espresso for optimal performance.
- Replace the top lid securely.
Video 3: Demonstrates adding coffee beans to the grinder.
6.2 Grinding Process
- Ensure the grinds cup is attached to the bottom of the grinder.
- Press the 'O' button to start grinding. The grinder will operate for a 15-second cycle and then automatically shut off.
- To stop grinding manually before the cycle ends, press the 'X' button.
- After grinding, remove the grinds cup to access your fresh coffee grounds.
Video 4: Shows the grinding process and collection of grounds.
7. Usage Tips
- Continuous Grinding: For best results, limit continuous grinding to approximately 10 sessions for pour-over coffee or 3 sessions for espresso. This prevents activating the overheat protection system. If triggered, allow a 15-minute cooldown.
- Unground Beans: Occasionally, some beans may remain unground during operation. A gentle shake of the grinder will help resolve this and ensure even grinding.
- Static Grounds: After grinding, tap the bottom of the grinder with moderate force to help release coffee grounds stuck at the exit due to static.

Figure 6: Tip for ensuring even grinding by gently shaking the device.

Figure 7: Addressing coffee grounds caused by static.
8. Cleaning & Maintenance
- Always clean the grinder with the included brush after each use.
- For best results, grind 1-2g of coffee beans before use to clean the interior.
- Important: Never wash the grinder with water to avoid damaging the circuit board and internal components.
- The grinder features a detachable design for easier cleaning of the burrs and internal parts.

Figure 8: The grinder's detachable design facilitates easy cleaning.
9. Troubleshooting
- Grinder not starting: Ensure the battery is charged. Check if the lid and grinds cup are securely attached.
- Inconsistent grind: Verify that the grind adjustment dial is set correctly for your desired brew method. Ensure burrs are clean and free of debris.
- Grinder stops unexpectedly: This may indicate the overheat protection has been activated. Allow the device to cool down for 15 minutes before resuming use.
- Beans not grinding: Check if the bean hopper is empty or if beans are jammed. Gently shake the grinder to dislodge any stuck beans.
10. Specifications
- Model Number: OX
- Brand: Nuttii
- Color: Tangerine Orange
- Product Dimensions: 2.95"L x 2.95"W x 7.4"H
- Item Weight: 1.39 pounds
- Material: Aluminum Alloy / Stainless Steel / ABS / Silicone
- Voltage: 220 Volts
- Batteries: 2 Lithium Ion batteries required (included)
- Manufacture Year: 2024
11. Warranty & Support
For warranty information, technical support, or customer service inquiries, please refer to the contact information provided with your purchase or visit the official Nuttii website. Keep your proof of purchase for warranty claims.
