1. Introduction
This manual provides comprehensive instructions for the installation, operation, and maintenance of your TP-Link Omada WiFi 7 Wireless Access Point (Model EAP723). Please read this manual thoroughly before using the device to ensure proper setup and optimal performance.
Product Overview
The TP-Link Omada EAP723 is a high-performance BE5000 Dual-Band Wi-Fi 7 Access Point designed for demanding network environments. It offers ultra-fast speeds and low-latency connectivity, making it suitable for 4K/8K streaming, real-time gaming, and large file transfers. Its advanced features include a 2.5G Ethernet port, 240 MHz bandwidth, Multi-RU technology, and seamless integration with the Omada SDN for centralized management.

Figure 1.1: TP-Link Omada EAP723 Access Point, showcasing its compact design and typical ceiling mount installation.
Key Features
- BE5000 Dual-Band Wi-Fi 7: Delivers speeds of 4324 Mbps on 5 GHz and 688 Mbps on 2.4 GHz.
- 2.5G Ethernet Port: Unlocks the full potential of Wi-Fi 7 for maximum throughput.
- 240 MHz Bandwidth: Enables more simultaneous transmissions for improved network efficiency.
- Multi-RU Technology: Optimizes network performance even with multiple active devices, reducing latency.
- Flexible Power Options: Supports Power over Ethernet (PoE) or DC power (adapter not included).
- Omada SDN Integration: Centralized management, mesh networking, and seamless roaming for comprehensive network control.
- Enhanced Security: Supports WPA3 for robust network protection.
Package Contents
Verify that all items are present in your package:
- 1 x EAP723 Wireless Access Point
- 1 x Installation Guide
- 1 x Ceiling/Wall Mounting Kit

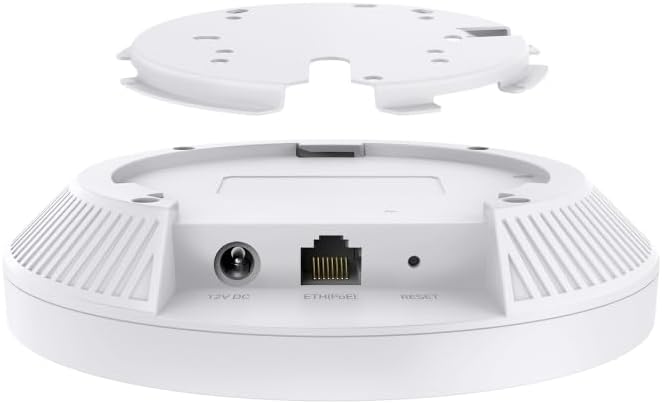
Figure 1.2: Front and rear views of the EAP723 Access Point, highlighting its compact form factor and connectivity options.
2. Setup and Installation
This section guides you through the physical installation and initial setup of your EAP723 Access Point.
Mounting the Access Point
The EAP723 can be mounted on a ceiling or wall using the provided mounting kit. Choose a central location for optimal Wi-Fi coverage.
- Prepare the Mounting Location: Ensure the chosen surface is stable and can support the device.
- Attach the Mounting Bracket: Use the screws and anchors from the kit to secure the mounting bracket to the ceiling or wall.
- Connect Ethernet Cable: Route an Ethernet cable from your network switch (preferably PoE-enabled) to the EAP723's Ethernet port.
- Secure the Access Point: Align the EAP723 with the mounting bracket and twist it clockwise until it locks into place.

Figure 2.1: EAP723 Access Point securely mounted, demonstrating its low-profile design.
Powering the Device
The EAP723 supports two power methods:
- Power over Ethernet (PoE): If your network switch supports 802.3at PoE, simply connect the Ethernet cable to the EAP723's Ethernet port. The device will draw power directly from the cable.
- DC Power: If PoE is not available, connect a 12V DC power adapter (not included) to the 12V DC port on the back of the device.
Note: Ensure only one power source is connected at a time. Using both simultaneously is not recommended.
Initial Configuration
The EAP723 is designed to be managed via the TP-Link Omada SDN controller. For initial setup, you can access the device directly or integrate it into your Omada network.
- Connect to the Network: Ensure the EAP723 is powered on and connected to your network via the 2.5G Ethernet port.
- Access Omada SDN Controller:
- Hardware Controller: If you have an Omada Hardware Controller, ensure it is powered on and connected to the same network. The EAP723 should be discoverable for adoption.
- Software Controller: Install the Omada Software Controller on a PC or server within your network. Launch the software and follow the on-screen instructions to discover and adopt the EAP723.
- Cloud-Based Controller: For cloud management, register your device with the Omada Cloud and follow the instructions to add the EAP723.
- Configure Wireless Settings: Once adopted, use the Omada SDN controller interface to configure your Wi-Fi networks (SSIDs), security settings (WPA3 recommended), and other advanced features.

Figure 2.2: Omada SDN integration diagram, illustrating how the EAP723 fits into a centralized network management system.
3. Operation
Once installed and configured, the EAP723 operates as a high-performance wireless access point. This section covers general operational aspects.
LED Indicators
The EAP723 features an LED indicator that provides status information:
- Solid Blue: Device is operating normally and broadcasting Wi-Fi.
- Flashing Blue: Device is booting up, being adopted by the Omada controller, or undergoing firmware upgrade.
- Off: Device is powered off or LED is disabled via controller settings.
Wireless Performance
The EAP723 leverages Wi-Fi 7 technologies to deliver superior performance:
- Dual-Band Operation: Simultaneously broadcasts on 2.4 GHz and 5 GHz bands.
- High Throughput: Achieves up to 4324 Mbps on 5 GHz and 688 Mbps on 2.4 GHz.
- 4K-QAM: Increases data transmission efficiency by 20% compared to Wi-Fi 6.
- Multi-RU: Improves efficiency and reduces latency by allowing multiple users to transmit data simultaneously on different resource units.


Figure 3.1: Visual representations of Wi-Fi 7 throughput, 4K-QAM efficiency, and Multi-RU latency reduction.
Network Management
The EAP723 is best managed through the Omada SDN controller, which provides:
- Centralized Control: Manage multiple EAPs from a single interface.
- Mesh Networking: Create a seamless mesh Wi-Fi network for extended coverage.
- Seamless Roaming: Clients automatically switch to the strongest access point without interruption.
- Guest Network: Create isolated networks for guests with captive portal support.
- QoS (Quality of Service): Prioritize traffic for critical applications.
4. Maintenance
Regular maintenance ensures the longevity and optimal performance of your EAP723 Access Point.
Firmware Updates
TP-Link regularly releases firmware updates to improve performance, add features, and address security vulnerabilities. It is recommended to keep your EAP723's firmware up to date.
- Firmware updates are typically managed through the Omada SDN controller.
- Always back up your configuration before performing a firmware update.
- Do not power off the device during a firmware update.
Cleaning
To clean the device:
- Ensure the device is powered off and disconnected from all power sources.
- Use a soft, dry cloth to wipe the exterior of the access point.
- Do not use liquid cleaners or aerosol sprays.
Resetting the Device
If you encounter persistent issues or need to revert to factory settings, you can perform a factory reset.
- Locate the Reset button on the back of the EAP723 (refer to Figure 1.2).
- With the device powered on, use a paperclip or a thin object to press and hold the Reset button for approximately 5-10 seconds until the LED indicator flashes rapidly.
- Release the button. The device will restart with factory default settings.

Figure 4.1: Product label with important device information such as Model (EAP723), Serial Number (Y254218000129), MAC Address (A8:29:48:93:7B:24), and Device Key (1A3660B20B7579AE0000).
5. Troubleshooting
This section provides solutions to common issues you might encounter with your EAP723 Access Point.
| Problem | Possible Cause | Solution |
|---|---|---|
| Device LED is off. | No power, or LED is disabled. | Check power connection (PoE or DC adapter). Ensure the power source is active. Verify LED status in Omada controller settings. |
| Cannot find the EAP723 in Omada controller. | Network connectivity issue, incorrect controller settings, or device already adopted. | Ensure the EAP723 is powered on and connected to the same network as the controller. Check firewall settings. Perform a factory reset on the EAP723 if it was previously adopted by another controller. |
| Slow Wi-Fi speeds. | Interference, outdated client drivers, incorrect channel settings, or too many devices. | Check for sources of interference. Update wireless drivers on client devices. Adjust Wi-Fi channels in the Omada controller to less congested ones. Consider adding more access points for high-density environments. |
| Frequent disconnections. | Weak signal, channel interference, or firmware issue. | Relocate the access point for better coverage. Check for channel interference and adjust settings. Ensure firmware is up to date. |
| Device runs hot. | Normal operation under load, or insufficient ventilation. | The device may get warm during operation, especially under heavy load. Ensure it is installed in a well-ventilated area and not enclosed. If overheating persists and causes instability, contact support. |
If the problem persists after trying these solutions, please refer to the official TP-Link Omada support resources or contact technical support.
6. Specifications
| Feature | Detail |
|---|---|
| Model Number | EAP723 |
| Wireless Standard | Wi-Fi 7 (802.11be), 802.11ax, 802.11ac, 802.11b/g/n |
| Frequency Band | Dual-Band (2.4 GHz & 5 GHz) |
| Wi-Fi Speeds | 5 GHz: 4324 Mbps, 2.4 GHz: 688 Mbps (BE5000 total) |
| Ethernet Port | 1 x 2.5G RJ45 Port |
| Power Supply | 802.3at PoE or 12V DC (adapter not included) |
| Dimensions (L x W x H) | 4.72 x 1.57 x 7.09 inches |
| Item Weight | 14.4 ounces |
| Mounting | Ceiling/Wall Mount (kit included) |
| Special Features | Access Point Mode, Beamforming, Guest Mode, Internet Security, QoS, 240 MHz Bandwidth, Multi-RUs, 4K-QAM |
| Compatible Devices | Personal Computer, Security Camera, Smart Television, Smartphone, Tablet |
| Recommended Uses | Business, Home |
7. Warranty and Support
Warranty Information
The TP-Link Omada EAP723 Wireless Access Point comes with a 5-Year Limited Warranty. This warranty covers defects in materials and workmanship under normal use. Please retain your proof of purchase for warranty claims.
For detailed warranty terms and conditions, please refer to the official TP-Link website or the warranty card included with your product.
Technical Support
For technical assistance, product registration, or to download the latest drivers and firmware, please visit the official TP-Link support website:
You may also find helpful resources and community forums on the Omada SDN platform.