Replacement IR Remote Control
Generic Replacement IR Remote Control User Manual
Model: Replacement IR Remote Control | Brand: Generic
1. Introduction
This manual provides instructions for the Generic Replacement IR Remote Control. This remote is designed to function as a replacement for specific projector models, offering essential control functionalities. Please read this manual carefully to ensure proper setup and operation.
2. Compatibility
This replacement remote control is compatible with the following projector models:
- Victsing BH400A Projector
- Victsing BH500A Projector
- Wimius W2 Mini LED LCD Wi-Fi Portable Projector
Important Note: This remote control is NOT compatible with the Wimius K2 projector. Please verify your projector model before use.
3. Setup: Battery Installation
The remote control requires two (2) AAA batteries for operation. Batteries are not included with this product.
- Locate the battery compartment on the back of the remote control.
- Slide open the battery compartment cover.
- Insert two new AAA batteries, ensuring the positive (+) and negative (-) terminals align correctly with the markings inside the compartment.
- Close the battery compartment cover securely.
Once batteries are installed, the remote is ready for use. No additional pairing or programming is typically required for IR (Infrared) replacement remotes.
4. Operation
To operate the projector using this remote control, point the remote directly at the projector's IR receiver. Ensure there are no obstructions between the remote and the projector.
4.1. Button Layout and Functions
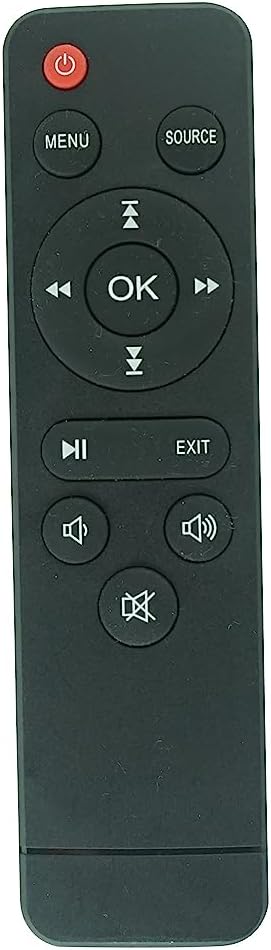
Image 1: Front view of the remote control, showing all buttons.
This image displays the front of the remote control, highlighting the arrangement of its buttons. The remote is black with white button labels. At the top left is the red power button. To its right are 'MENU' and 'SOURCE' buttons. Below these is a circular navigation pad with 'OK' in the center, surrounded by up, down, left, and right arrows. Further down are 'PLAY/PAUSE' and 'EXIT' buttons. At the bottom are volume controls: 'MUTE', 'VOLUME DOWN', and 'VOLUME UP'.
| Button | Function |
|---|---|
| Power (Red Button) | Turns the projector On or Off. |
| MENU | Accesses the projector's main menu. |
| SOURCE | Selects the input source (e.g., HDMI, USB, AV). |
| Navigation Arrows (Up, Down, Left, Right) | Navigates through menu options and content. |
| OK | Confirms selections or enters sub-menus. |
| Play/Pause (►▮) | Plays or pauses media content. |
| EXIT | Exits current menu or returns to the previous screen. |
| Volume Up (🔊) | Increases the audio volume. |
| Volume Down (🔉) | Decreases the audio volume. |
| Mute (🔇) | Mutes or unmutes the audio. |
5. Troubleshooting
- Remote is not responding:
- Ensure new AAA batteries are correctly installed with proper polarity.
- Check if the batteries are depleted and replace them if necessary.
- Verify there are no obstructions between the remote control and the projector's IR receiver.
- Ensure you are pointing the remote directly at the projector.
- Some functions do not work as expected:
- This is a replacement remote control and may not offer all the advanced functions of the original projector remote. Basic and common functions are typically supported.
- Refer to your projector's original manual for specific advanced features.
- Remote works intermittently:
- This could indicate low battery power. Replace batteries.
- Ensure a clear line of sight to the projector.
6. Specifications
| Feature | Detail |
|---|---|
| Product Type | Replacement IR Remote Control |
| Brand | Generic |
| Connectivity Technology | Infrared (IR) |
| Compatible Devices | Victsing BH400A, BH500A; Wimius W2 Projectors |
| Power Source | 2 x AAA Batteries (not included) |
| Max Number of Supported Devices | 1 (specific projector model) |
| Manufacturer | SZHKHXD |
7. Warranty and Support
No specific warranty information is provided with this generic replacement remote control. For any issues or support inquiries, please contact the seller directly through your purchase platform.
Ask a question about this manual
Ask about setup, troubleshooting, compatibility, parts, safety, or missing instructions. Manuals+ will review the question and use this page’s manual context to help answer it.