1. Important Safety Information
Please read all instructions carefully before installation and use. Keep this manual for future reference.
- Indoor Use Only: These wall sconces are designed for indoor use. Do not expose to moisture or outdoor elements.
- Battery Safety: Use only the provided Type-C cable for charging. Do not attempt to open or modify the battery pack. Avoid extreme temperatures.
- Installation: Ensure the mounting surface is clean, dry, and capable of supporting the weight of the sconce. If using screws, ensure no electrical wires or pipes are behind the wall.
- Cleaning: Disconnect power before cleaning. Use a soft, dry cloth. Do not use abrasive cleaners or solvents.
- Disposal: Dispose of batteries and electronic components according to local regulations.
2. Package Contents
Verify that all items are included in your package:
- 2 x Wall Sconce Bars
- 2 x Remote Controls
- 2 x Type-C Charging Cables
- 2 x Sets of Mounting Hardware (screws and anchors)
- 1 x Instruction Manual
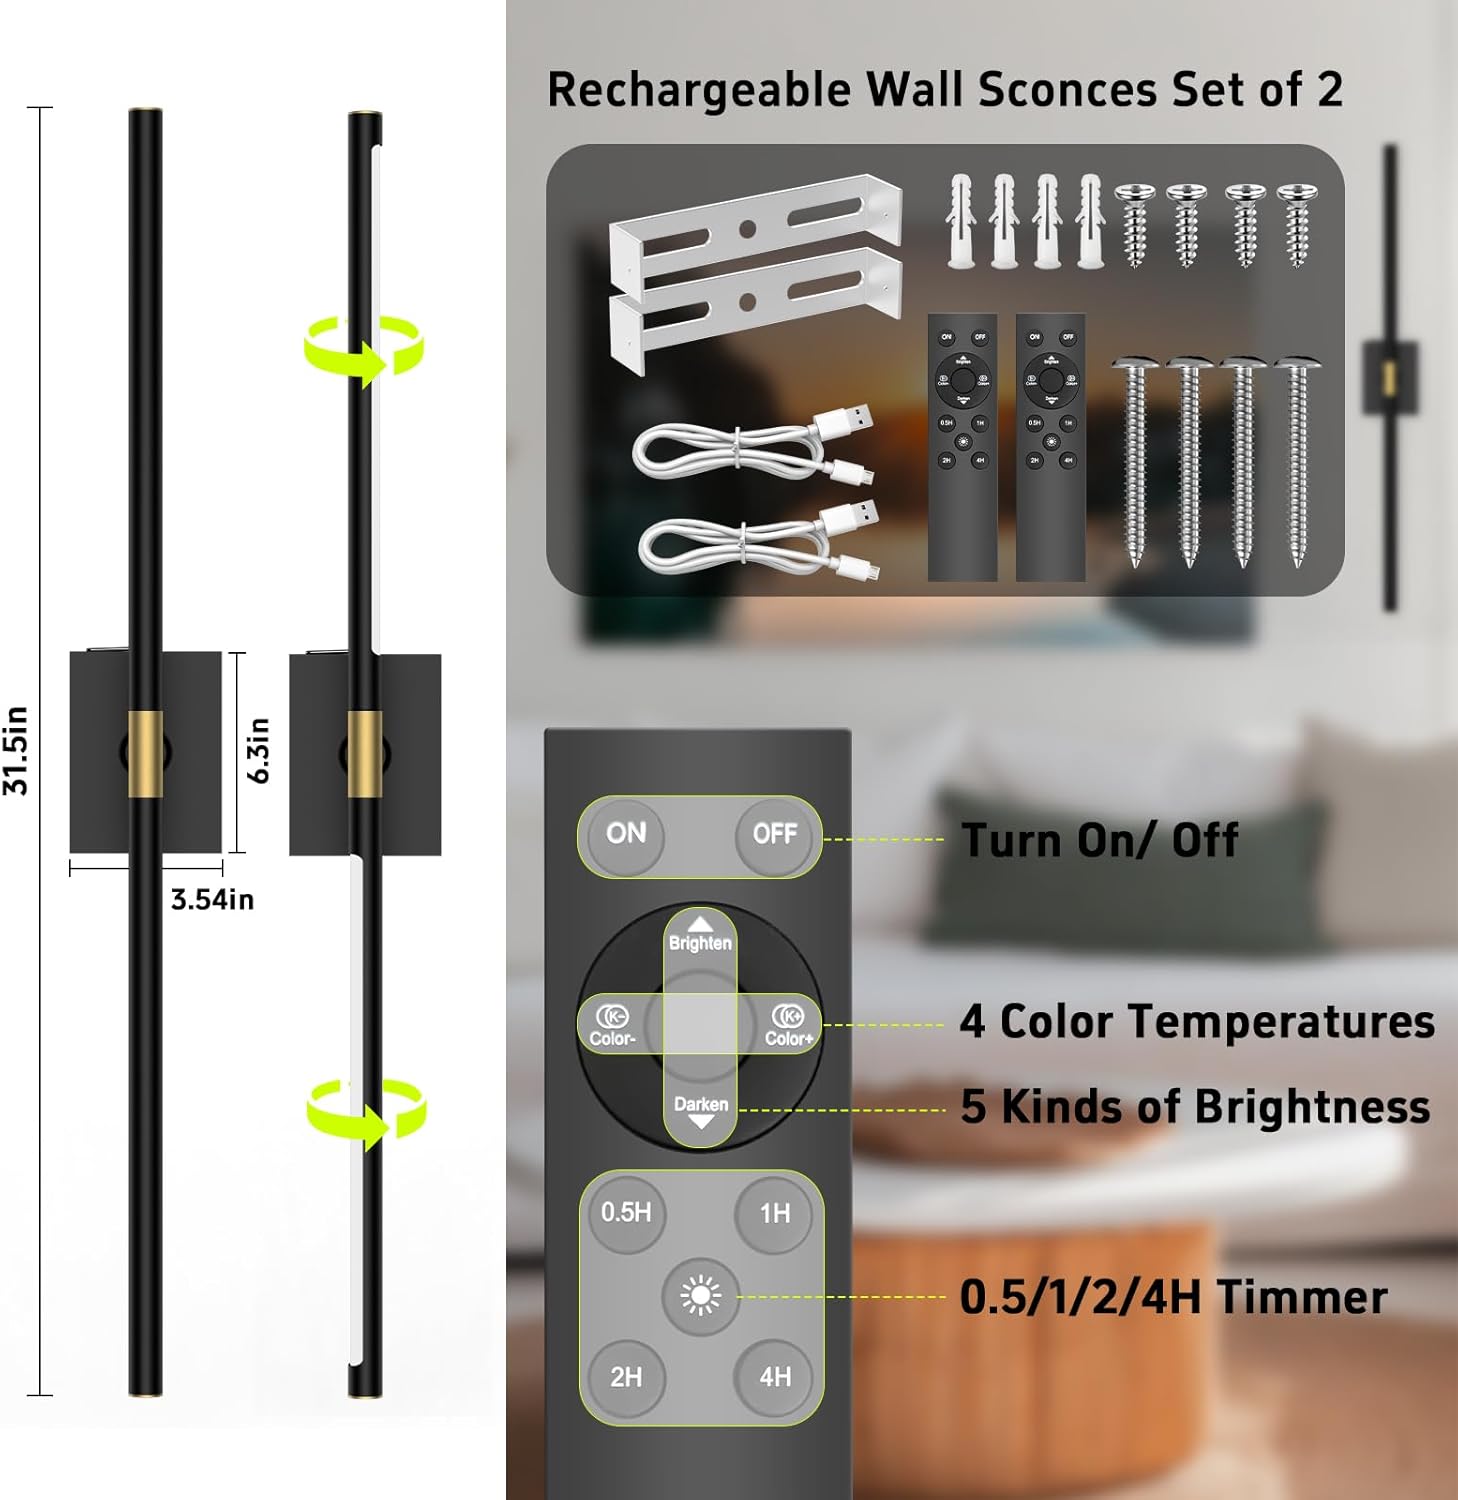
The image above illustrates the components included in your iThird DlampB2P Wall Sconces package, along with a detailed view of the remote control and its functions.
3. Product Features
- Wireless & Rechargeable: No wiring required, powered by a 10000mAh rechargeable battery for 20-60 hours of continuous illumination.
- Detachable Battery Box: Conveniently remove the battery box for charging without disassembling the entire fixture.
- Remote Control: Adjust settings from a distance of 12-15 feet. One remote can control multiple sconces.
- 4 Color Temperatures: Choose from 3000K (warm), 4000K (neutral), 5000K (cool), and 6000K (daylight).
- Adjustable Brightness: Dimmable from 20% to 100% in 5 levels.
- Timer Function: Set automatic shut-off for 0.5, 1, 2, or 4 hours.
- Memory Function: The sconce remembers your last brightness and color temperature settings.
- 360° Rotatable Light Bar: Adjust the light direction to your preference.

The 360° rotation feature allows for versatile lighting angles, enabling you to direct light precisely where needed.
4. Installation
The iThird DlampB2P wall sconces offer easy, wireless installation. No electrician is required.
4.1 Mounting with Screws
- Prepare the Wall: Choose a desired location on a clean, dry, and flat wall surface.
- Install Mounting Bracket: Use the included screws and wall anchors to securely fix the mounting bracket to the wall. Ensure the bracket is level.
- Attach Sconce Base: Align the sconce base with the installed mounting bracket and secure it with the provided screws.
- Insert Light Bar: Gently slide the light bar into the central holder on the sconce base. Ensure it is firmly seated.

This diagram illustrates the two main steps for securely mounting your wall sconce using the provided screws and bracket.
4.2 Installation Video Guide
This video demonstrates the straightforward installation process for the iThird wireless and rechargeable wall lights, highlighting their ease of setup.
5. Operation
Your iThird wall sconces can be operated via remote control or touch control.
5.1 Remote Control Functions
Point the remote control at the infrared receiver on the sconce for optimal response.
- ON/OFF: Press the 'ON' or 'OFF' button to turn the light on or off.
- Brightness Adjustment: Use the 'Brighten' and 'Darken' buttons to cycle through 5 levels of brightness (20%, 40%, 60%, 80%, 100%).
- Color Temperature: Use the 'Color+' and 'Color-' buttons to switch between 4 color temperatures (3000K, 4000K, 5000K, 6000K).
- Timer: Press '0.5H', '1H', '2H', or '4H' to set the automatic shut-off timer.

This image details the various functions available on the remote control, including power, brightness, color temperature, and timer settings, along with a visual representation of the brightness adjustment range.
5.2 Touch Control Functions
The sconce also features a touch-sensitive area for basic control.
- Short Touch: Tap the touch area to cycle through ON/OFF and 3 color temperatures.
- Long Touch: Press and hold the touch area for stepless dimming.

This image highlights both the touch control functionality on the sconce itself and the comprehensive remote control options, providing flexible ways to manage your lighting.
6. Charging the Battery
The iThird wall sconces feature a detachable battery box for convenient charging.
- Remove Battery Box: Gently slide the battery box out from the sconce fixture.
- Connect Charger: Plug the provided Type-C charging cable into the battery box and connect the other end to a USB power source (e.g., phone charger, computer USB port).
- Monitor Charging: An indicator light on the battery box will show red during charging and turn green when fully charged.
- Reinsert Battery Box: Once fully charged, slide the battery box back into the sconce fixture until it clicks securely into place.
Charging time is approximately 8-10 hours. A full charge provides 20-60 hours of working time, depending on the brightness level used.
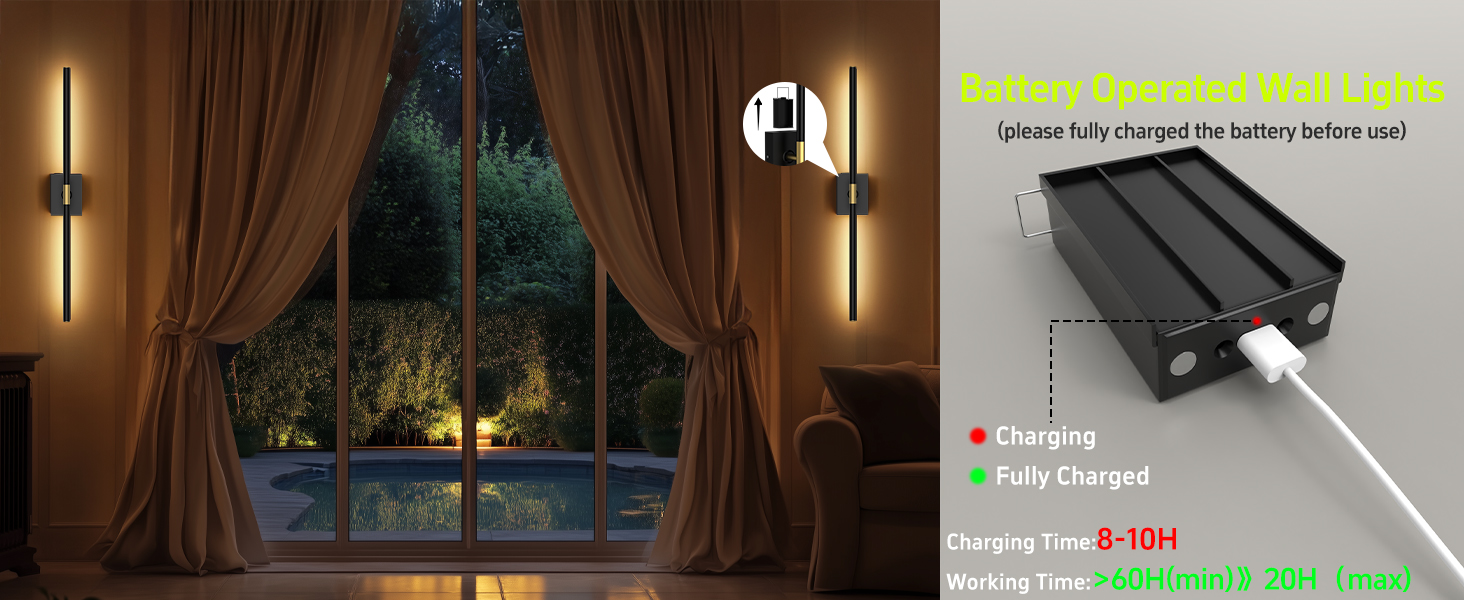
This illustration demonstrates how to charge the detachable battery box, including the charging indicator lights and estimated charging and usage times.
7. Maintenance
- Cleaning: Wipe the sconce surface with a soft, dry cloth. Do not use liquid cleaners or sprays directly on the fixture.
- Battery Care: For optimal battery life, avoid fully discharging the battery frequently. Charge the battery regularly, especially if the sconce will not be used for an extended period.
- Storage: Store the sconces in a cool, dry place when not in use.
8. Troubleshooting
| Problem | Possible Cause | Solution |
|---|---|---|
| Sconce does not light up. | Battery is discharged. | Charge the battery fully (refer to Section 6). |
| Light bar not properly seated. | Gently rotate the lamp tube slightly to ensure proper contact. | |
| Remote control not working. | Remote battery is low or dead. | Replace the remote control batteries. |
| Obstruction between remote and sconce. | Ensure a clear line of sight to the sconce's infrared receiver. | |
| Sconce falls off the wall (if using adhesive). | Improper surface preparation or insufficient adhesive. | Ensure the wall surface is clean, dry, and smooth. For a more secure installation, use the provided screws and anchors. |
9. Specifications
| Feature | Detail |
|---|---|
| Model Number | DlampB2P |
| Brand | iThird |
| Color | Black |
| Material | Metal |
| Power Source | Battery Powered |
| Battery Capacity | 10000mAh |
| Voltage | 5 Volts |
| Wattage | 4 watts |
| Brightness | 400 Lumen (Max) |
| Color Temperatures | 3000K, 4000K, 5000K, 6000K |
| Control Method | Remote Control, Touch Control |
| Dimensions (L x W x H) | Approx. 31.5"L x 3.54"W x 6.3"H (overall) |
| Indoor/Outdoor Usage | Indoor |
10. Warranty and Support
iThird offers a 2-year manufacturer warranty for this product. This warranty covers defects in materials and workmanship under normal use.
For any questions, technical support, or warranty claims, please contact iThird customer service through the platform where you purchased the product or refer to the contact information provided in your package.


