1. Introduction
The EPOMAKER P65 QMK/VIA Wireless Aluminum Gaming Keyboard is designed to enhance both your gaming and typing experience. This compact 65% layout keyboard features a silver glossy knob for quick multimedia access. Its durable CNC aluminum construction ensures longevity, while customizable QMK/VIA programmability allows you to tailor the layout and macros to your specific workflow. With multiple connectivity options and vibrant RGB backlighting, the EPOMAKER P65 is a versatile tool for productivity and immersive gaming.

Image: The EPOMAKER P65 QMK/VIA Wireless Aluminum Mechanical Keyboard, showcasing its compact design and features.

Image: An overview of the EPOMAKER P65, highlighting its tri-mode wireless capability, gasket-mount design, sound-dampening features, Linux/Mac/PC/Android compatibility, RGB backlight, and anti-ghosting.
2. Package Contents
Verify that all items are present in the package:
- 1x EPOMAKER P65 Keyboard
- 1x 2-in-1 Keycap-and-Switch Puller
- 1x 2.4Ghz Wireless Receiver
- 1x Detachable USB A to USB C cable
- 1x Multilingual Manual
- 3x Spare Switches
Video: An unboxing and typing demonstration of the EPOMAKER P65 keyboard, showing the contents of the package and the keyboard in use.
Video: A detailed unboxing video of the EPOMAKER P65, showcasing the keyboard and its accessories.
3. Setup
3.1 Initial Connection
- Unpack the keyboard and all accessories.
- Connect the keyboard to your device using the provided USB-A to USB-C cable for wired mode and initial charging.
- Ensure the mode switch on the back of the keyboard is set to the desired connection type (USB, 2.4G, or BT).
3.2 Operating System Compatibility
The P65 keyboard supports a variety of operating systems and devices:
- Windows (FN+A to switch modes)
- macOS (FN+S to switch modes)
- Linux
- PC
- Laptops
- Tablets
- Smartphones
- Gaming Consoles (PS/Xbox)

Image: The EPOMAKER P65 demonstrating wide compatibility with Windows, macOS, Tablets, Laptops, PCs, and Phones.

Image: The EPOMAKER P65 showing compatibility with Windows, macOS, Tablets, Laptops, PC, PlayStation, Switch, and Xbox.
4. Connectivity Modes
The P65 offers three versatile connectivity options:
4.1 Wired Mode (USB-C)
- Connect the keyboard directly to your device using the provided USB-A to USB-C cable.
- Set the switch on the back of the keyboard to 'USB'.
- This mode provides ultra-fast, low-latency performance with a 1000Hz polling rate.
4.2 2.4GHz Wireless Mode
- Plug the 2.4GHz wireless receiver into an available USB port on your device.
- Set the switch on the back of the keyboard to '2.4G'.
- The keyboard will automatically connect. This mode offers a 1000Hz polling rate.
4.3 Bluetooth 5.0 Mode
- Set the switch on the back of the keyboard to 'BT'.
- On your device, search for Bluetooth devices and select 'EPOMAKER P65'.
- The keyboard supports BT 5.0 for stable wireless connection with a 125Hz polling rate.
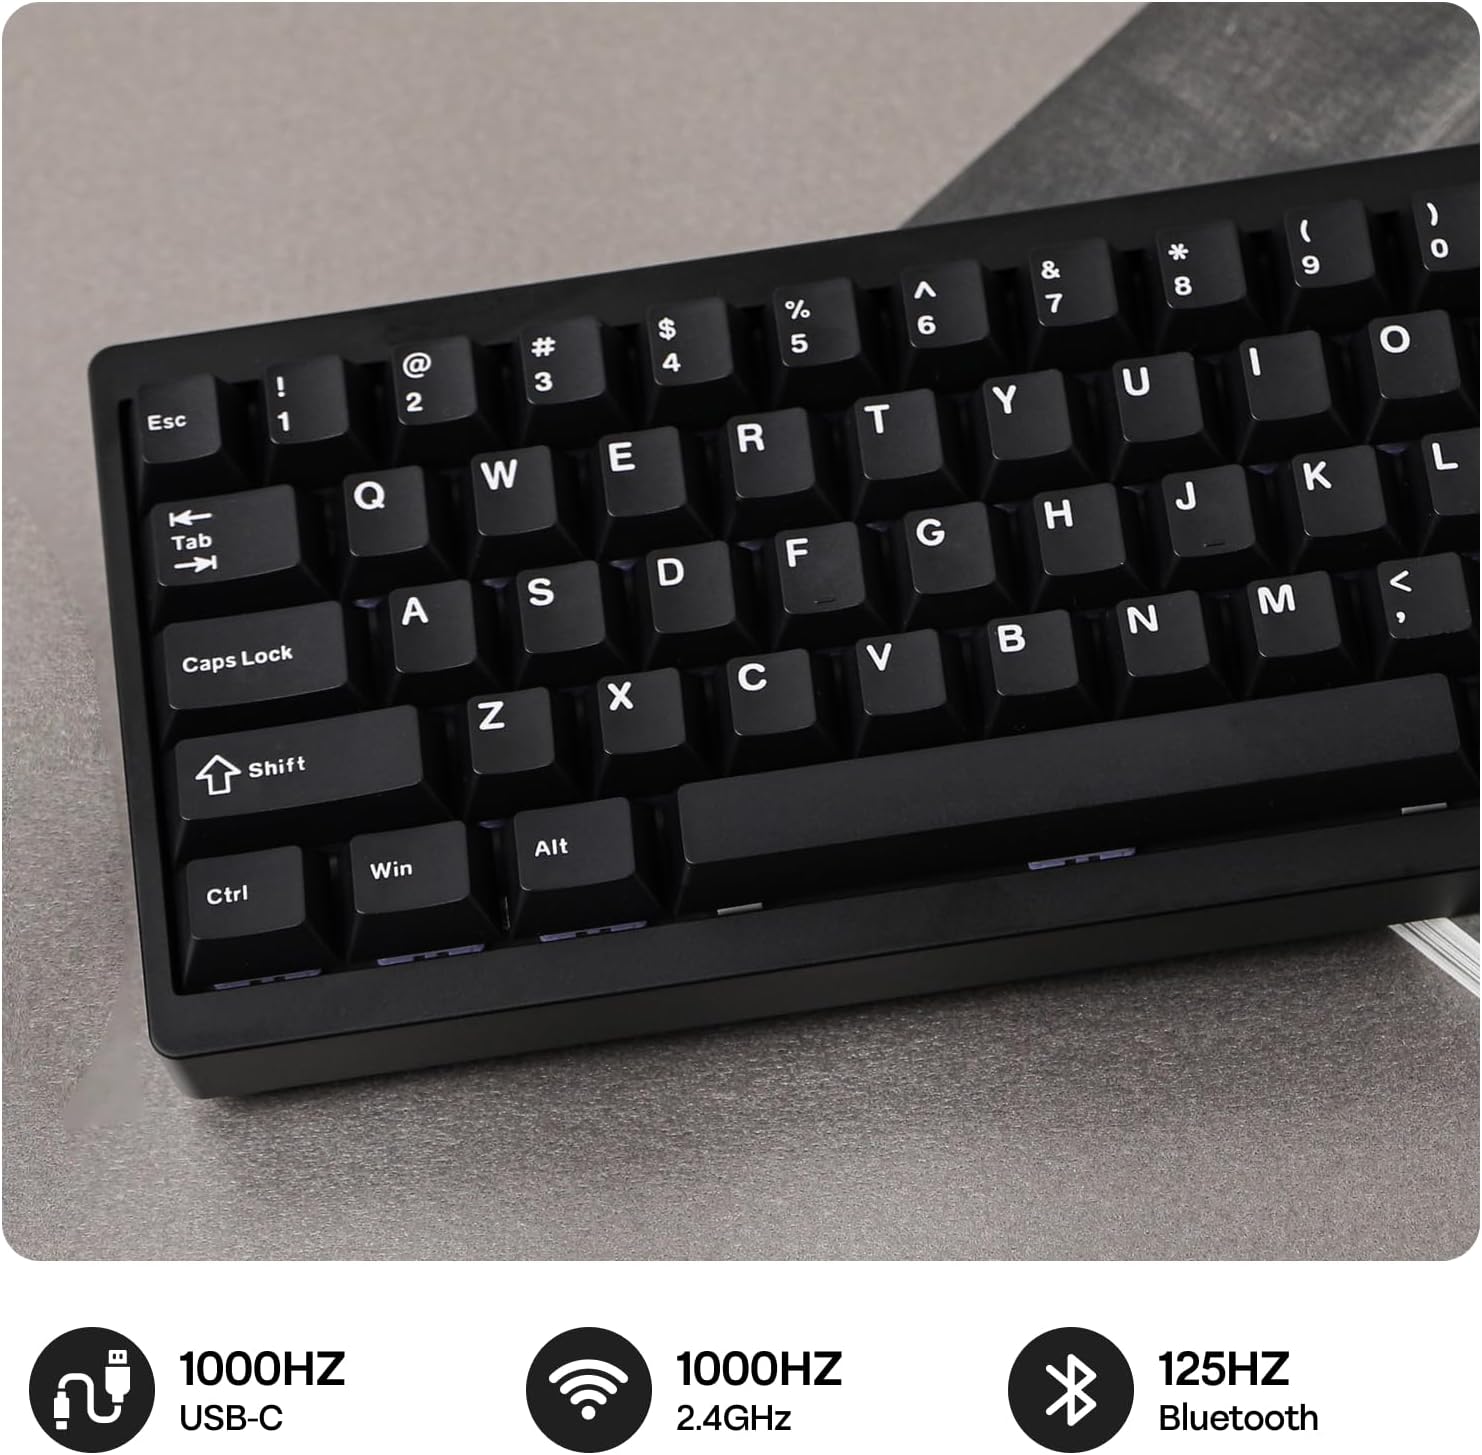
Image: The EPOMAKER P65 showing its 1000Hz USB, 1000Hz 2.4GHz, and 125Hz Bluetooth connectivity options.

Image: The EPOMAKER P65 displaying polling rates: USB (3ms) at 1000Hz, 2.4GHz (5ms) at 1000Hz, and Bluetooth (15ms) at 125Hz.

Image: A close-up of the EPOMAKER P65's side, showing the switch for Bluetooth, Wireless (2.4G), and USB-C connections.
5. QMK/VIA Customization
The P65 keyboard is fully programmable with QMK/VIA support, allowing extensive customization of key layouts and macros. This feature optimizes workflow for various tasks, including coding, gaming, or project work. The keyboard features NKRO for anti-ghosting and on-board memory to store layouts without requiring background software.
5.1 Using VIA Software
- Download the VIA software from the official EPOMAKER website or the VIA website.
- Connect your keyboard in wired mode.
- The VIA software allows real-time layout modifications, RGB lighting adjustments, macro creation, and special function assignments without needing to download additional programs.

Image: The EPOMAKER P65 demonstrating web driver customization via VIA software or QMK firmware, allowing personalization of settings, RGB lights, macros, key layout, and mod tap functions.

Image: The EPOMAKER P65 showing QMK/VIA customization options for RGB Lights, Macros, Settings, Key Layout, and Mod Tap and Special Functions.
6. Hot-Swappable Switches
The P65 features a hot-swappable PCB, allowing for easy switch replacement without soldering. This enables you to customize your typing experience by choosing your preferred switches (tactile, linear, or clicky feedback).
6.1 Replacing Switches
- Use the provided 2-in-1 keycap-and-switch puller to carefully remove the keycap.
- Use the switch puller to gently remove the switch from the PCB.
- Align the pins of the new 3/5-pin mechanical switch with the holes on the PCB.
- Press the new switch firmly until it clicks into place. Ensure the pins are not bent.
- Replace the keycap.

Image: The EPOMAKER P65 showcasing its hot-swappable PCB, south-facing per-key LEDs, plate-mounted stabilizers, and factory-lubed linear switches.

Image: The EPOMAKER P65 displaying details of Wisteria Linear V1 and Zebra (Linear) pre-lubed mechanical switches, including pin count, actuation force, actuation travel, spring length, and lifespan.
Video: An unboxing and typing demonstration of the EPOMAKER P65 keyboard, showing the contents of the package and the keyboard in use, including switch removal.
7. RGB Backlighting
The P65 features south-facing RGB backlighting, creating a visually appealing setup in various lighting conditions. The per-key RGB backlighting improves visibility and allows for extensive customization through the VIA software.
7.1 Customizing RGB Effects
- Use the VIA software to select from various pre-set RGB effects, adjust brightness, speed, and color patterns.
- Create custom lighting profiles to match your preferences or setup.
Video: A demonstration of the EPOMAKER P65's RGB lighting effects, showcasing various colors and patterns.
8. Battery Management
The P65 is equipped with a built-in 4000mAh large-capacity rechargeable battery, offering long-lasting wireless performance.
8.1 Charging
- Connect the keyboard to a USB power source using the provided USB-C cable.
- The keyboard can be used while charging.
8.2 Battery Life
- With RGB backlighting ON, the battery can last approximately 16 hours.
- With RGB backlighting OFF, the battery can last approximately 260 hours.

Image: The EPOMAKER P65 highlighting its 4000mAh battery, offering 16 hours with RGB backlight ON and 260 hours with RGB backlight OFF.
Image: The EPOMAKER P65 demonstrating a convenient battery check feature, where pressing FN+P displays the battery level via key lighting.
9. Operating Instructions
9.1 Basic Key Functions
- Function (Fn) Key: Used in combination with other keys to access secondary functions (e.g., multimedia controls, lighting adjustments).
- Multimedia Knob: The silver glossy knob provides quick access to multimedia functions, typically volume control. Its function can be customized via VIA software.
- N-Key Rollover (NKRO): Ensures that every key press is registered, even when multiple keys are pressed simultaneously, which is beneficial for fast typing and gaming.
9.2 Ergonomics
The keyboard is designed with an ergonomic typing angle to provide comfort during extended use.

Image: The EPOMAKER P65 featuring a 65% ergonomic compact layout with 66 keys, showing its dimensions and space-saving design.
Video: A typing sound test of the EPOMAKER P65 keyboard, demonstrating the acoustic feedback of the keys.
10. Maintenance
10.1 Cleaning
- Regularly clean the keyboard with a soft, dry cloth.
- For deeper cleaning, remove keycaps using the provided puller and use compressed air to clear debris.
- Avoid using harsh chemicals or abrasive materials.
10.2 Switch and Keycap Care
- When removing keycaps or switches, do so gently to avoid damaging the components.
- Store spare switches and keycaps in a safe place.

Image: The EPOMAKER P65 highlighting its sleek modern aluminum CNC metal case with an anodized finish, emphasizing durability and aesthetic appeal.
11. Troubleshooting
11.1 Connectivity Issues
- Keyboard not connecting in 2.4GHz or BT mode: Ensure the mode switch on the back of the keyboard is set correctly. For 2.4GHz, ensure the receiver is properly plugged in. For Bluetooth, ensure your device's Bluetooth is enabled and the keyboard is in pairing mode.
- Intermittent connection: Try moving the keyboard closer to the receiver/device. Ensure there are no strong interference sources nearby.
11.2 Keys Not Responding
- Single key not working: The switch might be faulty or not properly seated. Try removing and re-inserting the switch. If the issue persists, replace the switch with a spare.
- Multiple keys not working: Ensure the keyboard is properly connected. Try restarting your device or reconnecting the keyboard.
11.3 RGB Backlighting Issues
- Lights not turning on: Check if the RGB is enabled via the VIA software or keyboard shortcuts. Ensure the battery has sufficient charge if in wireless mode.
- Incorrect colors/patterns: Use the VIA software to reset or reconfigure the lighting effects.
12. Specifications
| Feature | Detail |
|---|---|
| Brand | EPOMAKER |
| Model Name | P65 |
| Keyboard Description | Mechanical |
| Number of Keys | 66 |
| Keyboard Layout | QWERTY |
| Connectivity Technology | 2.4GHz Wireless, BT 5.0, USB-A to C |
| Compatible Devices | Gaming Console, Laptop, PC, Smartphone, Tablet |
| Special Features | Aluminum, Backlit, Gasket-Mount, Hot-Swappable, N-key Rollover |
| Material | Aluminum |
| Product Dimensions (L x W x H) | 12.6"L x 4.57"W x 1.71"H |
| Keyboard Backlighting Color Support | RGB |
| Power Source | Battery Powered (4000mAh) |
| Switch Type | Linear (Wisteria/Zebra options) |
13. Warranty & Support
The EPOMAKER P65 keyboard comes with a 1 Year Warranty from the date of purchase.
For technical support, warranty claims, or further inquiries, please visit the official EPOMAKER website or contact their customer service.
You can find more information and support on the EPOMAKER Store.


