
EPOMAKER P65
EPOMAKER P65 QMK/VIA Wireless Aluminum Gaming Keyboard User Manual
Model: P65
1. Introduction
The EPOMAKER P65 is a 65% layout mechanical keyboard featuring QMK/VIA programmability, a durable CNC aluminum chassis, and gasket-mount design. It supports multiple connectivity options including Bluetooth 5.0, 2.4GHz wireless, and USB Type-C wired connections. The keyboard includes a silver glossy knob for multimedia control and offers vibrant RGB backlighting. Its design incorporates sound-dampening materials for an optimized typing experience.
2. Package Contents
Verify that all items are present in the package:
- EPOMAKER P65 Keyboard
- 1* 2-in-1 Keycap-and-Switch Puller
- 1* 2.4Ghz Wireless Receiver
- 1* Detachable USB A to USB C cable
- 3* Spare Switches
- 1* Multilingual Manual (This document)

Image: EPOMAKER P65 package contents.
3. Product Overview
The EPOMAKER P65 features a compact 65% layout with 66 keys and a rotary knob. Its construction includes an aluminum shell, PBT keycaps, lubed switches, a PC plate, and multiple sound-dampening layers for an enhanced typing experience.
Key Features:
- Tri-Mode Connectivity: Bluetooth 5.0, 2.4GHz Wireless, USB Type-C Wired.
- QMK/VIA Programmability: Customize key layouts and macros.
- Gasket-Mount Design: Provides a flexible and comfortable typing feel.
- Hot-Swappable PCB: Compatible with 3/5-pin mechanical switches without soldering.
- Durable Aluminum Build: CNC machined aluminum case with an anodized finish.
- Enhanced Sound Dampening: Multiple layers of foam (sandwich, IXPE, PET, sound-absorbing, EVA) reduce noise.
- Vibrant RGB Backlighting: South-facing per-key RGB LEDs.
- N-Key Rollover (NKRO): Ensures all key presses are registered accurately.

Image: Overview of EPOMAKER P65 key features.
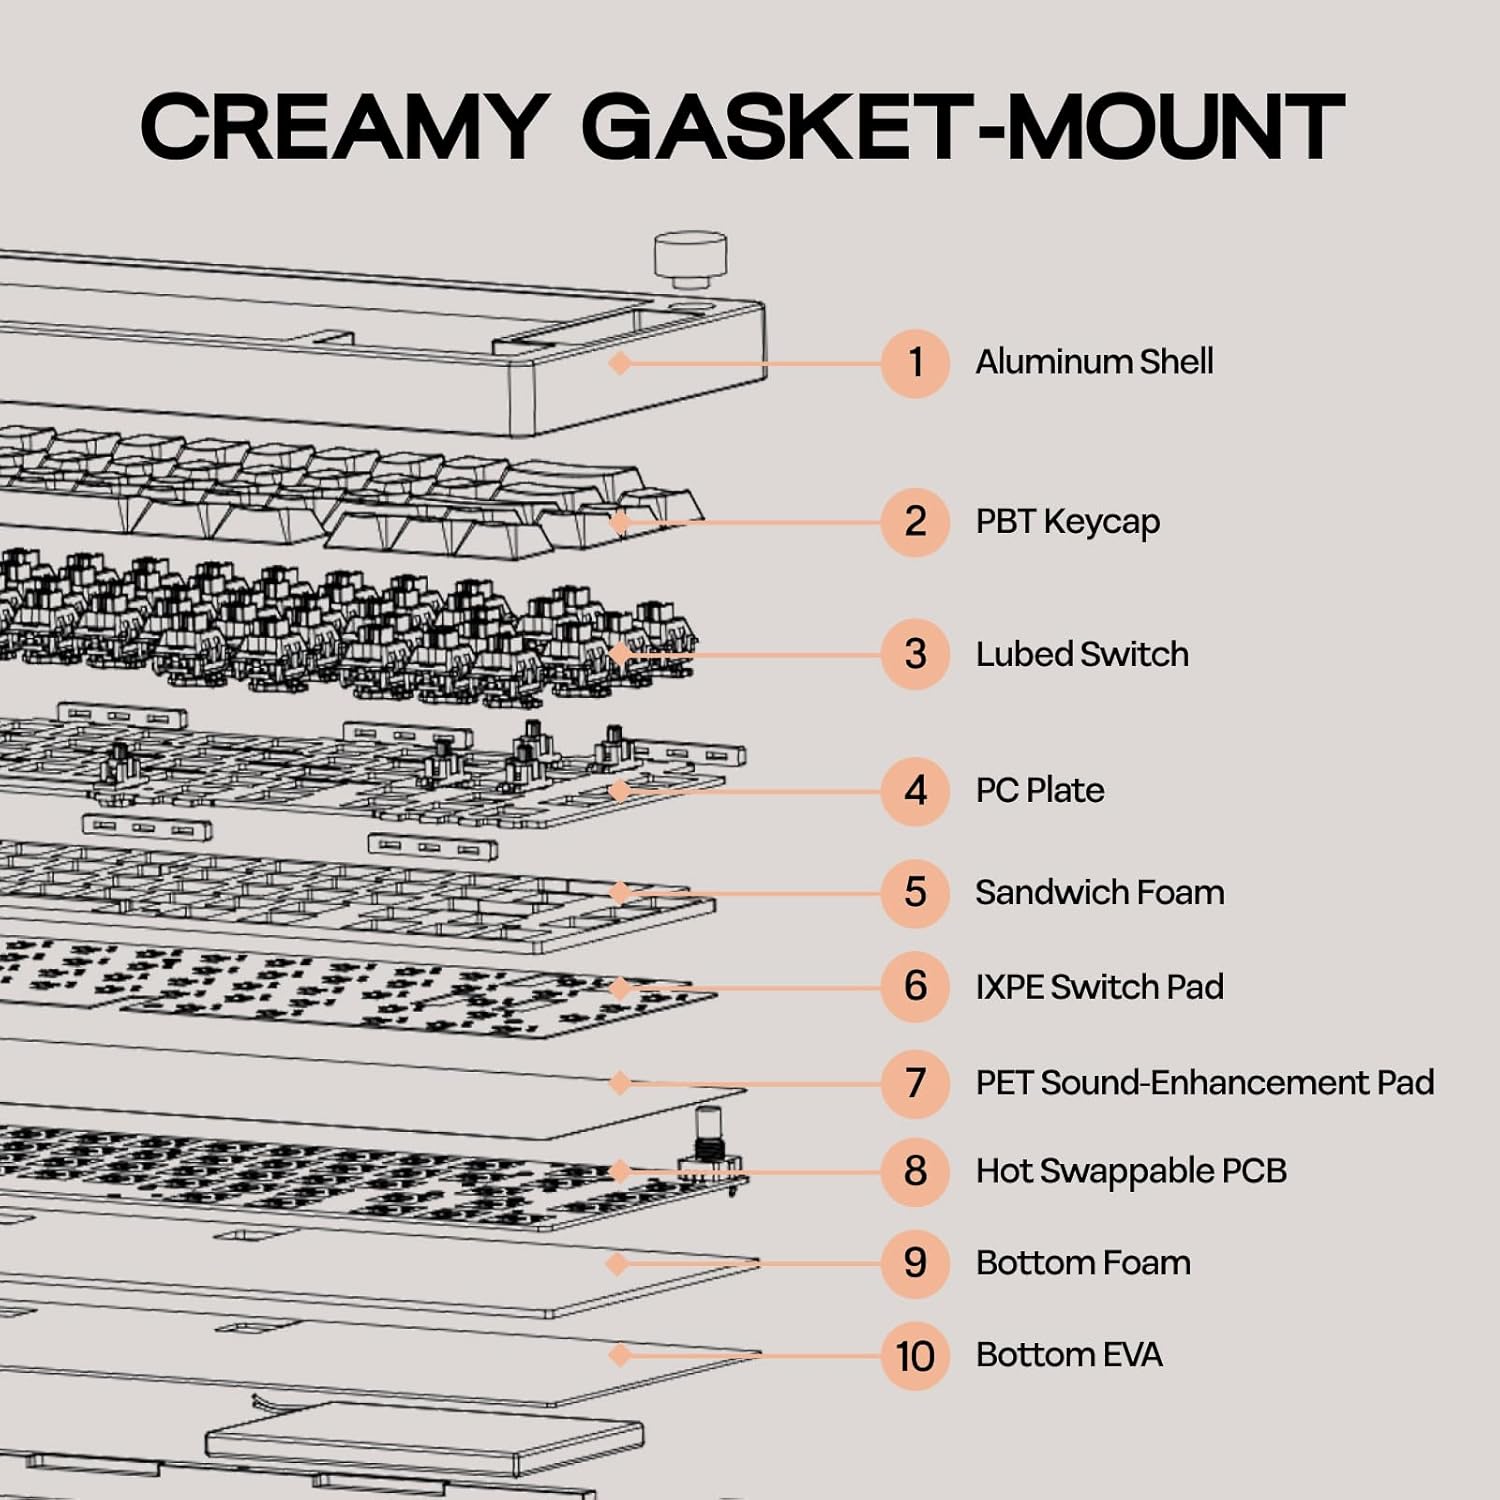
Image: Gasket-mount internal structure diagram.
4. Setup and Initial Connection
To begin using your EPOMAKER P65 keyboard, follow these steps for initial setup.
4.1. Wired Connection
- Locate the USB Type-C port on the back of the keyboard.
- Connect the provided USB-A to USB-C cable to the keyboard and to an available USB port on your computer.
- Ensure the mode switch on the back of the keyboard is set to 'USB'.
- The keyboard will be recognized automatically by your operating system.
4.2. Wireless Connection (2.4GHz)
- Locate the 2.4GHz wireless receiver (dongle) in the keyboard's magnetic storage slot or in the package.
- Plug the 2.4GHz receiver into an available USB port on your computer.
- Set the mode switch on the back of the keyboard to '2.4G'.
- Press Fn + R on the keyboard to activate 2.4GHz pairing mode. The indicator light will flash.
- The keyboard should connect automatically.
4.3. Bluetooth Connection
The keyboard supports up to three Bluetooth devices.
- Set the mode switch on the back of the keyboard to 'BT'.
- Press and hold Fn + Q, Fn + W, or Fn + E for 3-5 seconds to enter pairing mode for the desired Bluetooth channel. The indicator light for the selected channel will flash rapidly.
- On your device (computer, tablet, smartphone), enable Bluetooth and search for new devices.
- Select 'EPOMAKER P65' from the list of available devices to pair.
- Once paired, the indicator light will stop flashing.
- To switch between paired Bluetooth devices, press Fn + Q, Fn + W, or Fn + E briefly.
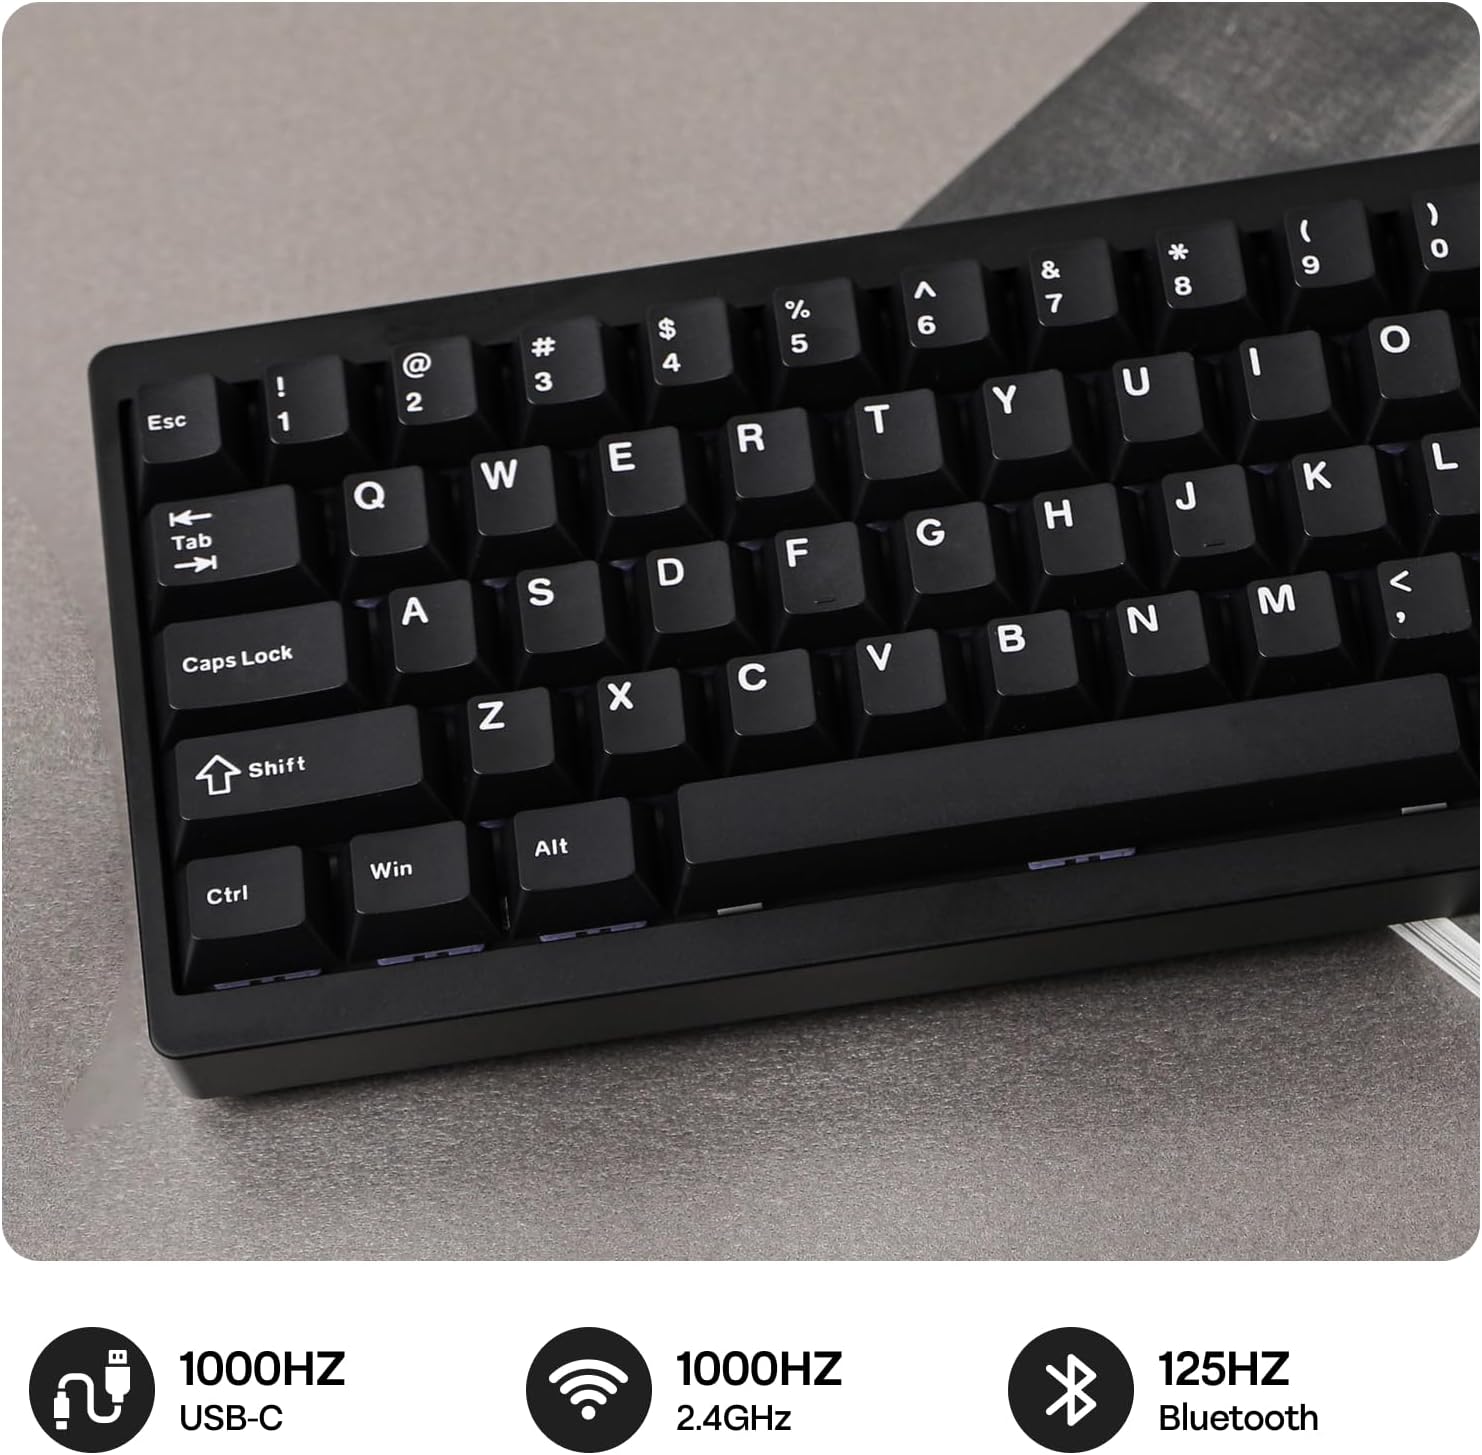
Image: Connectivity options and polling rates.

Image: Tri-mode wireless connectivity.
5. QMK/VIA Customization
The EPOMAKER P65 supports QMK firmware and VIA software, allowing for comprehensive customization of key layouts, macros, and RGB lighting without requiring additional software downloads.
- Download the VIA software from the official VIA website or EPOMAKER support page.
- Connect the keyboard to your computer via USB-C cable.
- Launch the VIA software. It should automatically detect the P65 keyboard. If not, you may need to load the appropriate .json file for the P65, which can be found on the EPOMAKER website.
- Within VIA, you can remap keys, create custom macros, adjust RGB lighting effects, and configure different layers.
- Changes made in VIA are applied in real-time to the keyboard's onboard memory.

Image: VIA software interface for keyboard customization.
6. Battery Management
The EPOMAKER P65 is equipped with a 4000mAh rechargeable battery for wireless operation.
6.1. Charging
Connect the keyboard to your computer or a USB power adapter using the provided USB-C cable. The keyboard will charge automatically. The indicator light will show charging status.
6.2. Battery Life
Expected battery life varies based on usage and RGB lighting settings:
- Approximately 16 hours with RGB backlighting on.
- Approximately 260 hours with RGB backlighting off.

Image: Battery life estimates.
6.3. Checking Battery Status
To check the current battery level, press a specific key combination (refer to the keyboard's quick guide or VIA software for the exact combination, often Fn + Backspace or similar). The RGB lighting will indicate the battery level.

Image: Battery check function.
7. Switch and Keycap Management
The EPOMAKER P65 features a hot-swappable PCB, allowing you to change mechanical switches without soldering. The keycaps are also removable for customization or cleaning.
7.1. Changing Switches
- Use the provided keycap puller to carefully remove the desired keycap.
- Use the provided switch puller to gently grip the switch from its top and bottom clips.
- Pull the switch straight up to remove it from the PCB.
- Align the pins of the new switch with the holes on the PCB. Ensure the pins are straight to avoid bending.
- Press the new switch firmly into place until it clicks.
- Replace the keycap.

Image: Hot-swappable switch replacement.
7.2. Keycap Removal
Use the keycap puller to remove keycaps. Hook the puller onto two opposite sides of the keycap and pull upwards evenly. Avoid excessive force to prevent damage to the keycap or switch stem.
8. Care and Maintenance
Proper care ensures the longevity and performance of your keyboard.
- Cleaning: Use a soft brush or compressed air to remove dust and debris from between keycaps. For deeper cleaning, remove keycaps and wipe them with a damp cloth and mild soap solution. Ensure keycaps are completely dry before reattaching.
- Case Cleaning: Wipe the aluminum case with a soft, lint-free cloth. Avoid abrasive cleaners or solvents.
- Storage: When not in use, store the keyboard in a clean, dry environment. The included transparent cover can help protect it from dust.
- Avoid Liquids: Keep liquids away from the keyboard to prevent damage to electronic components.
9. Troubleshooting Guide
If you encounter issues with your EPOMAKER P65, refer to the following common solutions:
| Problem | Possible Solution |
|---|---|
| Keyboard not responding (Wired) |
|
| Keyboard not responding (2.4GHz/Bluetooth) |
|
| Keys not registering or double-typing |
|
| RGB lighting not working or incorrect |
|
10. Technical Specifications
| Feature | Specification |
|---|---|
| Model | P65 |
| Layout | 65% (66 keys + 1 knob) |
| Connectivity | Bluetooth 5.0, 2.4GHz Wireless, USB Type-C Wired |
| Battery Capacity | 4000mAh Lithium Ion |
| Switches | Hot-swappable (3/5-pin mechanical switches) |
| Keycaps | PBT |
| Backlighting | RGB (South-facing) |
| Case Material | Aluminum |
| Dimensions (L x W x H) | 12.6 x 4.57 x 1.71 inches (32.0 x 11.6 x 4.3 cm) |
| Item Weight | 3.98 pounds (1.81 kg) |
| Compatibility | PC, Mac, Laptop, Gaming Console, Smartphone, Tablet |

Image: Technical specifications and dimensions.
11. Warranty and Support
EPOMAKER products are designed for reliability and performance. For specific warranty details, please refer to the warranty information provided at the time of purchase or visit the official EPOMAKER website.
If you require technical assistance, have questions about your product, or need to report an issue, please contact EPOMAKER customer support through their official channels. You can find more information and contact options on the EPOMAKER Brand Store.
An additional user manual in PDF format may be available for download here.
Related documentsP65


Ask a question about this manual
Ask about setup, troubleshooting, compatibility, parts, safety, or missing instructions. Manuals+ will review the question and use this page’s manual context to help answer it.