1. Product Overview
This manual provides essential information for the safe assembly, operation, and maintenance of your NEECHIPRO 36V Electric Go Kart. Please read all instructions carefully before use.

Figure 1: NEECHIPRO 36V Electric Go Kart, showcasing its sleek design and LED headlights.
2. Safety Information
Your safety and the safety of others are paramount. Always follow these guidelines:
- Age and Weight Limit: Suitable for children aged 6 years and up, with a maximum weight capacity of 132 lbs (60 kg).
- Supervision: Adult supervision is required at all times during operation.
- Protective Gear: Always wear a helmet, knee pads, and elbow pads.
- Operating Environment: Use on flat, dry surfaces away from traffic, pools, or other hazards. Avoid steep inclines.
- Seatbelt: Ensure the 2-point seatbelt is securely fastened before each ride.
- Braking: Familiarize yourself with the electronic brakes.
- Lights: Utilize the front and rear LED lights for enhanced visibility, especially in low-light conditions.
3. Setup and Assembly
Follow these steps to assemble your go-kart. Refer to the installation video for visual guidance.
Video 1: BMW Electric Go Kart Product Installation (7:52). This video provides a detailed walkthrough of the assembly process.
3.1 Unboxing and Component Identification
Carefully open the packaging and identify all components. Ensure no parts are missing or damaged. The main chassis, wheels, steering wheel, seat, and rear spoiler are key components.

Figure 2: All components laid out after unboxing, including the chassis, wheels, steering wheel, and accessories.
3.2 Chassis Assembly
Extend the adjustable chassis frame and secure it using the provided pins and bolts. Ensure all connections are tight.
3.3 Wheel Installation
Attach the rear wheels to the axle, securing them with washers and nuts. Repeat for the front wheels. Ensure the wheels spin freely but are securely fastened.

Figure 3: Underside view of the go-kart, highlighting the adjustable seat mechanism and wheel attachment points.
3.4 Steering Wheel and Column
Insert the steering column into the designated slot on the chassis. Connect the wiring for the steering wheel's functions (horn, music). Secure the steering wheel to the column with the provided screw.
3.5 Seat and Rear Spoiler Attachment
Place the seat onto the chassis and secure it with the screws. Attach the rear spoiler to the back of the go-kart, ensuring it is firmly in place.
4. Operating Instructions
Familiarize yourself with the controls before operating the go-kart.
Video 2: 24V Electric Go Kart for Kids (1:19). This video demonstrates the go-kart in action, highlighting its operational features.
4.1 Power On/Off
Locate the power button on the control panel. Press to turn the go-kart on or off.
4.2 Speed Modes
The go-kart features two speed modes: Low Speed for beginners and High Speed for experienced riders, reaching up to 7.5 MPH (12 km/h). Select the appropriate speed using the switch on the control panel.
4.3 Forward and Reverse
Use the shifter to select between forward and reverse gears. Ensure the go-kart is stationary before changing direction.
4.4 Drift Capabilities
Engage drift mode for enhanced excitement. The go-kart's dual-drive system and specialized rear wheels allow for thrilling drift maneuvers.
4.5 LED Lights
The go-kart is equipped with functional LED headlights and taillights. Use the dedicated switch to turn them on or off.

Figure 4: The go-kart with its headlights and taillights illuminated, indicating high and low speed capabilities.
4.6 Adjustable Seat
The seat offers three adjustable positions to accommodate growing children and ensure comfortable riding. Adjust the seat by releasing the locking mechanism, sliding to the desired position, and re-engaging the lock.
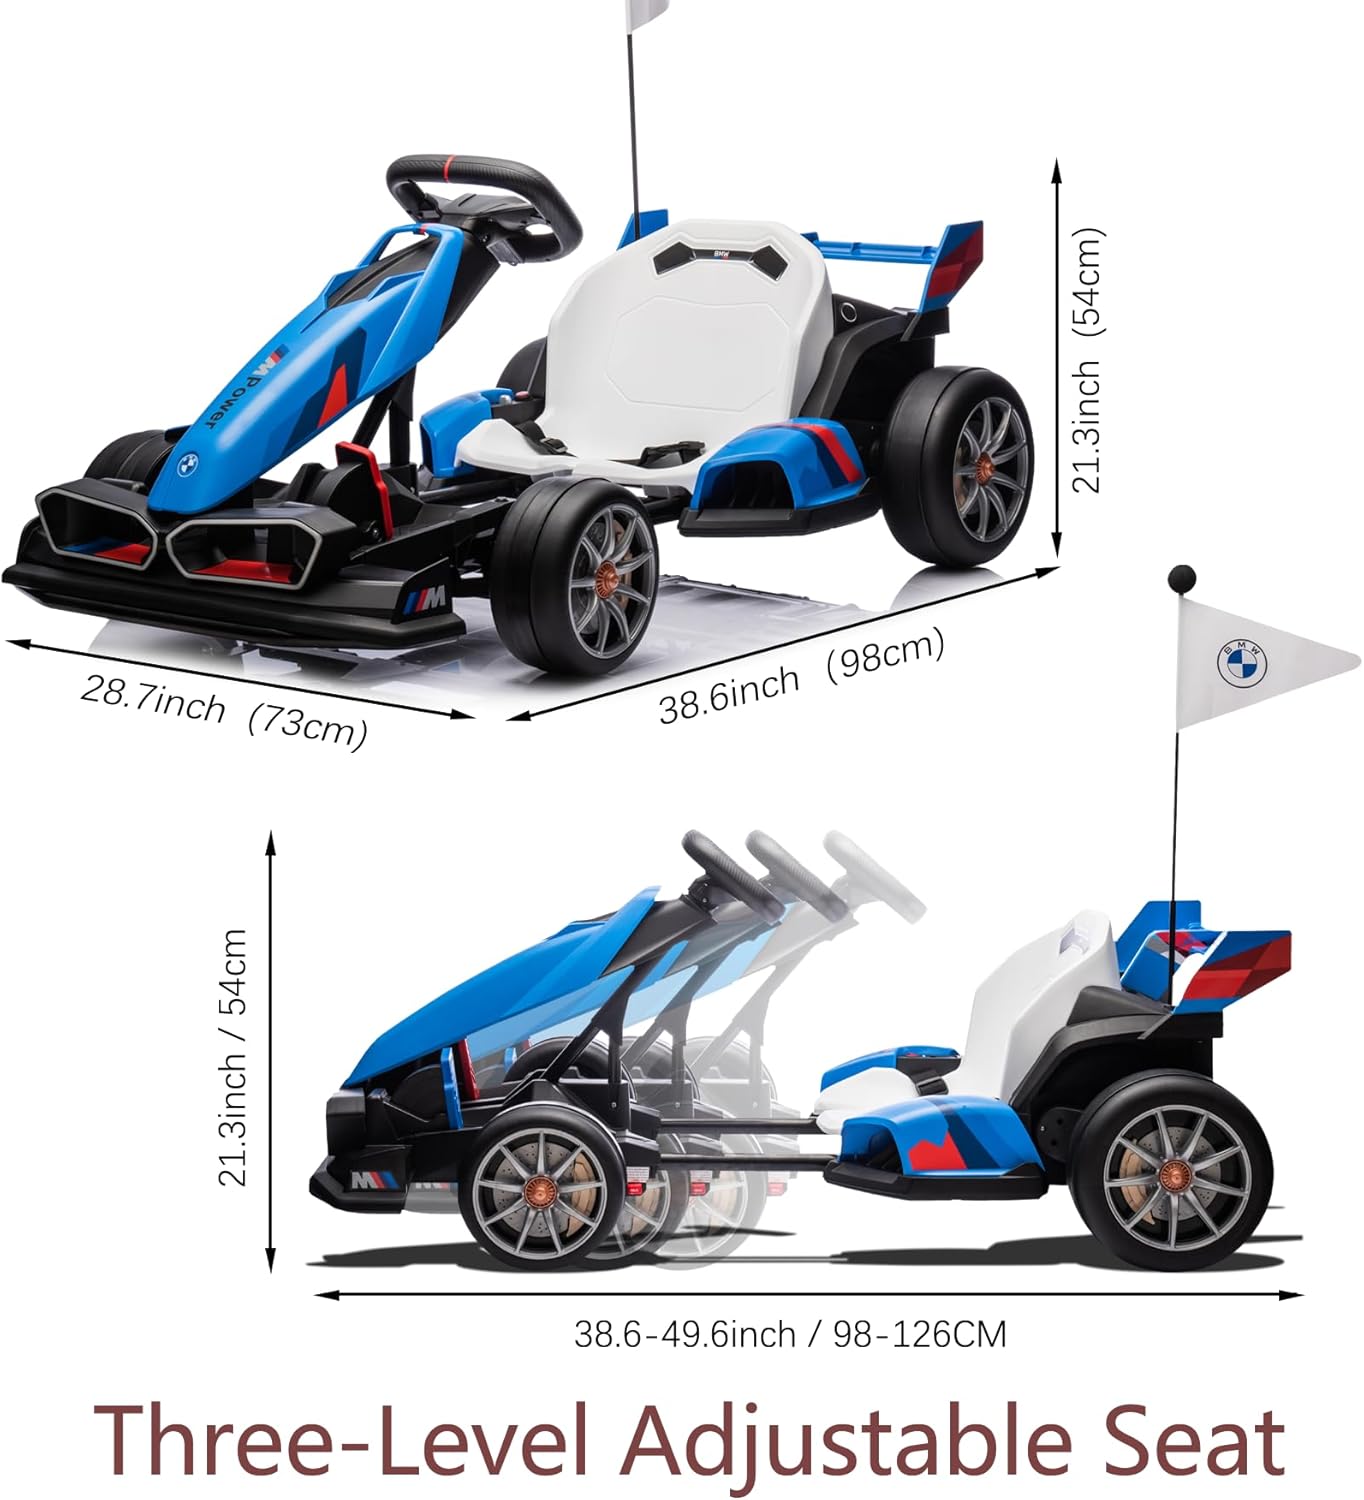
Figure 5: Diagram illustrating the three adjustable seat positions for optimal rider comfort and growth.
5. Maintenance
- Charging: Charge the 36V battery for 8-12 hours before first use and after each use. Do not overcharge.
- Cleaning: Wipe the go-kart with a damp cloth. Avoid using harsh chemicals or abrasive cleaners.
- Storage: Store the go-kart in a dry, cool place away from direct sunlight when not in use.
- Inspection: Regularly check all bolts, nuts, and connections to ensure they are secure. Inspect tires for wear and tear.
6. Troubleshooting
| Problem | Possible Cause | Solution |
|---|---|---|
| Go-kart does not turn on | Battery is low or disconnected | Charge the battery; ensure battery connections are secure. |
| Go-kart does not move | Motor issue or pedal not pressed | Ensure the pedal is fully pressed; check motor connections. |
| Reduced speed/power | Low battery charge | Recharge the battery fully. |
7. Specifications
- Model: B0DT3SH8VK
- Motor: 600W
- Battery: 36V 9AH
- Max Speed: 7.5 MPH (12 km/h)
- Recommended Age: 6 years and up
- Weight Capacity: 132 lbs (60 kg)
- Product Dimensions: 38.6" L x 28.7" W x 21.3" H
- Item Weight: 123 pounds
- Driving Time: 90-110 minutes (depending on speed and temperature)
8. Warranty and Support
For any support needs or warranty inquiries, please contact NEECHIPRO customer service. Refer to your purchase documentation for specific warranty details.