1. Introduction
Thank you for choosing the FitDVR F3 4K 3 Channel Dash Cam. This device is designed to provide comprehensive video surveillance for your vehicle, capturing footage from the front, interior, and rear simultaneously. This manual provides detailed instructions for installation, operation, and maintenance to ensure optimal performance.

Figure 1: FitDVR F3 Dash Cam and included components.
2. Package Contents
Please verify that all items listed below are included in your package:
- 1 x FitDVR F3 Dash Cam (Main Unit)
- 1 x Cigarette Lighter Cable (Power Supply)
- 1 x Rear Camera
- 1 x Rear Camera Cable
- 1 x 64GB Memory Card
- 1 x USB Thumb Drive
- 2 x Anti-Static Stickers
- 1 x Plastic Pry Tool
- 1 x User Manual

Figure 2: Visual representation of package contents.
3. Setup & Installation
3.1 Initial Setup
- Insert Memory Card: Gently insert the provided 64GB Micro SD card into the dash cam's SD card slot.
- Format Memory Card: Upon first use, the dash cam will prompt you to format the SD card. Follow the on-screen instructions to complete this process. This ensures optimal performance and compatibility.
3.2 Mounting the Dash Cam
The FitDVR F3 dash cam uses a 3M adhesive mount for secure attachment to your windshield. It is recommended to place the dash cam behind the rearview mirror to avoid obstructing your view.
- Clean Windshield: Ensure the chosen area on your windshield is clean and dry.
- Apply Anti-Static Sticker: Place one of the anti-static stickers on the desired mounting location. This helps in easy removal without leaving residue.
- Attach Dash Cam: Remove the red protective film from the 3M adhesive on the dash cam bracket. Firmly press the dash cam onto the anti-static sticker on the windshield.
- Adjust Angle: The dash cam's bracket allows for flexible adjustment. Position the front lens to capture the road ahead clearly.
3.3 Connecting Power and Routing Cables
The dash cam is powered via the included cigarette lighter cable. The plastic pry tool can assist in neatly tucking cables along the vehicle's trim.
- Connect Power Cable: Plug the Type-C end of the cigarette lighter cable into the dash cam's power input port.
- Route Front Cable: Use the plastic pry tool to tuck the power cable along the gap between the front windshield and the roof, down the A-pillar, and towards the cigarette lighter socket.
- Plug into Cigarette Lighter: Insert the cigarette lighter adapter into your vehicle's 12V power outlet.
- Install Rear Camera: Connect the rear camera cable to the main dash cam unit. Route this cable along the roofline and side panels to the rear windshield. Attach the rear camera to the center top of the rear windshield using the second anti-static sticker and 3M adhesive. Ensure the lens faces the correct direction for optimal rear view.
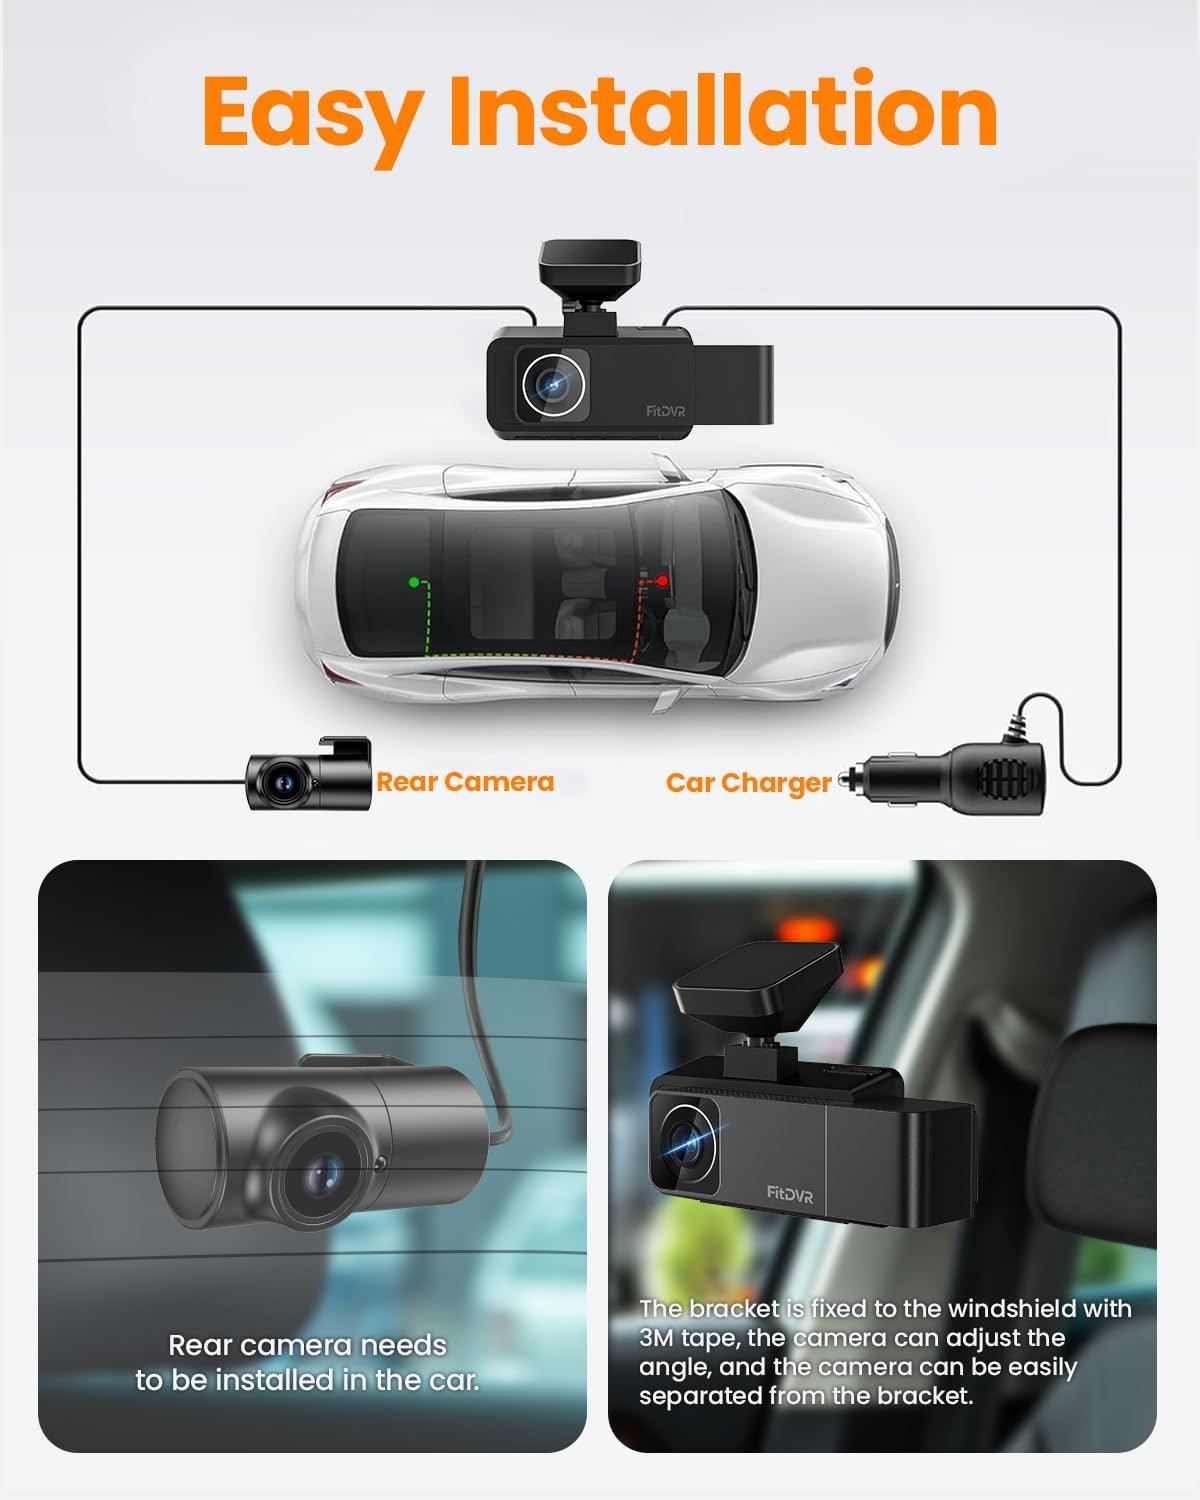
Figure 3: Dash Cam installation and cable routing diagram.
3.4 Installation Videos
Video 1: Step-by-step guide on how to install the dash cam, including mounting and cable management.
Video 2: Detailed installation and cable hiding process for a 3-channel dash cam.
4. Operating Instructions
4.1 Power On/Off
The dash cam will automatically power on and begin recording when your vehicle's ignition is turned on. It will power off automatically when the ignition is turned off.
4.2 Recording Modes & Resolution
The FitDVR F3 offers flexible recording options:
- Two-Camera Mode: Front camera records in 4K resolution, and the interior camera records in 1080P.
- Three-Camera Mode: Front camera records in 2K resolution, interior camera in 1080P, and rear camera in 1080P.

Figure 4: Recording mode and resolution options.
4.3 Loop Recording
The dash cam continuously records video in a loop. When the memory card is full, the oldest files will be automatically overwritten by new recordings. This ensures you always have the most recent footage.

Figure 5: Loop Recording functionality.
4.4 G-Sensor (Emergency Recording)
The built-in G-sensor detects sudden movements or collisions. In the event of an impact, the current video segment will be automatically locked and protected from being overwritten by loop recording. If connected to a fuse box for power (optional accessory), the G-sensor will also detect vibrations and lock video when parked.

Figure 6: G-Sensor activating emergency recording.
4.5 Parking Mode
When Parking Mode is enabled, the dash cam will automatically start recording and lock the video if an impact is detected while the vehicle is parked. For 24/7 parking mode functionality, a hardwire kit is required (not included, sold separately).

Figure 7: Parking Mode in action.
4.6 Built-in GPS
The integrated GPS module records your driving speed, acceleration, altitude, and routes. This data is synchronized with your video footage and can be viewed via the mobile app. All GPS data is stored locally on the memory card, ensuring privacy.

Figure 8: GPS Route Tracking interface.
4.7 Wi-Fi Connectivity & Mobile App
Connect your dash cam to your smartphone via the built-in Wi-Fi and the dedicated mobile app. This allows you to:
- View live stream video.
- Download recorded videos to your phone.
- Share videos to social media platforms.
- Edit videos within the app.

Figure 9: Mobile App interface for seamless connectivity.
4.8 Night Vision
- Front Camera: Equipped with Sony Starvis technology and HDR (High Dynamic Range) for superior image quality and clarity in low-light conditions.
- Interior Camera: Features infrared night vision capabilities with 4 built-in supplementary IR lights for clear recording in very dim light.

Figure 10: Interior camera infrared night vision.
4.9 Physical Buttons
The dash cam features intuitive physical buttons for easy navigation and control:
- Power Button: To manually turn the device on/off.
- Menu Button: To access settings and options.
- Up/Down Buttons: For navigating through menu options.
- OK Button: To confirm selections.

Figure 11: Physical buttons layout.
5. Maintenance
5.1 SD Card Management
Regularly formatting the SD card (at least once a month) is recommended to maintain optimal recording performance and prevent data corruption. The dash cam supports up to 256GB memory cards.
5.2 Temperature Resistance
The FitDVR F3 is designed to operate stably in a wide range of temperatures, from -4°F (-20°C) to 158°F (70°C), ensuring reliable performance in various climates.

Figure 12: Temperature resistance features.
6. Troubleshooting
If you encounter any issues with your FitDVR F3 Dash Cam, please refer to the following common troubleshooting steps:
- Camera Not Powering On: Ensure the cigarette lighter cable is securely connected to both the dash cam and the vehicle's 12V power outlet. Check if the vehicle's ignition is on.
- Recording Issues: Verify that the SD card is properly inserted and formatted. If issues persist, try formatting the card again or using a different compatible SD card.
- Wi-Fi Connection Problems: Ensure the dash cam's Wi-Fi is enabled and your smartphone is within range. Try restarting both the dash cam and your phone.
- GPS Not Working: Ensure the dash cam has a clear view of the sky for GPS signal acquisition. It may take a few minutes to acquire a signal after starting the vehicle.
- Screen Freezing/Unresponsive: Try performing a soft reset by pressing and holding the power button for 10-15 seconds. If the issue continues, a factory reset via the menu settings might be necessary (note: this will erase custom settings).
7. Specifications
| Feature | Specification |
|---|---|
| Product Dimensions | 7.87 x 6.69 x 7.09 inches |
| Item Weight | 1.57 pounds |
| Item Model Number | F3 |
| Batteries | 1 Lithium Metal batteries required (included) |
| Connectivity Technologies | Wi-Fi |
| Special Features | App Control, Built-In GPS, WiFi-APP Control |
| Video Capture Resolution | 1080p, 4K |
| Mounting Type | 3M Sticker & Static Windshield Stickers |
| Vehicle Service Type | Bus, Car, Minivan, RV, Truck |
| Manufacturer | FitDVR |
| Color | Black |