1. Introduction
The MIUCDA Smart Irrigation Computer is an advanced device designed to automate your garden and lawn watering needs. It features a large 4.5-inch LCD display and physical buttons for easy local control, alongside smart functionalities like Wi-Fi connectivity for remote management via the Smart Life/Tuya app. This manual provides comprehensive instructions for installation, operation, and maintenance to ensure optimal performance of your irrigation system.
2. Package Contents
Please check the package contents to ensure all items are present:
- MIUCDA Smart Irrigation Computer (SWT60)
- 4 x 1.5V AA Batteries
- Quick Connect Adapter (1/2'' and 3/4'' options)
- Teflon Tape (Thread Seal Tape)
- User Manual

Image: Contents of the MIUCDA Smart Irrigation Computer package.
3. Product Overview
The MIUCDA Smart Irrigation Computer features a robust design with an intuitive interface. Key components include:
- Faucet Connector: Standard 3/4'' connection with built-in metal filter.
- Large LCD Screen: 4.5-inch display for clear visibility of settings and status.
- Physical Buttons: '+', '-', 'SET', 'OK', and Wi-Fi button for direct control.
- Child Lock: Prevents accidental operation.
- Battery Compartment: Securely houses 4 AA batteries.
- Water Outlet: Connects to your hose or irrigation system.

Image: Detailed overview of the irrigation computer's components.
4. Installation
Follow these steps to install your irrigation computer:
- Insert Batteries: Open the battery compartment on the back of the device. Insert 4 x 1.5V AA batteries, ensuring correct polarity. Align the battery compartment cover and press firmly until it clicks into place to ensure a waterproof seal.
- Attach to Faucet: Screw the irrigation computer onto your outdoor faucet. Ensure it is securely tightened to prevent leaks. Use the provided Teflon tape on the threads for a better seal if needed. The device supports standard 3/4'' faucet connections and includes a 1/2'' adapter for smaller faucets.
- Connect Hose: Attach your garden hose or irrigation system to the water outlet at the bottom of the irrigation computer.
- Turn on Water: Fully open your faucet to allow water flow to the device. The device is IP65 waterproof, designed to withstand outdoor conditions.

Image: Installation steps for the irrigation computer.
5. App Setup & Pairing
The MIUCDA Smart Irrigation Computer connects directly to your 2.4G Wi-Fi network without needing a separate gateway. Use the Smart Life or Tuya app for remote control and advanced features.
- Download App: Download the "Smart Life" or "Tuya Smart" app from your smartphone's app store (iOS or Android). Register or log in to your account.
- Enter Pairing Mode:
- First, turn off the water timer by holding the 'OK' button for about 3 seconds until "OFF" appears on the display.
- Next, hold the Wi-Fi button (bottom right) for about 3 seconds until the Wi-Fi indicator on the display starts blinking. This indicates pairing mode.
- Add Device in App: Open the app, click on '+' to add a device. The app should automatically detect the "Valve Controller". If not, select it manually from the "Sensors" or "Electrical" category.
- Connect to Wi-Fi: Enter your 2.4GHz Wi-Fi network credentials when prompted. Ensure your phone's Bluetooth is enabled for faster discovery.
- Complete Pairing: Once connected, the Wi-Fi indicator on the device will stop blinking and remain solid. The device is now paired and ready for app control.

Image: Steps for app setup and pairing.
Video: Official product video demonstrating the MIUCDA Smart Irrigation Computer (SWT60) setup and features.
6. Programming Schedules
The device supports two main programming modes: Normal Schedule and Cycle Schedule. You can set up to 6 separate irrigation plans per day.
6.1 Normal Schedule (Timed Irrigation)
This mode allows you to set specific start and end times for watering on selected days.
- Via App:
- In the app, select the "Normal Schedule" option.
- Set the desired start time and irrigation duration (e.g., 5 minutes).
- Choose the specific days of the week for this schedule (e.g., Sun, Mon, Wed, Fri).
- Save the schedule. You can add multiple normal schedules.
- Manually on Device:
- Press and hold the 'SET' button for about 3 seconds.
- Use '+' or '-' to select "NORMAL" mode, then press 'OK'.
- Use '+' or '-' to navigate through programs (P1-P6). Press 'OK' to select a program.
- Use '+' or '-' to set the start time (e.g., 12:30 PM) and end time (e.g., 12:35 PM). Press 'OK' after each setting.
- Use '+' or '-' to select/deselect days of the week. Press 'OK' to confirm.

Image: Examples of fixed programming for different watering needs.
6.2 Cycle Schedule (Water & Pause)
This mode is ideal for breaking down watering into multiple cycles, allowing the soil time to soak and improving water efficiency.
- Via App:
- In the app, select the "Cycle Schedule" option.
- Set the overall start and end time for the cycle period (e.g., 12:30 PM - 5:30 PM).
- Define the "Water Duration" (e.g., 5 minutes) and "Pause Duration" (e.g., 30 minutes).
- Choose the days for this cycle schedule (e.g., Sun, Tue, Thu, Sat).
- Save the schedule.

Image: Explanation of the Cycle & Soak mode for efficient watering.
7. Manual Operation
You can manually start or stop watering directly from the device or via the app without affecting your programmed schedules.
- On Device: Press and hold the Wi-Fi button (bottom right) for about 3 seconds. The display will show "ON" and water will start flowing. To stop, press and hold the Wi-Fi button again until "OFF" appears.
- Via App: On the main screen of the app, you can see the current irrigation status. Tap the play/pause button to manually start or stop watering. You can also set a temporary duration for manual watering.

Image: Manual setting and control using physical buttons.
8. Rain Delay Function
The rain delay feature helps conserve water by automatically skipping watering on rainy days or allowing you to manually set a delay.
- Automatic Delay: The device can automatically skip watering based on local weather forecasts (requires app connection and location services enabled).
- Manual Delay: You can manually set a rain delay for 24, 48, or 72 hours via the app. This is useful if you anticipate rain or want to temporarily pause watering.
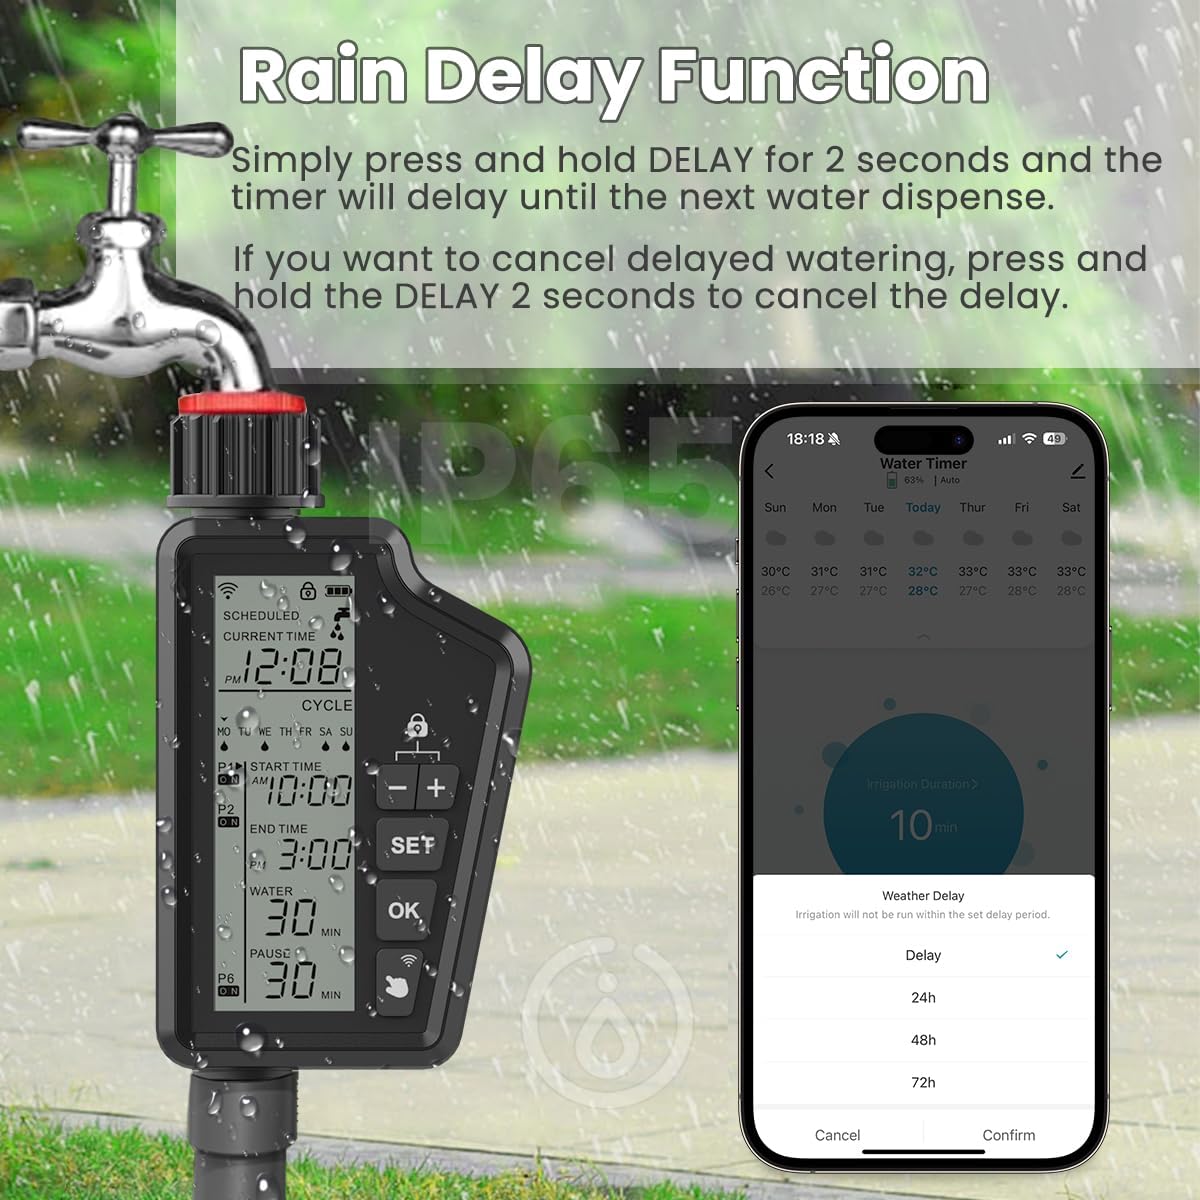
Image: Rain delay function to prevent overwatering.
9. Battery Management
The irrigation computer is powered by 4 x 1.5V AA batteries, offering up to 8 months of battery life.
- Battery Level Display: The battery level is shown on the device's LCD screen and can also be checked within the Smart Life/Tuya app.
- Replacement: Replace batteries promptly when the low battery indicator appears to ensure continuous operation.

Image: Battery level display.
10. Child Lock
To prevent accidental changes to settings or manual operation, the device features a child lock function.
- Activate/Deactivate: Press and hold the '+' and '-' buttons simultaneously for 3 seconds to activate or deactivate the child lock. A lock icon will appear/disappear on the display.

Image: Child lock feature.
11. Irrigation History
The Smart Life/Tuya app keeps a detailed record of all irrigation activities, helping you monitor water usage and avoid operational errors.
- View History: Access the "Irrigation History" or "Statistics" section within the app to view past watering times and durations.

Image: Irrigation history records in the app.
12. Troubleshooting
| Issue | Possible Cause | Solution |
|---|---|---|
| Device not connecting to Wi-Fi | Incorrect Wi-Fi password; Router too far; Only 5GHz Wi-Fi available; Device not in pairing mode. | Ensure correct 2.4GHz Wi-Fi network and password. Move router closer or use a Wi-Fi extender. Re-enter pairing mode (hold Wi-Fi button for 3s). |
| Water not flowing | Faucet not fully open; Low battery; Program not set correctly; Child lock active. | Check faucet is fully open. Replace batteries. Verify schedule settings in app/device. Deactivate child lock (hold +/- for 3s). |
| App language not English | App default language setting. | Check app settings for language options. Some app interfaces might have limited language support. |
| Alexa/Google Home control not working | Incorrect setup in voice assistant app; Device not recognized as a valve controller. | Ensure the device is correctly linked in the Smart Life/Tuya app and then re-sync with Alexa/Google Home. Verify device type in the voice assistant app. |
13. Specifications
| Feature | Detail |
|---|---|
| Brand | MIUCDA |
| Model Number | M-SWT60-EU-WiFi |
| Dimensions | 175 x 92.4 x 50 mm (5 x 9.3 x 17.5 cm) |
| Weight | 520 grams |
| Connectivity | 2.4GHz Wi-Fi (No Gateway Required) |
| App Compatibility | Smart Life / Tuya Smart |
| Voice Control | Alexa, Google Assistant |
| Display | 4.5-inch LCD |
| Watering Modes | Timed (Normal), Cycle (Water & Pause) |
| Max Schedules | Up to 6 per day |
| Rain Delay | Automatic (weather-based), Manual (24/48/72 hours) |
| Waterproof Rating | IP65 |
| Power Source | 4 x 1.5V AA Batteries (included) |
| Faucet Connection | 3/4'' (standard), 1/2'' adapter included |
14. Warranty & Support
For warranty information and technical support, please refer to the contact details provided on the product packaging or visit the official MIUCDA website. Keep your purchase receipt for warranty claims.