Introduction
This manual provides detailed instructions for the installation, operation, and maintenance of your VIPARSPECTRA XS1500 Pro and XS2500 LED Grow Lights. These lights are designed for indoor plant cultivation, providing optimal spectrum and intensity for various growth stages.
Safety Information
- Always disconnect power before installation or maintenance.
- Do not look directly at the LEDs when the light is on.
- Ensure proper ventilation around the fixture.
- This product is for indoor use only. Do not expose to water or high humidity.
- Keep out of reach of children.
Package Contents
- VIPARSPECTRA XS1500 Pro or XS2500 LED Grow Light
- Power Cord
- Hanging Kit (Rope Hangers, Metal Hangers)
- Daisy Chain Cable (for XS2500, or if purchased separately for XS1500 Pro)
- User Manual (this document)
Setup and Installation
Follow these steps to set up your grow light:
- Unpacking: Carefully remove all components from the packaging.
- Attaching Hanging Kit:
Attach the metal hangers to the four corners of the light fixture.
Connect the rope hangers to the metal hangers.

Image: The VIPARSPECTRA grow light suspended by its hanging kit, showing the metal hangers connected to the fixture and the rope hangers extending upwards.
- Mounting: Hang the light securely from a sturdy support structure in your grow area. Ensure the light is level.
- Connecting Power: Plug the power cord into the light fixture, then into a grounded electrical outlet.

Image: Two views of the VIPARSPECTRA grow light. The top view shows the LED board with many small yellow and red diodes. The bottom view shows the heat sink fins and the overall structure of the light.
Recommended Hanging Heights and Coverage
Adjust the hanging height based on the plant's growth stage and light intensity requirements.

Image: A diagram illustrating PAR (Photosynthetically Active Radiation) distribution for the XS1500 Pro in a 2x2 ft grow tent at 12-inch and 14-inch hanging heights. Values in µmol/m²/s are shown across a grid, indicating uniform light penetration.
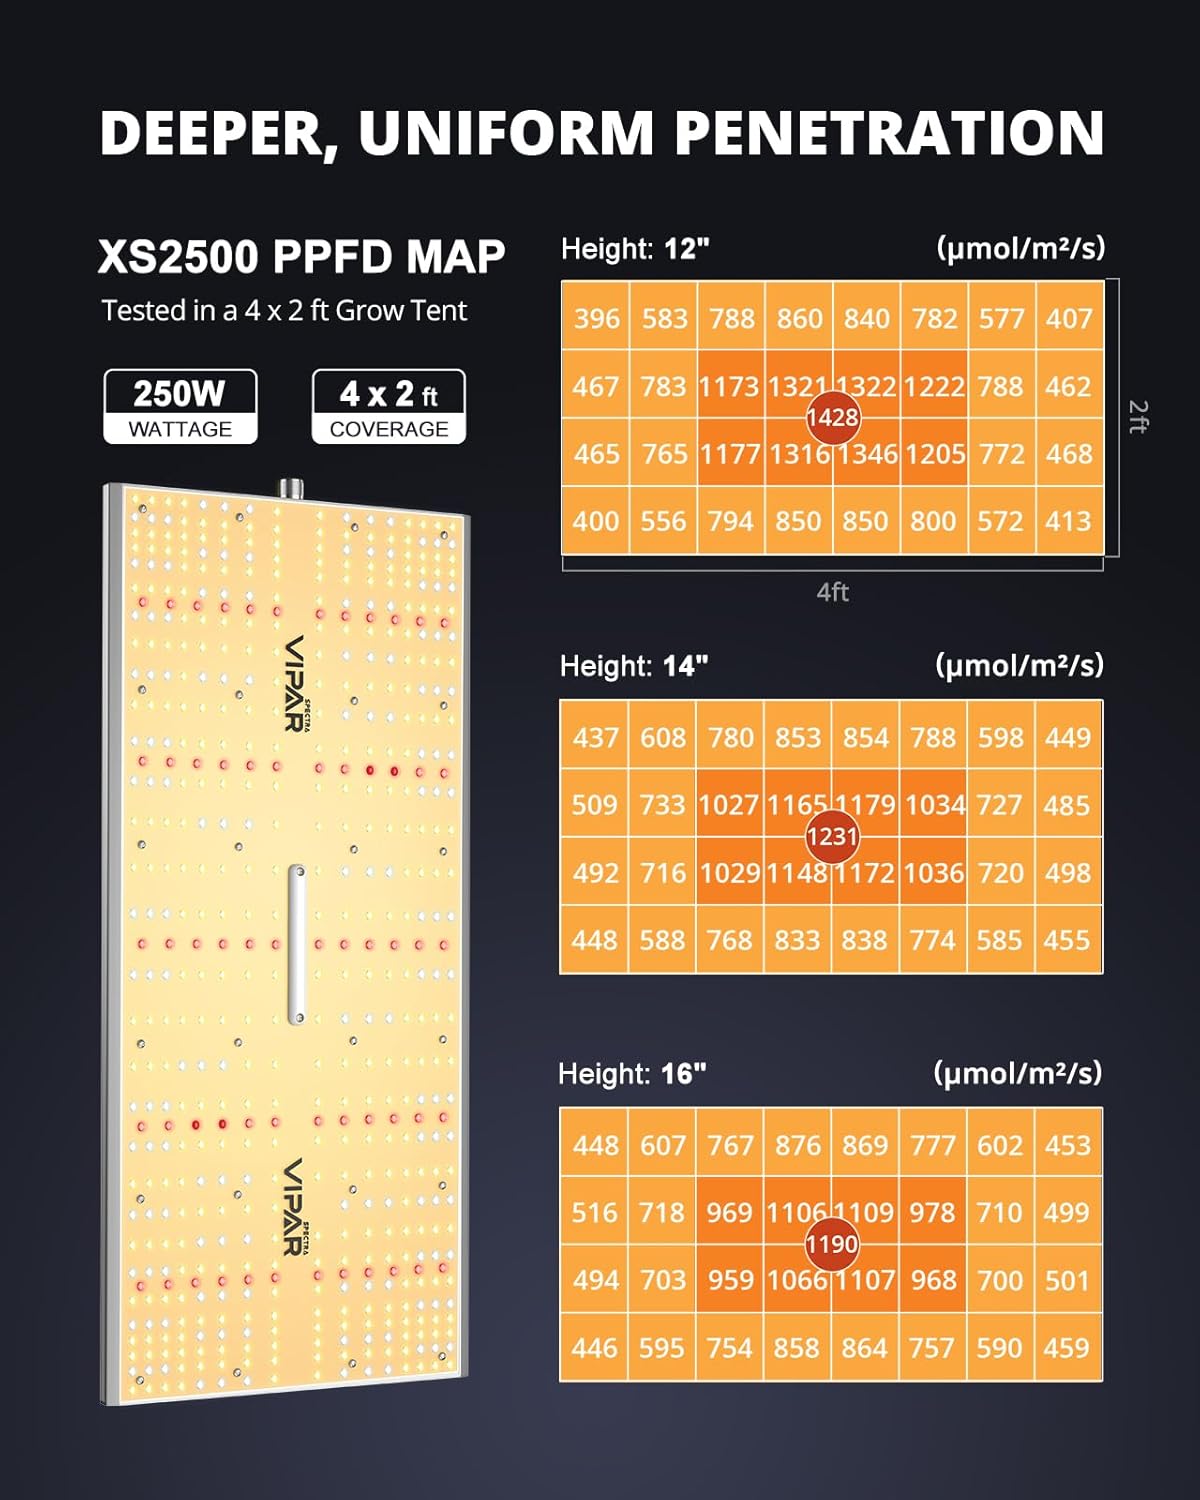
Image: A diagram illustrating PAR (Photosynthetically Active Radiation) distribution for the XS2500 in a 4x2 ft grow tent at 12-inch, 14-inch, and 16-inch hanging heights. Values in µmol/m²/s are shown across a grid, indicating light intensity across the coverage area.
Operating Instructions
Dimming Function
The XS1500 Pro and XS2500 models feature a dimming knob to adjust light intensity from 0% to 100%. Rotate the knob clockwise to increase brightness and counter-clockwise to decrease it.

Image: A close-up of the dimming knob on the grow light, showing markings for 6 levels of brightness from 0% to 100% and an external control option.
Multi-Light Dimming Daisy Chain
For commercial growing or larger setups, you can connect multiple XS1500 Pro or XS2500 lights together for unified dimming control. Up to 20 lights can be daisy-chained.
- Connect the daisy chain cable from the "OUT" port of the first light to the "IN" port of the second light.
- Repeat for additional lights.
- The dimming knob on the first light will control the intensity of all connected lights.

Image: Several VIPARSPECTRA grow lights arranged in a row, demonstrating how they are connected via daisy chain cables for synchronized dimming control.
Maintenance
- Cleaning: Periodically wipe the light fixture with a dry, soft cloth to remove dust and debris. Ensure the light is off and unplugged before cleaning.
- Inspection: Regularly check the power cord and hanging components for any signs of wear or damage.
- Ventilation: Ensure the cooling fins are not obstructed to maintain optimal heat dissipation.
Troubleshooting
| Problem | Possible Cause | Solution |
|---|---|---|
| Light does not turn on | No power supply; Loose connection; Faulty power cord | Check power outlet; Ensure all connections are secure; Try a different power cord |
| Light flickers | Unstable power; Loose connection | Ensure stable power source; Check all connections |
| Dimming function not working | Knob issue; Daisy chain misconfiguration | Ensure knob is not stuck; Recheck daisy chain connections |
Specifications
| Feature | XS1500 Pro | XS2500 |
|---|---|---|
| Power Draw | 150W | 250W |
| Equivalent HPS/MH | 250W | 500W |
| Diodes | Samsung LM301H | Samsung LM301H |
| Voltage | 120 Volts (AC) | 120 Volts (AC) |
| Daisy Chain | Up to 20 units | Up to 20 units |
| Finish Type | Unfinished | Unfinished |
| Shape | Rectangular | Rectangular |
Note: Specifications are subject to change without notice.
Warranty and Support
VIPARSPECTRA products come with a manufacturer's warranty. For specific warranty terms and conditions, please refer to the warranty card included with your product or visit the official VIPARSPECTRA website.
For technical support, troubleshooting assistance, or warranty claims, please contact VIPARSPECTRA customer service.
Contact Information:


