1. Introduction
Thank you for purchasing the SETHDA Portable Solar Radio IS-F10BTS. This versatile device combines an AM/FM/SW radio with a digital Bluetooth speaker, MP3 player, and an integrated LED flashlight. Designed for portability and reliability, it features multiple power options, including solar charging, making it suitable for various outdoor activities, emergencies, or everyday use. Please read this manual thoroughly to understand its functions and ensure proper operation and maintenance.
2. Safety Information
- Do not expose the device to extreme temperatures, direct sunlight for prolonged periods (beyond charging), or high humidity.
- Avoid dropping or subjecting the radio to strong impacts.
- Keep the device away from water and other liquids.
- Do not attempt to disassemble or modify the radio. This will void the warranty and may cause damage or injury.
- Use only the specified battery type (18650 rechargeable lithium battery) or compatible D-cell alkaline batteries.
- When charging, ensure the USB cable is connected correctly to a compatible power source (DC 5V).
- Dispose of batteries according to local regulations.
3. Package Contents
Verify that all items are present in the package:
- 1 x SETHDA Portable Solar Radio (IS-F10BTS)
- 1 x Carrying Strap
- 1 x USB Charging Cable
- 1 x User Manual (this document)
4. Product Overview
The SETHDA Portable Solar Radio IS-F10BTS features a compact design with intuitive controls and multiple functionalities. Refer to the images below for a visual guide to the radio's components.

Figure 4.1: Front and Side View with Labeled Features. This image highlights the external antenna, tuning key, LED switch, LED lights, 5V input, TF card socket, USB interface, volume adjustment button, and media control buttons (previous song, play/pause, next track).

Figure 4.2: Front View of the Radio. This image displays the main speaker grille, the solar panel on top, the tuning dial, volume control knob, and the AM/FM/SW band display.
Key Components:
- Solar Panel: Located on the top for solar charging.
- Telescopic Antenna: Extendable for improved radio reception.
- Tuning Dial: For selecting radio frequencies.
- Volume Knob: Adjusts audio output level.
- Band Selector Switch: Toggles between FM, AM, and SW bands.
- LED Flashlight: Integrated light for illumination.
- USB Port: For charging and USB drive playback.
- TF Card Slot: For Micro SD/TF card playback.
- DC 5V Input: For external power adapter charging.
- Battery Compartment: Houses the rechargeable 18650 battery or optional D-cell batteries.
5. Setup
5.1 Battery Installation
The radio comes with a rechargeable 18650 lithium battery. It can also operate with two D-cell alkaline batteries (not included) as an alternative power source.
- Locate the battery compartment cover on the back of the radio.
- Slide the cover to open it.
- Insert the 18650 rechargeable battery, ensuring correct polarity (+/-). If using D-cell batteries, insert them with correct polarity.
- Close the battery compartment cover securely.
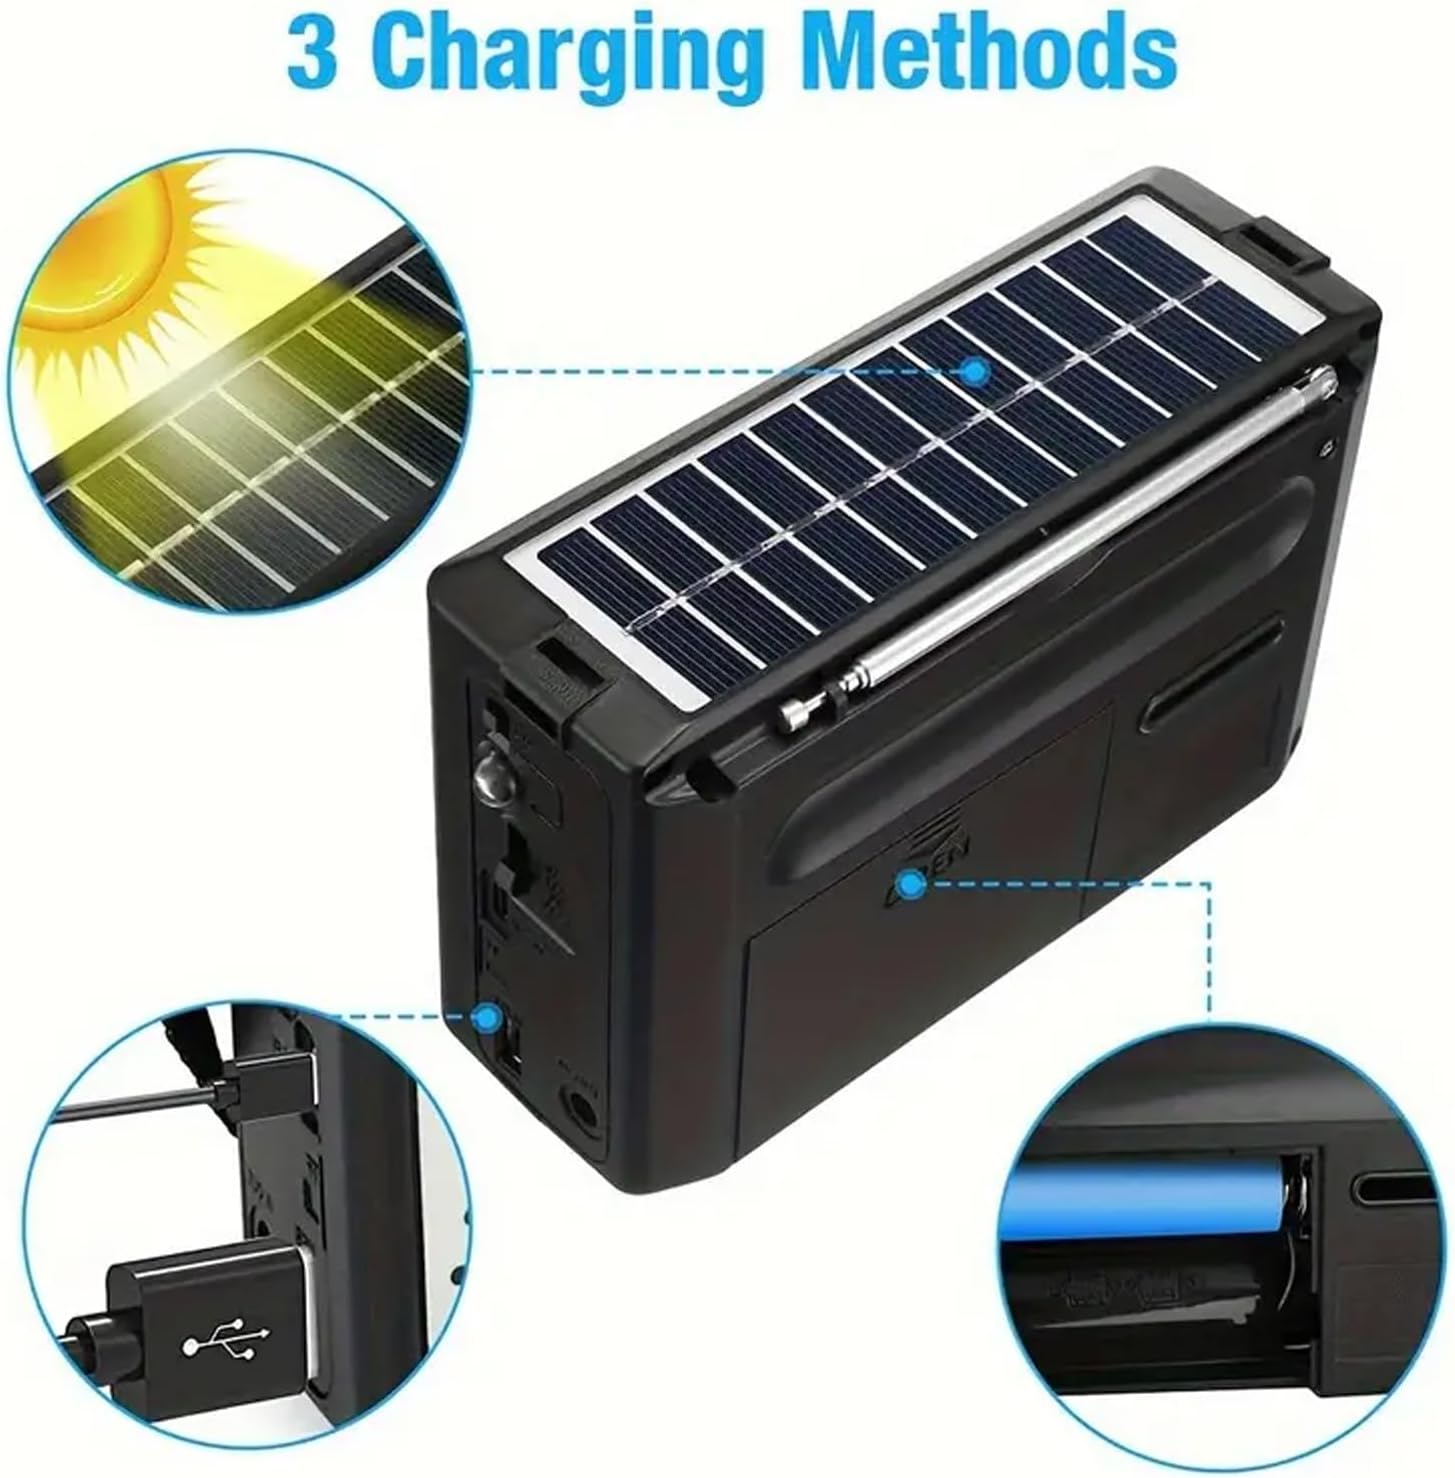
Figure 5.1: Battery Compartment and Charging Options. This image illustrates the open battery compartment with the 18650 battery and USB cable, alongside visual cues for solar and USB charging methods.
5.2 Initial Charging
For optimal performance, fully charge the internal rechargeable battery before first use.
- USB Charging: Connect the provided USB cable to the DC 5V input port on the radio and to a USB power adapter (not included) or a computer USB port. The charging indicator light will illuminate.
- Solar Charging: Place the radio with its solar panel facing direct sunlight. The solar panel will convert sunlight into energy to charge the internal battery. This method is slower than USB charging and is best for maintaining charge or emergency situations.
6. Operating Instructions
6.1 Power On/Off and Volume Control
- To power on the radio, rotate the Volume Knob clockwise from the "OFF" position.
- Continue rotating the knob clockwise to increase the volume. Rotate counter-clockwise to decrease volume.
- To power off, rotate the Volume Knob counter-clockwise until it clicks into the "OFF" position.
6.2 Radio Operation (AM/FM/SW)
- Extend the Telescopic Antenna fully for optimal reception.
- Use the Band Selector Switch to choose between FM, AM, or SW bands.
- Rotate the Tuning Dial to scan for radio stations. The frequency display will indicate the current band and frequency.
- Adjust the antenna position and radio orientation for the clearest signal.
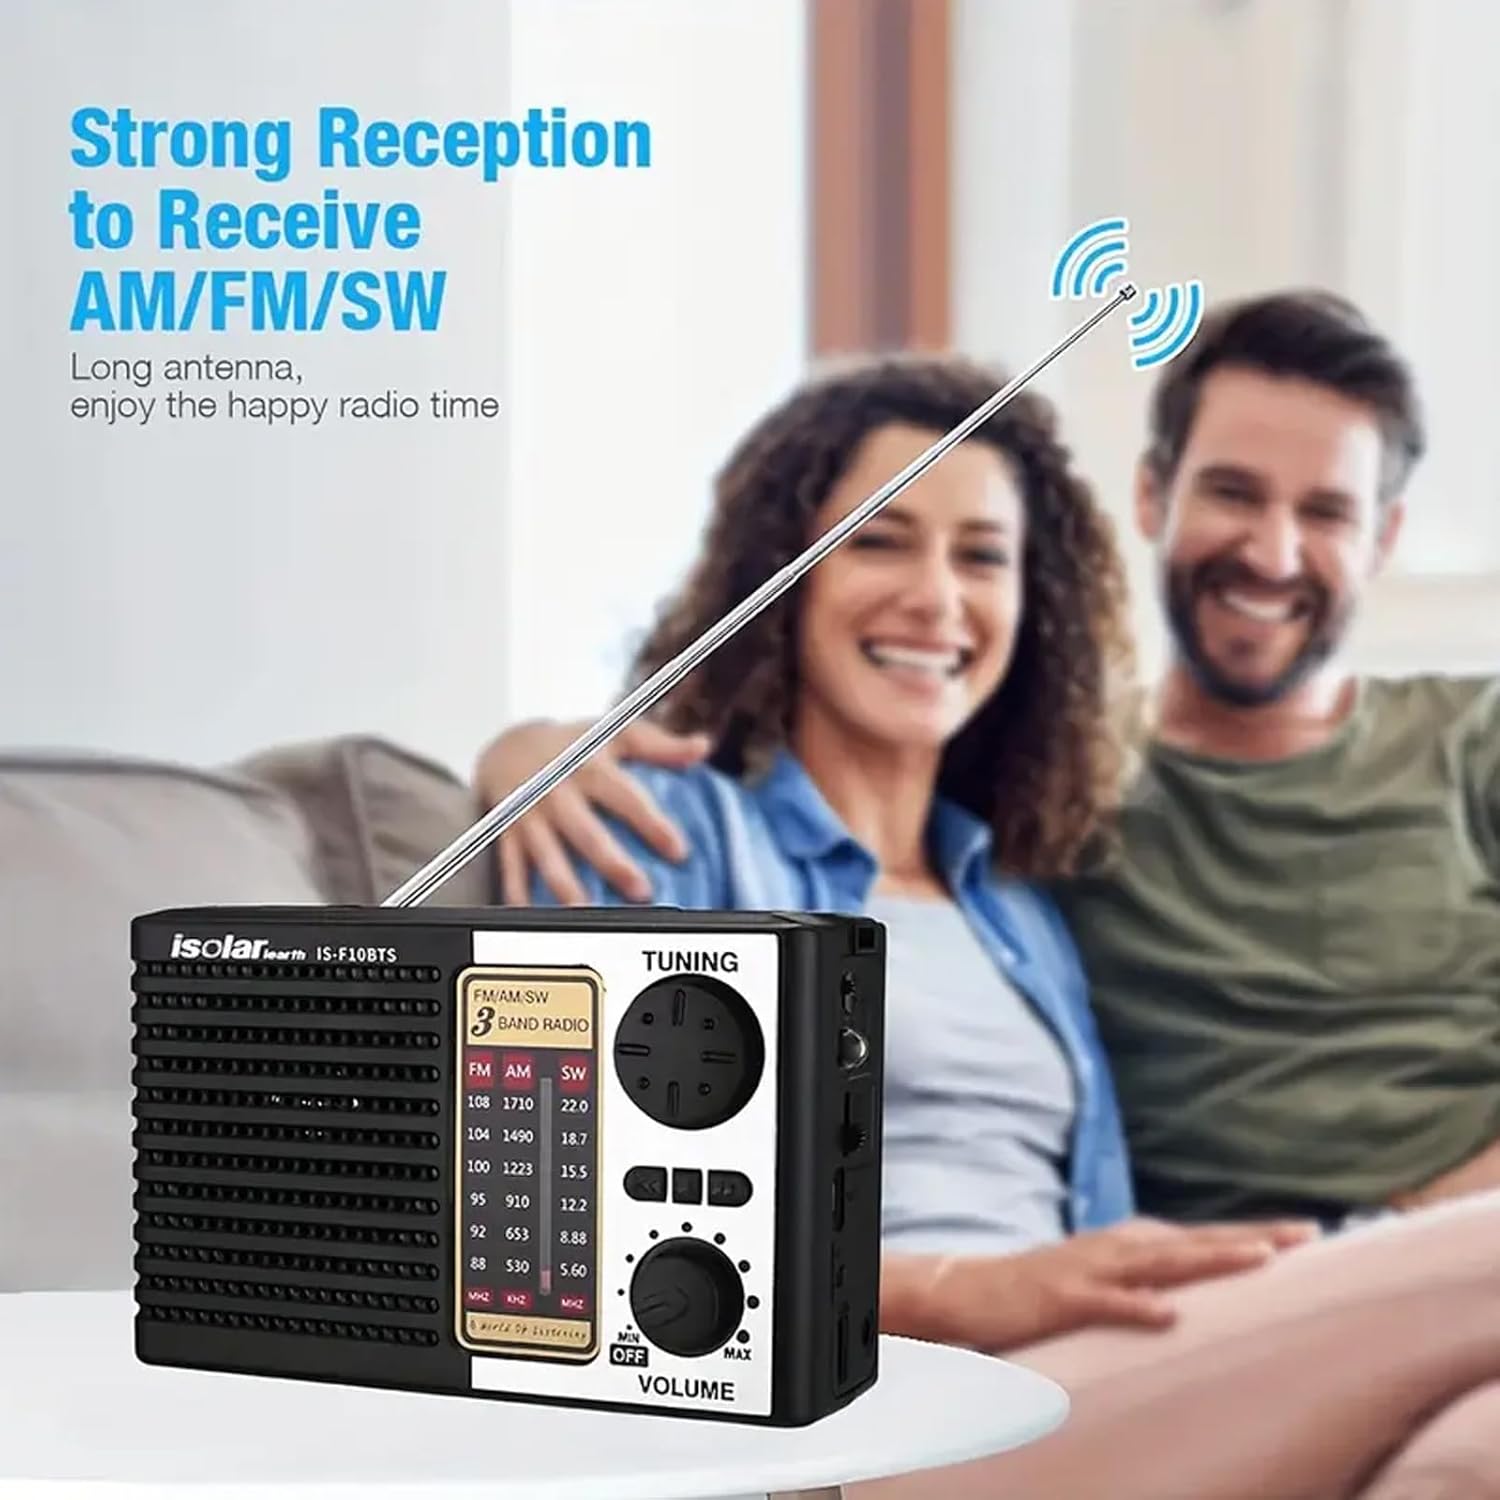
Figure 6.1: Strong Reception with Extended Antenna. This image demonstrates the radio's ability to receive AM/FM/SW signals effectively with its telescopic antenna extended.
6.3 Bluetooth Speaker Function
The radio can connect to Bluetooth-enabled devices for audio streaming.
- Switch the radio to Bluetooth mode (usually indicated by a specific position on the band selector or a dedicated mode button).
- On your mobile device, enable Bluetooth and search for available devices.
- Select "IS-F10BTS" (or similar name) from the list to pair.
- Once paired, you can play audio from your device through the radio's speaker.
6.4 USB/TF Card Playback
The radio supports playing MP3 audio files from a USB drive or TF (Micro SD) card.
- Insert a USB drive into the USB port or a TF card into the TF card slot.
- The radio should automatically switch to MP3 playback mode. If not, use the mode button to select it.
- Use the Previous Song, Play/Pause, and Next Track buttons to control playback.
6.5 LED Flashlight Operation
The integrated LED flashlight provides illumination.
- Locate the LED Switch on the side of the radio.
- Slide the switch to the "ON" position to activate the flashlight.
- Slide the switch to the "OFF" position to turn off the flashlight.
7. Charging
The SETHDA Portable Solar Radio offers multiple charging methods to ensure continuous power.
Figure 7.1: Three Charging Methods. This image visually explains the solar charging, USB charging, and the use of a detachable battery for power.
7.1 Solar Charging
- Place the radio in direct sunlight with the solar panel facing upwards.
- The solar panel will automatically begin charging the internal 18650 battery.
- Solar charging is ideal for outdoor use and maintaining battery life, but it is slower than USB charging.
7.2 USB Charging
- Connect the small end of the provided USB cable to the DC 5V input port on the radio.
- Connect the standard USB end to a USB power adapter (e.g., phone charger, computer USB port, power bank).
- The charging indicator light will show the charging status.
7.3 D-Cell Battery Power (Alternative)
- In situations where the rechargeable battery is depleted and other charging methods are unavailable, you can power the radio using two D-cell alkaline batteries.
- Open the battery compartment and insert the D-cell batteries with correct polarity.
- Note: D-cell batteries are not rechargeable within the device. Remove them when not in use for extended periods.
8. Maintenance
- Cleaning: Wipe the radio with a soft, dry cloth. Do not use abrasive cleaners or solvents.
- Storage: Store the radio in a cool, dry place when not in use. If storing for a long period, ensure the rechargeable battery has some charge and consider removing D-cell batteries if used.
- Antenna Care: Handle the telescopic antenna gently to prevent bending or breaking.
9. Troubleshooting
| Problem | Possible Cause | Solution |
|---|---|---|
| Radio does not turn on. | Battery is depleted or incorrectly installed. | Charge the internal battery via USB or solar. Check battery polarity. If using D-cells, replace them. |
| Poor radio reception. | Antenna not extended, weak signal area, interference. | Fully extend the telescopic antenna. Rotate the radio for better signal. Try a different location. |
| Bluetooth not connecting. | Radio not in Bluetooth mode, device not discoverable, too far apart. | Ensure radio is in Bluetooth mode. Make sure your device's Bluetooth is on and discoverable. Move devices closer. |
| USB/TF card not playing. | Incorrect file format, card/drive not inserted correctly, radio not in MP3 mode. | Ensure files are MP3 format. Reinsert USB drive/TF card. Select MP3 mode. |
| Flashlight not working. | Battery depleted, LED switch off. | Charge the battery. Ensure the LED switch is in the "ON" position. |
10. Specifications
- Model: IS-F10BTS
- Brand: SETHDA
- Type: FM/AM/SW Radio
- Bluetooth: Bluetooth 5.0
- Solar Panel: 6V 1W
- Radio Frequency Range:
- AM: 520kHz - 1610kHz
- FM: 88MHz - 108.0MHz
- SW: 3.20MHz - 22MHz
- Battery: Rechargeable Lithium Battery (5V/1200mAh 18650 type)
- Alternative Power: 2 x D Cell Alkaline batteries (not included)
- Size: 16.2 x 10.2 x 6.5 cm (approximately 6.38 x 4.02 x 2.56 inches)
- Working Time: 3-5 hours (depending on usage)
- Output Power: 2W
- Input Voltage: DC 5V
- Speaker Specification: 3 INCH, 4OHM, 3W
- Signal-to-Noise Ratio: 75 dB
- Flashlight: Bright 1 LED (40-45 lumen 0.5W)
- Main Functions: Bluetooth, USB, TF card, LED lighting, FM/AM/SW radio, solar charging.
11. Warranty and Support
This product comes with a standard manufacturer's warranty. For specific warranty details, please refer to the product packaging or contact your retailer. For technical support or inquiries, please reach out to SETHDA customer service through the contact information provided at the point of purchase or on the official SETHDA website.