1. Setup and Assembly
Before beginning assembly, ensure all parts are present and undamaged. Refer to the parts list provided in your packaging. A screwdriver is required for assembly.
1.1 Unpacking and Part Identification
Carefully unpack all components and lay them out on a clean, soft surface to prevent scratches. Identify each part using the provided labels and diagrams.
1.2 Assembly Steps
Follow the step-by-step instructions in the assembly video. Pay close attention to the orientation of each panel and the correct hardware for each connection.
Video 1: Detailed assembly guide for the Gyfimoie Corner Cabinet. This video demonstrates the step-by-step process of putting together the cabinet components, including attaching panels, installing hardware, and securing the structure.
Video 2: Alternative assembly walkthrough for the Corner Kitchen Pantry Cabinet. This video provides another perspective on the assembly process, highlighting key connections and ensuring proper construction.
1.3 Anti-Tip Device Installation
For safety, it is crucial to install the anti-tip device. Secure the cabinet to the wall using the provided hardware to prevent accidental tipping. This is especially important in households with children or pets.

Image: Thoughtful Anti-Tip Device. This diagram illustrates the correct method for attaching the cabinet to the wall using the anti-tip device, ensuring stability and safety, particularly for homes with children.
1.4 Adjustable Shelves
The cabinet features adjustable shelves. Insert the shelf pins into the desired holes on the side panels, then place the shelves on top of the pins. This allows for customized storage space to accommodate items of various sizes.

Image: Adjustable Layer Board. This image shows the groove design with two adjustable heights for flexible placement of daily necessities, allowing users to customize shelf spacing.
2. Operating Instructions
2.1 Opening and Closing Doors
Gently pull the handles to open the cabinet doors. Ensure the doors are fully closed after use to keep contents secure and dust-free. The doors feature magnetic catches for secure closure.
2.2 Adjusting Shelves
To adjust a shelf, remove all items from the shelf. Lift the shelf to remove it from the pins. Relocate the pins to the desired height and then place the shelf back onto the pins, ensuring it is level and secure.
2.3 Utilizing Door-Side Racks
The cabinet includes two 3-layer door-side storage racks. These are ideal for smaller items such as spice bottles, condiments, or small jars. The second shelf on these racks is also adjustable in height.

Image: Diversified Storage Spaces. This image displays the interior of the cabinet, showcasing various items like cans, bottles, and snacks stored on the main shelves and within the convenient door-side racks.
3. Maintenance
3.1 Cleaning
Wipe the cabinet surfaces with a soft, damp cloth. Avoid using harsh chemicals or abrasive cleaners, as these can damage the finish. Dry immediately with a clean cloth.
3.2 General Care
Avoid placing hot items directly on the cabinet surface. Use coasters or protective pads. Keep the cabinet away from direct sunlight and excessive moisture to prevent warping or discoloration of the engineered wood.
3.3 Anti-Tip Device Check
Periodically check the anti-tip device to ensure it remains securely fastened to both the cabinet and the wall. Tighten any loose screws as needed.
4. Troubleshooting
4.1 Doors Not Aligning
If doors do not align perfectly, check the hinge screws. Loosen them slightly, adjust the door position, and then retighten. Ensure the cabinet is on a level surface.
4.2 Cabinet Instability
Ensure the cabinet is placed on a flat, level surface. Verify that all assembly screws are tightened. Confirm the anti-tip device is correctly installed and securely anchored to the wall.
4.3 Missing or Damaged Parts
If any parts are missing or damaged upon arrival, do not proceed with assembly. Contact customer support immediately for assistance.
5. Specifications
| Feature | Detail |
|---|---|
| Brand | Gyfimoie |
| Model Name | Pantry Cabinet |
| Item Model Number | Cabinet-100413A1 |
| Color | White |
| Product Dimensions | 23.62"D x 23.62"W x 70.39"H |
| Material | Engineered Wood |
| Item Weight | 106.7 Pounds |
| Number of Shelves | 3 (Adjustable) |
| Number of Compartments | 5 |
| Mounting Type | Floor Mount |
| Installation Type | Freestanding |
| Assembly Required | Yes |
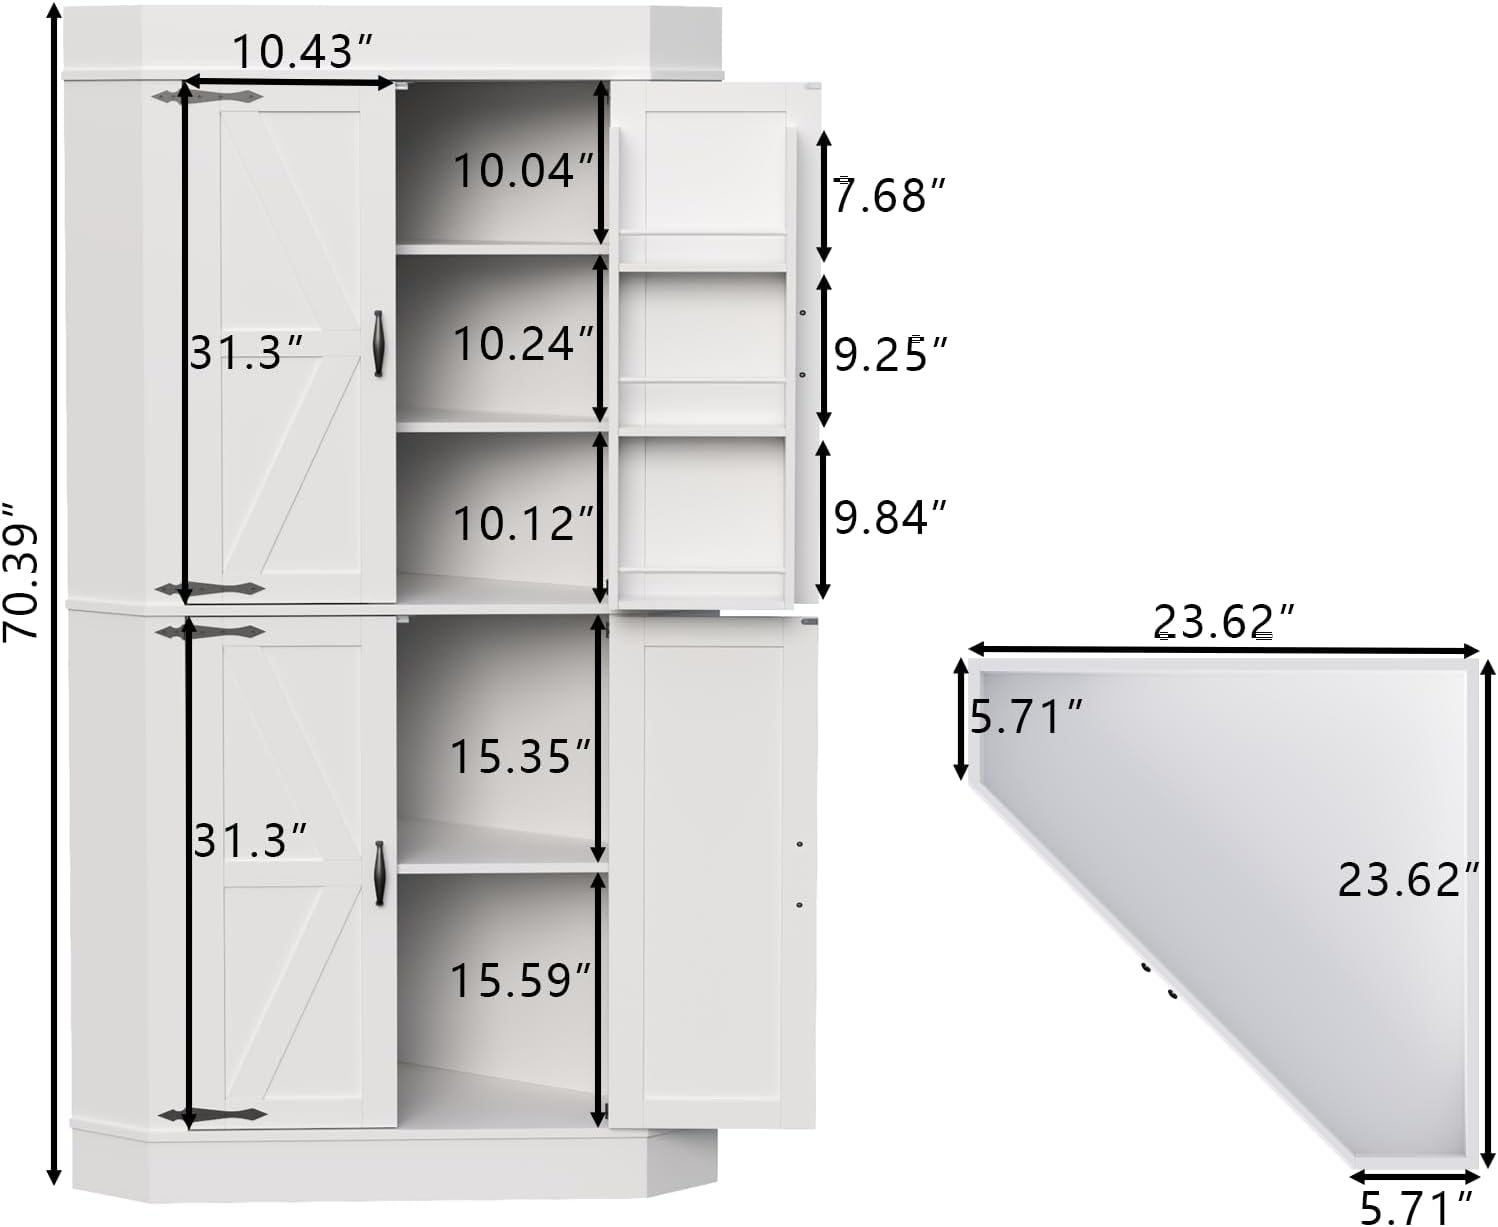
Image: Product Dimensions. This image provides a detailed diagram of the cabinet's dimensions, including the overall height, width, and depth, as well as internal shelf measurements.
6. Warranty Information
For detailed warranty information regarding your Gyfimoie Corner Cabinet, please refer to the documentation included with your purchase or visit the official Gyfimoie website. Warranty terms and conditions may vary.
7. Customer Support
If you have any questions, require assistance with assembly, or need to report missing/damaged parts, please contact Gyfimoie customer support. You can find contact information on the official Gyfimoie website or through your retailer.
Visit the official Gyfimoie Store for more products and support resources.