1. Introduction
This manual provides essential information for the safe and effective operation of your H HZXVOGEN HVT250P Aluminum AC/DC TIG Welder. Please read this manual thoroughly before operating the equipment to ensure proper usage, prevent injury, and maintain the welder's performance. Keep this manual for future reference.

Image 1.1: The H HZXVOGEN HVT250P AC/DC TIG Welder, showcasing its front panel, TIG torch, ground clamp, and various consumables.
2. Safety Information
Welding operations involve significant risks. Adhere to all safety precautions to prevent electric shock, burns, fire, and other hazards. Always wear appropriate personal protective equipment (PPE), including welding helmet, gloves, protective clothing, and safety shoes.
- Electric Shock: Ensure the welder is properly grounded. Do not touch live electrical parts. Work in a dry environment.
- Fumes and Gases: Provide adequate ventilation to remove welding fumes and gases from the work area.
- Arc Rays: The welding arc produces intense visible and invisible (UV and IR) rays that can burn eyes and skin. Always use a welding helmet with the correct shade filter.
- Fire and Explosion: Remove all flammable materials from the welding area. Have a fire extinguisher readily available.
- Hot Parts: Welded materials and equipment parts can remain hot for an extended period. Use insulated gloves when handling.
3. Product Overview and Features
The HVT250P is a versatile 6-in-1 multiprocess TIG welder designed for various welding applications. It supports AC TIG, DC TIG, AC Pulse TIG, DC Pulse TIG, AC Pulse TIG Square, and Stick (MMA) welding modes. This unit features dual voltage input (110V/220V) and an IGBT inverter for stable performance.
Key Features:
- Multiprocess Capability: Offers AC TIG, DC TIG, AC Pulse TIG, DC Pulse TIG, AC Pulse TIG Square, and Stick welding.
- Dual Voltage: Operates on both 110V and 220V power supplies.
- Advanced Waveform Technology: Includes pulse and square waveforms to minimize material burnout and distortion, especially beneficial for thin metals.
- Digital Parameter Control: MCU digital control system for precise adjustment of welding parameters like Pre-flow, Post-flow, AC frequency, AC balance, and pulse settings.
- High-Frequency (HF) Start: Ensures non-contact arc ignition for clean starts.
- Efficient Heat Dissipation: Equipped with fan cooling and IGBT technology for prolonged operation.
- Large LCD Display: Provides clear visibility of welding parameters and settings.

Image 3.1: Visual representation of the HVT250P's multi-process capabilities, including TIG AC Square, TIG AC Pulse Square, TIG DC Pulse, TIG DC, and MMA (Stick) welding modes.

Image 3.2: An internal diagram of the HVT250P welder, highlighting its IGBT technology, smooth arc, cooling fan, and amorphous transformer for efficient heat dissipation.
4. Setup
4.1 Unpacking and Inspection
Carefully unpack the welder and all accessories. Inspect for any shipping damage. Report any damage to the carrier immediately. Ensure all components listed in the packing list are present.

Image 4.1: The HVT250P welder shown with its standard accessories, including the TIG torch, ground clamp, gas hose, and various consumables.
4.2 Power Connection
The HVT250P supports dual voltage input (110V/220V). Connect the power cable to an appropriate power source. Ensure the power outlet is properly grounded and can supply the necessary current for welding operations.
- For 110V operation, use the appropriate plug adapter if necessary.
- For 220V operation, ensure the correct plug is used.
4.3 Gas Connection (TIG Welding)
For TIG welding, an inert shielding gas (typically Argon) is required. Connect the gas hose from your gas cylinder regulator to the gas inlet on the rear panel of the welder.
- Securely attach the gas regulator to your Argon cylinder.
- Connect one end of the gas hose to the regulator's output.
- Connect the other end of the gas hose to the "Gas Inlet" port on the welder's rear panel.
- Ensure all connections are tight to prevent gas leaks.
- Set the gas flow rate according to the welding parameters (refer to Section 6.2).

Image 4.2: The rear panel of the HVT250P, indicating the gas inlet, power cable connection, and cooling fan.
4.4 Torch and Ground Clamp Connection
Connect the TIG torch and ground clamp to the appropriate terminals on the front panel.
- TIG Torch: Connect the TIG torch cable to the designated TIG torch connector. Ensure the gas line from the torch is also connected.
- Ground Clamp: Connect the ground clamp cable to the appropriate output terminal. For DC TIG, the ground clamp is typically connected to the positive (+) terminal, and the torch to the negative (-) terminal (DCEN - Direct Current Electrode Negative). For AC TIG, the polarity alternates.
- Foot Pedal (Optional): If using a foot pedal (not included), connect it to the 5-pin foot pedal interface on the front panel.
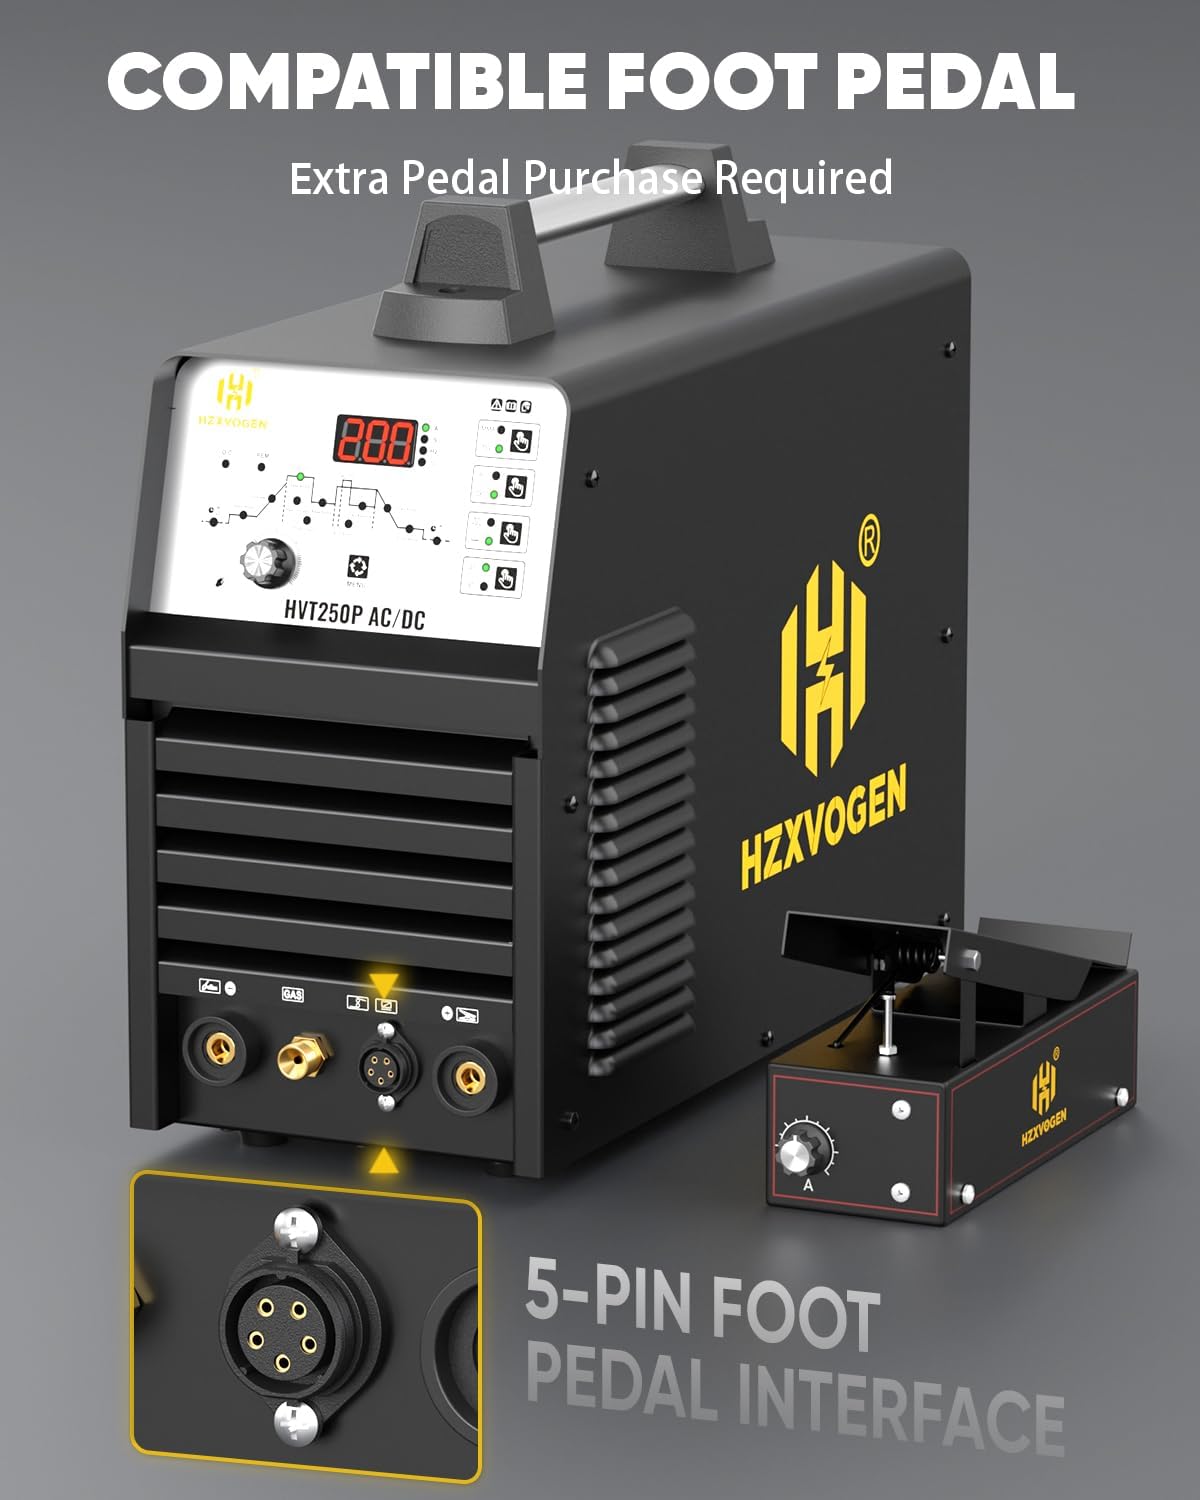
Image 4.3: The HVT250P welder showing the 5-pin foot pedal interface for optional remote control.
5. Operating Modes and Panel Controls
The HVT250P features an intuitive control panel for selecting welding modes and adjusting parameters.
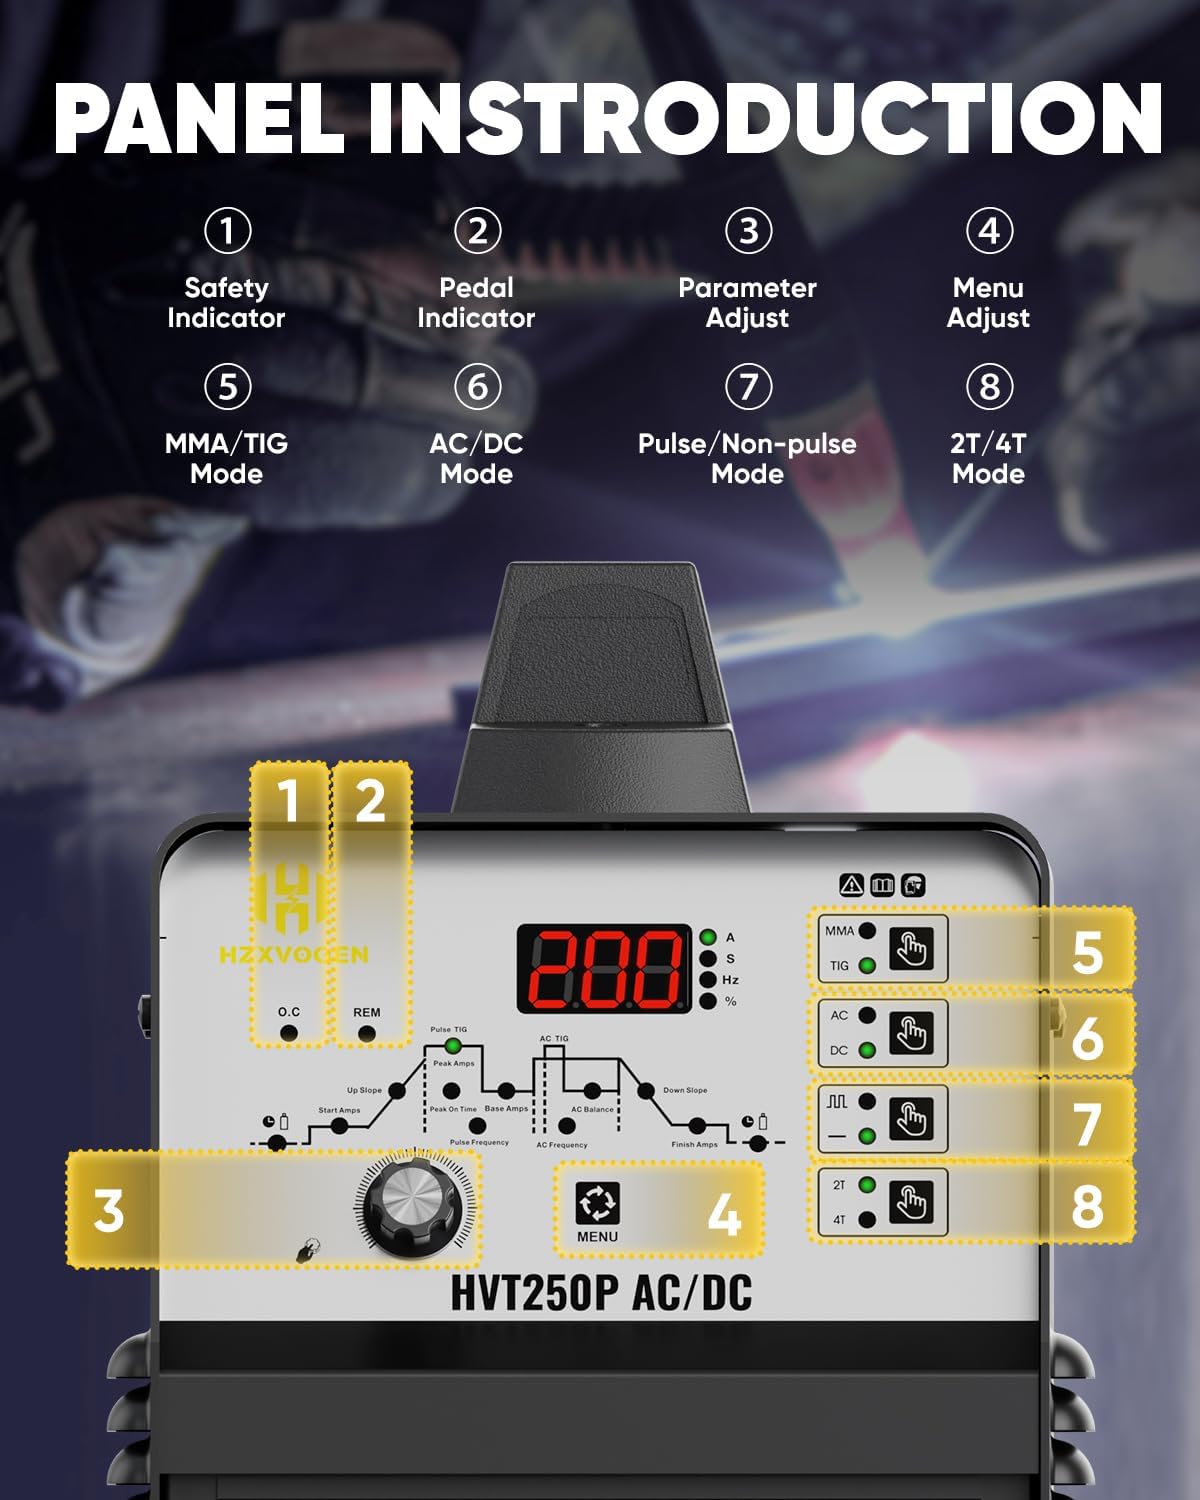
Image 5.1: Detailed view of the HVT250P control panel with numbered indicators for various functions.
- Safety Indicator: Illuminates to indicate a safety alert or fault.
- Pedal Indicator: Illuminates when an optional foot pedal is connected and active.
- Parameter Adjust Knob: Used to adjust selected welding parameters.
- Menu Adjust Button: Cycles through available parameters for adjustment.
- MMA/TIG Mode Button: Selects between Stick (MMA) and TIG welding modes.
- AC/DC Mode Button: Selects between AC and DC current for TIG welding.
- Pulse/Non-pulse Mode Button: Toggles between standard TIG and Pulse TIG modes.
- 2T/4T Mode Button: Selects between 2-stroke (2T) and 4-stroke (4T) torch trigger control.
5.1 Welding Modes
- AC TIG: Ideal for welding aluminum alloys, magnesium alloys, and other non-ferrous metals. The square waveform provides a stable arc and effective oxide cleaning.
- DC TIG: Suitable for welding stainless steel, carbon steel, copper, and other ferrous metals. Offers precise low-temperature control.
- Pulse TIG (AC/DC): Reduces heat input, minimizes distortion, and is excellent for welding thin materials.
- Stick (MMA) Welding: For general-purpose welding with coated electrodes.
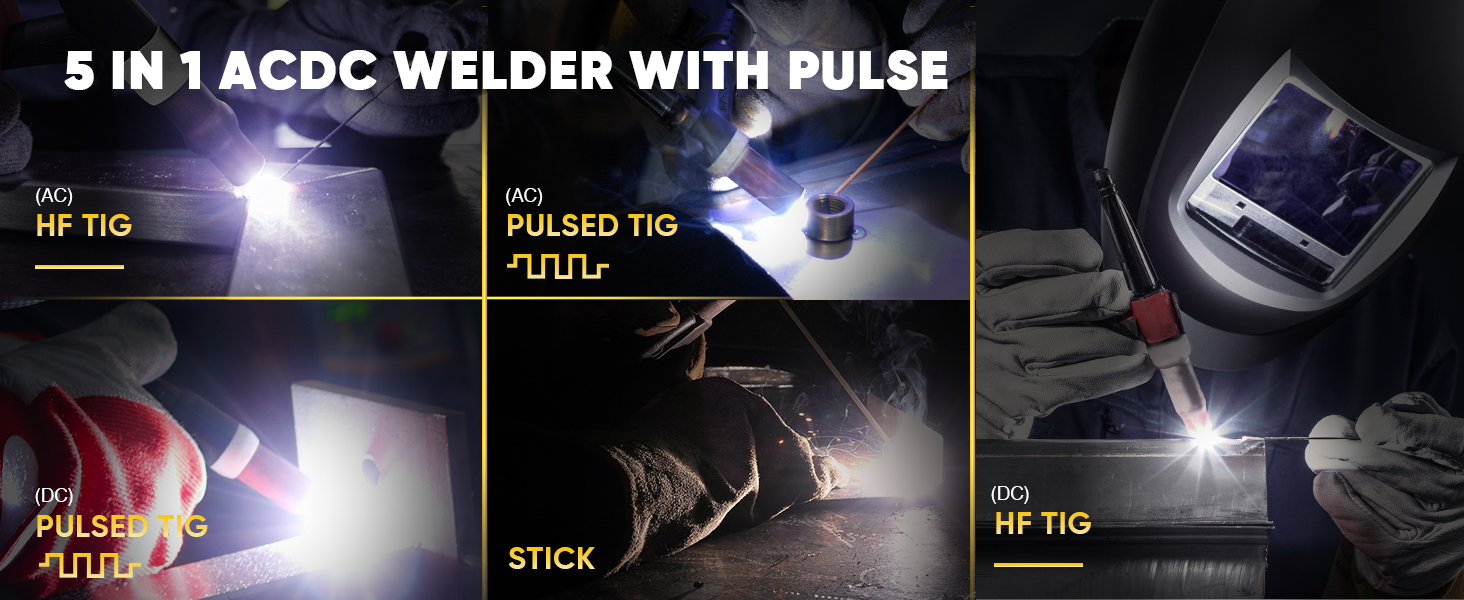
Image 5.2: Visual examples of the various welding processes supported by the HVT250P, including AC TIG, Pulsed TIG (AC and DC), Stick, and DC TIG.
6. Parameter Settings
The HVT250P allows for fine-tuning of various welding parameters to achieve optimal results for different materials and thicknesses.

Image 6.1: A diagram illustrating the various TIG welding parameters that can be adjusted, such as Pre-flow, Up-slope, Peak Amps, Base Amps, Down-slope, Post-flow, Pulse Frequency, AC Frequency, and AC Balance.
6.1 Adjustable Parameters:
- Pre-flow: Duration of gas flow before arc ignition.
- Initial Current: Starting current for the weld.
- Up-slope: Time taken for current to rise from initial to peak current.
- Peak Current: Maximum welding current.
- Base Current: Minimum current during pulse welding.
- Down-slope: Time taken for current to fall from peak to crater current.
- Crater Current: Final current before arc extinction.
- Post-flow: Duration of gas flow after arc extinction to protect the weld pool.
- Pulse Duty: Percentage of time spent at peak current during pulse welding.
- AC Frequency: Controls the arc cone and cleaning action in AC TIG.
- AC Balance: Adjusts the ratio of electrode negative to electrode positive in AC TIG, affecting cleaning and penetration.
- Pulse Frequency: Number of pulses per second in pulse welding.
6.2 Recommended Welding Parameters
The following table provides general guidelines for welding parameters. Actual settings may vary based on specific materials, joint configurations, and operator skill.
| Material | Mode | Material Thickness | Amps | Filler Metal | Filler Metal Diameter | Gas Flow Rate | Pre Flow | Post Flow | AC Balance |
|---|---|---|---|---|---|---|---|---|---|
| Aluminum | AC | 1/25" 1.0mm | 45-60 | 4043 | 1/16" 1.6mm | 15% | 0.4s | 5s | 25% |
| 1/16" 1.6mm | 55-75 | 17% | |||||||
| 3/32" 2.4mm | 70-100 | 3/32" 2.4mm | 21% | ||||||
| 1/8" 3.2mm | 90-140 | ||||||||
| Stainless Steel | DC | 1/16" 1.6mm | 50-90 | ER308/308L | 1/16" 1.6mm | 12% | / | ||
| 3/32" 2.4mm | 80-120 | 14% | |||||||
| 1/8" 3.2mm | 85-140 | 3/32" 2.4mm | |||||||
| Steel | DC | 1/16" 1.6mm | 45-80 | ER70S-2 | 1/16" 1.6mm | 12% | 0.4s | 5s | / |
| 3/32" 2.4mm | 70-125 | 14% | |||||||
| 1/8" 3.2mm | 110-200 | 3/32" 2.4mm |
Image 6.2: A table providing recommended welding parameters for Aluminum, Stainless Steel, and Steel across different thicknesses and modes.
7. Maintenance
Regular maintenance ensures the longevity and safe operation of your welder.
- Cleaning: Periodically clean the welder's exterior with a dry cloth. Use compressed air to blow out dust and debris from inside the machine, especially around cooling vents. Ensure the power is disconnected before cleaning.
- Cable Inspection: Regularly inspect all cables (power, torch, ground) for cuts, cracks, or damaged insulation. Replace damaged cables immediately.
- Torch Consumables: Check and replace TIG torch consumables (collets, collet bodies, ceramic nozzles, tungsten electrodes) as they wear out.
- Gas Connections: Verify that all gas connections are secure and free of leaks.
- Storage: Store the welder in a clean, dry environment when not in use.
8. Troubleshooting
This section addresses common issues you might encounter during operation.
| Problem | Possible Cause | Solution |
|---|---|---|
| Welder does not power on. | No power supply; power switch off; circuit breaker tripped. | Check power connection; turn on power switch; reset circuit breaker. |
| No arc in TIG mode. | No gas flow; incorrect gas pressure; faulty torch connection; ground clamp not properly attached; tungsten electrode not installed or contaminated. | Check gas supply and flow rate; ensure torch and ground clamp are securely connected; inspect and replace tungsten electrode if necessary. |
| Poor weld quality (porosity, unstable arc). | Insufficient shielding gas; contaminated base metal; incorrect welding parameters (current, speed); improper tungsten preparation. | Increase gas flow; clean base metal thoroughly; adjust welding parameters; regrind tungsten electrode. |
| Overheating indicator active. | Exceeded duty cycle; blocked cooling vents; high ambient temperature. | Allow welder to cool down; clear any obstructions from cooling vents; operate in a well-ventilated area. |
9. Specifications
Below are the technical specifications for the H HZXVOGEN HVT250P TIG Welder.
- Model: HVT250P
- Input Voltage: 110V/220V Dual Voltage
- Welding Current: Up to 200A
- Welding Processes: AC TIG, DC TIG, AC Pulse TIG, DC Pulse TIG, AC Pulse TIG Square, Stick (MMA)
- Technology: IGBT Inverter, HF Start, Square Wave
- Aluminum Thickness Capacity: 0.5mm to 5mm (1/5" to 1.97")
- Metal Thickness Capacity (General): Up to 10mm (3.94")
- Display: LCD Digital Display
- Parcel Dimensions: 56 x 48 x 37 cm
- Item Weight: 17.2 kg (37.9 lbs)
- Manufacturer: H HZXVOGEN

Image 9.1: A visual representation of the HVT250P welder's dimensions and weight, indicating its portability.
10. Warranty and Support
The H HZXVOGEN HVT250P TIG Welder is backed by a 2-Year quality support warranty. For technical assistance, warranty claims, or service inquiries, please contact H HZXVOGEN customer support through their official channels or the retailer where the product was purchased.
Ensure you have your purchase receipt and product model number (HVT250P) available when contacting support.