1. Introduction
This manual provides detailed instructions for the safe and effective use of your CWOVRS Fixed-Angle Knife Sharpening System, Model BY-200S. This system is designed to provide precise and consistent sharpening for various types of knives, utilizing a quick-clamp design and a selection of diamond and water stones.
2. Safety Information
- Always handle knives with extreme care. Blades are sharp and can cause serious injury.
- Ensure the sharpening system is securely clamped to a stable surface before use.
- Keep fingers away from the blade edge during sharpening. The handle is positioned to minimize hand contact with the blade.
- Wear appropriate protective gloves if desired.
- Keep the sharpening system out of reach of children.
- Do not use damaged or broken sharpening stones. Contact support for replacements if necessary.
3. Package Contents
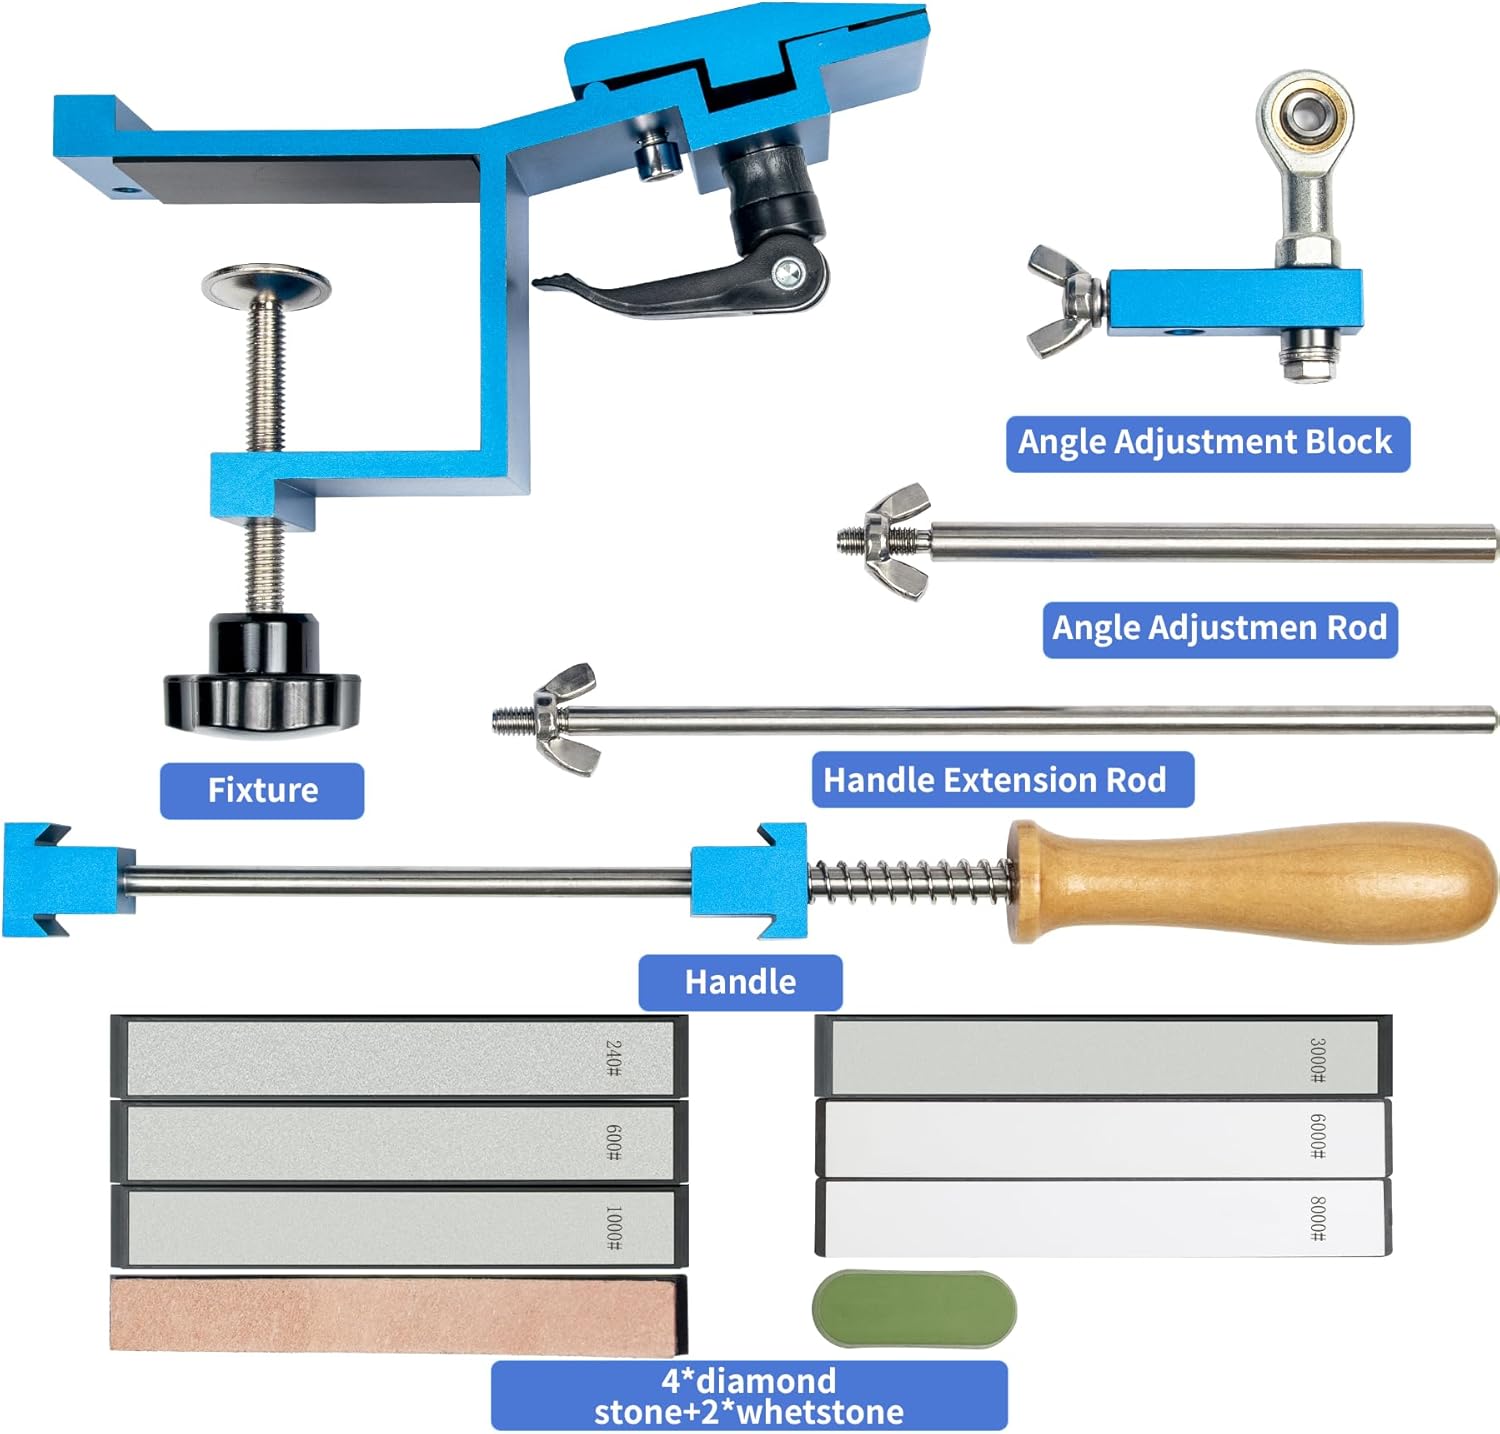
Verify that all components are present in your CWOVRS Fixed-Angle Knife Sharpening System kit:
- Main Fixture with Quick-Clamp
- Angle Adjustment Block
- Angle Adjustment Rod
- Handle Extension Rod
- Handle
- 4 Diamond Sharpening Stones (various grits)
- 2 Water Sharpening Stones (various grits)
- Leather Strop
- Polishing Paste
4. Setup
Follow these steps to assemble and prepare your sharpening system:
- Secure the Main Fixture: Place the main fixture on a stable table or countertop. Use the quick-clamp mechanism to firmly attach it. Ensure the anti-slip silicone gasket on the desktop-fix position prevents wobbling.
- Install the Angle Adjustment Rod: Insert the Angle Adjustment Rod into the designated slot on the main fixture.
- Attach the Angle Adjustment Block: Slide the Angle Adjustment Block onto the Angle Adjustment Rod. This block allows for flexible angle adjustment. There are two installation methods for the block to achieve low or high angles.
- Assemble the Handle: Connect the Handle Extension Rod to the Handle.
- Select and Insert Sharpening Stone: Choose the appropriate sharpening stone based on the knife's condition (see Section 5.2 for grit guide). Insert the stone into the abrasive holding system on the handle. The system can clamp two stones of the same size simultaneously.


5. Operating Instructions
Achieving a sharp edge requires careful attention to angle and technique.
5.1. Clamping the Knife
- Open the blade clamping device by pulling the quick-release wrench.
- Insert the knife blade into the clamp. The soft silicone gasket protects the blade from scratching.
- Release the quick-release wrench to securely fix the blade. The device raises automatically, simplifying blade fixation without additional tools.
5.2. Setting the Sharpening Angle
The system allows for precise angle adjustment. You can use a digital angle finder (not included) or a smartphone app to verify the angle.
- Adjust the height of the rectangular squares on the vertical rod to achieve your desired sharpening angle.
- Place an angle measuring device on the knife blade to confirm the angle.

5.3. Sharpening Process
Always start with a coarser grit stone and progress to finer grits. Water stones require soaking before use, while diamond stones can be used dry or with a small amount of water.
- Prepare Stones: If using water stones, soak them in water for 5-10 minutes until no more bubbles appear. Diamond stones can be used dry or with water.
- Coarse Grinding (240#, 600#): For repairing damaged blades or establishing a new edge. Use the coarse diamond stones (240#, 600#) with firm, consistent pressure, moving the stone along the blade edge.
- Medium Grinding (1000#, 3000#): To refine the edge. Progress to finer diamond stones (1000#) and then water stones (3000#). Reduce pressure as you move to finer grits.
- Fine Grinding and Polishing (6000#, 8000#): For a razor-sharp finish. Use the fine water stones (6000#, 8000#) with light pressure.
- Stropping: Apply polishing paste to the leather strop. Use light, backward strokes (away from the edge) to remove any burrs and achieve a mirror polish.

6. Maintenance
- Cleaning Stones: After each use, clean the sharpening stones with water and a brush to remove metal particles. Allow them to air dry completely before storage.
- Cleaning System: Wipe down the metal components of the sharpening system with a damp cloth to remove any residue. Dry thoroughly.
- Storage: Store the sharpening system and stones in a dry, safe place to prevent damage and corrosion.
7. Troubleshooting
- Stones Sliding in Clamp: Ensure the stones are correctly seated and the clamp is tightened sufficiently. If using two stones, they must be of the same size for a secure fit.
- Difficulty Maintaining Angle: Double-check that the angle adjustment block is securely fastened and the main fixture is stable. Use a digital angle finder or smartphone app to consistently verify your angle.
- Knife Not Getting Sharp: Ensure you are using the correct grit progression (coarse to fine). Verify the sharpening angle is appropriate for your knife type. Apply consistent, even pressure.
- Broken Whetstones: The whetstones are fragile. If any arrive broken or break during normal use, please contact CWOVRS customer support for replacements.
8. Specifications
| Feature | Specification |
|---|---|
| Model Number | BY-200S |
| Material | 304 Stainless Steel, ABS, Stones |
| Color | Blue |
| Product Dimensions | 13.3"L x 7.09"W x 2.6"H |
| Item Weight | 2.31 pounds |
| Grit Types Included | Extra Coarse, Coarse, Medium, Fine, Ultra Fine (240#, 600#, 1000#, 3000#, 6000#, 8000#) |
9. Warranty and Support
For information regarding product warranty, returns, or technical support, please refer to the contact information provided with your purchase or visit the official CWOVRS website. Please retain your proof of purchase for warranty claims.