1. Introduction
This manual provides detailed instructions for the setup, operation, and maintenance of your AHXJKA 15.6-inch Portable Touchscreen Monitor (Model S150T). Please read this manual thoroughly before using the product to ensure proper functionality and to maximize your user experience.

Image: The AHXJKA 15.6-inch Portable Touchscreen Monitor in use, displaying a media player. The monitor is set up on its smart cover case, acting as a stand.
2. Key Features
- 15.6-inch Full HD Touch Screen: Features a 1920x1080 resolution with touch capability, providing an interactive display.
- IPS/HDR Technology: Equipped with IPS and HDR for vibrant colors and wide viewing angles.
- Lightweight and Durable: Weighs approximately 1.74 lbs and includes a smart cover case for portability and protection.
- Versatile Connectivity: Includes two Type-C ports, a mini HDMI port, and a 3.5mm audio jack for connecting to various devices.
- Built-in Speakers: Equipped with 8Ω/1W*2 speakers for integrated audio.

Image: Visual representation of the monitor's display characteristics, highlighting brightness, contrast, color depth, low blue light feature, and wide viewing angle.

Image: Examples of the monitor's versatile applications, including collaborative work, financial analysis, and gaming entertainment.
3. What's in the Box
Verify that all items are present in the package:
- AHXJKA Portable Monitor
- Monitor Stand (Smart Cover Case)
- User Manual
- Mini HDMI to HDMI Cable
- Type-C to Type-C Cable

Image: All components included in the AHXJKA Portable Monitor package.
4. Setup and Connection
The AHXJKA portable monitor offers multiple connection options for various devices. Ensure your device supports the necessary output for video and touch functionality.
4.1. Connectivity Overview

Image: Overview of available cables and connection methods for laptops.

Image: Detailed view of the monitor's ports and controls, indicating compatibility with smartphones, tablets, laptops, PCs, Switch, Camera, Xbox, Raspberry Pi, and Computer.
4.2. Enabling Touch Functionality
For touch functionality, a specific USB-C connection is required in addition to the video signal. Ensure any protective film is removed from the screen for optimal touch response.
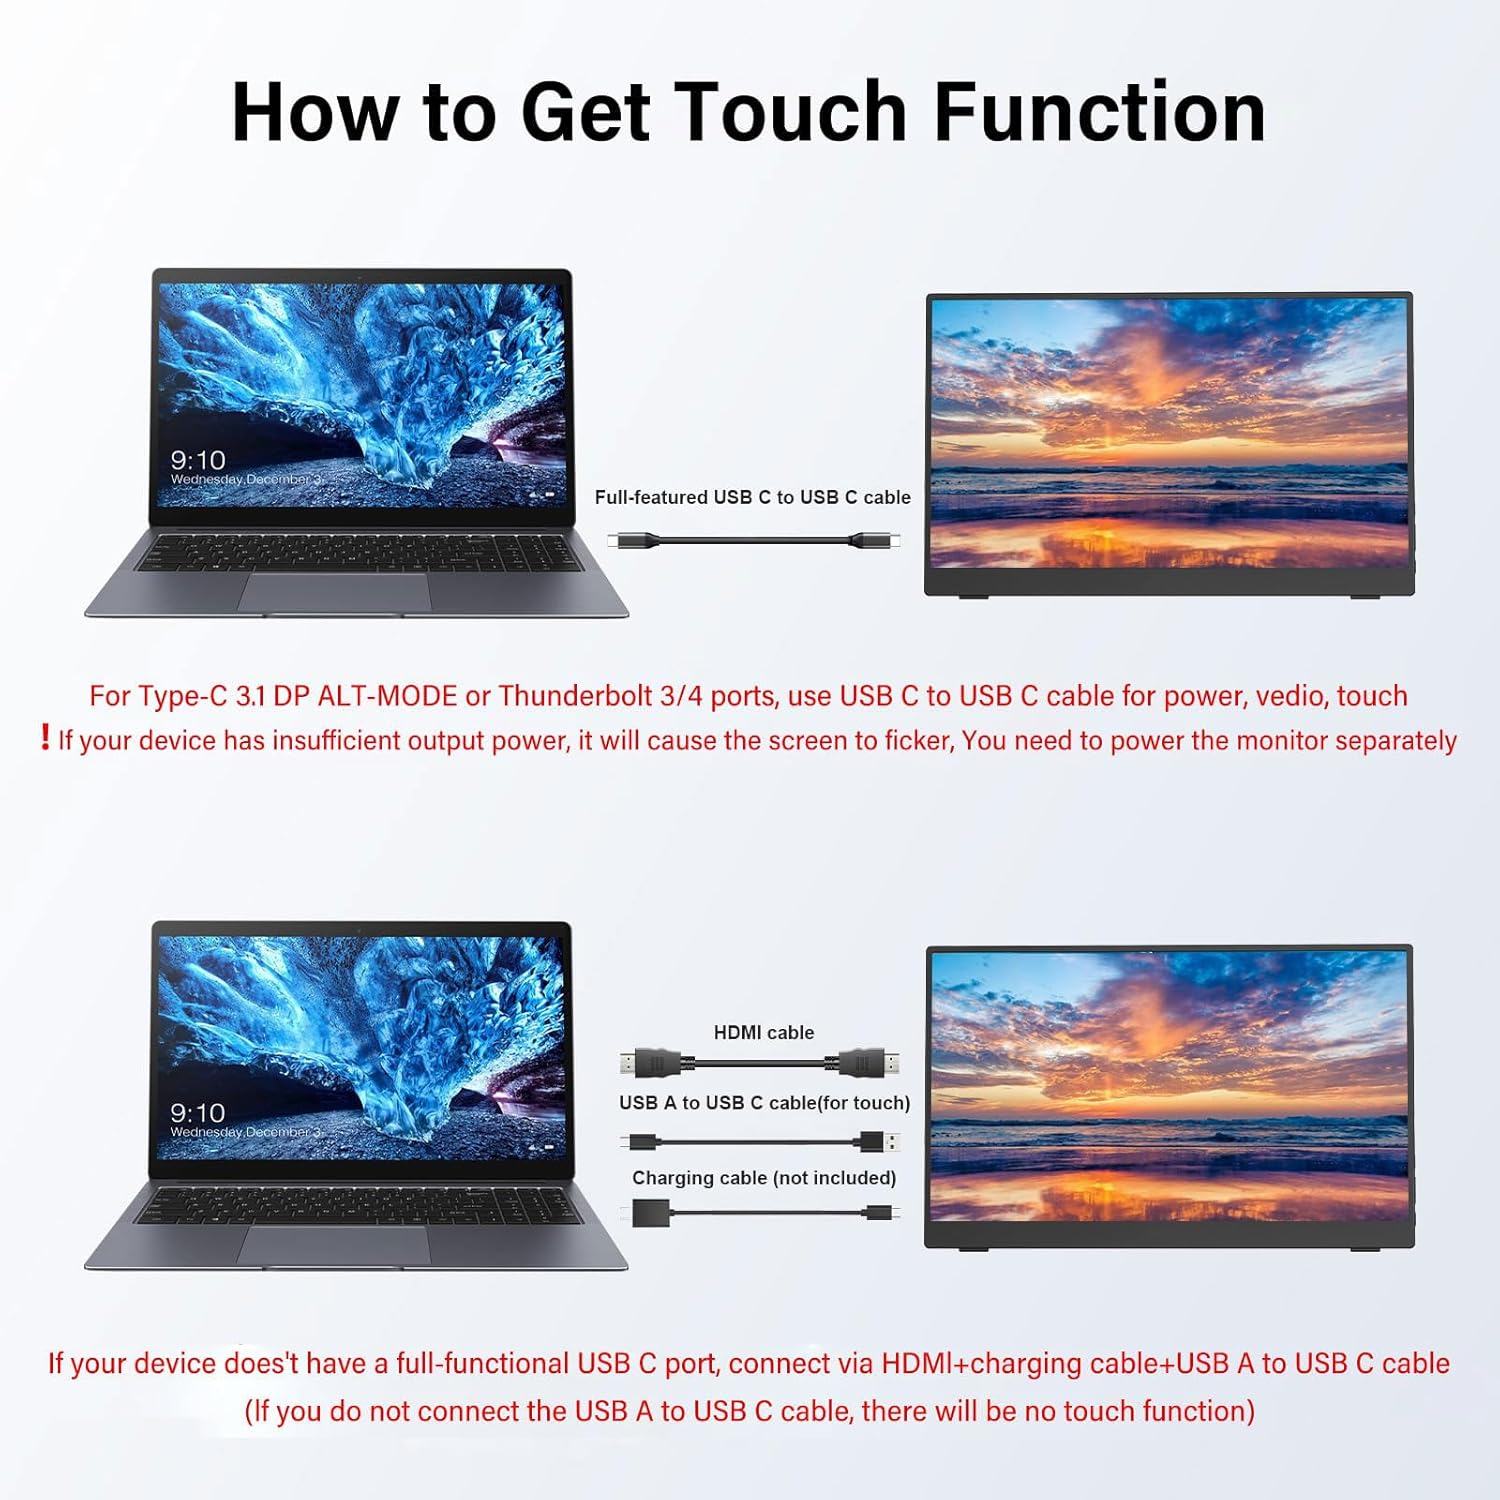
Image: Instructions for enabling touch functionality via USB-C or HDMI with a separate USB-A to USB-C cable.
4.3. Connection Methods
Below are common connection methods for your portable monitor:
4.3.1. HDMI Connection (for Video)
Connect the monitor to your laptop or PC using the Mini HDMI to HDMI cable for video output. For touch functionality, an additional USB-A to Type-C cable must be connected from your computer to the monitor's Type-C port. Power can be supplied via a separate USB-A to Type-C cable connected to a power adapter or your computer's USB port.
Video: Demonstrates connecting the monitor to a laptop via HDMI for video and a USB-A to Type-C cable for touch input, along with a separate power connection.
4.3.2. Type-C Connection (Full-Featured)
If your device (laptop, smartphone, or tablet) has a full-featured USB-C port (supporting DisplayPort Alt Mode and power delivery), you can connect it to the monitor using a single Type-C to Type-C cable. This cable will transmit video, audio, touch data, and power simultaneously. If your device's USB-C port does not provide sufficient power, you may need to connect an additional USB-A to Type-C cable to a power adapter for external power.
Video: Illustrates connecting the monitor to a laptop using a single Type-C cable for video, touch, and power, and also shows phone connection.
4.3.3. Smartphone Connection
For smartphones with full-featured USB-C ports, connect using a Type-C to Type-C cable. This enables screen mirroring or extended display with touch functionality. Ensure your phone supports video output over USB-C. If the phone cannot power the monitor, use an external power source connected to the monitor's charging port.
Video: Demonstrates connecting a smartphone to the portable monitor via a Type-C cable, showcasing screen mirroring and touch interaction.
5. Operating Instructions
5.1. Power On/Off and Menu Navigation
- Power Button/Return: Press and hold to power the monitor on or off. During menu navigation, a short press acts as a 'Return' or 'Back' function.
- MENU Button: Press to access the On-Screen Display (OSD) menu.
- Adjustments: To adjust brightness, press the Power Button/Return upwards. To adjust volume, press downwards. If both need simultaneous adjustment, adjust one first, then use the MENU button to switch to the other setting.
5.2. Touchscreen Functions
The monitor supports multi-touch gestures for intuitive interaction:
- Single Touch: Tap to select or activate items.
- Multi-Touch: Use multiple fingers for specific actions (e.g., two-finger scroll).
- Slide Control: Drag a finger across the screen to scroll or move items.
- Zoom Control: Use a pinch-to-zoom gesture with two fingers to enlarge or reduce content.

Image: Illustration of ten-point touch capabilities and various control gestures.

Image: Demonstrates touch, click, enlarge, and pinch gestures on the monitor.
6. Maintenance and Care
- Cleaning the Screen: Use a soft, lint-free cloth slightly dampened with water or a screen cleaner. Avoid harsh chemicals, alcohol, or abrasive materials.
- Cleaning the Casing: Wipe the monitor casing with a soft, dry cloth.
- Storage: When not in use, store the monitor in its protective smart cover case to prevent scratches and damage. Avoid exposing it to extreme temperatures or humidity.
- Handling: Handle the monitor with care. Avoid dropping it or applying excessive pressure to the screen.
7. Troubleshooting
If you encounter issues with your monitor, refer to the following common solutions:
- No Signal/Black Screen:
- Ensure all cables (HDMI, Type-C) are securely connected to both the monitor and the source device.
- Verify the source device is powered on and configured to output video to an external display.
- Check if the monitor is receiving sufficient power. Connect an external power adapter if using HDMI or if the Type-C source cannot provide enough power.
- Try a different cable or port on both the monitor and the source device.
- Touch Function Not Working:
- Ensure the correct USB-C connection for touch data is established (either a full-featured Type-C cable or a separate USB-A to Type-C cable for touch).
- Remove any screen protectors that may interfere with touch sensitivity.
- Verify that your source device (laptop, phone) supports touch input to an external monitor and that the necessary drivers are installed (for Windows PCs).
- Ensure the monitor is receiving adequate power.
- Flickering Screen:
- This often indicates insufficient power. Connect the monitor to an external power adapter using the provided USB-A to Type-C charging cable.
- Ensure the video cable is not damaged and is properly connected.
- No Audio:
- Check the monitor's volume settings via the OSD menu.
- Ensure your source device's audio output is directed to the external monitor.
- If using the 3.5mm audio jack, ensure headphones or speakers are properly connected.
- Image Quality Issues (Blurry, Distorted):
- Adjust the resolution and refresh rate settings on your source device to match the monitor's native resolution (1920x1080).
- Check the video cable for damage or loose connections.
8. Specifications
| Brand | AHXJKA |
| Model Number | S150T |
| Screen Size | 15.6 Inches |
| Resolution | 1920 x 1080 Pixels (FHD 1080p) |
| Aspect Ratio | 16:9 |
| Panel Type | IPS |
| HDR Support | Yes |
| Touchscreen | Yes (10-point touch) |
| Image Brightness | 250 cd/m² |
| Contrast Ratio | 1000:1 |
| Color Depth | 16.7 Million Colors |
| Screen Surface | Matte |
| Product Dimensions | 0.4 x 8.69 x 13.9 inches |
| Item Weight | 3.39 pounds |
| Built-in Speakers | 8Ω/1W*2 |
| Connectivity | 2x Type-C (Full-featured), 1x Mini HDMI, 1x 3.5mm Audio Jack |
9. Warranty and Support
For warranty information and technical support, please refer to the warranty card included in your product packaging or contact AHXJKA customer service through the official channels provided at the time of purchase. Please have your model number (S150T) and purchase details ready when contacting support.