1. Introduction
This manual provides comprehensive instructions for the safe and effective use, installation, and maintenance of your KAKA Industrial BS-1018R Hydraulic Cylinder. This hydraulic cylinder is designed to regulate the descent rate of the saw arm on compatible metal cutting band saws, enhancing cutting precision and operational safety. Please read this manual thoroughly before operating the equipment to ensure proper function and to prevent injury or damage.
2. Safety Information
Always prioritize safety when working with machinery. Failure to follow safety guidelines can result in serious injury or equipment damage.
- Read the Entire Manual: Understand all instructions and warnings before installation or operation.
- Wear Personal Protective Equipment (PPE): Always wear appropriate safety glasses, gloves, and other necessary protective gear.
- Ensure Stable Installation: The hydraulic cylinder must be securely mounted according to the band saw manufacturer's specifications.
- Inspect Before Use: Check for any signs of damage, leaks, or loose connections before each operation.
- Do Not Exceed Rated Capacity: Use the hydraulic cylinder only within its specified operational parameters.
- Keep Clear of Moving Parts: Ensure hands and clothing are clear of the saw blade and other moving components during operation.
3. Product Overview
The KAKA Industrial BS-1018R Hydraulic Cylinder is a precision component designed to provide controlled descent for the cutting head of a metal band saw. It features a robust construction with integrated hydraulic lines and a control valve for adjusting the feed rate.

Figure 3.1: KAKA Industrial BS-1018R Hydraulic Cylinder in its retracted position, showing the main body, piston rod, hydraulic lines, and control valve assembly.

Figure 3.2: KAKA Industrial BS-1018R Hydraulic Cylinder in its fully extended position, illustrating the full stroke capability.

Figure 3.3: Close-up view of the hydraulic cylinder's control valve assembly, used for adjusting the descent speed of the saw arm.
4. Specifications
The following are the key specifications for the KAKA Industrial BS-1018R Hydraulic Cylinder:
| Feature | Measurement |
|---|---|
| Hydraulic Cylinder Diameter | 2.36" (60mm) |
| Total Length (Retracted) | 11.8" (300mm) |
| Total Length (Extended) | 17.32" (440mm) |
| Hydraulic Rod Length (Extended) | 6.8" (175mm) |
| Piston Rod Diameter | 0.6" (16mm) |
| Mounting Hole Diameter (Cylinder Body) | 0.78" (20mm) |
| Mounting Hole Diameter (Piston Rod) | 0.47" (12mm) |
| Stroke | 5.5" (140mm) |
| Net Weight / Gross Weight | 4.3 kg / 5 kg (approx. 9.5 lbs / 11 lbs) |
| Product Dimensions | 14 x 5.5 x 4.5 inches |
| Power Source | Hydraulic |
| Color | Black |

Figure 4.1: Detailed dimensional diagram of the hydraulic cylinder in both retracted and extended states.
Note: The BS-1018R model differs from the BS1018B hydraulic cylinder in the angle of the installation hole at the cylinder body and the length of the connected hose. Ensure compatibility with your specific band saw model.
5. Setup and Installation
Proper installation is crucial for the safe and effective operation of the hydraulic cylinder. Refer to your band saw's instruction manual for specific mounting points and procedures.
5.1 Pre-Installation Checks
- Verify that the hydraulic cylinder is the correct model for your band saw.
- Inspect the cylinder for any shipping damage, leaks, or missing components.
- Ensure all mounting hardware (not included with cylinder) is available and compatible with the specified mounting hole diameters.
5.2 Installation Steps
- Secure the Band Saw: Ensure the band saw is powered off, unplugged, and secured against accidental movement.
- Remove Old Cylinder (if applicable): Carefully detach and remove any existing hydraulic cylinder or dampening mechanism.
- Mount the Cylinder Body: Attach the cylinder body to the designated mounting point on the band saw frame using appropriate bolts and washers. Ensure a secure fit. The mounting hole diameter for the cylinder body is 0.78" (20mm).
- Connect the Piston Rod: Connect the piston rod end to the saw arm's attachment point. The mounting hole diameter for the piston rod is 0.47" (12mm).
- Verify Connections: Double-check all connections for tightness and ensure hydraulic lines are not kinked or obstructed.
- Test Movement: Manually raise and lower the saw arm to ensure smooth, unobstructed movement of the hydraulic cylinder.
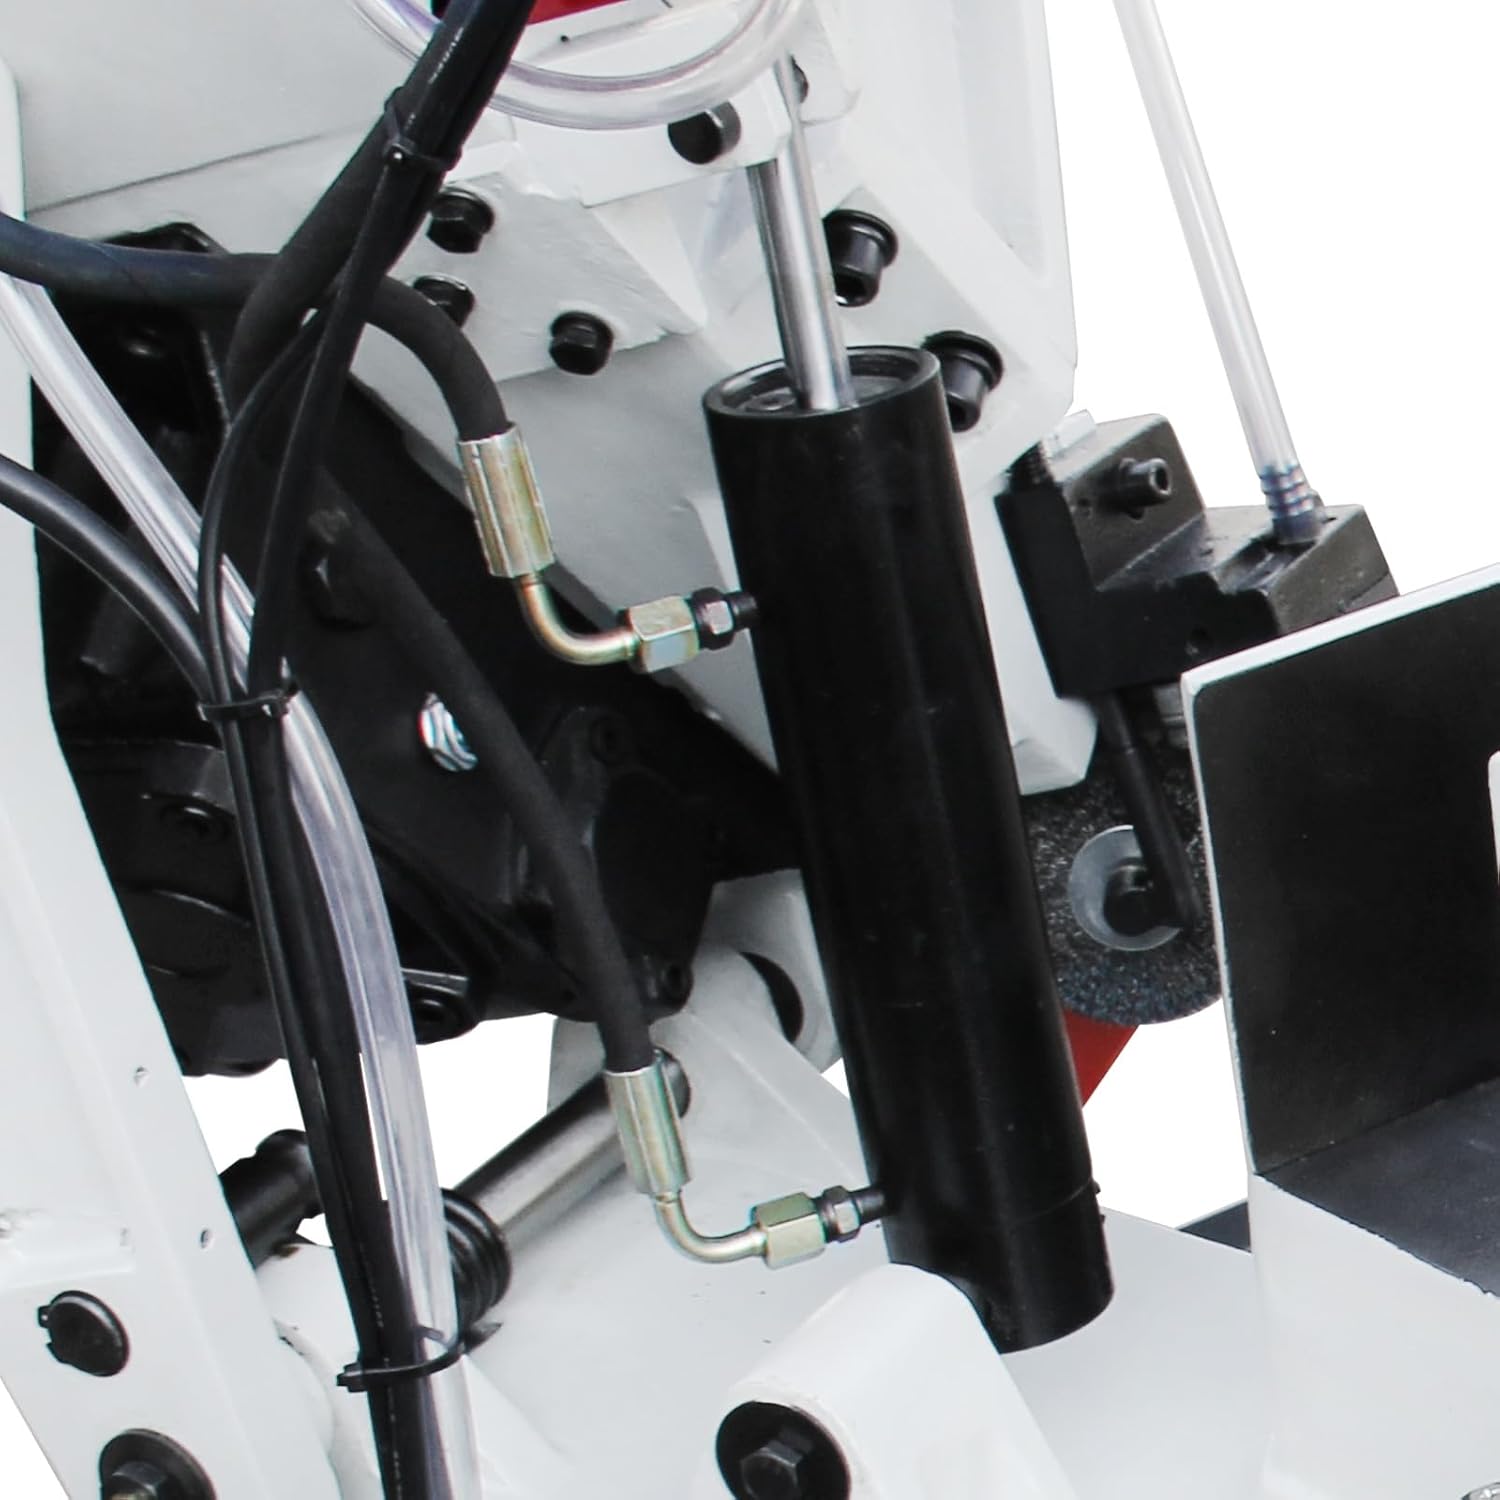
Figure 5.1: The hydraulic cylinder shown installed on a typical metal cutting band saw, demonstrating its position relative to the saw arm.
6. Operating Instructions
The hydraulic cylinder controls the descent rate of the band saw's cutting head. Adjusting this rate is essential for optimal cutting performance and blade longevity.
6.1 Adjusting Descent Rate
- Locate the control valve assembly on the hydraulic cylinder (refer to Figure 3.3).
- The control valve typically features a knob or lever for adjustment.
- Turn the knob clockwise to decrease the descent rate (slower cut).
- Turn the knob counter-clockwise to increase the descent rate (faster cut).
- Always make small adjustments and test the descent rate on a scrap piece of material before making a critical cut.
6.2 General Operation Tips
- The ideal descent rate depends on the material being cut, its thickness, and the type of blade used.
- A slower descent rate is generally recommended for harder materials or thicker stock to prevent blade damage and ensure a clean cut.
- Monitor the cutting process and adjust the descent rate as needed to maintain consistent chip load and avoid excessive heat buildup.
7. Maintenance
Regular maintenance ensures the longevity and reliable performance of your hydraulic cylinder.
- Cleanliness: Keep the cylinder body and piston rod clean and free from debris, dust, and metal shavings. Wipe down regularly with a clean cloth.
- Inspect for Leaks: Periodically check all hydraulic lines and connections for any signs of fluid leaks. Address any leaks immediately to prevent loss of hydraulic pressure and potential damage.
- Check Mounting: Ensure all mounting bolts remain tight and secure. Re-tighten if necessary.
- Piston Rod Condition: Inspect the piston rod for scratches, pitting, or corrosion. Damage to the rod can lead to seal failure and fluid leaks.
- Hydraulic Fluid: While this is a sealed unit, if any servicing requires opening the system, ensure only compatible hydraulic fluid is used and that air is bled from the system. This should ideally be performed by qualified personnel.
8. Troubleshooting
This section addresses common issues you might encounter with your hydraulic cylinder.
8.1 Saw Arm Descends Too Fast or Too Slow
- Check Control Valve: Ensure the control valve is properly adjusted. Turn clockwise for slower descent, counter-clockwise for faster.
- Inspect for Leaks: A leak in the hydraulic system can cause inconsistent or uncontrolled descent. Check all connections and the cylinder body for fluid.
- Air in System: Air trapped in the hydraulic system can lead to spongy or erratic operation. If suspected, professional servicing may be required to bleed the system.
8.2 Hydraulic Fluid Leakage
- Tighten Connections: Check all hose fittings and connections for tightness.
- Inspect Seals: If leakage persists from the cylinder body or piston rod, internal seals may be worn or damaged. This typically requires professional repair or replacement of the cylinder.
- Damage to Piston Rod: Scratches or dents on the piston rod can damage seals, leading to leaks.
8.3 Cylinder Not Moving Smoothly
- Obstructions: Ensure there are no physical obstructions preventing smooth movement of the saw arm or cylinder.
- Mounting Alignment: Verify that the cylinder is mounted correctly and is not binding due to misalignment.
- Internal Issues: If external checks yield no solution, there may be internal issues with the cylinder requiring professional inspection.
9. Warranty and Support
This KAKA Industrial product is manufactured by KAKA INDUSTRIAL LLC. For specific warranty information, technical support, or replacement parts, please contact KAKA INDUSTRIAL LLC directly. Keep your purchase receipt as proof of purchase for any warranty claims.
Contact information can typically be found on the manufacturer's official website or through your original point of purchase.