1. Introduction
This manual provides comprehensive instructions for the safe and efficient operation, setup, and maintenance of your KYKYK JJ-1B Electric Blender Laboratory Precision Power Mixer. Please read this manual thoroughly before using the device to ensure proper functionality and to prevent damage or injury.
The JJ-1B is a high-precision laboratory mixer designed for various stirring applications, featuring stepless speed regulation and a timing function for precise control over mixing processes.
2. Safety Instructions
Always observe the following safety precautions to prevent personal injury or damage to the equipment:
- Ensure the power supply matches the specifications of the mixer.
- Do not operate the mixer with wet hands or in wet environments.
- Keep the enclosed housing free from liquid ingress to protect internal circuitry.
- Always secure the stirring rod and container properly before operation.
- Avoid touching moving parts during operation.
- Disconnect the power cord before cleaning or performing maintenance.
- Operate the control box on a stable workbench to prevent accidental movement.
3. Package Contents
Verify that all items are present and undamaged upon unpacking:
- JJ-1B Electric Blender (Main Unit) x 1
- Stirring Rod x 1
- Stand Assembly (Base, Rod, Clamps) x 1
- Control Box x 1
- Power Cord x 1
4. Product Overview
The KYKYK JJ-1B Electric Blender consists of a motor unit, a stirring rod, a robust stand, and a separate control box for precise adjustments.

Figure 1: Fully assembled KYKYK JJ-1B Electric Blender, showing the motor, stirring rod, stand, and control unit.
The motor unit drives the stainless steel stirring rod, which is resistant to high temperature oxidation, acid, and corrosion. The stand provides stability and allows for adjustable positioning of the motor and stirring rod. The control box features a digital display and knobs for speed and timing adjustments.
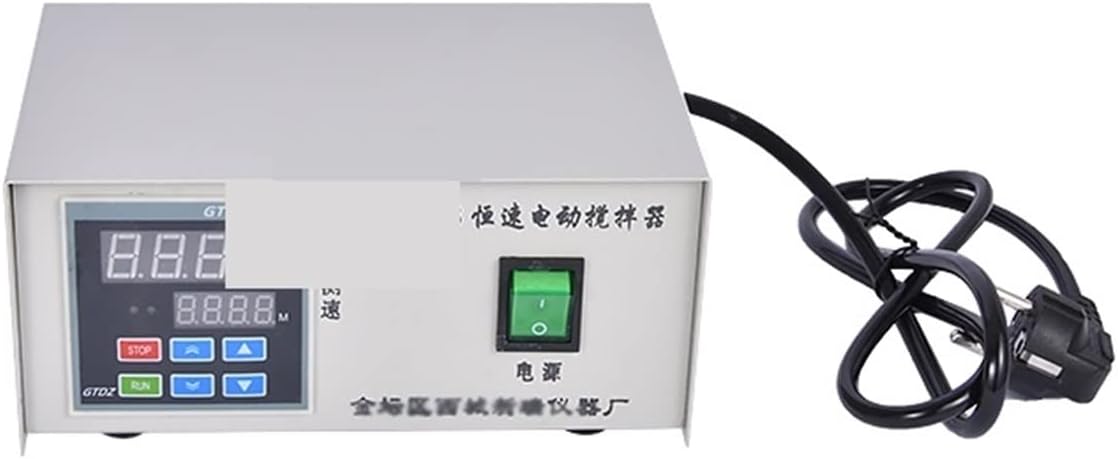
Figure 2: Detailed view of the control box, highlighting the digital display, speed adjustment, and timing controls.
5. Setup Instructions
- Assemble the Stand: Insert the vertical rod into the semicircular base and secure it firmly.
- Attach Clamps: Secure the adjustable black clamps to the vertical rod at desired heights. These clamps will hold the motor unit and potentially the beaker.
- Mount the Motor Unit: Attach the motor unit to one of the clamps, ensuring it is securely fastened and positioned directly above where your mixing container will be placed.
- Install Stirring Rod: Insert the stainless steel stirring rod into the chuck of the motor unit and tighten it securely. Ensure the rod is straight and centered.
- Position Control Box: Place the control box on a stable workbench.
- Connect Cables: Connect the motor unit cable to the designated port on the control box. Plug the power cord into the control box and then into a suitable power outlet.
- Adjust Beaker Position: Use the adjustable fixed black clamp to secure your beaker or mixing container in place, ensuring the stirring rod is immersed correctly without touching the bottom or sides of the container.

Figure 3: Side view illustrating the robust stand and adjustable clamps for securing the motor and beaker.
6. Operating Instructions
- Power On: Flip the main power switch on the control box to the "ON" position. The digital display will illuminate.
- Set Speed: Use the speed adjustment knob or buttons on the control box to set the desired stirring speed. The JJ-1B features stepless speed regulation with a maximum speed of 3000 rpm.
- Set Timer (Optional): If timed operation is required, use the timing knob or buttons to set the duration. The timing range is 0-120 minutes. If no time is set, the mixer will operate continuously.
- Start Mixing: Press the "RUN" button to begin the stirring process. The motor will start, and the stirring rod will rotate at the set speed.
- Monitor Operation: Observe the mixing process. The liquid solution can be stirred accurately and stably across the wide speed range.
- Stop Mixing: To stop the mixer, press the "STOP" button. If a timer was set, the mixer will automatically stop once the countdown is complete.
- Power Off: After use, flip the main power switch to the "OFF" position and disconnect the power cord.
7. Maintenance
Regular maintenance ensures the longevity and optimal performance of your JJ-1B Electric Blender.
- Cleaning: Disconnect power before cleaning. Wipe the exterior of the motor unit, stand, and control box with a soft, damp cloth. Do not use abrasive cleaners or allow liquids to enter the control box or motor housing.
- Stirring Rod Care: The stainless steel stirring rod is resistant to corrosion. After each use, clean it thoroughly to remove any residual materials.
- Inspection: Periodically inspect the power cord for any signs of damage. Check all clamps and connections to ensure they are secure.
- Storage: Store the mixer in a clean, dry environment when not in use.
8. Troubleshooting
| Problem | Possible Cause | Solution |
|---|---|---|
| Mixer does not power on. | Power cord not connected; power switch off; no power from outlet. | Check power cord connection; ensure power switch is ON; test outlet with another device. |
| Motor does not start. | "RUN" button not pressed; speed set to zero; internal fault. | Press "RUN"; increase speed setting; if problem persists, contact support. |
| Stirring rod wobbles or vibrates excessively. | Stirring rod not securely tightened; bent stirring rod; unstable setup. | Ensure stirring rod is tight in chuck; replace bent rod; verify stand stability and clamp security. |
| Timing function not working. | Timer not set correctly; timer function disabled. | Review operating instructions for setting the timer; ensure timer is activated. |
9. Specifications
| Parameter | Value |
|---|---|
| Model | JJ-1B |
| Power | 100W |
| Speed Range | Start - 3000 rpm (stepless speed regulation) |
| Timing Range | 0 - 120 minutes |
| Item Weight | 32 pounds (approx. 14.5 kg) |
| Package Dimensions | 45 x 28 x 20 cm (approx. 17.7 x 11 x 7.9 inches) |
| Stirring Rod Material | Stainless Steel |
10. Warranty and Support
For warranty information or technical support, please refer to the documentation provided at the point of purchase or contact your vendor. Keep your purchase receipt as proof of purchase.
For further assistance, please visit the KYKYK official website or contact their customer service department.