VEVOR WTS210F
VEVOR Table Saw 210mm 1200W
User Manual - Model WTS210F
1. Introduction
Thank you for choosing the VEVOR Table Saw 210mm 1200W (Model WTS210F). This manual provides essential information for the safe operation, maintenance, and troubleshooting of your new table saw. Please read this manual thoroughly before operating the machine to ensure proper use and to prevent injury or damage. This portable table saw is designed for various woodworking projects, offering a 225mm max cutting capacity and a 4800 RPM cutting speed, making it suitable for DIY enthusiasts and professional workshops.

Figure 1: Overview of the VEVOR Table Saw 210mm 1200W.
2. Important Safety Instructions
Always follow basic safety precautions to reduce the risk of fire, electric shock, and personal injury.
- Read the Manual: Read and understand all instructions before operating the table saw.
- Wear Eye Protection: Always wear safety glasses or goggles to protect your eyes from flying debris.
- Use Hearing Protection: Wear ear protection during operation to prevent hearing damage.
- Keep Work Area Clean: Cluttered areas invite accidents. Ensure your workspace is well-lit and free of obstructions.
- Avoid Dangerous Environment: Do not use power tools in damp or wet locations, or expose them to rain. Keep work area well lit.
- Keep Children Away: Do not let visitors contact the saw or extension cord. All visitors should be kept away from the work area.
- Secure Workpiece: Always secure the workpiece firmly before cutting.
- Use Push Stick: Always use a push stick when making narrow cuts to keep hands away from the blade.
- Maintain Guards: Ensure all guards are in place and functioning correctly before operation. The protective shield prevents wood chips from splashing, and the saw blade guard ensures the blade stays securely in place.
- Overload Protection: The machine features an automatic overload protection system. If the saw stops due to overload, turn it off, unplug it, and allow it to cool before restarting.
- Unplug Before Adjustments: Always unplug the saw from the power source before making any adjustments, changing blades, or performing maintenance.
- Inspect Blade: Before each use, inspect the saw blade for damage or dullness. Replace if necessary.

Figure 2: Safety features including blade protection and automatic shut-off.
3. Components and Parts
The VEVOR Table Saw comes with the following main components and accessories:
- Table Saw Unit (main body with motor and table)
- Saw Blade (24-tooth)
- Rip Fence (1x)
- Push Stick (1x)
- Upper Guard (1x)
- Miter Gauge (1x)
- Blade Guard
- Adjustable Parallel Stop
- Measuring Guide
- Non-Slip Feet

Figure 3: Key components and accessories included with the table saw.
4. Setup and Assembly
Follow these steps for initial setup and assembly of your table saw:
- Unpacking: Carefully remove all components from the packaging. Inspect for any shipping damage.
- Placement: Place the table saw on a stable, level surface. Ensure the non-slip feet are securely positioned to prevent movement during operation.
- Install Blade Guard: Attach the upper guard and blade guard securely over the saw blade. Ensure it moves freely and provides adequate protection.
- Attach Rip Fence: Install the rip fence onto the table. Ensure it slides smoothly and locks firmly in place for accurate cuts.
- Connect Miter Gauge: The miter gauge can be inserted into the miter slot for angled cuts.
- Power Connection: Connect the power cord to a suitable power outlet. Ensure the voltage matches the saw's requirements (230V AC).

Figure 4: The compact design allows for easy setup and portability.
5. Operation Guide
This section outlines the general procedures for operating your VEVOR Table Saw.
- Power On/Off: Use the green button to turn the saw ON and the red button to turn it OFF.
- Adjusting Blade Height: Use the hand crank to adjust the blade height for different material thicknesses. The adjustable saw blade can be set to 1.77 inches / 45 mm.
- Adjusting Bevel Angle: The saw blade can be adjusted for cross sections to the desired angle in a range of -45° to 45°. Use the angle adjustment mechanism to set the desired bevel.
- Using the Rip Fence: For longitudinal cuts, position the adjustable, continuous parallel stop (rip fence) according to the desired cutting width using the measuring guide. Lock it firmly in place.
- Using the Miter Gauge: For cross-cuts or angled cuts, use the miter gauge. Set the desired angle and guide the workpiece through the blade.
- Cutting Procedure:
- Ensure the workpiece is stable and properly supported.
- Turn on the saw and allow the blade to reach full speed (4800 RPM).
- Slowly and steadily feed the workpiece into the blade, maintaining firm contact with the fence or miter gauge.
- Always use the push stick for narrow cuts or when your hands are close to the blade.
- The saw can handle a maximum cutting capacity of 225mm and is suitable for wood, plastic, aluminum, and mild steel.
- Dust Collection: Connect a dust collection system to the saw's dust port for a cleaner working environment.

Figure 5: Demonstrating the large cutting capacity of the table saw.

Figure 6: The table saw is capable of cutting wood, plastic, aluminum, and mild steel.
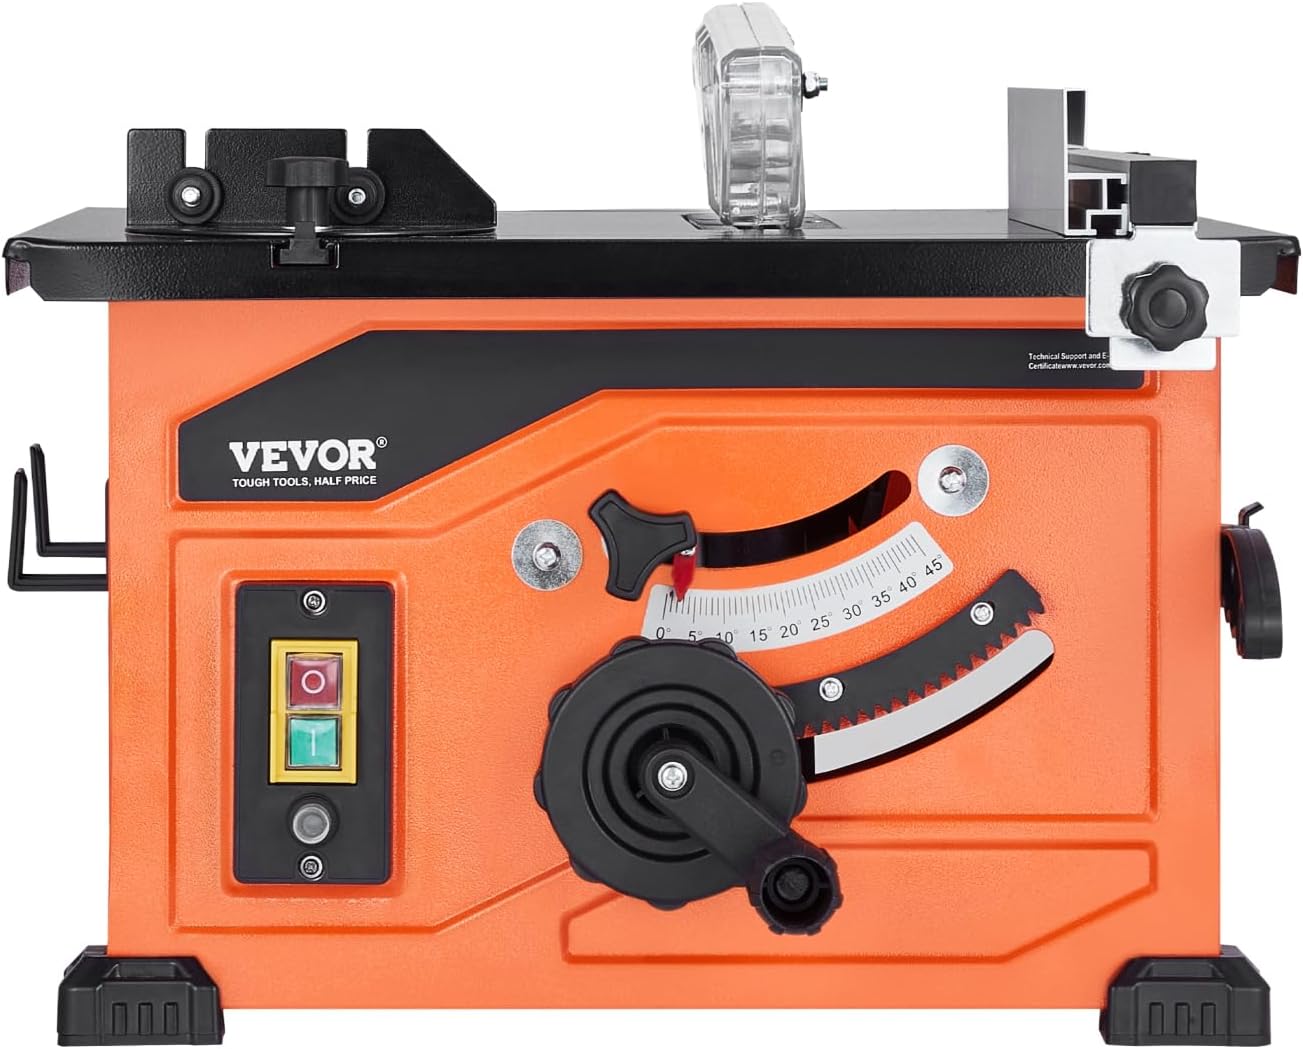
Figure 7: The table saw in operation, showing connection for dust extraction.
6. Maintenance
Regular maintenance ensures the longevity and optimal performance of your VEVOR Table Saw.
- Cleaning: After each use, unplug the saw and clean off sawdust and debris from the table, blade, and motor housing. Use a brush or compressed air.
- Blade Inspection: Regularly inspect the saw blade for sharpness and damage. A dull or damaged blade can cause kickback and poor cut quality. Replace blades as needed.
- Lubrication: Periodically lubricate moving parts such as the blade height adjustment mechanism and bevel adjustment mechanism according to manufacturer recommendations (if any specific points are mentioned in a full manual).
- Check Fasteners: Periodically check all nuts, bolts, and screws for tightness. Tighten any loose fasteners.
- Cord Inspection: Inspect the power cord for any signs of damage, cuts, or fraying. Replace if damaged.
- Storage: Store the table saw in a dry, clean, and secure location, out of reach of children.
7. Troubleshooting
This section addresses common issues you might encounter with your table saw.
| Problem | Possible Cause | Solution |
|---|---|---|
| Saw does not start. | No power supply; Overload protection activated; Faulty switch. | Check power connection and circuit breaker. Allow motor to cool if overload protection tripped. Contact service if switch is faulty. |
| Blade does not tilt/incline. | Adjustment mechanism is stiff or jammed; Debris in mechanism. | Unplug the saw. Clean the bevel adjustment mechanism. Apply a small amount of lubricant if necessary. Ensure no debris is obstructing movement. |
| Cuts are not straight or accurate. | Rip fence not aligned or locked properly; Dull blade; Blade wobble. | Ensure rip fence is parallel to the blade and securely locked. Replace dull blade. Check blade for proper installation and tightness. |
| Excessive vibration or noise. | Loose components; Damaged blade; Unbalanced motor. | Check all fasteners and tighten. Replace damaged blade. If problem persists, contact VEVOR support. |
| Missing parts upon unboxing. | Packaging error. | Immediately contact VEVOR customer support with your purchase details. |
8. Technical Specifications
Key technical specifications for the VEVOR Table Saw 210mm 1200W:
| Specification | Value |
|---|---|
| Model Number | WTS210F |
| Manufacturer | VEVOR |
| Power Source | Corded Electric |
| Voltage | 230 Volts (AC) |
| Wattage | 1200W |
| No-Load Speed | 4800 RPM |
| Blade Diameter | 210mm |
| Max Cutting Capacity | 225mm |
| Adjustable Blade Height | Up to 45mm (1.77 inches) |
| Bevel Angle Range | -45° to 45° |
| Item Weight | 11.4 Kilograms |
| Product Dimensions | 57 x 48 x 40 cm |
| Blade Material | High Speed Steel |
| Handle Material | Plastic or Aluminum |

Figure 8: Key features including adjustable saw blade, 1200W motor, and non-slip feet.
9. Warranty and Support
VEVOR products are designed for durability and performance. For warranty information, technical support, or service inquiries, please contact VEVOR customer support directly. Keep your purchase receipt as proof of purchase.
For the most up-to-date support information, please visit the official VEVOR website or refer to the warranty card included with your product.
Ask a question about this manual
Ask about setup, troubleshooting, compatibility, parts, safety, or missing instructions. Manuals+ will review the question and use this page’s manual context to help answer it.