Introduction
This manual provides essential instructions for the installation, operation, and maintenance of your KENWOOD DMX500S Digital Multimedia Receiver. Please read this manual thoroughly before using the product to ensure correct usage and to prevent damage. Keep this manual for future reference.
Safety Information
- Always operate the vehicle safely. Distracted driving can lead to accidents.
- Ensure all wiring is correctly connected to prevent short circuits or damage.
- Do not disassemble or modify the unit. This may cause malfunction or injury.
- Consult a professional installer if you are unsure about any installation steps.
- Observe all local traffic laws and regulations regarding the use of in-car entertainment systems.
What's in the Box
Verify that all items are present before beginning installation:
- Kenwood DMX500S receiver, trim ring, and pre-installed side mounting brackets & fuse.
- Wiring harness, GPS antenna with cable, self-adhesive pad, and parking brake wire (6.5 ft).
- Microphone with 10 ft cable & bracket, double-sided tape, and trim ring removal tool.
- 4 pan-head and 4 flat-head ISO screws, installation hardware, and Quick Start Guide.
- Warranty card included. Some installations may require additional vehicle-specific parts.
Setup and Installation
1. Installation Overview
The DMX500S is designed for double DIN openings. Professional installation is recommended. Ensure the vehicle's battery is disconnected before starting any wiring.
2. Wiring Connections
Connect the wiring harness to your vehicle's electrical system. Key connections include power (constant and accessory), ground, speaker outputs, parking brake wire (for safety features), and the backup camera input.
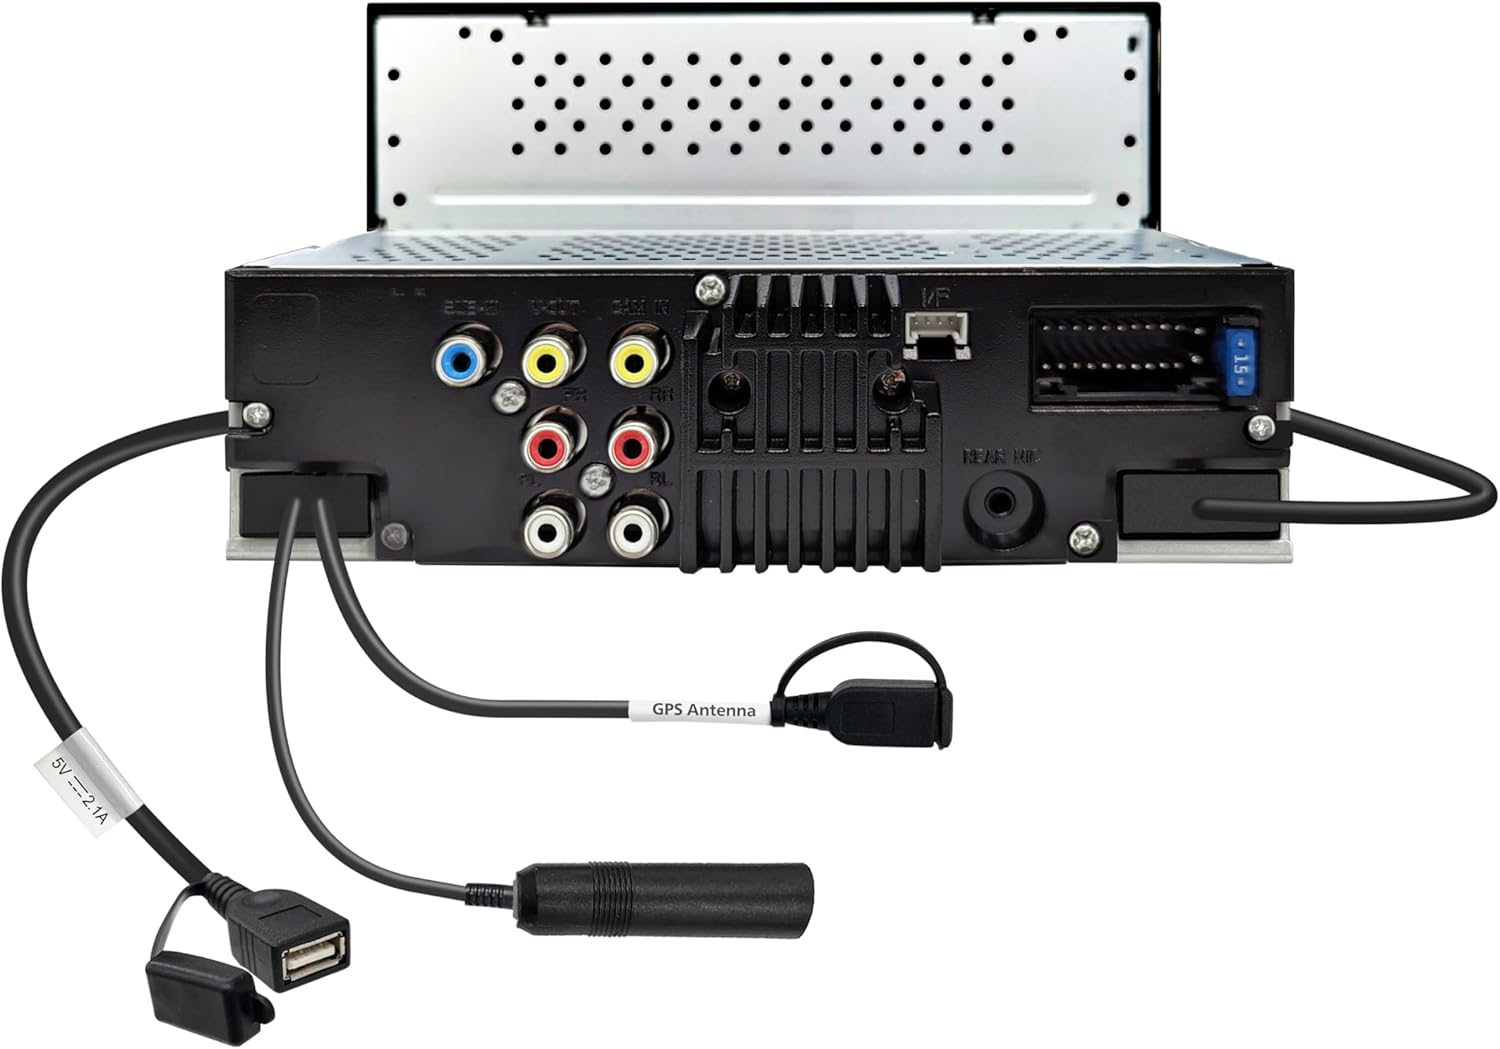
Image: Rear panel of the DMX500S, illustrating the various connection ports including RCA outputs, USB, and antenna inputs. This view helps identify where to connect external devices and vehicle wiring.
3. Initial Power-On
After installation, reconnect the battery. The unit will power on. Follow any on-screen prompts for initial setup, such as language selection and time zone.
Operating Instructions
1. Basic Operation
- Power On/Off: Press the power button (usually located on the front panel) to turn the unit on or off.
- Volume Control: Use the volume up/down buttons or on-screen controls to adjust audio levels.
- Display Off: The display can be turned off for night driving by pressing the 'DISP OFF' button, while audio continues to play. Touch the screen to reactivate.
2. Apple CarPlay
Connect your iPhone (iOS 13 and up) wirelessly or via USB to access Apple CarPlay. This allows you to use compatible iPhone apps directly on the receiver's screen.

Image: The DMX500S screen displaying the Apple CarPlay home interface, featuring icons for Phone, Music, Maps, Messages, and other applications. This demonstrates the integrated smartphone experience.

Image: A detailed view of the Apple CarPlay navigation feature on the DMX500S, showing a map of Los Angeles with an active search overlay for points of interest like restaurants and groceries. This highlights the ease of navigation and search functionality.
3. Android Auto
Connect your Android smartphone (Android 11 and up) wirelessly or via USB to use Android Auto. This integrates your phone's navigation, communication, and entertainment apps.

Image: The DMX500S screen displaying the Android Auto interface, featuring icons for Maps, Waze, Messages, Phone, and other applications. This illustrates the seamless integration of Android smartphone features.
4. Bluetooth Connectivity
Pair your smartphone via Bluetooth for hands-free calling and wireless audio streaming. The unit supports dual phone pairing for convenience.
- Go to the Bluetooth settings on the receiver and your phone.
- Select the DMX500S from your phone's available devices.
- Confirm the pairing code on both devices.
5. Audio Settings
Access the audio settings menu to customize your sound experience. Features include a 13-band graphic equalizer, digital time alignment, and advanced crossover settings.
6. Backup Camera Input
Connect a compatible backup camera to the dedicated RCA video input. The unit provides adjustable parking guidelines on the screen when the vehicle is in reverse.
7. Video Output
Utilize the rear video output to connect additional monitors for rear-seat entertainment. Video files from USB devices or mirrored smartphone screens can be displayed.
Maintenance
- Screen Cleaning: Use a soft, dry cloth to gently wipe the touchscreen. For stubborn smudges, slightly dampen the cloth with water or a screen cleaner designed for electronics. Avoid harsh chemicals.
- General Care: Keep the unit free from dust and debris. Ensure proper ventilation around the unit to prevent overheating.
Troubleshooting
If you encounter issues, refer to the following common problems and solutions:
| Problem | Possible Cause | Solution |
|---|---|---|
| No power | Blown fuse, incorrect wiring, vehicle battery issue. | Check vehicle fuses and the unit's fuse. Verify power and ground connections. Check vehicle battery. |
| No sound | Volume too low, mute activated, speaker wiring issue. | Increase volume. Check if mute is active. Verify speaker connections. |
| Touchscreen unresponsive | Software glitch, temporary error. | Perform a soft reset using the reset button (typically a small pinhole). If issue persists, consult support. |
| Apple CarPlay/Android Auto not connecting | Incorrect USB cable, phone settings, software issue. | Use a certified USB cable. Ensure phone is unlocked and has the latest OS. Check phone's CarPlay/Android Auto settings. Try restarting both devices. |
| Bluetooth pairing fails | Device not in pairing mode, interference, incorrect password. | Ensure both devices are in pairing mode. Delete previous pairings and try again. Check for correct pairing code. |
If problems persist after attempting these solutions, please contact Kenwood customer support.
Specifications
| Feature | Detail |
|---|---|
| Package Dimensions | 9.02 x 7.36 x 6.38 inches |
| Item Weight | 3.39 pounds |
| Manufacturer | Kenwood |
| Connectivity Technology | Backup Camera Input (RCA video input with parking guide support), Bluetooth® (hands-free calling and wireless audio streaming), RCA Preamp Outputs (for external amps and subwoofers), USB (media playback and smartphone charging), Wi-Fi (wireless Apple CarPlay® and Android Auto™) |
| Controller Type | Touch Screen |
| Special Feature | 13-band graphic EQ with digital time alignment for personalized audio tuning, Backup camera input with adjustable parking guidelines for added safety, Built-in Bluetooth® with dual phone pairing for hands-free calling and streaming, High-resolution 6.8" capacitive touchscreen (1024x600) for sharp visuals and responsive control, Wireless Apple CarPlay® & Android Auto™ for seamless smartphone integration |
| Compatible Devices | Android smartphones (Android 11 and up) – for wireless & wired Android Auto, Backup cameras (RCA video input) – for rear-view functionality with parking guidelines, Car stereo amplifiers – via 6-channel RCA preamp outputs (front, rear, subwoofer), USB flash drives – for audio and video playback through the rear USB port, iPhone® (iOS 13 and up) – for wireless & wired Apple CarPlay® |
| Total HDMI Ports | 1 |
| Connector Type | HDMI, USB |
| Audio Output Mode | Stereo |
| Surround Sound Channel Configuration | 4 Channel |
| Video encoding | MPEG-1, MPEG-2, MPEG-4, H.264 / AVC, WMV (Windows Media Video) |
Warranty and Support
Your KENWOOD DMX500S comes with a manufacturer's warranty. Please refer to the warranty card included in the packaging for specific terms and conditions. For technical support, service, or additional information, please visit the official Kenwood website or contact their customer service department.
Online Support: www.kenwood.com/usa/car/


