1. Introduction
This user manual provides comprehensive instructions for the ASRock B860M-X Micro ATX motherboard. It covers installation, configuration, operation, and troubleshooting to ensure optimal performance and longevity of your system. The ASRock B860M-X is designed to support Intel Core Ultra processors with an LGA1851 socket, offering advanced features for a powerful computing experience.
2. Safety Information
Always observe the following safety precautions during installation and operation:
- Disconnect the power cord from the wall outlet before touching any components.
- Wear an anti-static wrist strap to prevent electrostatic discharge (ESD) damage to components.
- Handle components by their edges to avoid touching sensitive parts.
- Ensure proper ventilation within your PC case to prevent overheating.
- Do not expose the motherboard to moisture or extreme temperatures.
3. Package Contents
Verify that all items are present in your motherboard package:
- ASRock B860M-X Micro ATX Motherboard
- Quick Installation Guide
- Regulatory Notice
- SATA Data Cables
- I/O Shield
- M.2 Screws/Standoffs

Image: ASRock B860M-X Motherboard and included accessories.
4. Motherboard Layout
Familiarize yourself with the key components and connectors on your ASRock B860M-X motherboard.

Image: Top-down view of the ASRock B860M-X Micro ATX Motherboard, highlighting the CPU socket, RAM slots, and various connectors.
Rear I/O Panel
The rear I/O panel provides various ports for connecting peripherals.
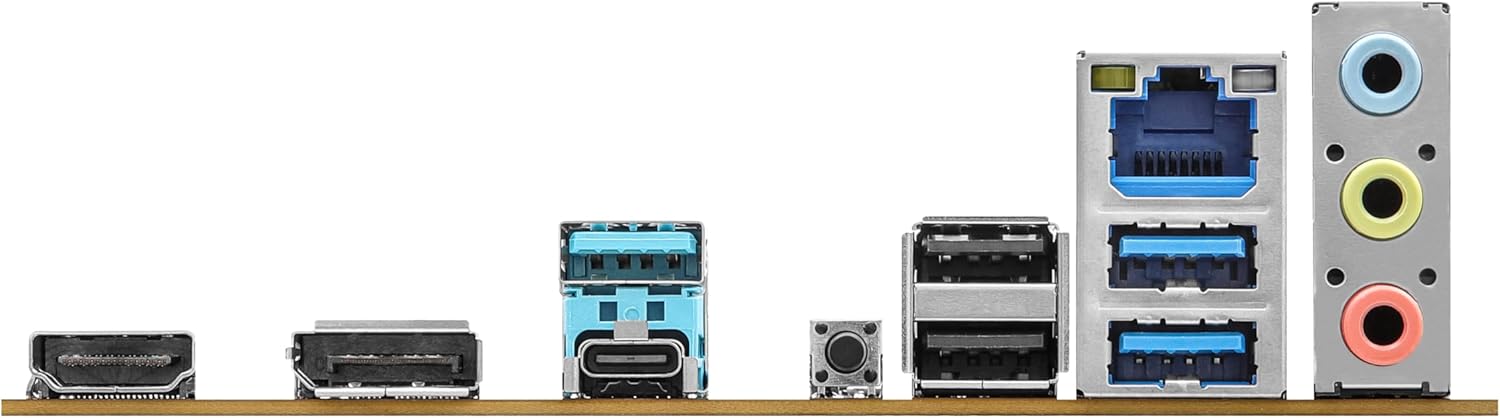
Image: Close-up of the rear I/O panel, showing USB ports, HDMI, DisplayPort, Ethernet, and audio jacks.
5. Setup and Installation
Follow these steps for proper installation of your motherboard and components.
5.1 CPU Installation (LGA1851)
- Open the CPU socket lever.
- Carefully align the CPU with the socket, ensuring the notches match.
- Gently place the CPU into the socket without forcing it.
- Close the socket lever to secure the CPU.
5.2 Memory (RAM) Installation
The ASRock B860M-X supports 2 x DDR5 DIMMs for dual-channel memory up to 9066+ MHz (OC).
- Open the clips at both ends of the DIMM slot.
- Align the memory module with the slot, ensuring the notch on the module matches the slot key.
- Press down firmly on both ends of the memory module until the clips snap into place.
5.3 Storage Installation (M.2 and SATA)
The motherboard supports M.2 drives and up to 4 SATA3 6.0 Gb/s devices.
- M.2 SSD: Locate the M.2 slot(s). Insert the M.2 SSD into the slot at an angle and secure it with the provided screw/standoff.
- SATA Drives: Connect SATA data cables from your storage devices (HDDs/SSDs) to the SATA3 ports on the motherboard. Connect power cables from your power supply to the SATA devices.
5.4 Expansion Card Installation (PCIe)
The motherboard features PCIe slots for graphics cards and other expansion cards.
- Align your graphics card or other PCIe card with the appropriate slot.
- Press down firmly until the card is seated correctly and the retention clip locks.
- Secure the card to the PC case with a screw.
5.5 Power Supply Connections
Connect the 24-pin ATX power connector and the 8-pin CPU power connector from your power supply to the corresponding ports on the motherboard.
5.6 Front Panel Connections
Connect the front panel cables (power button, reset button, USB ports, audio jacks, etc.) to their respective headers on the motherboard. Refer to the motherboard diagram for exact locations.
6. Operating Instructions
6.1 First Boot
After assembling your system, connect your monitor, keyboard, and mouse. Power on your system. The system should display the ASRock logo and enter the BIOS setup or begin the operating system installation process.
6.2 BIOS/UEFI Setup
To enter the BIOS setup utility, press the Delete or F2 key during the Power-On Self-Test (POST) screen. Here you can configure various system settings, including boot order, CPU settings, memory timings, and fan speeds.
6.3 Driver Installation
After installing your operating system, install the necessary drivers for your motherboard components (chipset, audio, LAN, graphics, etc.) from the ASRock website or the included driver CD/USB drive.
7. Maintenance
7.1 BIOS Update
Keeping your BIOS updated ensures compatibility with new hardware and improves system stability. ASRock provides two methods for BIOS updates: USB BIOS Flashback and Instant Flash.
Video: ASRock Motherboard BIOS Update Tutorial. This video demonstrates two methods for updating your ASRock motherboard's BIOS: USB BIOS Flashback and Instant Flash.
7.2 Cleaning
Regularly clean your PC case and motherboard to prevent dust buildup, which can lead to overheating and component failure. Use compressed air to remove dust from fans, heatsinks, and other components. Ensure the system is powered off and unplugged before cleaning.
8. Troubleshooting
If you encounter issues, refer to these common troubleshooting tips:
- No Power: Check all power connections (24-pin ATX, 8-pin CPU, GPU, SATA). Ensure the power supply switch is on.
- No Display: Verify monitor connection and input source. Reseat the graphics card and memory modules.
- System Instability: Check memory compatibility and seating. Ensure CPU cooler is properly installed. Update BIOS and drivers.
- Boot Issues: Check boot order in BIOS. Verify storage device connections.
9. Specifications
Key technical specifications for the ASRock B860M-X Micro ATX Motherboard:
| Feature | Specification |
|---|---|
| Brand | ASRock |
| Model Name | B860M-X |
| CPU Socket | LGA 1851 |
| Compatible Processors | Intel Core Ultra |
| Chipset Type | Intel B860 |
| RAM Memory Technology | DDR5 |
| Memory Clock Speed | 9066 MHz (OC) |
| Max Memory Storage Capacity | 128 GB |
| Memory Slots Available | 2 |
| Total SATA Ports | 4 |
| Total PCIe Ports | 3 |
| Graphics Output Options | 1 HDMI, 1 DisplayPort |
| Number of Ethernet Ports | 1 |
| Audio Codec | Realtek ALC1220 7.1 CH HD Audio Codec |
| Power Phase Design | 7+1+1+1+1 |
| RGB Lighting | Polychrome RGB |
Video: Overview of Intel B860 Series Motherboards. This video highlights key features and design aspects of the ASRock B860 motherboard series.
10. Warranty and Support
ASRock provides a 3-year warranty for this product. For technical support, driver downloads, and further information, please visit the official ASRock website. You can also find additional support resources and FAQs there.
For warranty claims or service, please contact your retailer or authorized ASRock service center with your proof of purchase.


