Introduction
This manual provides detailed instructions for the safe and effective operation of your kidoom Twin Needles Sewing Machine, Model FHSM-520A. Please read this manual thoroughly before using the machine to ensure proper setup, operation, and maintenance. Retain this manual for future reference.
Note: The sewing machine is factory-threaded and includes a fabric sample for testing purposes. This indicates a quality control check, not a used product.
Important Safety Instructions
- Always unplug the sewing machine from the electrical outlet immediately after using and before cleaning, making any adjustments, or removing parts.
- Do not operate the machine if the power cord or plug is damaged, or if the machine is not working properly, has been dropped, or damaged.
- Keep fingers away from all moving parts. Special care is required around the sewing machine needle.
- Use only attachments recommended by the manufacturer.
- Never drop or insert any object into any opening.
- Do not use outdoors.
- Do not operate where aerosol (spray) products are being used or where oxygen is being administered.
- To disconnect, turn all controls to the off position, then remove the plug from the outlet.
Package Contents
Verify that all items listed below are included in your package:
- Sewing machine
- AC/DC Adapter
- Foot Pedal
- Instruction Manual
- Buttonhole Presser
- Double spool holder
- Single spool holder
- Spare needles
- Spare twin needle
- Pre-filled Bobbins
- Thread spool
- Needle Threader
- Thread Unpicker
- Scissors
- Tape Measure
- Thimble
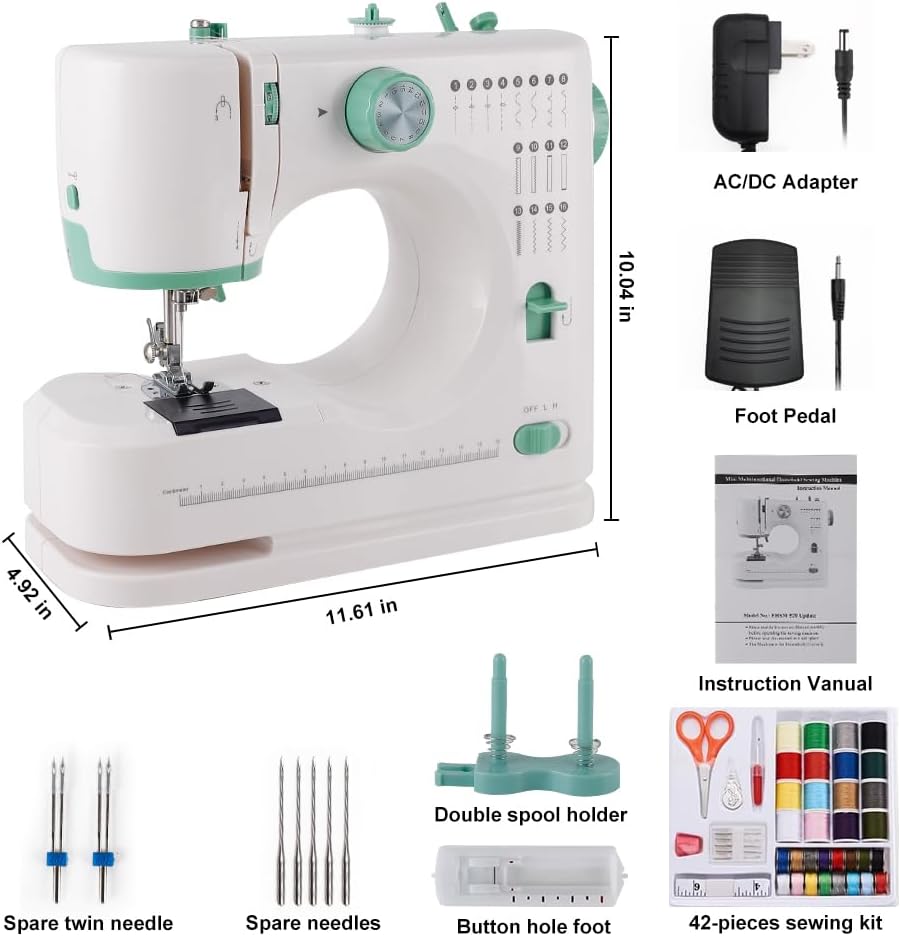
Image: The kidoom sewing machine with its various accessories laid out, including the AC/DC adapter, foot pedal, instruction manual, spare needles, spool holders, and a 42-piece sewing kit.
Product Overview and Parts Identification
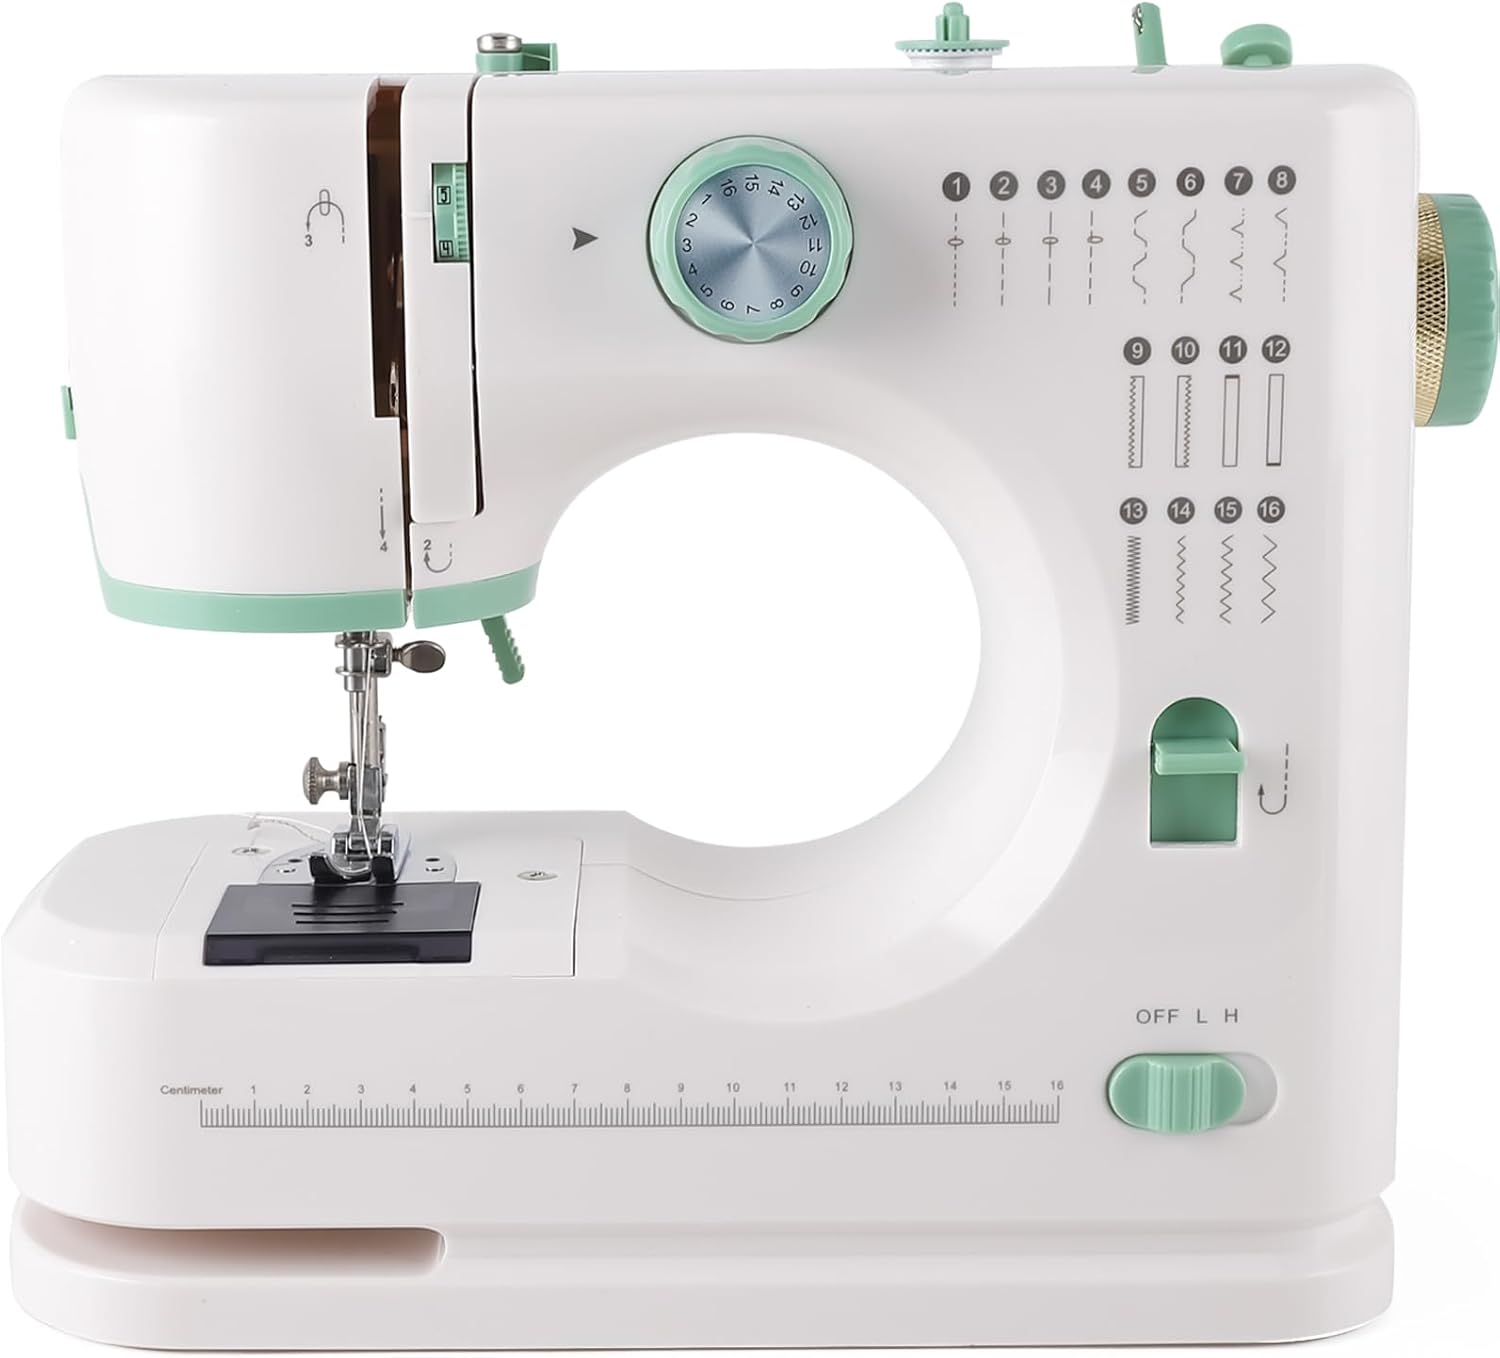
Image: A front-facing view of the kidoom Twin Needles Sewing Machine FHSM-520A, showcasing its compact design and control dials.
Familiarize yourself with the different parts of your sewing machine:

Image: A detailed diagram labeling key components of the kidoom sewing machine, including the Take Up Lever, Thread Cutter, LED Light, Needle Clamp Screw, Bobbin Cover, 16cm Dividing Rule, Mini Hidden Drawer, Upper Thread Tension Dial, Pattern Selection Dial, Hand Wheel, Reverse Button, and Power Off & Speed Switch.
- Take Up Lever: Guides the upper thread.
- Thread Cutter: Conveniently cuts threads.
- LED Light: Illuminates the sewing area.
- Needle Clamp Screw: Secures the needle in place.
- Bobbin Cover: Protects the bobbin area.
- 16cm Dividing Rule: Integrated ruler for quick measurements.
- Mini Hidden Drawer: Storage for small accessories.
- Upper Thread Tension Dial: Adjusts the tension of the upper thread (1-9 levels).
- Pattern Selection Dial: Selects one of the 16 available stitch patterns.
- Hand Wheel: Manually raises and lowers the needle.
- Reverse Button: Engages reverse stitching.
- Power Off & Speed Switch: Controls power and sewing speed (OFF, L, H).
Setup
1. Power Connection
Connect the AC/DC adapter to the power input port on the sewing machine and then plug it into a suitable electrical outlet.
2. Foot Pedal Connection
Insert the foot pedal cable into the designated port on the sewing machine. The foot pedal provides an alternative method for controlling sewing speed.
3. Bobbin Winding
The machine features an automatic winding function for bobbins. Follow the instructions in the manual for proper bobbin winding to ensure smooth operation.
4. Threading the Machine
Correct threading is crucial for proper stitching. Follow these steps carefully:

Image: A step-by-step visual guide demonstrating how to thread the kidoom sewing machine. Each step is numbered and shows the path of the thread through various guides and tension discs.
- Step 1: Place a spool on the threaded spindle, put on the thread spindle cover, and pull out the thread.
- Step 2: Pull the thread, passing it through the bobbin winder tension disk.
- Step 3: Guide the thread through the gap.
- Step 4: Guide the thread through the groove and pull it up towards the chromed take-up lever.
- Step 5: Feed the thread from right to left through the hole in the chromed lever.
- Step 6: Pull the thread straight down towards the needle.
- Step 7: Feed the thread through the hole in the needle holder, then through the eye of the needle from the front side to the back side, and pull out 10cm to the back.
Operating Instructions
1. Stitch Selection
The machine offers 16 built-in stitch patterns. To select a stitch, turn the Pattern Selection Dial to the corresponding number. Refer to the stitch chart for available patterns.

Image: A visual representation of the 16 available stitch patterns, ranging from straight stitches to zigzag, decorative, and buttonhole stitches.
2. Speed Adjustment
Adjust the sewing speed using the Speed button on the machine. Options include "OFF" (stop), "H" (high speed), and "L" (low speed). You can also control speed via the foot pedal when connected.
3. Reverse Sewing
To reinforce stitches, press and hold the Reverse Button while sewing. This function is useful for securing the beginning and end of seams.
4. Double Needle Sewing
This machine supports double needle and double thread sewing for stronger and more decorative seams. Ensure the spare twin needle is installed correctly and both threads are properly routed.
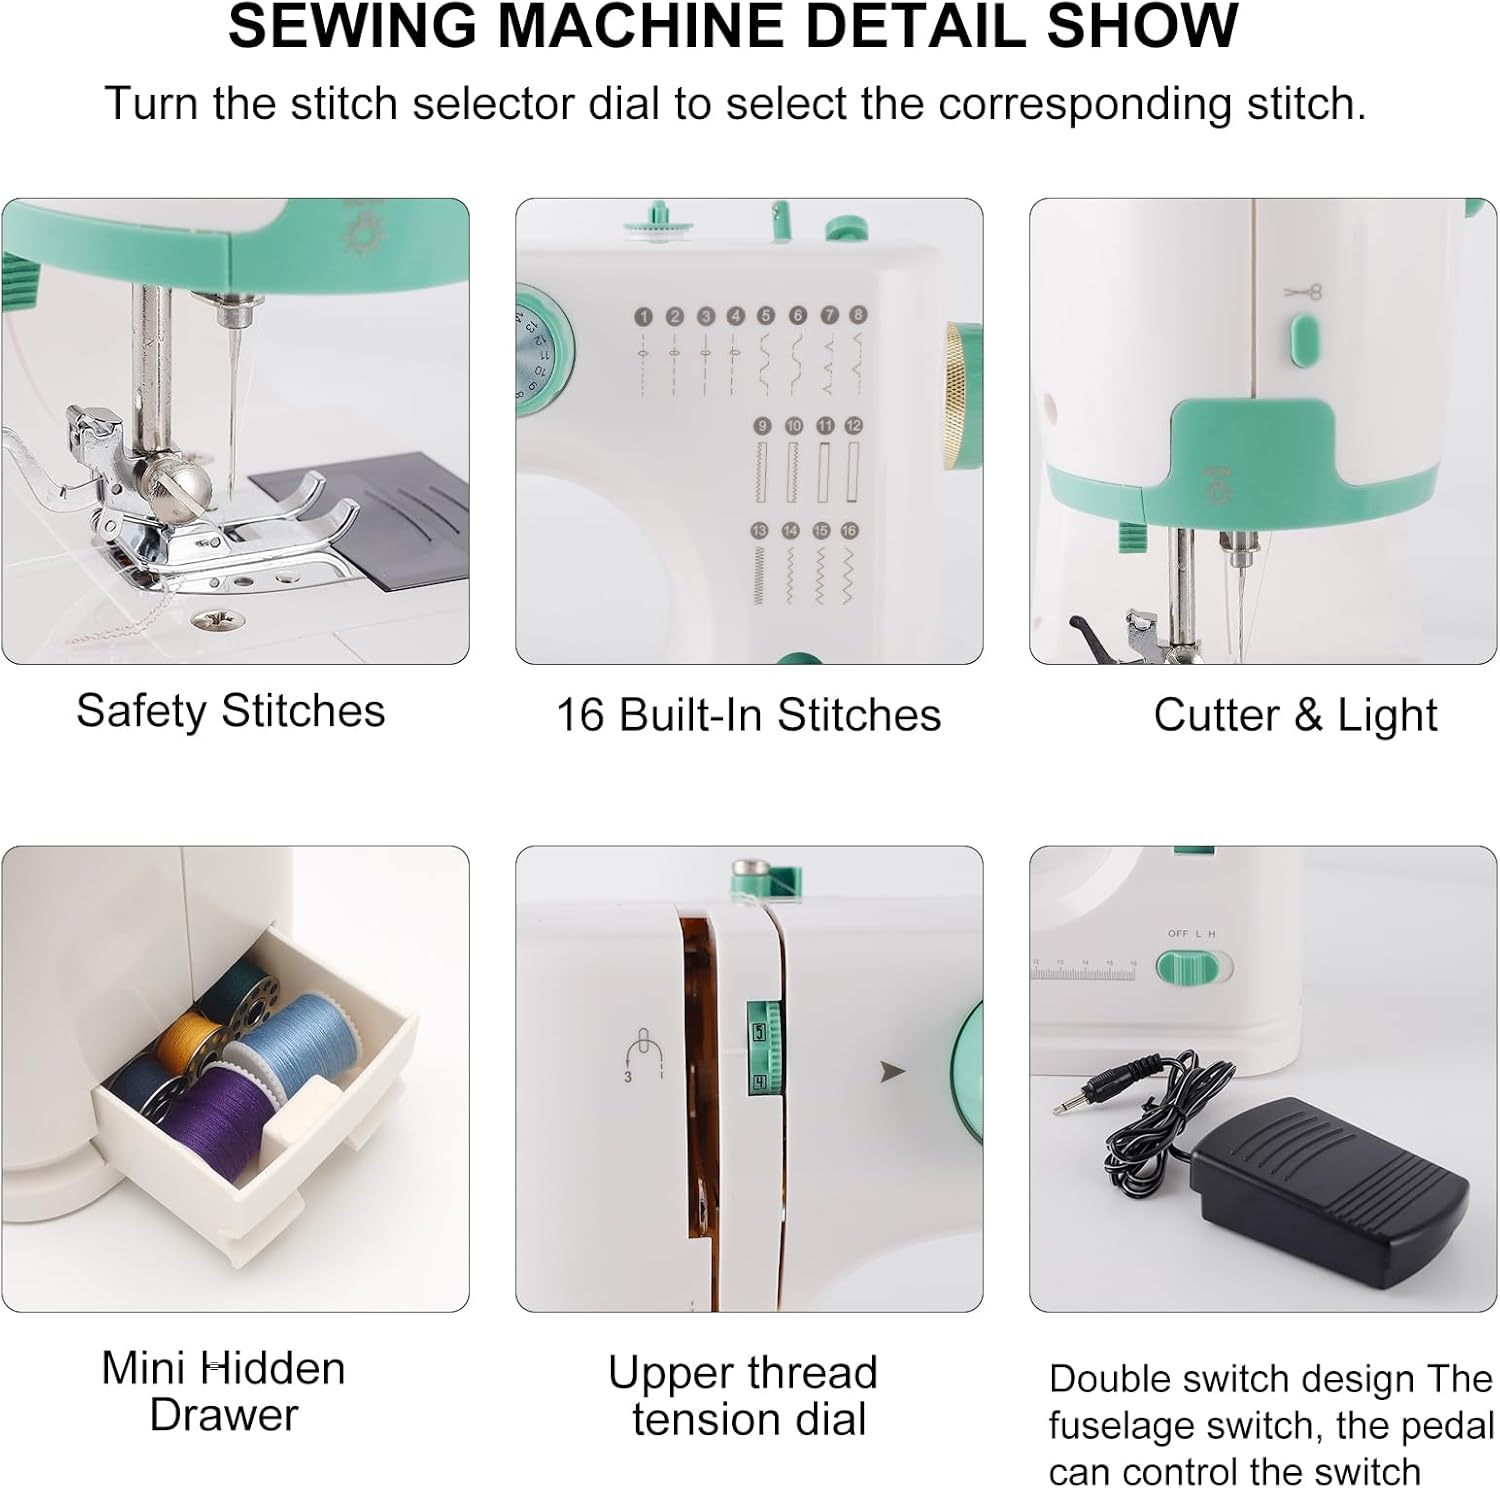
Image: A collage of detailed views of the sewing machine, showing the stitch selector dial, built-in stitches, thread cutter, LED light, mini hidden drawer, upper thread tension dial, and the double switch design for foot pedal and fuselage control.
5. Thread Tension Adjustment
Adjust the Upper Thread Tension Dial (1-9 levels) to achieve balanced stitches. Incorrect tension can lead to loose or puckered seams. Test on a scrap fabric before sewing your project.
6. Fabric Compatibility
The machine is designed to work with a variety of fabrics, including silk, jeans, wool, and chiffon. It can penetrate up to 6 layers of denim. Always test on a scrap piece of your fabric to ensure optimal stitch quality.

Image: Demonstrates the machine's ability to sew through multiple layers of fabric, specifically showing 6 layers of denim. Also displays examples of suitable fabrics: Denim, Cotton cloth, Elastic fabric, Thin fabric, and Chiffon fabric.
Maintenance
1. Cleaning
Regularly clean lint and dust from the bobbin area and feed dogs using a small brush. Ensure the machine is unplugged before cleaning.
2. Needle Replacement
Replace needles regularly, especially if they become bent, dull, or if you notice skipped stitches. Use the Needle Clamp Screw to loosen and tighten the needle. Ensure the flat side of the needle faces the back of the machine when inserting.
Troubleshooting
- Skipped Stitches: Check if the needle is bent or dull, replace if necessary. Ensure the needle is inserted correctly. Verify proper threading of the upper thread and bobbin.
- Thread Breakage: Check for correct threading, ensure the thread tension is not too tight, and inspect the needle for burrs or damage.
- Uneven Stitches: Adjust the upper thread tension dial. Ensure the bobbin is wound evenly and inserted correctly.
- Machine Not Starting: Check if the power adapter is securely plugged in. Ensure the power switch is in the "L" or "H" position.
Specifications
| Model Number | FHSM-520A |
| Brand | kidoom |
| Product Dimensions | 5.71"D x 12.6"W x 11.22"H (14.5 x 32 x 28.5 cm) |
| Item Weight | 5.29 pounds (2.4 kg) |
| Color | White |
| Stitch Applications | 16 |
| Needle Type | Single and Twin Needle compatible |
| Thread Tension | Adjustable (1-9 levels) |
| Motor Type | New generation motor for greater piercing power, low noise, longer service life |
| UPC | 635393168701 |

Image: Highlights the new generation motor with features such as more power, low noise, and longer service life, shown alongside the sewing machine.
Warranty and Support
For warranty information or technical support, please contact kidoom customer service. Refer to the product packaging or the manufacturer's website for contact details.