1. Introduction
Thank you for choosing the TOOLIOM CUT-50PRO Plasma Cutter. This manual provides essential information for the safe and efficient operation, maintenance, and troubleshooting of your new plasma cutting machine. Please read this manual thoroughly before operating the equipment and retain it for future reference.

Figure 1: TOOLIOM CUT-50PRO Plasma Cutter and included accessories.
2. Safety Information
Operating a plasma cutter involves significant risks. Always prioritize safety to prevent injury or damage to equipment. This section outlines general safety precautions. Refer to local safety regulations and standards for comprehensive guidelines.
2.1 General Safety Precautions
- Electric Shock: Plasma cutting equipment uses high voltage. Never touch live electrical parts. Ensure the machine is properly grounded. Wear dry welding gloves and protective clothing.
- Fumes and Gases: Plasma cutting produces fumes and gases that can be hazardous to health. Operate in a well-ventilated area or use local exhaust ventilation. Avoid breathing fumes.
- Arc Rays: Arc rays can cause eye injury and burn skin. Always wear a welding helmet with appropriate shade filter, protective clothing, and gloves. Protect bystanders with welding screens.
- Fire and Explosion: Sparks, hot metal, and slag can cause fires. Keep flammable materials away from the cutting area. Have a fire extinguisher readily available. Do not cut containers that have held flammable substances.
- Noise: Excessive noise can damage hearing. Wear ear protection.
- Burns: Hot metal and equipment can cause severe burns. Allow materials to cool before handling.
- Compressed Air: Ensure air compressor and lines are in good condition and rated for the required pressure. Never direct compressed air at yourself or others.
3. Product Overview
The TOOLIOM CUT-50PRO is a 50 Amp plasma cutter featuring a non-touch pilot arc, dual voltage capability (110V/220V), and an IGBT inverter for efficient cutting. It is designed for clean cuts on various metals.
3.1 Key Features
- Cutting Thickness: Ideal clean cut of 1/4" (8mm) at 110V and 5/8" (16mm) at 220V. Maximum cutting capacity is 1/2" (12mm) at 110V and 3/4" (20mm) at 220V.
- Non-Touch Pilot Arc: Reduces energy consumption and electrode burning, extending consumable life. Suitable for cutting stainless steel, alloy steel, mild steel, copper, and aluminum.
- Air Pressure Settings: Maximum air pressure capacity of 50 PSI (0.35 MPa) at 110V and 65 PSI (0.45 MPa) at 220V. Features a post-flow function (5-20 seconds) to cool torch consumables.
- Large Digital Display: Clearly shows air pressure, voltage, and current for real-time monitoring and adjustment.
- Dual Voltage: Connects to 110V or 220V outlets without additional tools.
- Lightweight Design: Weighs approximately 13.23 lbs for portability.
3.2 Components and Accessories

Figure 2: Included accessories for the TOOLIOM CUT-50PRO Plasma Cutter.
- Work Clamp
- Air Hose
- 1/4" NPT Air Connector
- Plasma Cutting Torch
- Power Cord Adapter
- Air Compressor Filter
3.3 Control Panel and Display
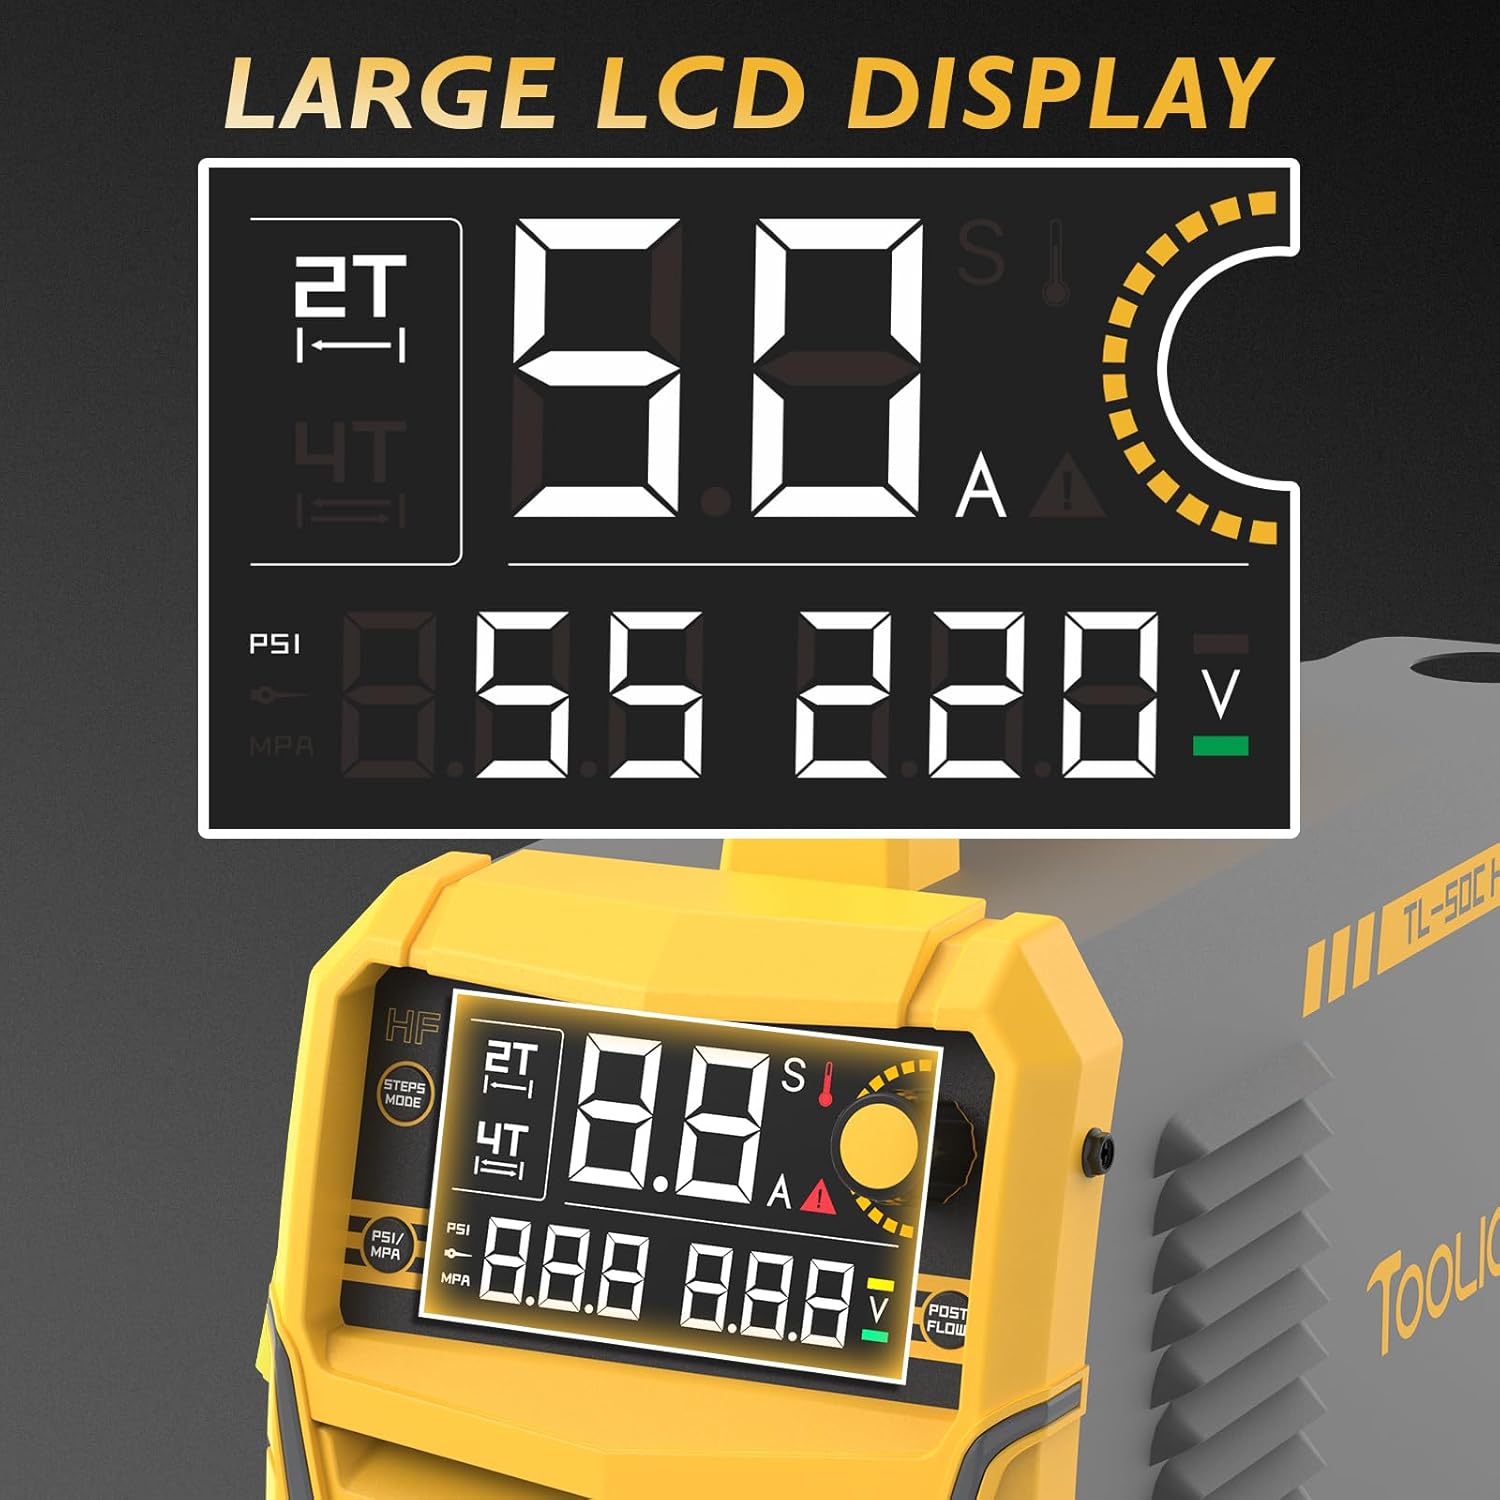
Figure 3: Large LED Display showing operational parameters.

Figure 4: Control Panel Button Introduction.
- Steps Mode Switch (2T/4T)
- PSI / MPA Switch
- Current / Post Gas Time Display
- Gas Pressure Value Display
- Input Voltage Display
- Current / Post Gas Time Knob
- Post Flow Time Switch
3.4 2T/4T Functionality
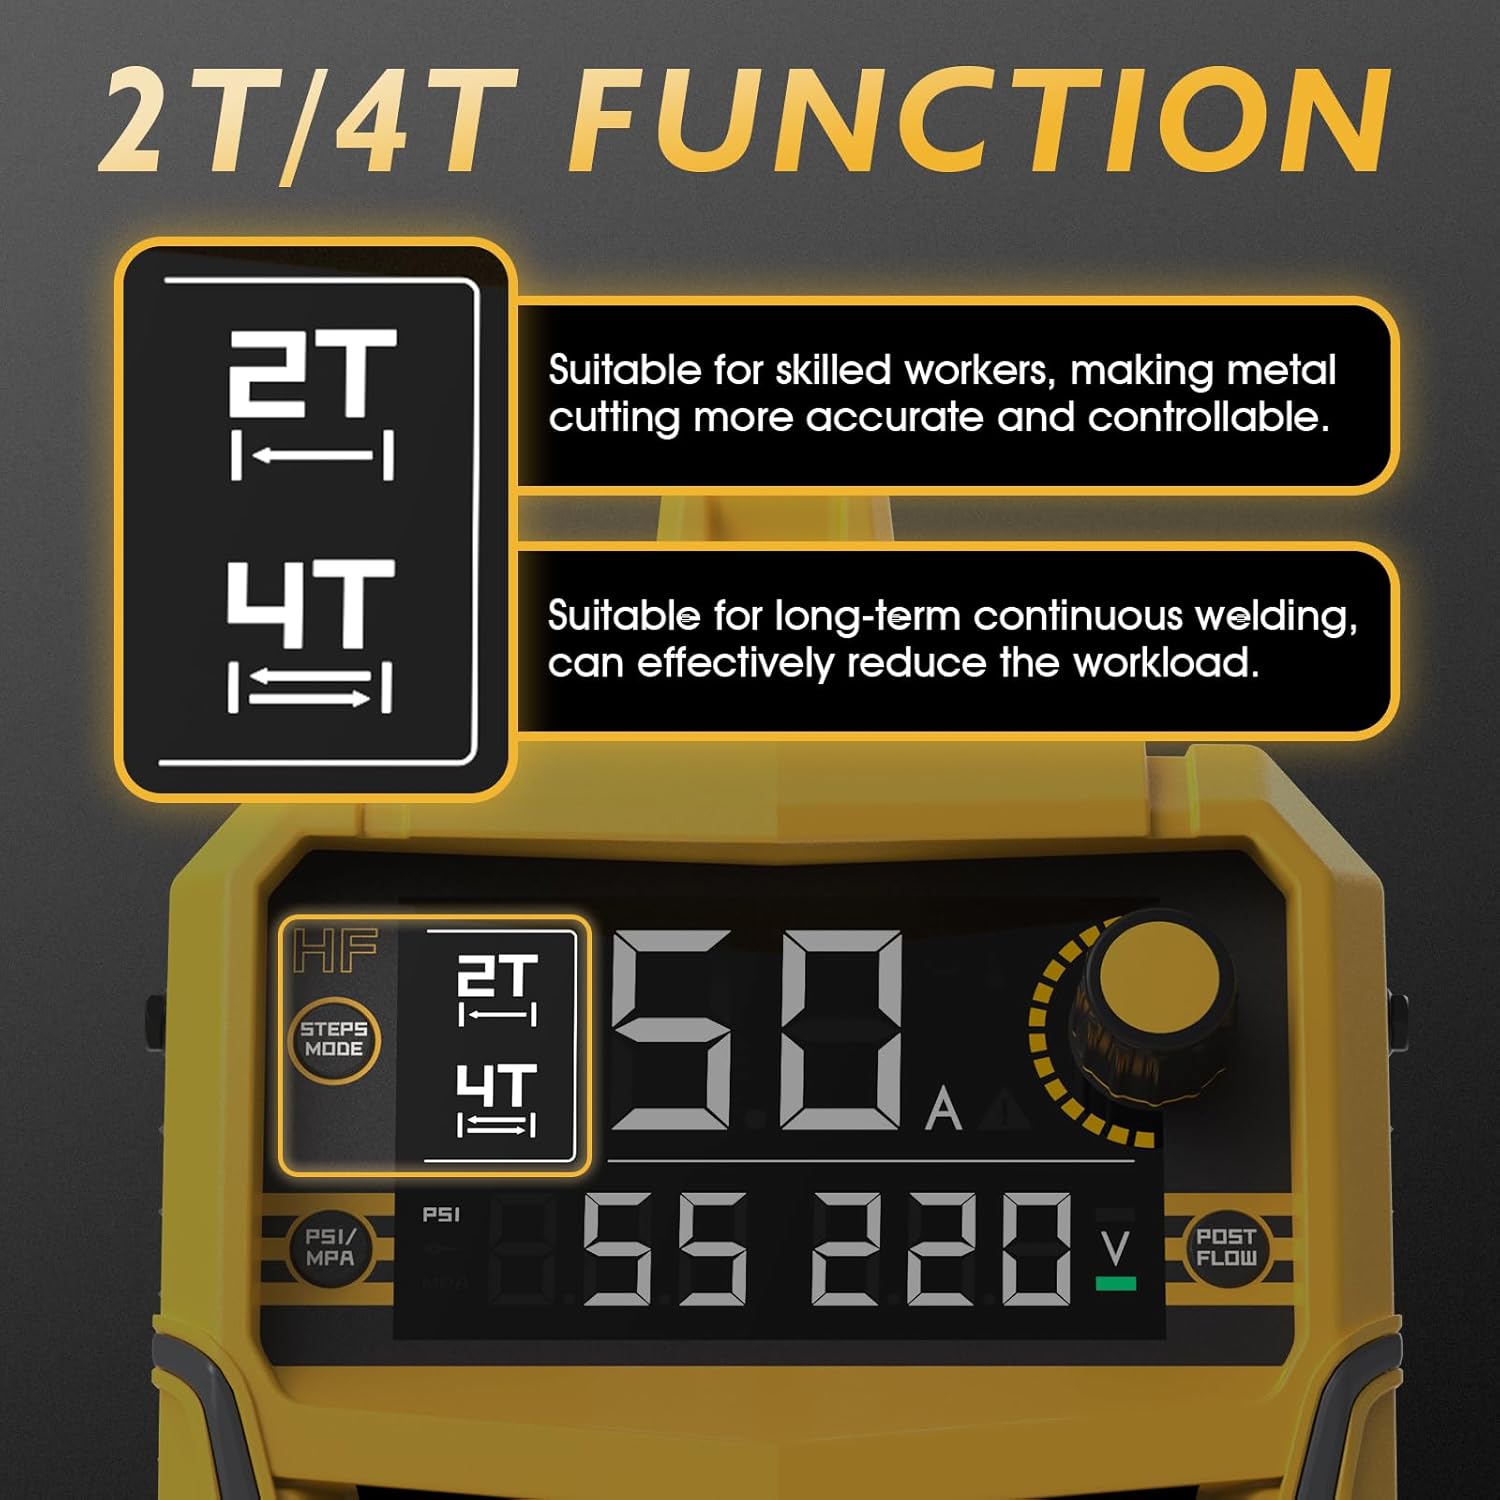
Figure 5: Explanation of 2T and 4T operating modes.
- 2T (Two-Touch) Mode: Suitable for skilled operators, providing more accurate and controllable metal cutting. The torch trigger must be held down during cutting.
- 4T (Four-Touch) Mode: Ideal for long-term continuous cutting, effectively reducing operator workload. Press the trigger once to start the arc, and press again to stop.
3.5 Non-Touch Pilot Arc Technology

Figure 6: Non-Touch Pilot Arc in operation.
The non-touch pilot arc feature allows the torch head to initiate the arc without direct contact with the metal workpiece. This results in better cutting quality and extends the lifespan of consumables.
4. Setup
Proper setup is crucial for safe and effective operation. Follow these steps carefully.
4.1 Power Connection
- Ensure the plasma cutter is switched off before connecting to power.
- The CUT-50PRO supports dual voltage (110V/220V). Use the appropriate power cord adapter for your power supply.
- Connect the power cord to a properly grounded electrical outlet.
4.2 Air Compressor Connection

Figure 7: Built-in air pressure sensor and 1/4" NPT air connector.
- Connect the air hose from your air compressor to the 1/4" NPT air connector on the back of the plasma cutter.
- The machine has a built-in air pressure sensor, eliminating the need for external installation.
- Ensure your air compressor can provide sufficient airflow and pressure for optimal cutting performance (refer to specifications).
4.3 Torch and Ground Clamp Connection
- Connect the plasma cutting torch to the designated port on the front panel.
- Connect the work clamp (ground clamp) to the appropriate terminal on the front panel.
- Securely attach the work clamp to the workpiece, ensuring good electrical contact. The workpiece must be clean and free of rust or paint for effective grounding.
5. Operating Instructions
Follow these steps for safe and effective plasma cutting.
5.1 Pre-Operation Checklist
- Ensure all connections (power, air, torch, ground) are secure.
- Verify adequate ventilation in the work area.
- Wear all necessary personal protective equipment (PPE): welding helmet, gloves, protective clothing.
- Clear the work area of flammable materials.
5.2 Powering On and Setting Parameters
- Turn on the plasma cutter using the main power switch.
- The large LED display will illuminate, showing current, voltage, and air pressure.
- Adjust the cutting current using the Current/Post Gas Time Knob according to the material thickness and type.
- Set the air pressure using the external regulator on your air compressor to the recommended PSI/MPa for your voltage (50 PSI for 110V, 65 PSI for 220V). Use the PSI/MPA Switch to view the desired unit.
- Select 2T or 4T mode using the Steps Mode Switch based on your cutting task.
- Adjust the Post Flow Time using the dedicated switch if needed. This cools the torch after cutting.
5.3 Cutting Procedure
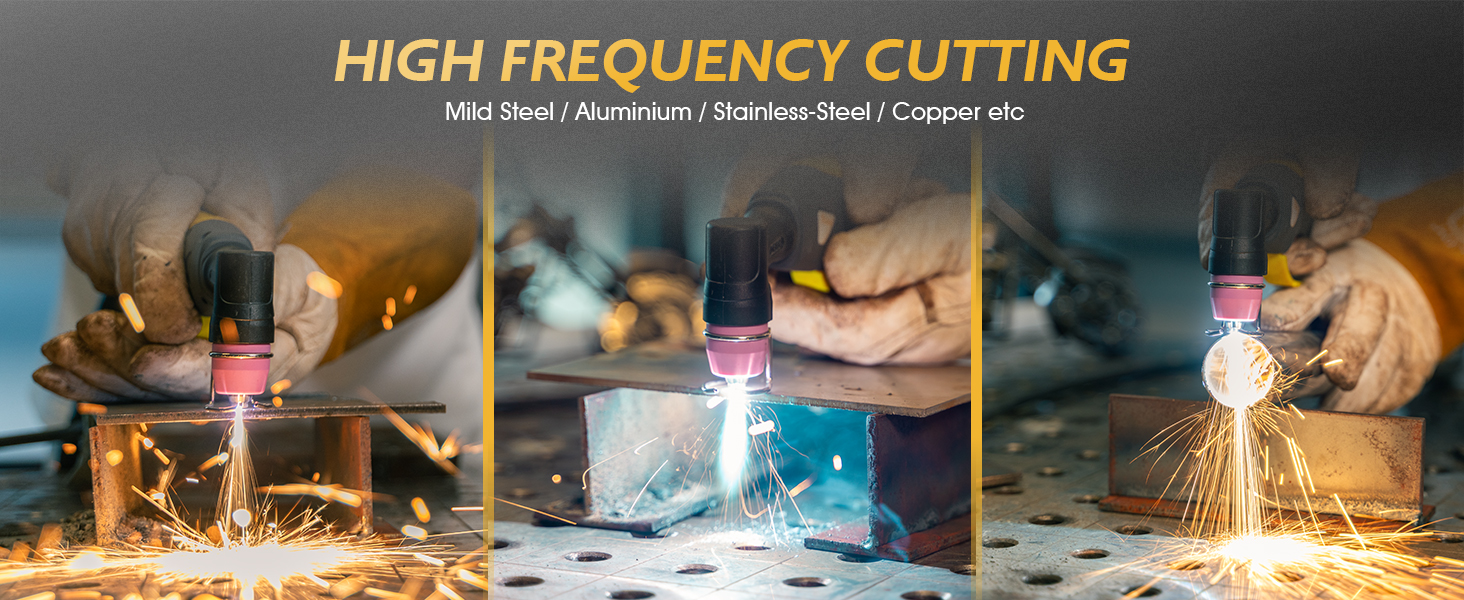
Figure 8: High-frequency cutting on various metals.
- Position the torch nozzle approximately 1/8 inch (3mm) above the workpiece for non-touch pilot arc initiation.
- Press the torch trigger to start the arc. The pilot arc will establish, then the cutting arc will form.
- Move the torch steadily along the desired cut line. Maintain a consistent speed for a clean cut.
- For 2T mode, release the trigger to stop cutting. For 4T mode, press the trigger again to stop.
- Allow the post-flow air to cool the torch consumables after cutting.
5.4 Cutting Thickness Guidelines

Figure 9: Detailed cutting parameters for various materials and voltages.
Refer to the table above for recommended current, air pressure, and cutting speeds for different materials and thicknesses at both 110V and 220V. These are general guidelines; actual performance may vary based on material condition and operator technique.
6. Maintenance
Regular maintenance ensures the longevity and optimal performance of your plasma cutter.
6.1 Daily Maintenance
- Inspect the plasma torch consumables (electrode, nozzle, shield cup) for wear or damage. Replace as needed.
- Check all cables and hoses for cuts, abrasions, or loose connections.
- Clean the exterior of the machine to prevent dust and debris buildup.
6.2 Weekly/Monthly Maintenance
- Drain any moisture from the air compressor and the plasma cutter's internal air filter (if applicable).
- Inspect the cooling fan for obstructions. Ensure proper airflow around the machine.
- Check the ground clamp for good contact surfaces and clean if necessary.
6.3 Torch Consumables

Figure 10: TL-AG60 Plasma Cutting Torch components.
The plasma torch uses several consumable parts that require regular inspection and replacement. These include the electrode, nozzle, and ceramic nozzle (shield cup). Replace these components when they show signs of wear, such as a widened orifice in the nozzle or a pitted electrode, to maintain cutting quality and efficiency.
7. Troubleshooting
This section provides solutions to common operational issues. For problems not listed here, contact customer support.
| Problem | Possible Cause | Solution |
|---|---|---|
| No arc initiation | No power; poor ground connection; worn consumables; insufficient air pressure. | Check power supply; ensure ground clamp is secure and clean; replace torch consumables; verify air pressure. |
| Poor cut quality / Rough cut | Incorrect cutting speed; worn consumables; incorrect air pressure; wrong current setting. | Adjust cutting speed; replace consumables; set correct air pressure; adjust cutting current. |
| Machine shuts down during operation | Overheating (thermal overload); low input voltage. | Allow machine to cool down; check input voltage and ensure it's within specifications. |
| Air flows but no arc | Torch trigger issue; internal fault; consumables not seated correctly. | Check torch trigger; reseat consumables; contact support if problem persists. |
8. Specifications
Technical specifications for the TOOLIOM CUT-50PRO Plasma Cutter.
- Model Number: CUT-50PRO
- Manufacturer: TOOLIOM
- Input Voltage: 110V/220V Dual Voltage
- Output Current: 20-50 Amps
- Clean Cut Thickness (110V): 1/4" (8mm)
- Max Cut Thickness (110V): 1/2" (12mm)
- Clean Cut Thickness (220V): 5/8" (16mm)
- Max Cut Thickness (220V): 3/4" (20mm)
- Max Air Pressure (110V): 50 PSI (0.35 MPa)
- Max Air Pressure (220V): 65 PSI (0.45 MPa)
- Item Weight: Approximately 13.23 lbs (21.4 pounds as per product data)
- Dimensions: 16.14" x 6.10" x 11.02" (410mm x 155mm x 280mm)
- Power Source: AC
- Included Components: 50A Plasma Cutter (main unit), Plasma Cutting Torch, Work Clamp, Air Hose, 1/4" NPT Air Connector, Power Cord Adapter, Air Compressor Filter.

Figure 11: Physical dimensions and weight of the plasma cutter.
9. Warranty and Support
For warranty information, technical support, or service inquiries, please refer to the warranty card included with your product or contact TOOLIOM customer service directly. Keep your purchase receipt as proof of purchase for warranty claims.
Contact Information: Please visit the official TOOLIOM website or refer to the contact details provided in your product packaging for the most up-to-date support information.