
1. Introduction
The EnhanBili CMS260 is an advanced all-in-one controller designed for LED screens, integrating both video processing and video control functionalities into a single unit. This device features 4 Ethernet output ports, enabling it to drive up to 2.6 million pixels. It supports a maximum output width and height of 3840 pixels, making it suitable for a wide range of LED display applications. This manual provides essential information for the proper setup, operation, and maintenance of your CMS260 controller.
2. Product Features
- Integrated video processing and control capabilities.
- Four Ethernet output ports for extensive pixel driving capacity.
- Supports up to 2.6 million pixels.
- Maximum output resolution of 3840 pixels in both width and height.
- Multiple input interfaces including HDMI, DVI, and SDI.
- Intuitive front panel controls for easy operation.
3. Safety Guidelines
Please read and follow these safety instructions carefully to prevent damage to the device and ensure user safety:
- Ensure the input voltage matches the device's requirements (AC 100-240V).
- Do not expose the device to moisture or extreme temperatures.
- Avoid blocking ventilation openings to prevent overheating.
- Only use accessories specified by the manufacturer.
- Disconnect power before cleaning or servicing the device.
- Refer all servicing to qualified personnel.
4. Package Contents
Upon unpacking, please verify that all items are present and in good condition:
- EnhanBili CMS260 LED Screen All-in-One Video Controller
- Power Cable
- USB Cable (for control PC connection)
- User Manual (this document)

Figure 4.1: Packaging dimensions. The package measures approximately 550 mm in length, 400 mm in width, and 175 mm in height.
5. Component Identification
5.1. Overall View
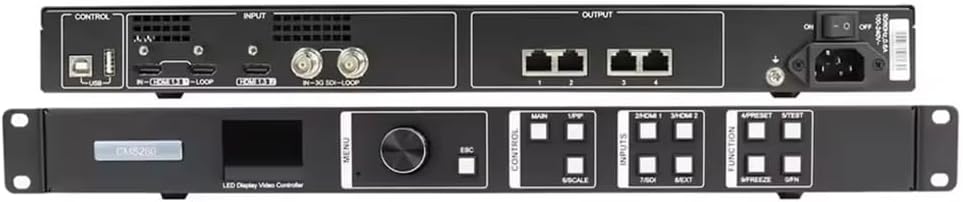
Figure 5.1: Overall view of the CMS260 controller, displaying the front panel with controls and the rear panel with input/output ports.
5.2. Front Panel

Figure 5.2: The front panel features a display screen, a rotary knob for navigation, an ESC button, and various control buttons for inputs (MAIN, PIP, 2HDMI 1, 2HDMI 2) and functions (PRESET, TEST, FREEZE, OPN).
5.3. Rear Panel

Figure 5.3: The rear panel includes a USB control port, HDMI input/loop ports, SDI input/loop ports, four Ethernet output ports (1-4), and the AC power input with an ON/OFF switch.
6. Installation and Connections
Follow these steps to properly connect your CMS260 controller:
- Power Connection: Connect the provided AC power cable to the power input on the rear panel of the CMS260 and then to a suitable power outlet. Ensure the power switch is in the OFF position before connecting.
- Control PC Connection: Connect a USB cable from your control PC to the USB control port on the rear panel of the CMS260. This allows for software-based control and configuration.
- Video Source Connections: Connect your video sources (e.g., laptops, cameras) to the input ports on the rear panel. The CMS260 supports HDMI and SDI inputs. Use the LOOP ports if you need to pass the signal through to another device.
- LED Screen Output: Connect RJ45 Ethernet cables from the four Ethernet output ports (1-4) on the rear panel of the CMS260 to your LED screen receiving cards. Ensure proper cabling for pixel mapping.

Figure 6.1: Connection diagram illustrating how to connect a control PC via USB, HDMI sources, an SDI source, and the LED screen via RJ45 Ethernet cables to the CMS260 controller.
7. Basic Operation
7.1. Powering On/Off
After all connections are made, switch the power button on the rear panel to the ON position. The device will power on, and the front panel display will illuminate. To power off, switch the button to the OFF position.
7.2. Input Selection
Use the input selection buttons on the front panel (MAIN, PIP, 2HDMI 1, 2HDMI 2) to switch between different video sources. The selected input will be displayed on the front panel screen.
7.3. Output Configuration
The CMS260 allows for flexible output configuration to your LED screen. Detailed pixel mapping and advanced settings are typically managed via the control software connected through the USB port. Refer to the software manual for advanced output configurations.
8. Technical Specifications
| Feature | Specification |
|---|---|
| Model Number | CMS260 |
| Input Voltage | AC 100-240V |
| Overall Consumption | 28W |
| Operating Temperature | -20℃ to 60℃ |
| Net Weight | 3.2 Kg (7.04 pounds) |
| Gross Weight | 5.3 Kg |
| Product Dimensions (L x W x H) | 19.09 x 9.84 x 1.97 inches (485 x 250 x 50 mm) |
| Compatible Devices | Laptop (and other HDMI/SDI sources) |
| Connector Type | DVI, HDMI, SDI, USB, RJ45 Ethernet |
| Certifications | CE, FCC, RoHS |

Figure 8.1: Detailed dimensions of the CMS260 controller, indicating a width of 482.6 mm, depth of 250.0 mm, and height of 50.1 mm.
9. Troubleshooting
If you encounter issues with your CMS260 controller, refer to the following common problems and solutions:
- No Power: Ensure the power cable is securely connected and the power switch is ON. Verify the power outlet is functional.
- No Video Output: Check all input and output cable connections. Confirm the correct input source is selected on the front panel. Verify the LED screen is properly configured and receiving signals.
- Image Distortion/Incorrect Colors: Check cable integrity. Ensure the output resolution and refresh rate settings in the control software match the LED screen's capabilities.
- Control Software Not Connecting: Verify the USB cable connection. Ensure the correct drivers are installed on your control PC. Restart both the controller and the PC.
10. Care and Maintenance
To ensure the longevity and optimal performance of your CMS260 controller:
- Keep the device in a clean, dry environment, away from direct sunlight and excessive dust.
- Clean the exterior with a soft, dry cloth. Do not use liquid cleaners or aerosols.
- Ensure proper ventilation around the device to prevent overheating.
- Regularly check cable connections for security and wear.
11. Warranty and Support
For warranty information and technical support, please refer to the documentation provided at the time of purchase or contact EnhanBili customer service through their official website or authorized distributors. Please have your product model number (CMS260) and purchase details ready when contacting support.