Furnulem DS-019-cl-55-P01
Furnulem White Dresser with LED Lights & Charging Station - Instruction Manual
Model: DS-019-cl-55-P01
1. Introduction
This manual provides detailed instructions for the assembly, operation, maintenance, and troubleshooting of your Furnulem White Dresser with LED Lights & Charging Station. Please read this manual thoroughly before assembly and use to ensure proper function and safety.
2. Safety Information
Important Safety Instructions
- Read all instructions carefully before assembly and use.
- Keep all small parts and packaging materials away from children and pets to prevent choking hazards.
- Ensure all screws and fasteners are securely tightened before use. Periodically check and re-tighten as necessary.
- Do not overload drawers or shelves. Refer to specifications for weight limits.
- Always use the included anti-tip kit to secure the dresser to a wall. This is crucial to prevent serious injury from tipping.
- Do not climb on or allow children to climb on the dresser.
- Keep liquids away from the charging station and electrical components.
- Unplug the charging station when not in use or during electrical storms.
3. Package Contents
Please verify that all components listed below are present before beginning assembly.
- Metal Frame Components
- Wooden Top Panel
- Fabric Drawers (various sizes)
- LED Light Strip
- Charging Station (2 AC outlets, 2 USB ports)
- Power Cord (4.9-foot)
- Assembly Hardware (screws, bolts, etc.)
- Assembly Tool (Allen wrench)
- Anti-Tip Kit
4. Setup
Assembly Instructions
Follow these steps carefully for proper assembly. It is recommended to assemble the dresser on a soft, clean surface to prevent scratches.
Step 1: Assemble the Base Frame
Begin by connecting the main vertical and horizontal metal frame components. Ensure all connections are secure.

This image illustrates the overall product dimensions and the varying sizes of the 12 storage drawers, including their individual weight capacities.
Step 2: Attach the Top Panel
Carefully place the wooden top panel onto the assembled frame. Secure it using the provided screws. The video below demonstrates the process of screwing in the top board.
This video demonstrates the assembly process, specifically highlighting how to secure the top panel to the dresser frame using the provided tools.
Step 3: Install the Charging Station and LED Lights
Insert the charging station into the designated cutout on the top panel. Connect the LED light strip to its power source and adhere it to the underside of the top shelf.

This image provides a detailed view of the integrated charging station, featuring two 5V/2A USB ports and two 125V/12A AC outlets, along with its 4.9-foot power cord.

This image displays the dresser functioning as a TV stand, with the smart RGB LED lights active in the open shelf compartment, highlighting various control options.
Step 4: Assemble and Insert Fabric Drawers
Unfold each fabric drawer and insert the bottom panel to create a sturdy box. Attach the wooden handles to the front of each drawer.

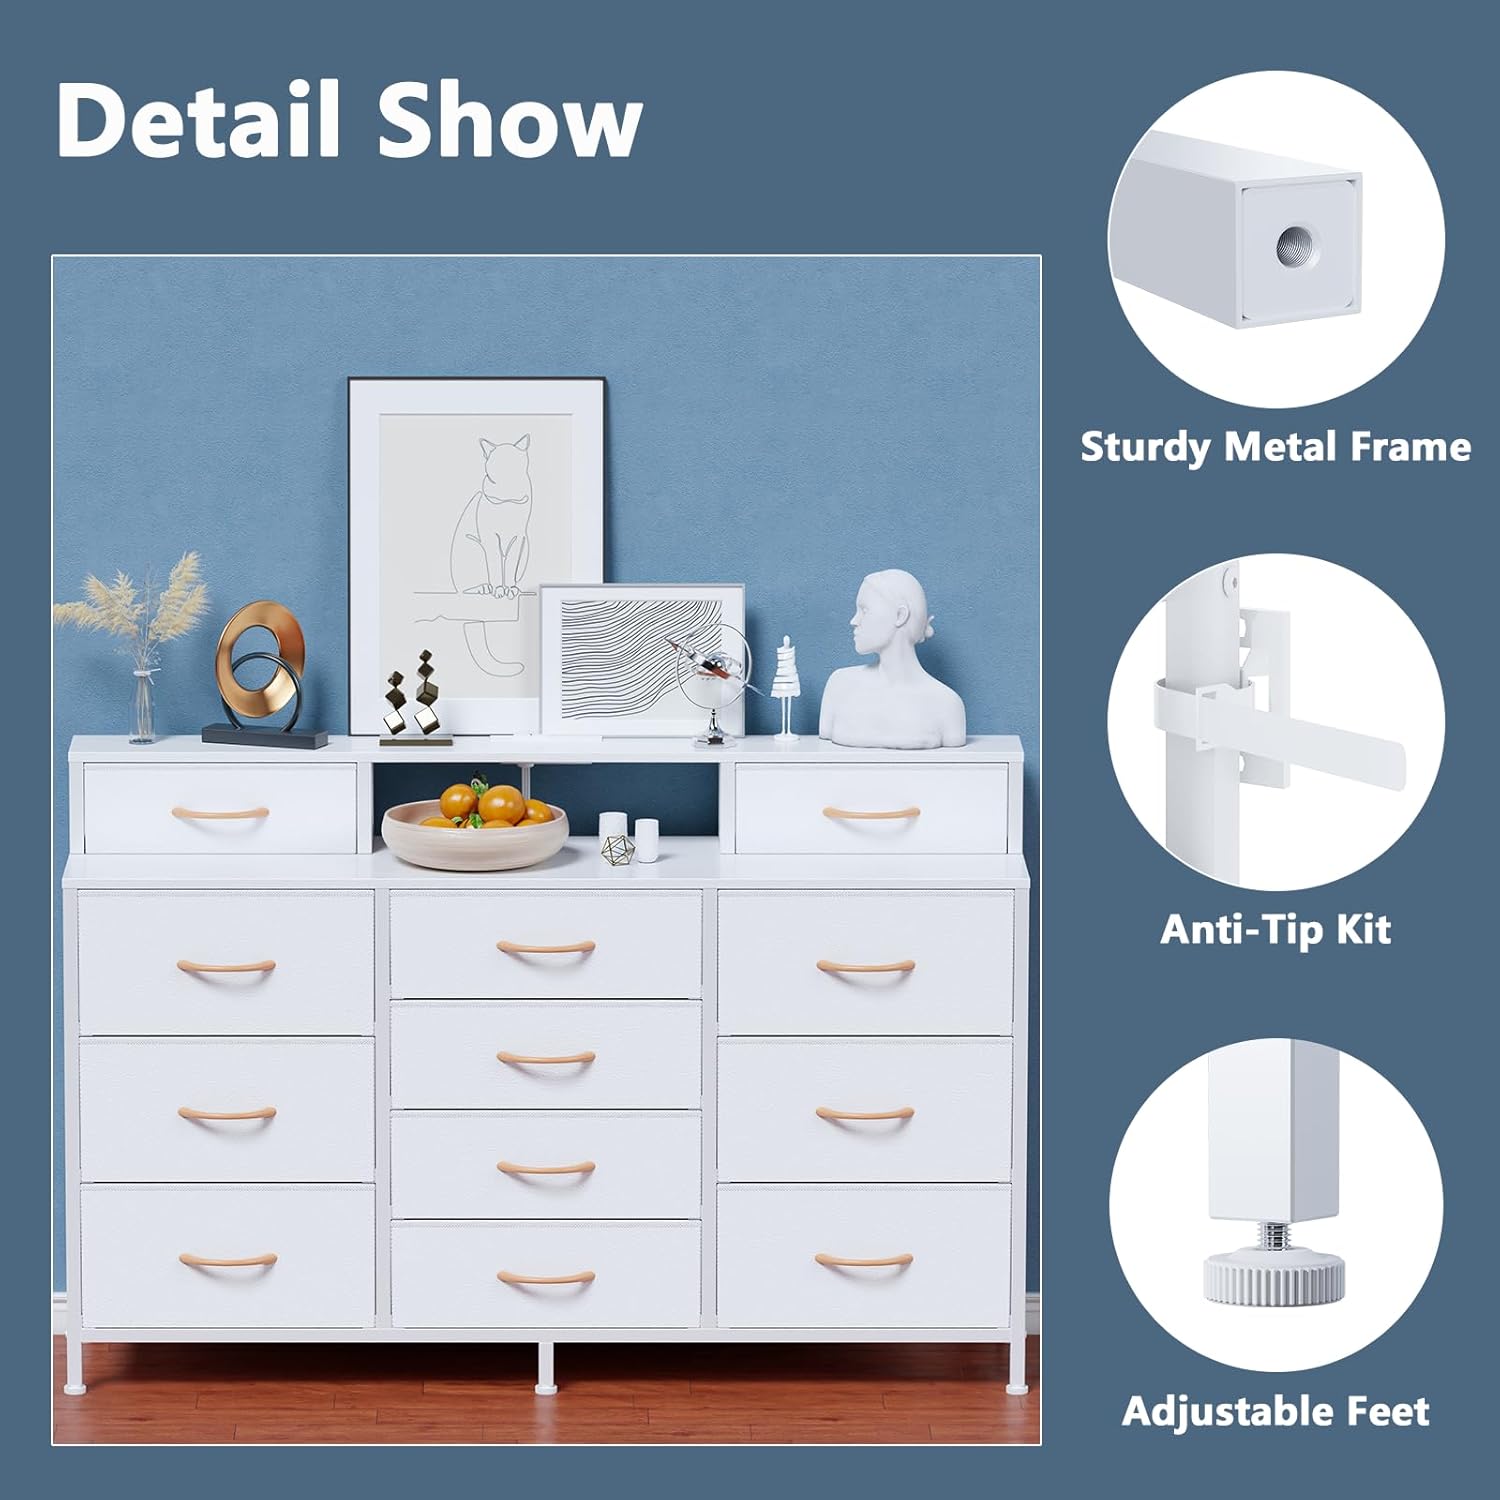
This image highlights key construction details: the sturdy metal frame, the anti-tip kit for safety, and the adjustable feet for stability on uneven surfaces.
This image illustrates the spacious interior of the dresser, showcasing the 12 large fabric drawers filled with various household items, emphasizing its storage capacity.
Once assembled, slide the drawers into their respective compartments in the dresser frame.
Step 5: Install Anti-Tip Kit
Securely attach the anti-tip kit to the back of the dresser and to a wall stud using the provided hardware. This step is critical for safety.
5. Operating Instructions
LED Light Operation
- The smart RGB LED lights can be controlled via a mobile application or the included remote control.
- Mobile App Control: Download the specified app (check product packaging or online listing for app name) to access over 60,000 color options, adjust brightness, change modes, and set timing functions.
- Remote Control: Use the remote to select from 29 preset RGB LED light colors, adjust brightness, and cycle through various lighting modes.
- Music Sync: The built-in microphone allows the lights to sync with music, creating dynamic lighting effects.
Charging Station Usage
- Plug the dresser's power cord into a standard wall outlet.
- Use the 2 AC outlets (125V/12A) to power devices such as lamps or small electronics.
- Use the 2 USB ports (5V/2A) to charge mobile phones, tablets, headphones, and other USB-powered devices.
6. Maintenance
Care and Cleaning
- Cleaning the Frame and Top: Wipe surfaces with a soft, damp cloth. Avoid abrasive cleaners or harsh chemicals that may damage the finish.
- Cleaning Fabric Drawers: Spot clean fabric drawers with a mild detergent and water. Allow to air dry completely before reinserting. Do not machine wash.
- Electrical Components: Keep the charging station and LED lights dry. Do not immerse in water.
- Regular Checks: Periodically inspect all screws and connections to ensure they remain tight. Re-tighten as needed.
7. Troubleshooting
Common Issues and Solutions
| Problem | Possible Cause | Solution |
|---|---|---|
| Dresser is wobbly | Uneven floor; loose connections | Adjust the leveling feet at the bottom of the dresser. Check and tighten all assembly screws. |
| LED lights not working | Power cord unplugged; loose connection; remote battery low | Ensure the power cord is securely plugged into the wall and the LED strip. Check connections to the charging station. Replace remote batteries if necessary. |
| Charging station not providing power | Power cord unplugged; circuit breaker tripped | Verify the power cord is fully inserted into the wall outlet. Check your home's circuit breaker. |
| Drawers do not slide smoothly | Overloaded drawer; fabric not fully extended | Reduce the weight in the drawer. Ensure the fabric drawer is fully unfolded and the bottom panel is correctly inserted. |
8. Specifications
Product Specifications
| Feature | Detail |
|---|---|
| Brand | Furnulem |
| Model Name | DS-019-cl-55-P01 |
| Product Dimensions | 11.81"D x 55.12"W x 35.2"H |
| Color | White |
| Mounting Type | Floor Mount |
| Room Type | Bedroom, Kids Room, Living Room, Nursery, Playroom |
| Special Features | Adjustable Feet, Fade Resistant, Space Saving, LED Lights, Charging Station |
| Assembly Required | Yes |
| Item Weight | 40.8 pounds |
| Charging Station | 2 AC Outlets (125V/12A), 2 USB Ports (5V/2A), 4.9-foot Power Cord |
| LED Lights | Smart RGB, 29 preset colors, >60,000 app colors, Mobile App + Remote Control, Music Sync, Timing functions |
9. Warranty and Support
Warranty Information
For warranty details and customer support, please refer to the warranty card included with your product or visit the official Furnulem website.
Contact Support: For any questions or assistance, please contact Furnulem customer service through their official channels.
Online Resources: Additional support and FAQs may be available on the Furnulem Store on Amazon.
Ask a question about this manual
Ask about setup, troubleshooting, compatibility, parts, safety, or missing instructions. Manuals+ will review the question and use this page’s manual context to help answer it.