1. Important Safety Information
Please read and understand this entire manual before attempting to assemble, operate, or install the product. Failure to follow these instructions could result in electric shock, fire, or serious personal injury.
- Ensure all electrical connections comply with local codes and ordinances, as well as the National Electrical Code (NEC).
- Consult a qualified electrician if you are unfamiliar with electrical wiring.
- Before installation, disconnect power by turning off the circuit breakers at the main fuse box.
- The fan must be mounted with a minimum of 7 feet (2.1 meters) clearance from the floor to the trailing edge of the blades.
- Do not use the fan with a dimmer switch for speed control; use only the provided remote control.
2. Package Contents
Verify that all components are present before beginning installation.
- Motor Assembly
- Fan Blades (5)
- Dimmable LED Light Kit
- Remote Control
- Mounting Bracket
- Downrod
- Hardware Pack (screws, wire nuts, etc.)
- User Manual

Image: Overview of the Regair 42-inch ceiling fan, including the main unit, fan blades, and remote control.
3. Setup and Installation
Follow these steps for proper installation. It is recommended to have two people for installation.
3.1 Mounting Options
The fan supports both downrod and angled mounting configurations.

Image: Illustration showing the Downrod Mount and Angled Mount options for ceiling fan installation.
3.2 Wiring
Connect the fan's electrical wires to your household wiring. Ensure all connections are secure using wire nuts. The fan is designed for standard wall switch control for on/off functionality, but speed and light dimming are controlled via the remote.

Image: Visual guide indicating that the fan is suitable for standard wall switches but not for dimmer switches.
3.3 Blade and Light Kit Installation
Attach the five fan blades securely to the motor housing. Install the LED light kit according to the instructions provided in the package. Ensure all connections are firm.
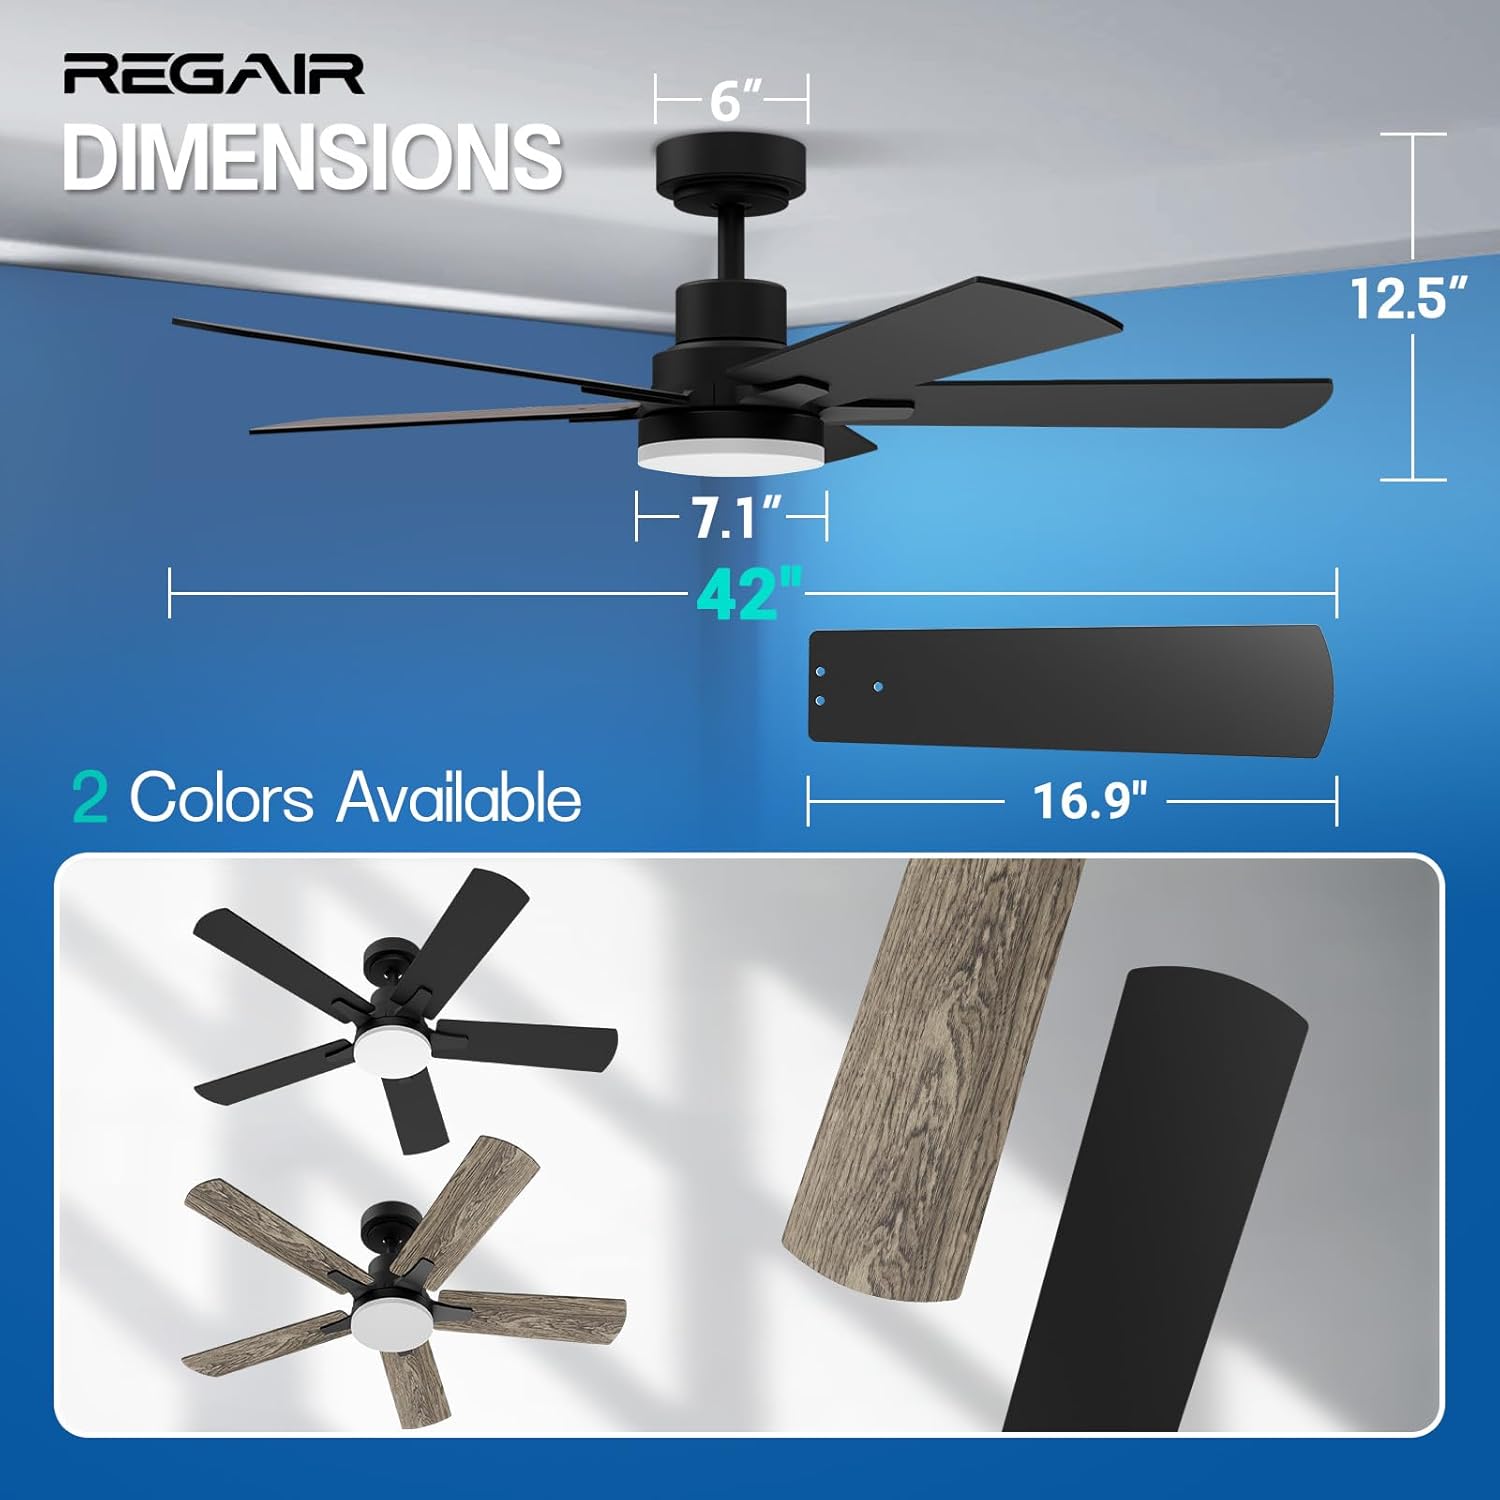
Image: Detailed dimensions of the 42-inch ceiling fan and a close-up of a fan blade.
4. Operating Instructions
Your Regair ceiling fan is controlled by the included remote control.
4.1 Remote Control Functions

Image: Diagram of the remote control, highlighting buttons for fan on/off, 6-speed selection, LED on/off/color change, reverse airflow, light brightness adjustment, and timing functions.
- Fan On/Off: Powers the fan on or off.
- Speed Selection (1-6): Adjusts fan speed from 1 (lowest) to 6 (highest).
- LED On/Off/Color Change: Toggles the light on/off and cycles through color temperatures (3000K, 4000K, 6500K).
- Reverse Airflow: Changes the direction of blade rotation for summer or winter mode.
- Light Brightness (+/-): Dims or brightens the LED light (10% to 100%).
- Timing Function (1H/3H/6H): Sets the fan to turn off automatically after 1, 3, or 6 hours.
4.2 Light Adjustment
The integrated LED light offers three color temperatures and dimmable brightness.

Image: Display of the three available light color temperatures (Warm White, Natural White, Cool White) and the 10%-100% dimming range.
4.3 Reversible DC Motor
The reversible motor allows for year-round comfort and energy efficiency.
- Summer Mode (Downdraft): Blades rotate counter-clockwise, pushing cool air down.
- Winter Mode (Updraft): Blades rotate clockwise, drawing cool air up and circulating warm air trapped near the ceiling.

Image: Illustration demonstrating the fan's reversible function, showing downdraft for summer and updraft for winter.
4.4 Quiet Operation and Timer Function
The DC motor operates quietly, ensuring minimal disturbance. Use the timer function to automatically turn off the fan after a set period.

Image: Visual representation of the fan's low noise output (below 35dB) and available timer settings.
4.5 Setting Lighting Preferences
To save your preferred light color temperature and brightness:
- Turn on the light and set your desired color temperature and brightness.
- Maintain these settings for at least 10 seconds.
- Turn off the light with the remote control and wait 30 seconds.
- When you turn the lighting on again with the remote control, it will recall your preference settings.

Image: Step-by-step visual instructions for saving preferred light color and brightness settings.
5. Maintenance
Regular maintenance ensures optimal performance and longevity of your ceiling fan.
- Cleaning: Use a soft, damp cloth to clean the fan blades and motor housing. Do not use abrasive cleaners or solvents.
- Blade Balance: Periodically check that all blade screws are tight. If the fan wobbles, ensure blades are balanced.
- Light Cover: The acrylic light cover can be gently wiped clean.
6. Troubleshooting
If you experience issues with your fan, refer to the following common problems and solutions.
| Problem | Possible Cause | Solution |
|---|---|---|
| Fan does not start | No power, loose wiring, remote not paired. | Check circuit breaker. Ensure all wiring connections are secure. Re-pair remote control if necessary (refer to remote instructions). |
| Light does not work | Loose connection, LED failure, remote battery. | Check light kit wiring. Replace remote battery. If LED is faulty, contact support. |
| Fan wobbles | Loose blades, unbalanced blades, loose mounting. | Ensure all blade screws are tight. Use balancing kit (not included) if needed. Verify mounting bracket is securely fastened to the ceiling. |
| Remote not responding | Dead battery, remote not paired, interference. | Replace remote battery. Re-pair remote. Ensure no obstructions between remote and fan receiver. |
7. Specifications
| Feature | Detail |
|---|---|
| Brand | Regair |
| Model Number | 1170 |
| Size | 42 inches |
| Color | Matte Black |
| Material | Engineered Wood, Metal |
| Motor Type | DC Motor (Reversible) |
| Noise Level | Less than 35 dB |
| Light Source | Dimmable LED (3CCT: 3000K, 4000K, 6500K) |
| Brightness Range | 10% - 100% |
| Fan Speeds | 6 |
| Timer Settings | 1H, 3H, 6H |
| Control Method | Remote Control |
| Voltage | 120 Volts |
| Wattage | 32 watts |
| Certifications | ETL Listed |
| Product Dimensions | 42 x 12.5 x 42 inches |
| Item Weight | 13.86 pounds |
8. Warranty and Support
The Regair 42-inch ceiling fan is backed by a 3-Year Warranty, ensuring quality and performance.

Image: Promotional image highlighting features such as Eye-Care LED Beads, ETL Listing, and a 3-Year Warranty.
For technical assistance, troubleshooting not covered in this manual, or warranty claims, please contact Regair customer support. Refer to your purchase documentation for specific contact details or visit the official Regair website.