ZLPOWER B0DSKCK6VQ
ZLPOWER Photo Booth Instruction Manual
Model: B0DSKCK6VQ
1. Introduction
This manual provides comprehensive instructions for the setup, operation, maintenance, and troubleshooting of your ZLPOWER Photo Booth. Designed for versatility, this photo booth is compatible with various iPad sizes (10.2", 10.9", 11", 12.9") and DSLR cameras, making it suitable for a wide range of events and professional use. Please read this manual thoroughly before operating the device to ensure safe and optimal performance.
2. Product Overview
The ZLPOWER Photo Booth is a dual-use selfie station featuring an RGB ring light and a honeycomb box design. It is engineered for ease of use and portability, making it an ideal solution for rental events, weddings, and other social gatherings.
Key Features:
- Dual Compatibility: Supports all iPad sizes (10.2", 10.9", 11", 12.9") and popular DSLR camera brands (Canon, Nikon, Sony).
- Customizable Logo & LED Light Box: Features a standard logo area with an LED light box for enhanced visibility and branding.
- RGB Ring Light: Offers adjustable brightness and color, including voice-activated modes, to match any event atmosphere.
- Social Media Integration: Easily share photos and videos to platforms like Instagram, Facebook, YouTube, and TikTok.
- Printer Connectivity: Supports connection to a printer for instant photo prints.
- Durable Construction: Built with a stable metal case and thickened metal base for reliability.

Figure 2.1: ZLPOWER Photo Booth with RGB Ring Light and Honeycomb Box. This image shows the complete photo booth setup with three individuals holding heart-shaped balloons, indicating its use for events.
3. Specifications
| Feature | Detail |
|---|---|
| Model | B0DSKCK6VQ (Honeycomb Box Black) |
| Dimensions (Package) | 45 x 18 x 15 inches |
| Item Weight | 69 pounds |
| Material | Aluminum, Plastic |
| Light Source Type | LED (RGB Ring Light) |
| Power Interface | Supports 100-240V wide voltage |
| iPad Compatibility | 10.2" (7th, 8th, 9th Gen), 10.5" (Pro 2017, Air 3 2019), 10.9" (Air 4 2020, Air 5 2022), 11" (Pro 2018, 2020, 2021, 2022), 12.9" (Pro 3 2018, 4 2020, 5 2021, 6 2022) |
| Camera Compatibility | Canon, Nikon, Sony DSLR cameras |
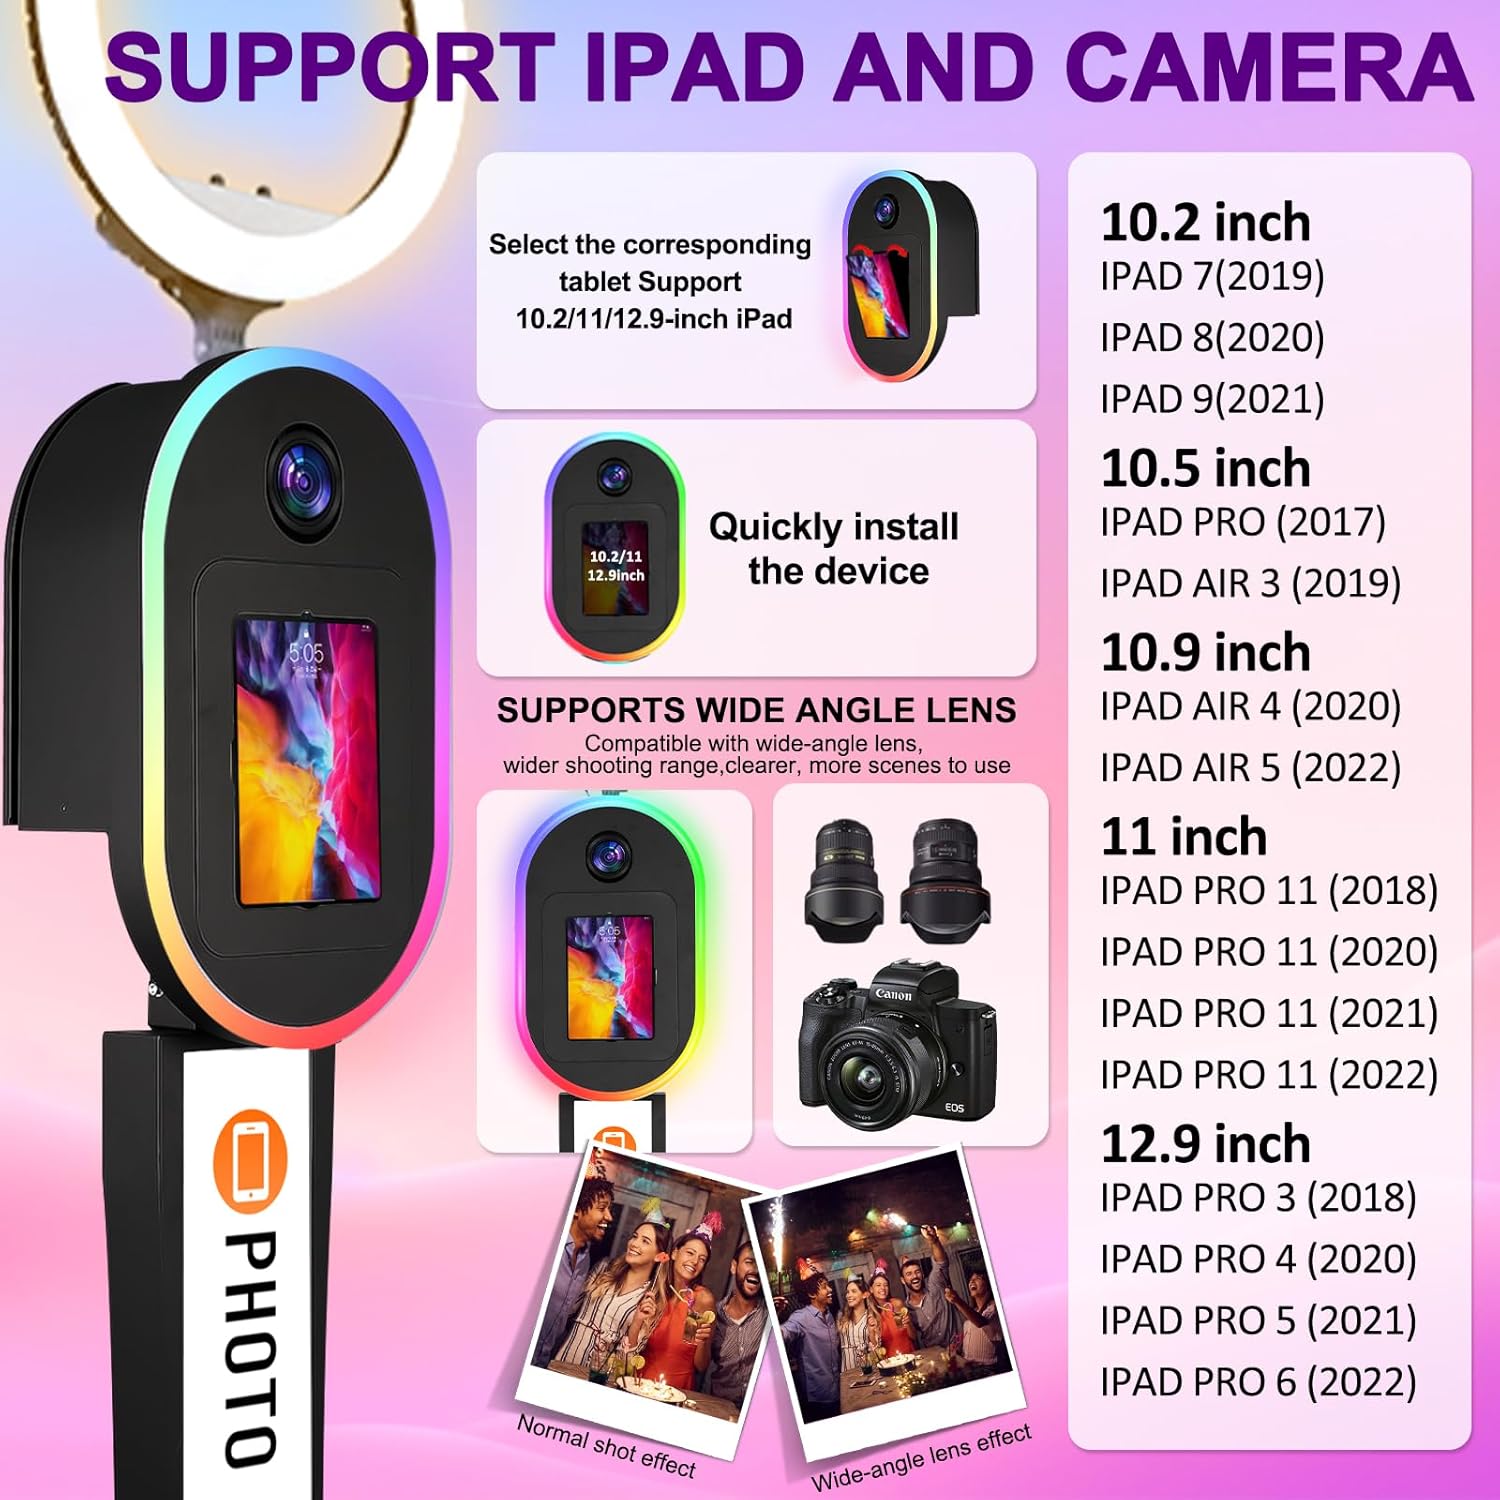
Figure 3.1: Detailed compatibility chart for various iPad models and DSLR cameras. This image visually lists the supported iPad sizes and camera brands, along with illustrations of how they fit into the photo booth head unit.

Figure 3.2: Diagram illustrating key components and features of the photo booth, including the fill light, DSLR support, iPad panel, customized logo area, LED light box, supporting base, power interface, safety lock, and wheels/foot pads.
4. Setup and Assembly
Follow these steps to assemble your ZLPOWER Photo Booth. Ensure all components are present before beginning assembly.
Components Checklist:
- iPad DSLR Head Box
- Connecting Strut
- 10.2/11 inch iPad Panel (if applicable)
- LED Light Box
- Printer Stand
- Square Base
- Accessory Bag (screws, hex wrench, Phillips screwdriver)
Assembly Steps:
- Base Installation:
Place the LED light box horizontally. Move the acrylic sheet and remove the power cord. Close the acrylic sheet. Select 4*M6 hex socket screws and spacers. Align the bottom of the LED light box with the square base. Be sure to insert it to the bottom. Screw the M6 hex socket screws to secure the base. The bottom two places should be locked as well. Use a hex wrench to tighten the screws.
Video 4.1: ZLPOWER T Photo Booth for iPad and Camera Installation Video. This video demonstrates the step-by-step assembly process, starting with the base installation.
- Printer Bracket Installation:
Flip the LED light box. Select 2*M6 hex socket screws and spacers. Select the printer stand. Align it with the hole position. Lock the 2*M6 hex socket screws. Use a hex wrench to lock the screws.
- Support Connecting Rod Installation:
Install and place the support connecting rod on the ground. Select 4*M6 Phillips screws. The power cable is fed into the support connecting rod. Use a Phillips screwdriver to lock the screws.
- iPad DSLR Head Box Installation:
Select the iPad DSLR header box. The power cord is threaded through the bottom. Screw on the M6 screws. Use a hex wrench to tighten the screws.
- iPad and DSLR Camera Installation:
Use the key to open the back cover. Connect the upper and lower power cables. Align the male and female notch clasp and connect them. Remove the iPad support strip. Put the iPad in the corresponding size slot. 10.2-11 inch iPad needs a replacement panel. Lock the iPad support bar. Choose the right DSLR screw. Place the camera on the camera set platform. Align camera hole locking screws. Move the camera so the lens fits into the glass. Turn the camera mounting screw. Supports rotation and small angle adjustment of DSLR cameras. Supports portrait shooting.

Figure 4.1: Initial components laid out for assembly, including the iPad DSLR head box, connecting strut, iPad panel, LED light box, printer stand, square base, and accessory bag.
5. Operating Instructions
Once assembled, your ZLPOWER Photo Booth is ready for operation. This section covers basic usage and features.
Powering On and Light Control:
- Connect the power cable to a 100-240V power source.
- The RGB ring light can be controlled via a remote control.
- The ring light also features voice-activated modes, allowing lighting changes to synchronize with music or ambient sound.
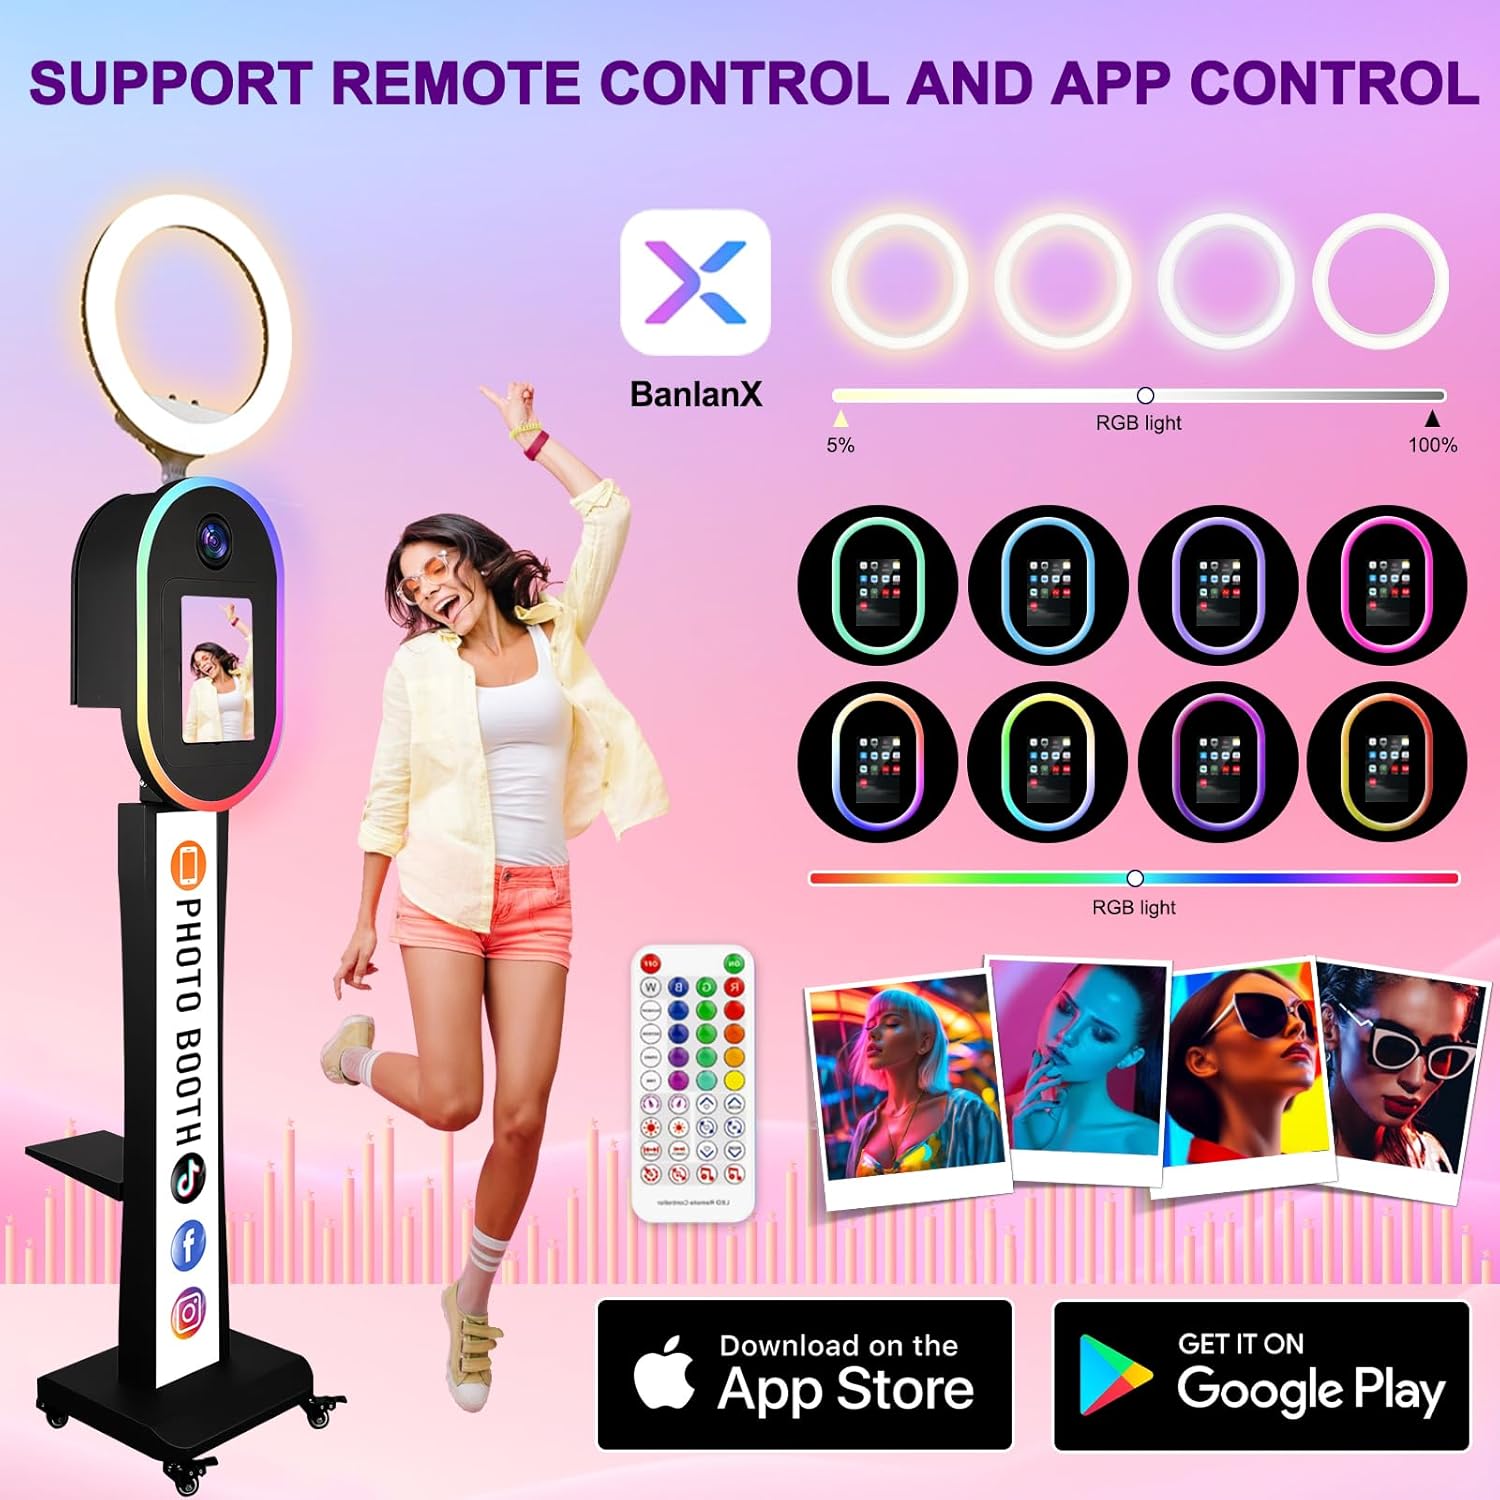
Figure 5.1: Image showing the photo booth with a remote control and illustrations of RGB light settings and app control options. This highlights the various ways to control the lighting and features.
Capturing and Sharing:
- Utilize the iPad or DSLR camera for capturing photos and videos.
- The system supports connecting to a printer for immediate photo prints.
- Photos and videos can be uploaded to social media platforms (Instagram, Facebook, YouTube, TikTok, etc.) via Bluetooth or the internal platform.
- The software solution allows for customization of the user interface, background, and idle screens.
- The system can operate offline; sharing requests are saved and sent automatically once an internet connection is restored.
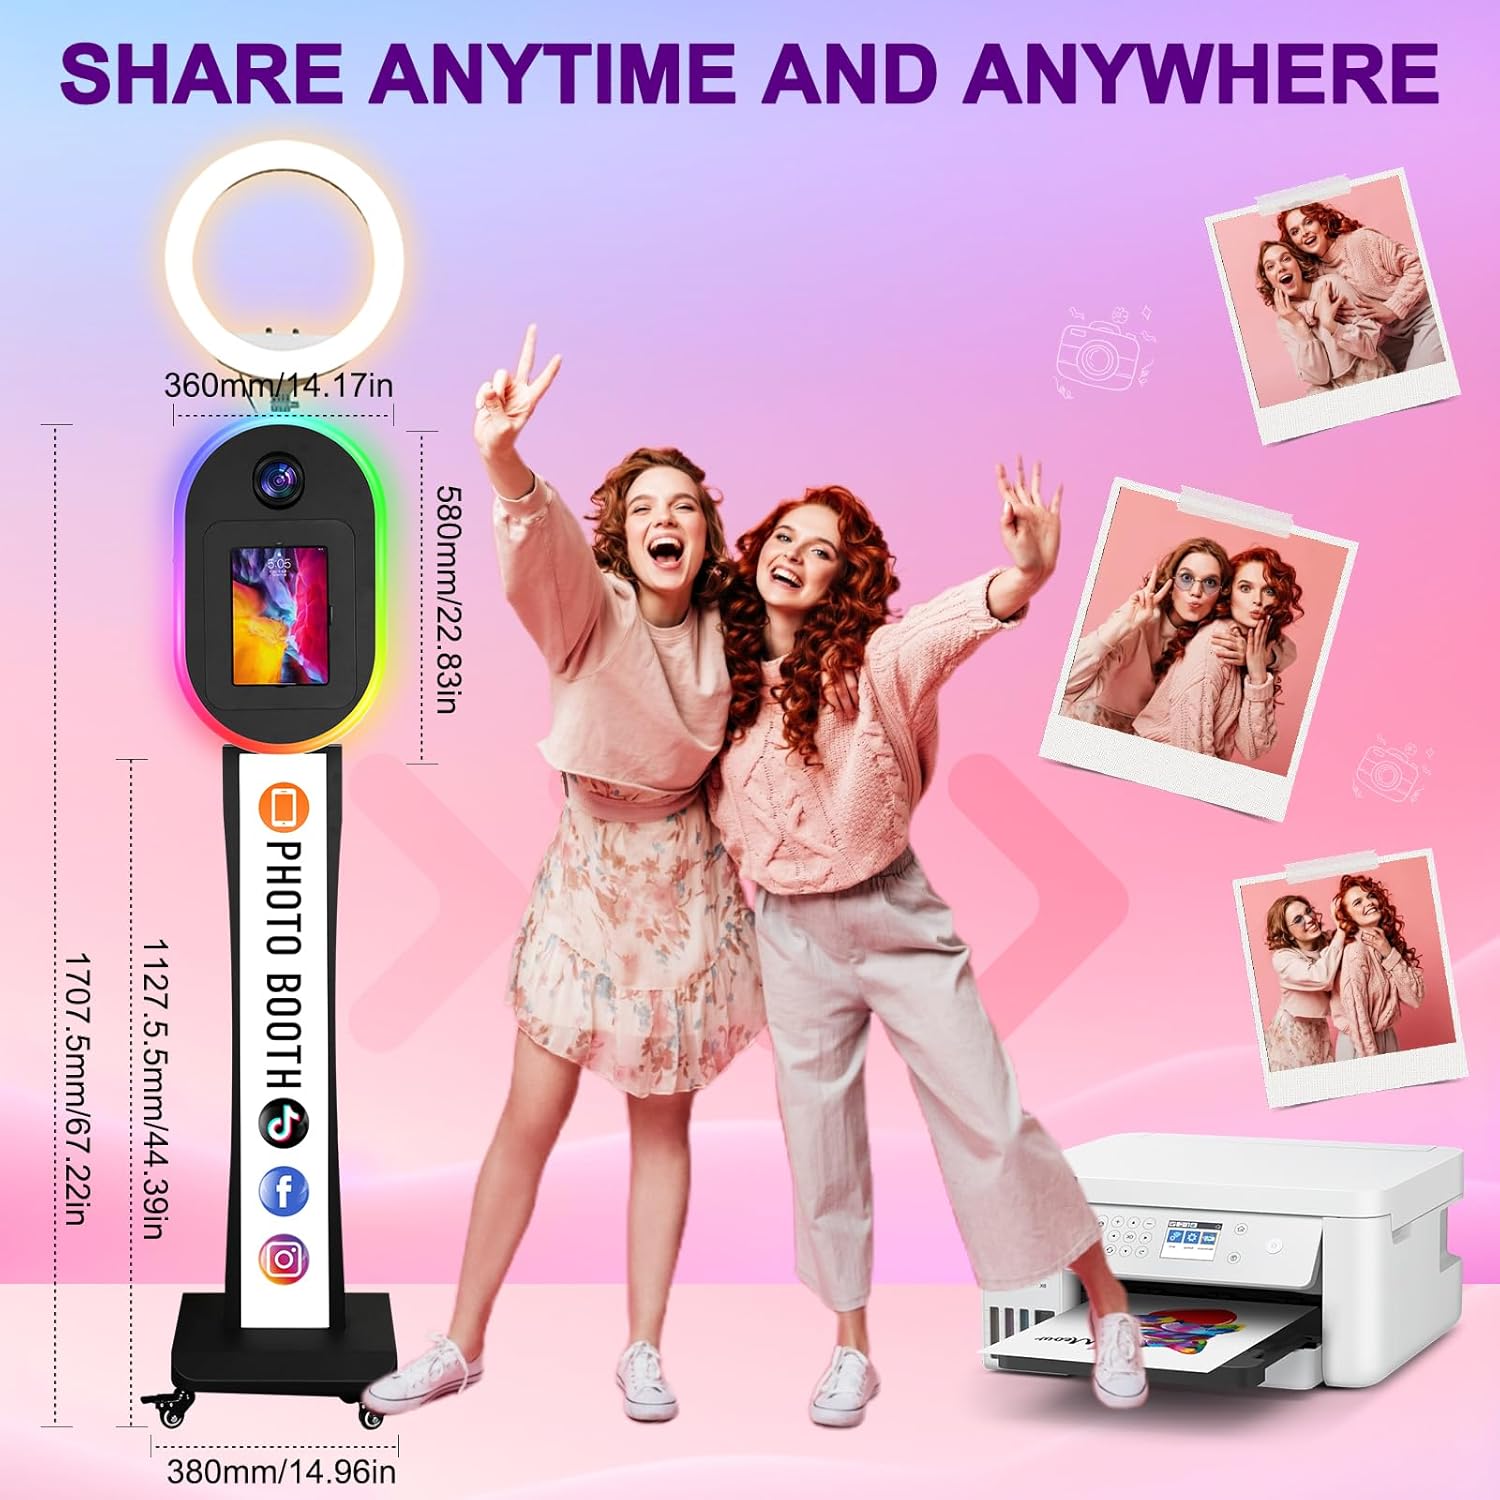
Figure 5.2: Image demonstrating the sharing capabilities of the photo booth, showing various social media icons and a printer, indicating easy sharing and printing options.
6. Maintenance
Regular maintenance ensures the longevity and optimal performance of your photo booth.
- Cleaning: Use a soft, dry cloth to clean the exterior surfaces. For the screen and camera lens, use a microfiber cloth and a specialized cleaning solution if necessary. Avoid abrasive cleaners.
- Cable Management: Periodically check all cables for wear and tear. Ensure they are securely connected and not pinched.
- Storage: When not in use, store the photo booth in its original honeycomb box or a suitable protective case in a dry, cool environment to prevent damage.
- Software Updates: Keep your iPad and any photo booth software applications updated to the latest versions for best performance and security.
7. Troubleshooting
This section addresses common issues you might encounter and their solutions.
| Problem | Possible Cause | Solution |
|---|---|---|
| Photo booth does not power on. | Power cable disconnected; power outlet issue; internal wiring issue. | Check power cable connection. Try a different power outlet. Ensure internal power cables are securely connected as per assembly instructions. |
| Ring light not working. | Remote control battery low; light setting off; connection issue. | Replace remote control batteries. Ensure light is turned on via remote or app. Check power connection to the ring light. |
| iPad/Camera not recognized. | Incorrect installation; loose connection; software issue. | Verify iPad/camera is correctly seated and secured. Ensure all internal connections are firm. Restart the iPad/camera and photo booth software. |
| Cannot share photos/videos. | No internet connection; Bluetooth off; app settings. | Check Wi-Fi or cellular data connection. Ensure Bluetooth is enabled on the iPad. Verify sharing settings within the photo booth application. |
8. Warranty and Support
For any issues not covered in this manual or for warranty claims, please contact ZLPOWER customer support.
- Customer Support: Refer to your purchase documentation for specific contact details or visit the official ZLPOWER store on Amazon: ZLPOWER Store.
- Returns: This product typically includes a 30-day easy return policy. Please check your purchase details for exact terms.
- Protection Plans: Extended protection plans may be available for purchase.
Note: Always refer to the latest information provided by the manufacturer or seller for the most accurate warranty and support details.
Related Documents - B0DSKCK6VQ
 |
ZLPOWER 360 Photo Booth Machine Installation Guide Detailed installation and operation manual for the ZLPOWER 360 Photo Booth Machine, covering setup, software, and app control for parties and events. |
 |
GSII4K-12KW Hybrid Solar Inverter User Manual Comprehensive user manual for the ZLPOWER GSII4K-12KW Hybrid Solar Inverter, covering installation, operation, specifications, safety guidelines, and Wi-Fi setup. |
Ask a question about this manual
Ask about setup, troubleshooting, compatibility, parts, safety, or missing instructions. Manuals+ will review the question and use this page’s manual context to help answer it.