1. Introduction
This manual provides detailed instructions for the GHRERTX DMX 1024 Channel Stage Lights Controller. It is designed to help users understand the features, setup, operation, and maintenance of the device to ensure optimal performance and longevity. Please read this manual thoroughly before operating the controller.

Image 1.1: The GHRERTX DMX 1024 Channel Stage Lights Controller, showcasing its faders, buttons, and display screen.
Key Features:
- 1024 Control Channels: Supports 512/1990 standard, capable of controlling up to 96 smart lights.
- Graphic Trajectory Generator: Features 135 built-in graphics for dynamic lighting effects such as painting, spiral, rainbow, and chasing. Parameters like amplitude, speed, interval, waveform, and direction are independently adjustable.
- Scene Storage: The console can store up to 60 scenes, with multi-step scenes supporting up to 600 steps.
- Light Library Function: Supports the Pearl R20 light library for comprehensive light management.
- LCD Display: Backlit LCD screen for clear display of channels, tracking signals, editing steps, and operational data.
- Data Maintenance: Supports shutdown data maintenance, backup, and upgrade capabilities.
2. Package Contents
Upon unpacking, please verify that all items listed below are present and in good condition. If any items are missing or damaged, contact your vendor immediately.

Image 2.1: Visual representation of the items included in the product packaging.
- 1 x DMX Controller Console
- 1 x Power Cable
- 1 x USB Light
- 1 x User Manual (this document)
- 1 x 32G USB Disk
3. Product Overview and Components
Familiarize yourself with the various parts of your DMX controller to facilitate easier setup and operation.

Image 3.1: Detailed diagram showing the labeled components and ports of the DMX controller.
Front Panel Controls:
- Preset Fader: Adjusts preset values.
- Fixture Selection Area: Numeric buttons for selecting lights.
- Pages of Fixture: Navigates through fixture pages.
- Master Faders: Main control faders for overall output.
- Playback Faders: Control playback of scenes and chases.
- HD LCD Display Screen: Shows operational data and menu.
- Function Area: Buttons for various functions like Hilight, Locate, Softkey, Clear Program.
- Speed and Volume Controller: Adjusts speed and other parameters.
Rear Panel Ports:
- DMX Signal Ports: Multiple 3-pin DMX outputs for connecting to lighting fixtures.
- Power Port: For connecting the power cable.
- Power Button: On/Off switch for the controller.
- USB Port: For connecting USB devices like the included USB light or disk.
4. Setup
Follow these steps to set up your DMX controller and connect it to your lighting system.
4.1 Power Connection
- Ensure the power button on the rear panel is in the OFF position.
- Connect the provided power cable to the power port on the rear of the console.
- Plug the other end of the power cable into a suitable power outlet.
4.2 DMX Device Connection
- Connect your DMX-compatible lighting fixtures (e.g., par lights, moving head lights, fog machines) to the DMX signal output ports on the rear of the controller using 3-pin DMX cables.
- Ensure proper DMX addressing for each fixture according to their respective manuals.
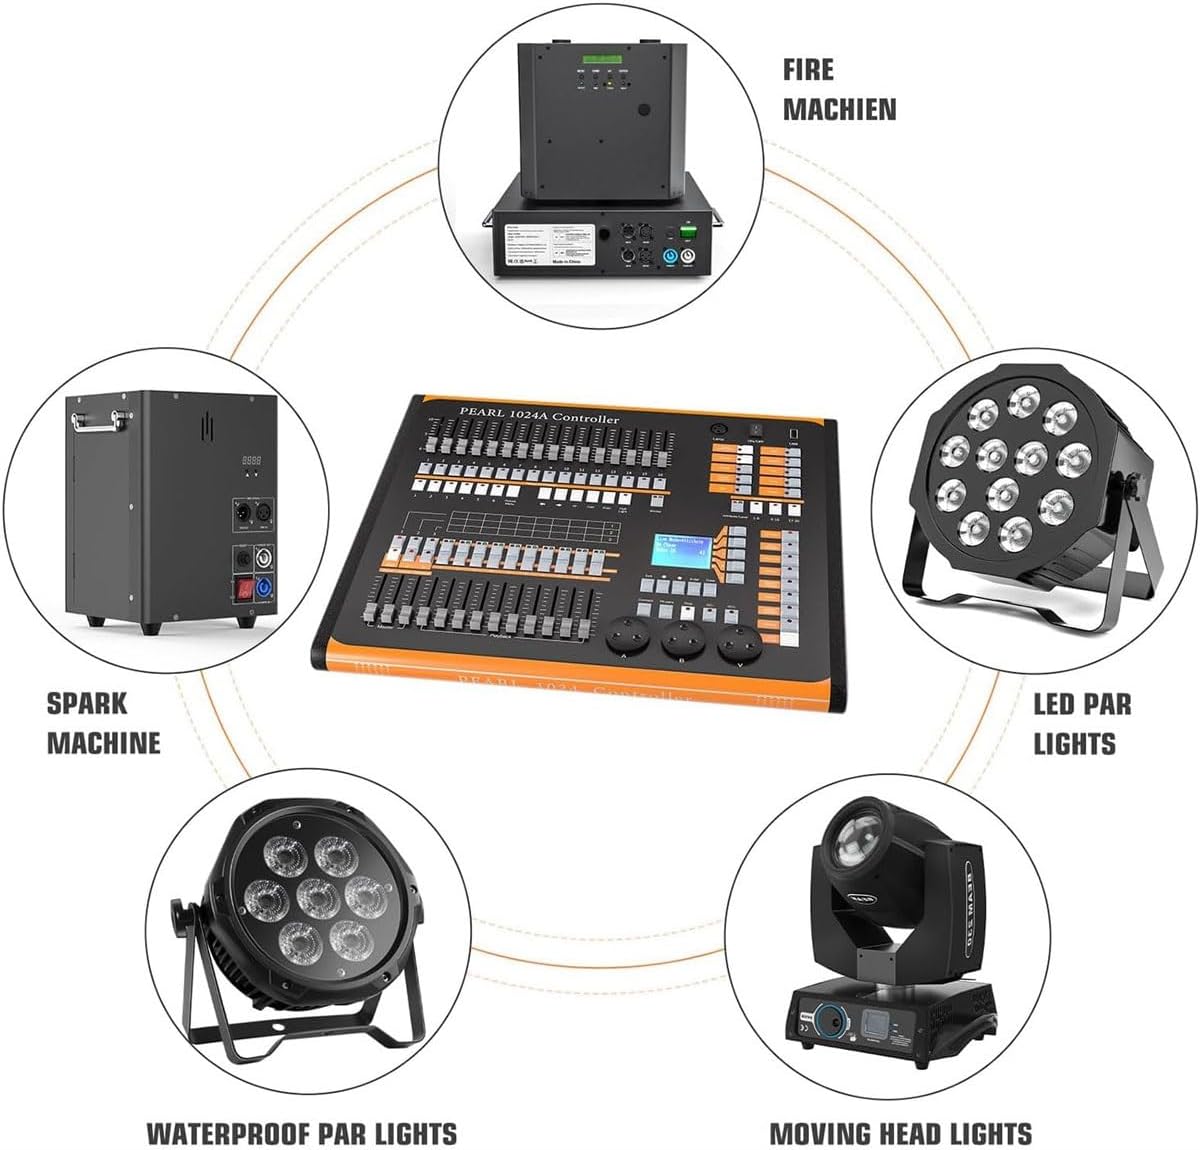
Image 4.1: The DMX controller connected to various compatible stage lighting equipment, including LED par lights, moving head lights, and spark machines.
4.3 Initial Power On
- After all connections are secure, press the power button on the rear panel to turn on the controller.
- The LCD display will illuminate, indicating the system is booting up.
5. Operating Instructions
This section covers the basic operation and advanced features of your DMX controller.
5.1 Basic Control
- Fixture Selection: Use the numeric buttons in the fixture selection area to choose the lights you wish to control.
- Channel Control: Adjust the faders to control individual DMX channels for selected fixtures (e.g., dimmer, color, pan, tilt).
- Master Faders: Use the master faders to control the overall output level.
5.2 Graphic Trajectory Generator
The controller features a built-in graphic trajectory generator with 135 pre-programmed graphics.
- Navigate to the graphic trajectory generator menu using the function buttons.
- Select a desired graphic effect (e.g., painting, spiral, rainbow, chase).
- Adjust parameters such as amplitude, velocity, interval, waveform, and direction using the dedicated controllers or menu options to customize the effect.
5.3 Scene Storage and Playback
The console allows for the creation and storage of complex lighting scenes.
- Creating a Scene: Set your desired lighting states using the faders and controls. Press the 'Store' button (or equivalent) and follow the on-screen prompts to save the scene to a specific location.
- Multi-Step Scenes: For more complex sequences, create multi-step scenes. The console can store up to 600 steps within a multi-step scene.
- Playback: Use the playback faders and associated buttons to trigger and control stored scenes and chases.
5.4 Light Library Function
The console supports the Pearl R20 light library, enabling you to manage and integrate various lighting fixtures efficiently. Refer to the on-screen menu for instructions on loading and managing light profiles.
6. Maintenance
Proper maintenance ensures the longevity and reliable operation of your DMX controller.
- Cleaning: Regularly wipe the surface of the controller with a soft, dry cloth. Avoid using abrasive cleaners or solvents.
- Storage: When not in use, store the controller in a cool, dry place, away from direct sunlight and extreme temperatures.
- Cable Management: Ensure all cables are neatly organized and not under strain to prevent damage.
7. Troubleshooting
If you encounter issues with your DMX controller, refer to the following common problems and solutions.
- No Power:
- Check if the power cable is securely connected to both the controller and the power outlet.
- Verify that the power outlet is functional.
- Ensure the power button on the rear panel is in the ON position.
- Lights Not Responding:
- Confirm that DMX cables are correctly connected between the controller and the fixtures.
- Check the DMX addresses of your fixtures to ensure they match the settings on the controller.
- Verify that the correct fixture type is selected on the controller.
- Display Issues:
- If the display is dim or flickering, ensure the power supply is stable.
- Restart the controller.
If problems persist after attempting these solutions, please contact customer support for further assistance.
8. Specifications
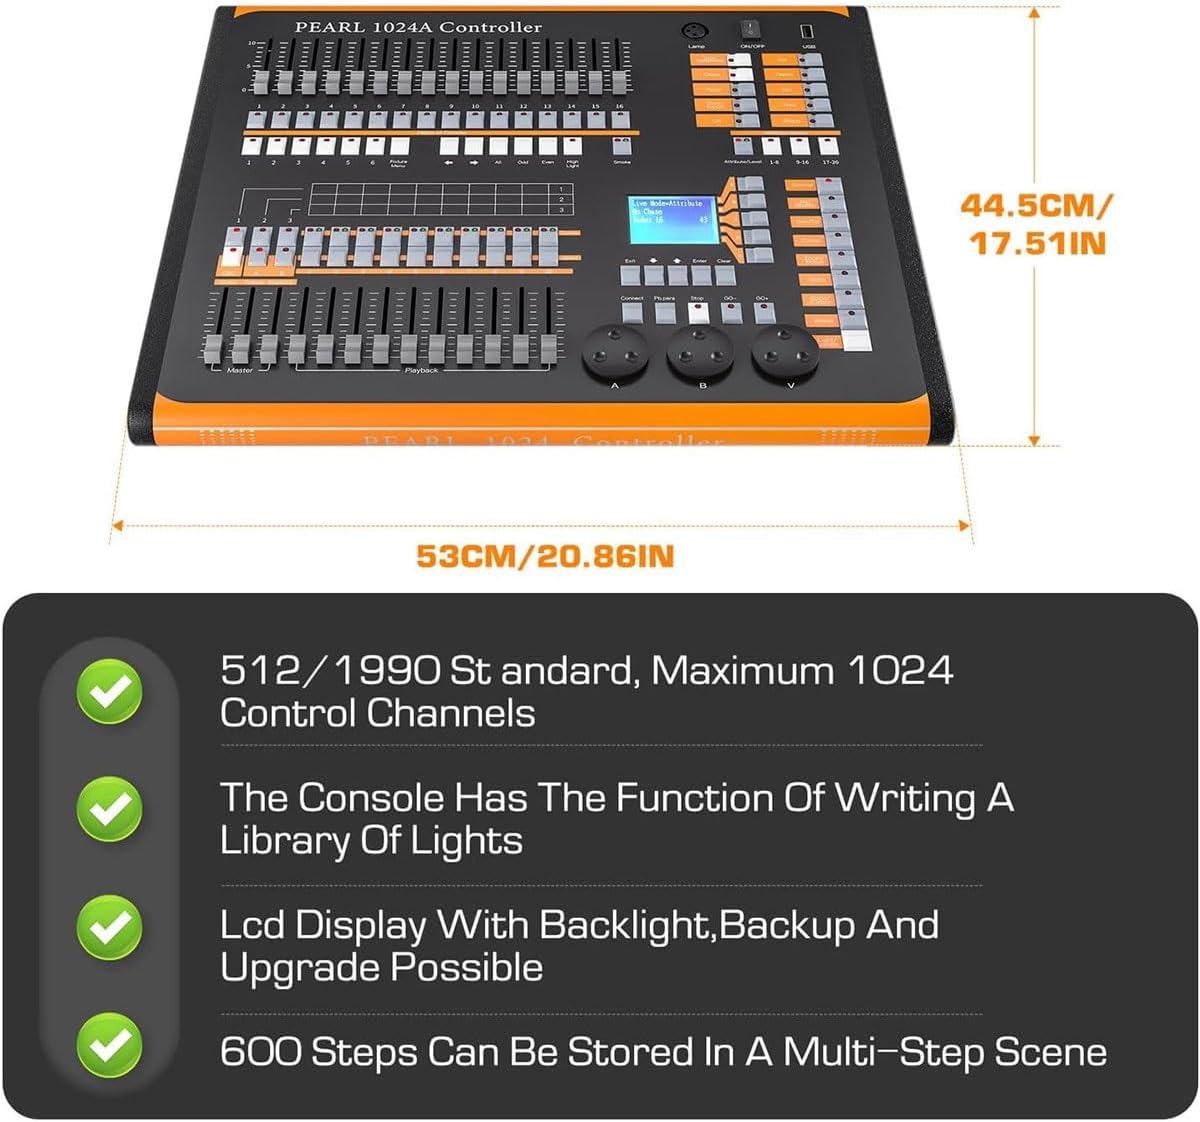
Image 8.1: The DMX controller with its dimensions labeled in centimeters and inches.
| Feature | Specification |
|---|---|
| Number of Channels | 1024 |
| DMX Standard | DMX 512/1990 |
| Max Controllable Lights | 96 |
| Display | Backlit LCD Screen |
| Graphic Trajectory | 135 Built-in Graphics |
| Multi-step Scene Storage | Up to 600 steps |
| Product Dimensions (L x W x H) | 485mm x 415mm x 110mm (19.1 x 16.3 x 4.3 inches) |
| Item Weight | Approximately 10 kg (22 pounds) |
| Power Input | AC 100-240V |
9. Safety Information
Please observe the following safety precautions to prevent injury or damage to the device.
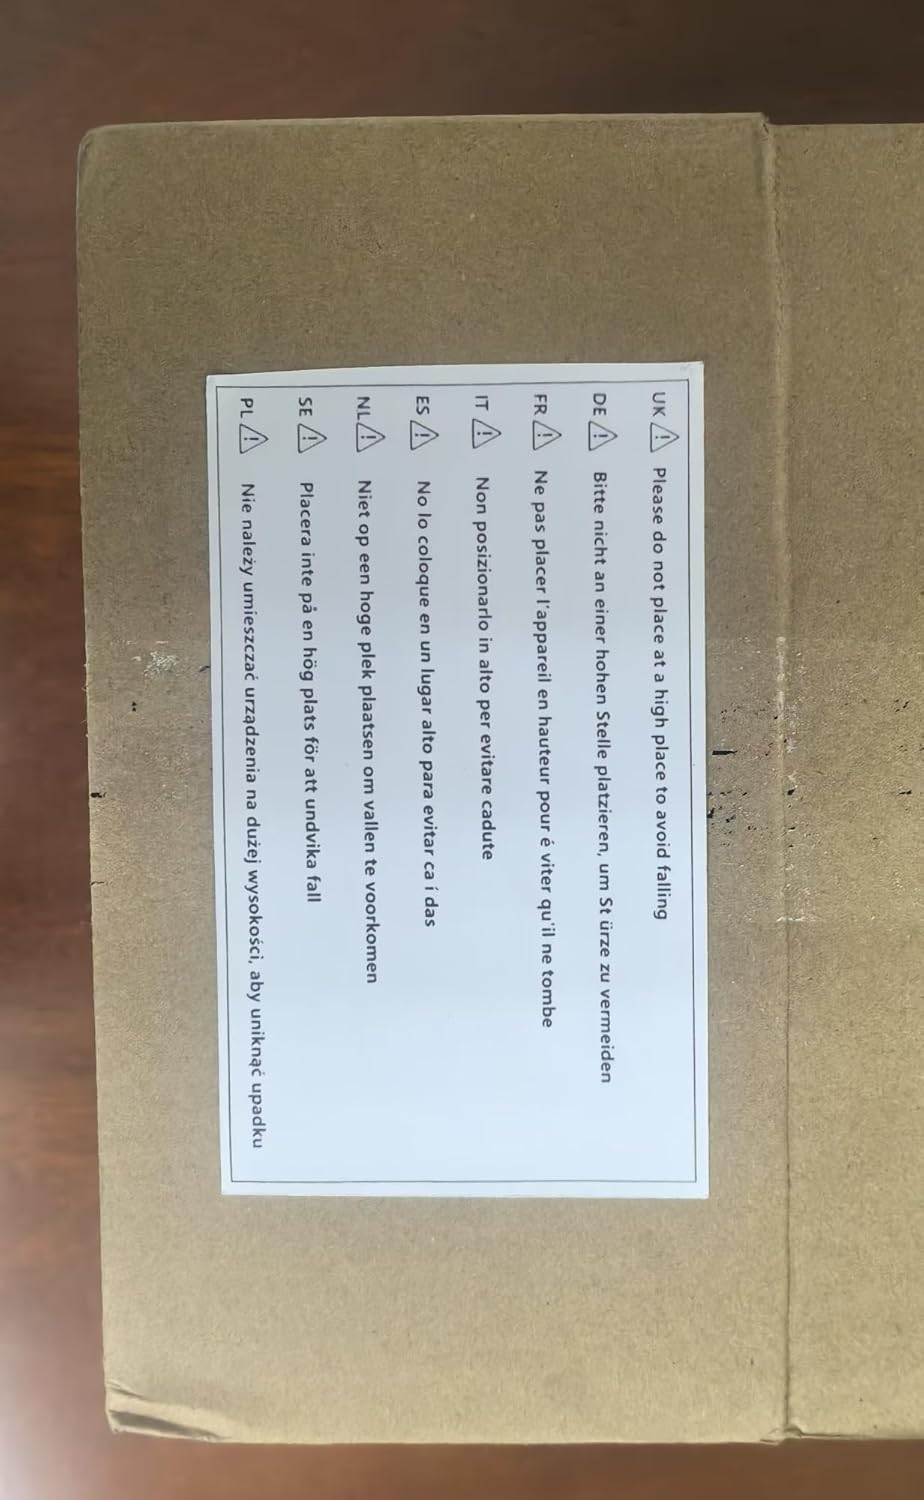
Image 9.1: A warning label indicating not to place the device at a high location to prevent falling.
- Placement: Do not place the controller at a high or unstable location to avoid accidental falls and potential damage or injury.
- Power Supply: Use only the provided power cable and ensure the power source matches the specified voltage requirements.
- Environment: Avoid exposing the controller to moisture, extreme temperatures, or direct sunlight. Operate in a well-ventilated area.
- Servicing: Do not attempt to open or repair the controller yourself. Refer all servicing to qualified personnel.
10. Warranty and Support
For any questions, concerns, or technical support regarding your GHRERTX DMX 1024 Channel Stage Lights Controller, please contact your retailer or the manufacturer directly. Please have your product model and purchase information ready when contacting support.