NEEWER UA018
NEEWER 21" Magic Arm Camera Mount with Super Clamp User Manual
Model: UA018
Brand: NEEWER
1. Introduction and Overview
The NEEWER 21" Magic Arm Camera Mount with Super Clamp (Model UA018) is a versatile and robust accessory designed for securely mounting various photographic and videographic equipment. This kit provides flexible positioning for cameras, LED video lights, field monitors, and other accessories, making it ideal for overhead shots, vlogging, live streaming, and general content creation. Its articulating design and strong clamping mechanism ensure stability and adaptability in diverse shooting environments.
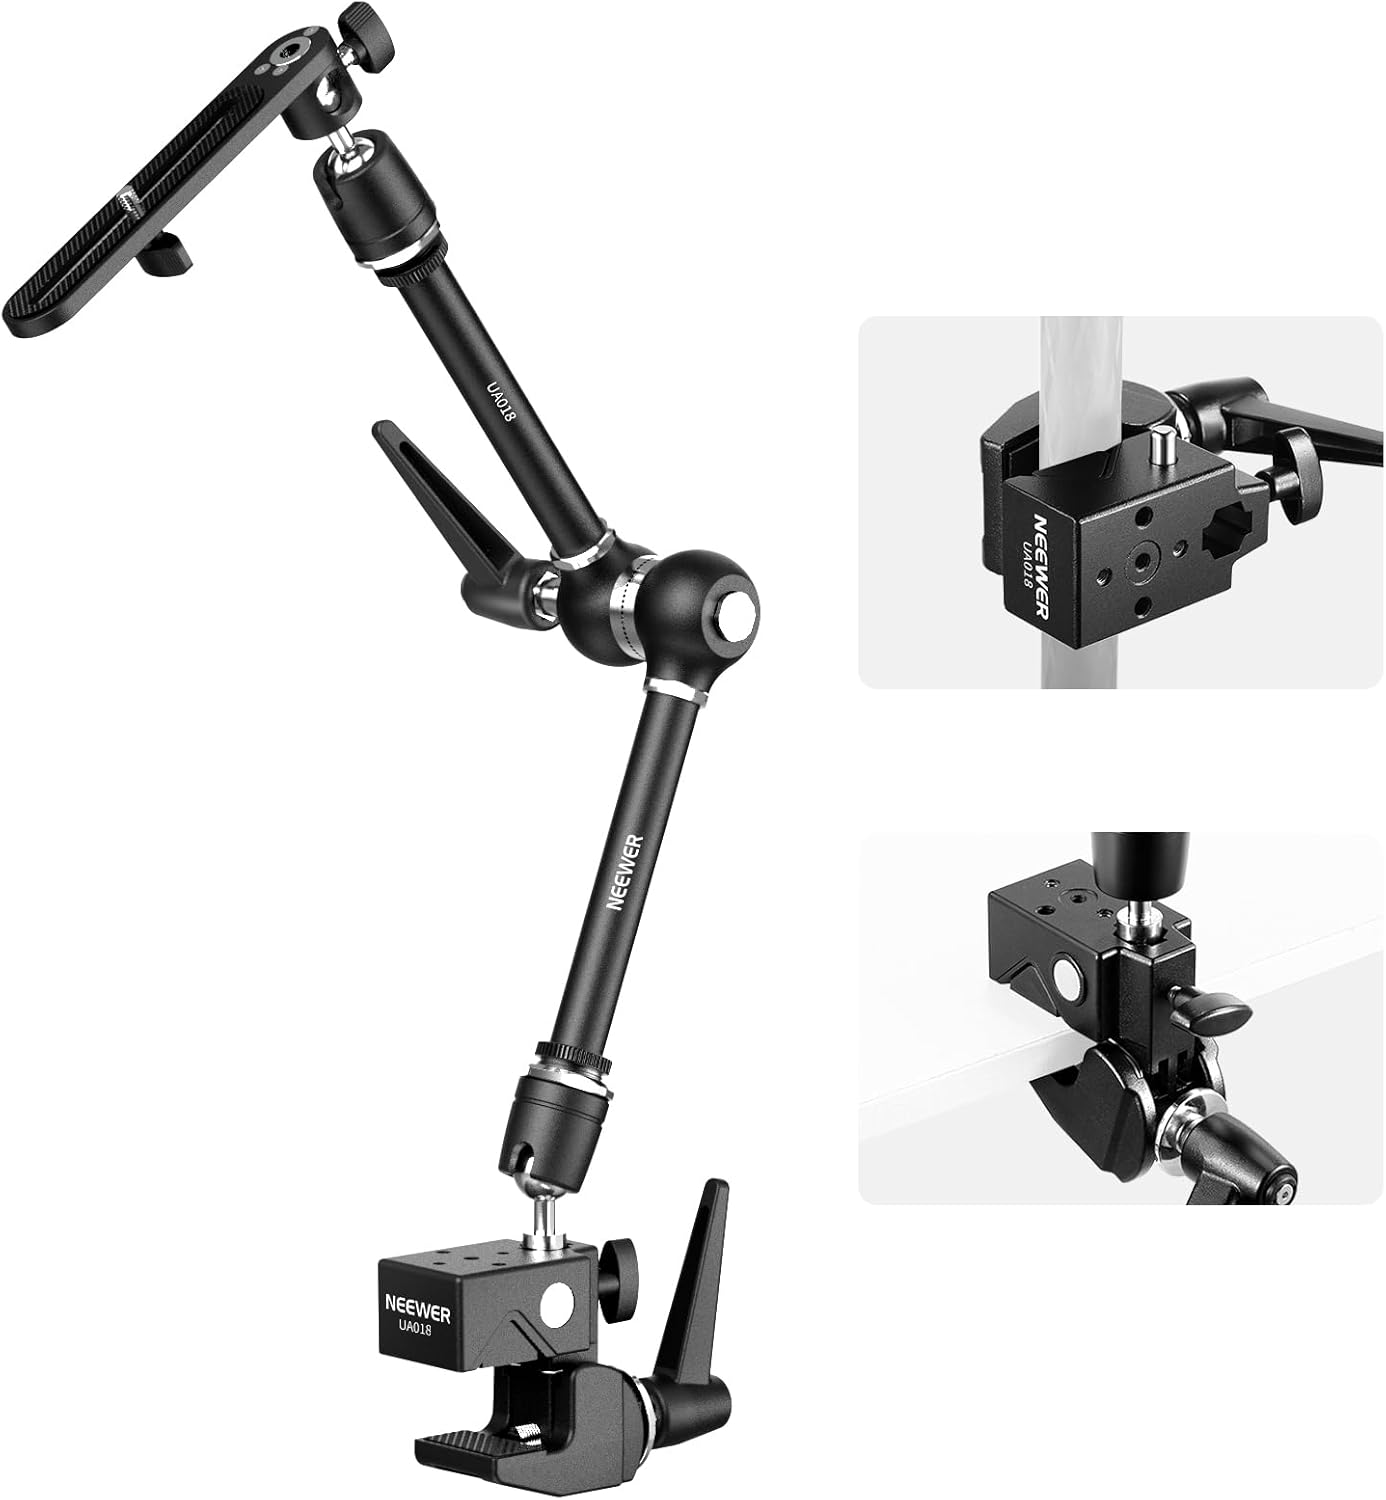
Figure 1: NEEWER 21" Magic Arm Camera Mount with Super Clamp (Model UA018).
2. Package Contents
Please verify that all components are present in your package:
- 1 x Articulating Magic Arm
- 1 x Reinforced Super Clamp
- 1 x 1/4" to 3/8" Screw Adapter
- 1 x Mounting Plate

Figure 2: Visual representation of the package contents.
3. Setup Instructions
Follow these steps to set up your NEEWER Magic Arm Camera Mount:
- Attach Super Clamp: Identify a suitable mounting surface, which can be a flat surface (up to 0.2"/0.4cm thick) or a round pole/tube (0.2"-2.4"/0.5-6cm in diameter). Open the super clamp jaws by rotating the tightening knob. Position the clamp onto the desired surface and tighten the knob until it is securely fastened. Ensure the non-slip rubber pads are in contact with the surface for enhanced stability and to prevent damage.
- Connect Magic Arm to Super Clamp: The magic arm connects to the super clamp via its 5/8" hexagonal female adapter. Align the 5/8" stud on the super clamp with the corresponding receiver on the magic arm and secure it firmly.
- Attach Mounting Plate: The extended mounting plate connects to the other end of the magic arm using a knob. This plate provides a stable platform for your camera or other devices.
- Mount Your Device: Use the appropriate screw (1/4" or 3/8" via the included adapter) on the mounting plate or directly on the articulating arm to attach your camera, monitor, LED light, or other compatible equipment. Ensure the device is securely fastened.

Figure 3: Super Clamp attachment to round and flat surfaces.

Figure 4: Multiple mounting options and compatibility.
4. Operating Instructions
The articulating magic arm offers extensive flexibility for positioning your equipment:
- Adjusting Angles: The magic arm features two articulated sections connected by a 360° friction gear joint. Each end also has a ball head with a U-notch, allowing for 360° rotation and 90° tilt. Loosen the enlarged lever to adjust the arm and ball heads to your desired position.
- Securing Position: Once the desired angle and position are achieved, tighten the enlarged lever firmly to lock the arm and ball heads in place. The upgraded locking structure at the gear joint ensures stability and prevents accidental movement.
- Load Capacity: The magic arm has a maximum load capacity of 6.6lb (3kg). Ensure that the total weight of your mounted equipment does not exceed this limit to maintain stability and prevent damage.

Figure 5: Articulating Magic Arm movement capabilities.
5. Maintenance
To ensure the longevity and optimal performance of your NEEWER Magic Arm Camera Mount, follow these maintenance guidelines:
- Cleaning: Wipe the surfaces with a soft, dry cloth. For stubborn dirt, a slightly damp cloth can be used, followed by immediate drying. Avoid abrasive cleaners or solvents.
- Inspection: Regularly inspect all screws, knobs, and joints for tightness. Ensure the rubber pads on the super clamp are intact and free from damage.
- Storage: Store the mount in a clean, dry environment away from extreme temperatures and humidity when not in use.
6. Troubleshooting
If you encounter any issues with your NEEWER Magic Arm Camera Mount, consider the following:
- Device Slipping or Falling:
- Ensure all locking knobs (on the magic arm and super clamp) are fully tightened.
- Verify that the mounted equipment's weight does not exceed the 6.6lb (3kg) maximum load capacity.
- Check that the super clamp is securely fastened to a stable surface and the non-slip pads are properly engaged.
- Difficulty Adjusting Arm:
- Ensure the main locking lever is sufficiently loosened before attempting to adjust the arm's position.
- Check for any obstructions or debris in the joints.
If the issue persists, please contact NEEWER customer support for further assistance.
7. Specifications
| Feature | Detail |
|---|---|
| Model | UA018 |
| Material | Aluminum Alloy, Stainless Steel |
| Magic Arm Length | 21" / 53cm |
| Max Load Capacity (Magic Arm) | 6.6lb / 3kg |
| Super Clamp Jaw Opening | Flat surfaces: up to 0.2" / 0.4cm thick Round objects: 0.2"-2.4" / 0.5-6cm diameter |
| Mounting Points | 1/4", 3/8", 5/8" Stud |
| Item Weight | 15 Ounces (approx. 425g) |
| Compatible Devices | Cameras, LED Light Panels, Field Monitors, Phone Holders, etc. |

Figure 6: Sturdy Metal Build and Load Capacities.
8. Warranty and Support
Specific warranty details for the NEEWER 21" Magic Arm Camera Mount (Model UA018) are not provided in this manual. For warranty information, technical support, or service inquiries, please visit the official NEEWER website or contact their customer service directly.
Manufacturer: NEEWER
Official Website: www.neewer.com
Ask a question about this manual
Ask about setup, troubleshooting, compatibility, parts, safety, or missing instructions. Manuals+ will review the question and use this page’s manual context to help answer it.