1. Introduction
This manual provides comprehensive instructions for the safe and effective use of your Dragonhawk Atom2 Tattoo Pen Machine Kit. The Atom2 is a versatile device designed for both traditional tattooing and permanent makeup (PMU) applications, including eyebrows, eyeliner, and lip liner. Please read this manual thoroughly before operating the device to ensure proper function and longevity.
2. Product Overview
The Dragonhawk Atom2 features a lightweight, ergonomic design with advanced functionalities for precise work. It can operate in both cordless mode using its integrated battery or corded mode with an RCA adapter.

Figure 2.1: Dragonhawk Atom2 Tattoo Pen Machine with key components labeled, including the cordless battery, motor, non-slip grip handle, RCA jack part, and cartridge needle.
Key Features:
- Cordless & Corded Operation: Offers flexibility with an integrated battery for wireless use and an RCA adapter for traditional corded power.
- Lightweight Design: Weighing approximately 111g (3.9oz), the slim and ergonomic design reduces fatigue during extended sessions.
- Smart Screen & Operation Modes: Features a smart display and five built-in modes: Lining, Shading, Eyeliner, Lip, and Eyebrow.
- Quiet & Smooth Performance: Equipped with a custom Mcore-C coreless motor for reduced vibration and consistent RPMs.
- Universal Compatibility: Compatible with all standard cartridge needles.

Figure 2.2: Two Dragonhawk Atom2 tattoo pens, one gold and one red, highlighting their lightweight construction at 98g and 111g respectively.
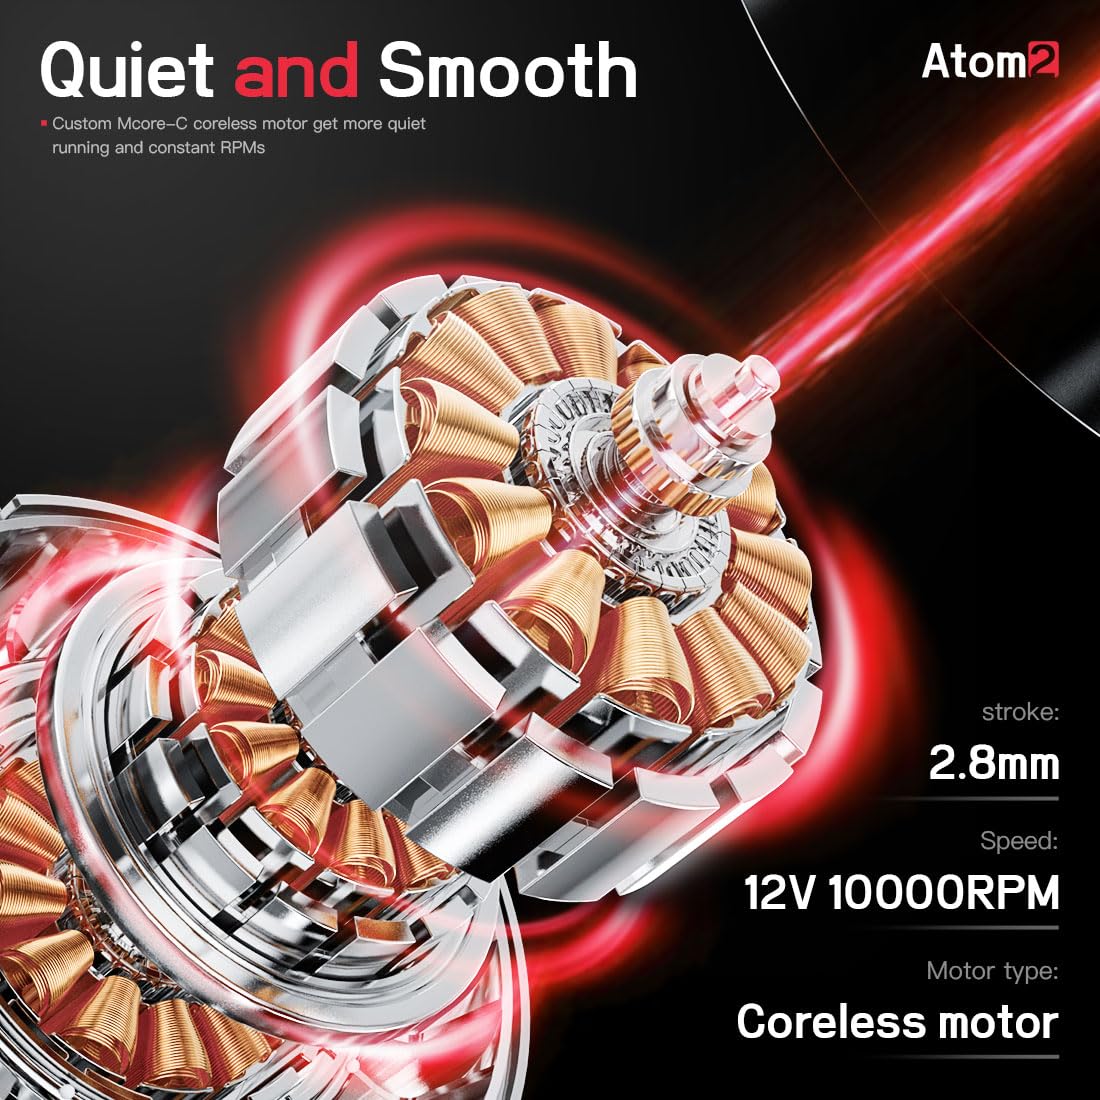
Figure 2.3: An internal view of the Atom2's coreless motor, detailing its 2.8mm stroke and 12V 10000RPM speed for quiet and smooth operation.
3. Package Contents
Your Dragonhawk Atom2 Tattoo Pen Machine Kit typically includes the following items. Please verify all components upon unboxing.
- Atom2 Cordless Tattoo Pen Machine
- Rechargeable Batteries (quantity may vary by kit)
- RCA Adapter (for corded use)
- USB-C Charging Cable
- Tattoo Cartridge Needles (specific types and quantities may vary)
- Tattoo Ink (0.5oz, specific color may vary)
- Practice Skin
- Transfer Paper
- Disposable Gloves
- Self-Adhesive Wrap
- Ink Caps

Figure 3.1: A visual representation of the items included in a typical Dragonhawk Atom2 Tattoo Kit, featuring the pen machine, batteries, RCA adapter, needles, ink, and various accessories.
4. Safety Information
For external use only. This device is intended for professional use or by individuals trained in tattooing and permanent makeup procedures. Always adhere to local health and safety regulations, including sterilization protocols, proper disposal of sharps, and use of personal protective equipment. Do not use on irritated or broken skin. Consult a medical professional if you have any concerns about skin conditions or allergic reactions.
5. Setup Instructions
5.1 Charging the Battery
- Connect the USB-C charging cable to the charging port on the battery.
- Plug the other end into a compatible USB power adapter (not included).
- The battery indicator on the smart screen will show charging status. Ensure the battery is fully charged before first use.
5.2 Attaching Power Source (Cordless or Corded)

Figure 5.1: The Atom2 pen machine disassembled, showing the main body, detachable battery, and RCA adapter for flexible power options.
- For Cordless Operation: Twist the fully charged battery onto the main body of the pen machine until secure.
- For Corded Operation: Twist the RCA adapter onto the main body of the pen machine. Connect an RCA cord from the adapter to a compatible power supply (not included).
5.3 Inserting a Cartridge Needle
- Ensure the machine is turned off.
- Carefully push the desired cartridge needle into the front opening of the machine until it clicks into place.
- Twist slightly to ensure it is seated securely.
5.4 Adjusting Needle Depth

Figure 5.2: Hands demonstrating how to adjust the needle depth on the Atom2 by twisting the grip, allowing for precise control from 0-4mm.
- Twist the grip of the machine clockwise or counter-clockwise to adjust the needle protrusion (depth).
- Adjust the depth according to your specific tattooing or PMU requirements. The Atom2 allows for 0-4mm needle depth adjustment.
6. Operating Instructions
6.1 Power On/Off
- Press and hold the power button (usually indicated by a circle or 'C' symbol) on the smart screen to turn the machine on or off.
6.2 Adjusting Voltage

Figure 6.1: A detailed view of the Atom2's smart screen, illustrating the voltage increase and reduction buttons, and the central switch button. Voltage can be adjusted from 4-12V.
- Use the '+' and '-' buttons on the smart screen to increase or decrease the voltage.
- The current voltage will be displayed on the screen. The Atom2 supports voltage adjustment from 4V to 12V.
6.3 Selecting Operation Modes

Figure 6.2: The Atom2's smart screen interface, showing the five pre-set operation modes: Lining, Shading, Eyeliner, Lip, and Eyebrow, allowing for quick selection based on the task.
- The Atom2 features five built-in operation modes: Lining, Shading, Eyeliner, Lip, and Eyebrow.
- Press the mode selection button (refer to screen icons) to cycle through these modes. Each mode may have optimized settings for specific procedures.
- The smart memory function saves your last used settings for convenience.
6.4 Recommended Voltage for Lining and Shading

Figure 6.3: Visual guide suggesting voltage ranges for different techniques: 7V-8.3V for Lining and 6V-7.5V for Shading, demonstrating the precision achievable with the Atom2.
- Lining: Recommended voltage range is 7V-8.3V.
- Shading: Recommended voltage range is 6V-7.5V.
6.5 Instructional Videos
Video 6.1: An official instructional video demonstrating how to use the Dragonhawk Atom2 Tattoo Kit, covering various aspects of its operation.
Video 6.2: An official product video showcasing the features and smart functionalities of the Dragonhawk Atom2 Smart Tattoo Pen.
7. Maintenance
7.1 Cleaning the Machine
- Always disconnect the power source (battery or RCA cord) before cleaning.
- Wipe the exterior of the machine with a clean, damp cloth and a mild, non-abrasive disinfectant.
- Do not immerse the machine in liquid.
- Ensure no liquids enter the motor housing or charging port.
7.2 Battery Care
- Store batteries in a cool, dry place away from direct sunlight.
- Avoid overcharging or completely draining the battery to prolong its lifespan.
- If the machine will not be used for an extended period, charge the battery to approximately 50% before storage.
8. Troubleshooting
If you encounter issues with your Dragonhawk Atom2, please refer to the following common problems and solutions:
| Problem | Possible Cause | Solution |
|---|---|---|
| Machine does not turn on. | Low or uncharged battery; loose connection; power button not pressed correctly. | Ensure battery is fully charged or RCA adapter is securely connected to a working power supply. Press and hold the power button firmly. |
| Battery not charging or not holding charge. | Faulty charging cable/adapter; battery degradation. | Try a different USB-C cable and power adapter. If the issue persists, the battery may need replacement. Contact customer support. |
| Needle not moving or inconsistent. | Improperly seated cartridge needle; low voltage; motor issue. | Re-seat the cartridge needle. Increase voltage. If the problem continues, contact customer support. |
| Machine vibrates excessively or is unusually loud. | Loose components; damaged motor. | Ensure all parts are securely fastened. If noise or vibration is abnormal, discontinue use and contact customer support. |
| Difficulty adjusting needle depth. | Grip mechanism obstruction or damage. | Ensure no debris is obstructing the grip. Apply gentle, consistent pressure while twisting. If stuck, do not force. |
9. Specifications
Technical specifications for the Dragonhawk Atom2 Tattoo Pen Machine:
| Feature | Detail |
|---|---|
| Weight | Approximately 111g (3.9oz) |
| Motor | Coreless Motor |
| Speed | 12V 10000RPM |
| Diameter & Length | 26mm x 126mm |
| Battery Capacity | 800mAh |
| Stroke | 2.8mm |
| Charging Cable | Type-C |
| Package Dimensions | 9.92 x 7.72 x 2.44 inches |
| Manufacturer | DRAGONHAWK |

Figure 9.1: A summary of the Dragonhawk Atom2's key technical parameters, including its physical dimensions, motor type, speed, battery capacity, and stroke length.
10. Warranty and Support
Dragonhawk offers a 12-month warranty for the Atom2 Tattoo Pen Machine Kit. We are committed to providing lifetime customer service to ensure a seamless experience with our products.
Contacting Support:
- For any inquiries, questions, or concerns regarding your product, please reach out through Amazon's messaging system.
Additional Resources:
- Visit Youtube.com/@Dragonhawkofficial for video tutorials, setup guides, and professional tips on machine maintenance and technique breakdowns.