PULWTOP BD182C-B
PULWTOP 11-in-1 USB C Hub for iMac 24-inch User Manual
Model: BD182C-B
Introduction
This user manual provides detailed instructions for the setup, operation, maintenance, and troubleshooting of your PULWTOP 11-in-1 USB C Hub, specifically designed for iMac 24-inch models (2021, 2023, 2024, M1, M3, M4). This versatile hub integrates multiple functionalities including a 4K HDMI output, M.2 SSD enclosure, 2.5G Ethernet, various USB-A/C ports, and an SD/TF card reader, enhancing your iMac's connectivity and productivity.
Setup Guide
1. Connecting the USB C Hub to your iMac
The PULWTOP USB C Hub is designed to seamlessly integrate with your iMac 24-inch. It connects via two USB-C cables to your iMac's Thunderbolt ports. For proper functionality, especially for external display extension, ensure the hub is connected to one of your iMac's Thunderbolt ports.

Image: The PULWTOP 11-in-1 USB C Hub positioned beneath an iMac, illustrating its various ports and how it connects to the iMac and other peripherals.

Image: A visual guide demonstrating the correct methods for connecting the hub's dual USB-C cables to the iMac's Thunderbolt ports, highlighting that connection to a Thunderbolt port is essential for full functionality.
- Position the hub securely under the base of your iMac.
- Connect the integrated dual USB-C cable from the hub to two Thunderbolt ports on the back of your iMac.
- Important Note: For external display functionality, the hub MUST be connected to one of your iMac's Thunderbolt ports.
2. M.2 NVMe SSD Installation (Optional)
The hub includes an M.2 SSD enclosure for additional storage, supporting up to 4TB M.2 NVMe PCIe or SATA SSDs (sizes 2230/2242/2260/2280). SSD is NOT included.
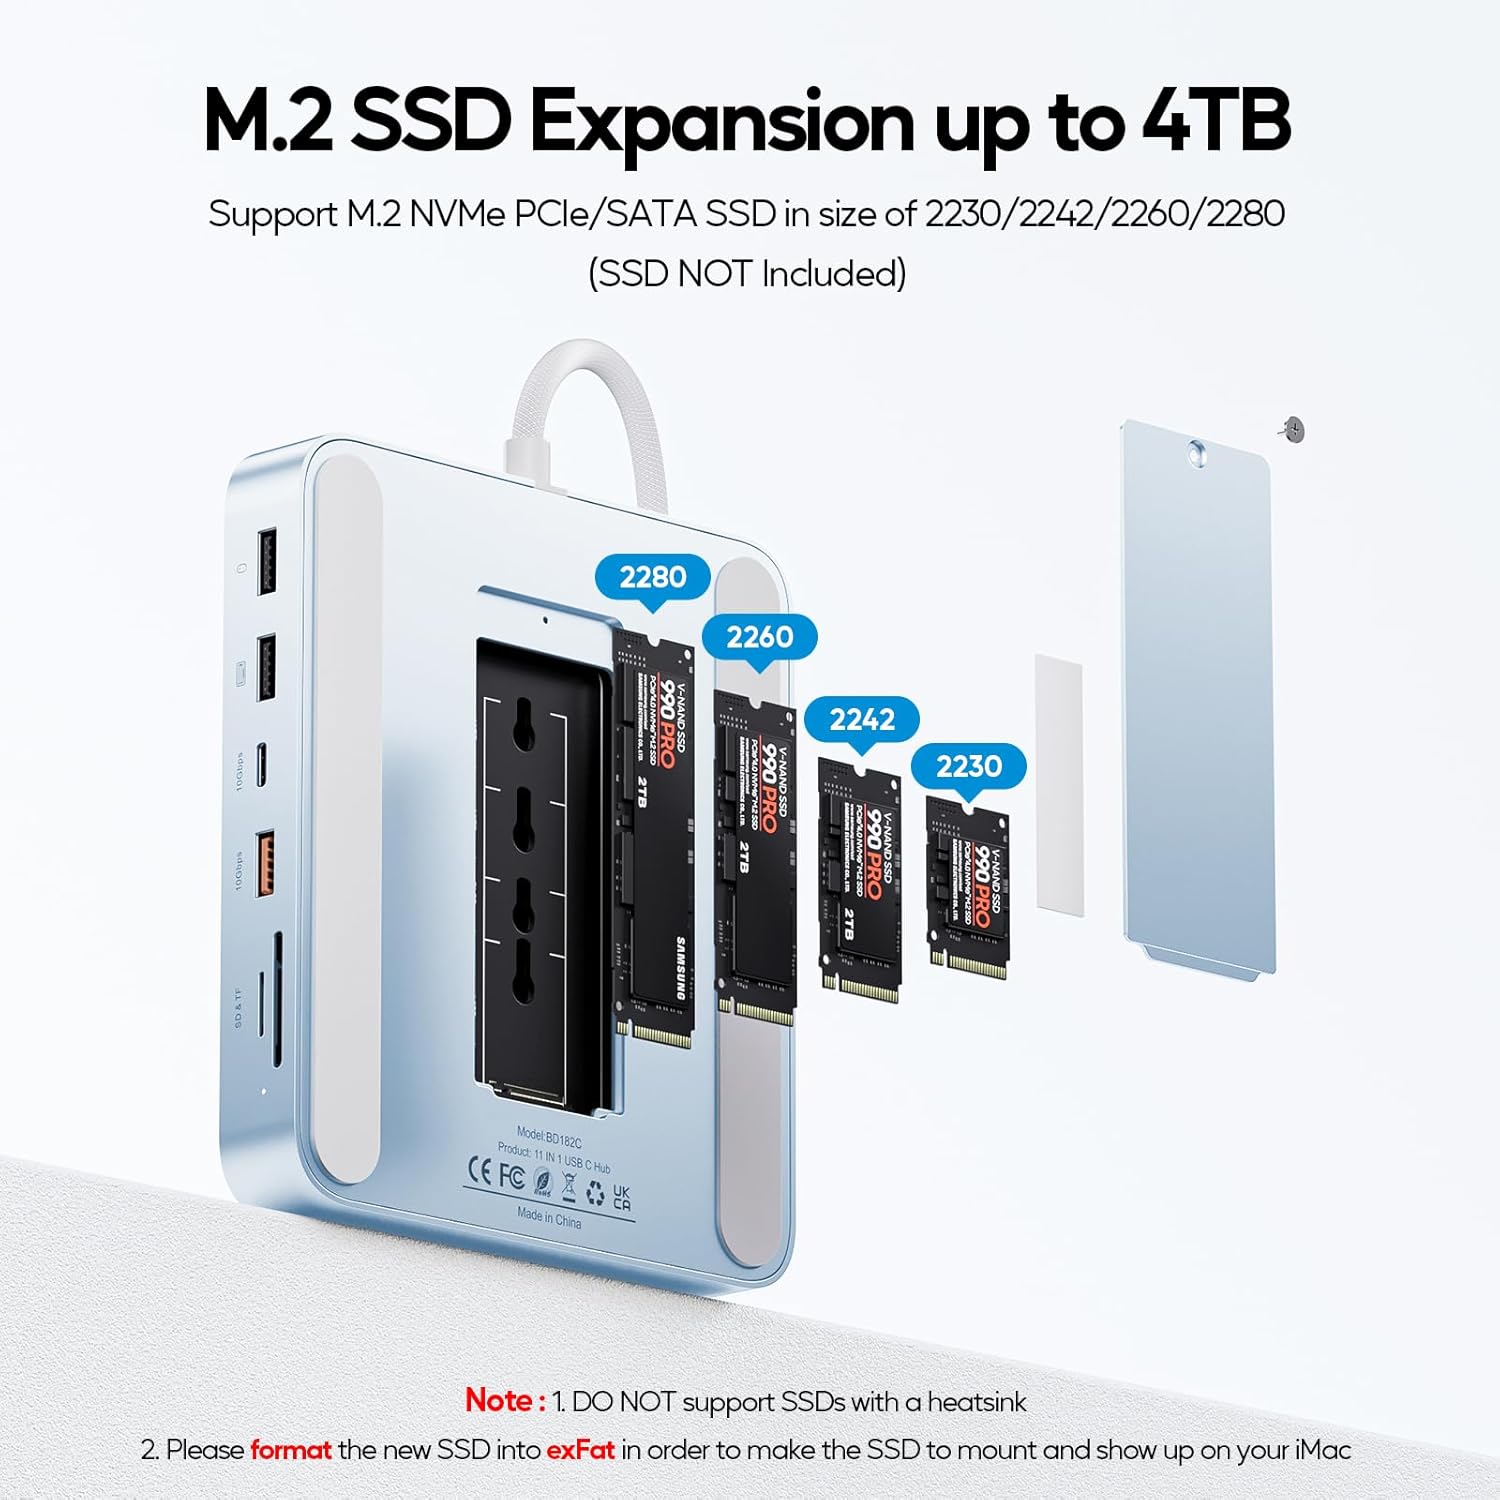
Image: An exploded view of the hub's M.2 SSD slot, showing various compatible SSD sizes (2230, 2242, 2260, 2280) and the installation process.

Image: A four-step visual guide detailing the installation of an M.2 SSD: inserting the fixing buckle, inserting the SSD, applying thermal pad, and securing the cover.
- Locate the external hard drive slot at the bottom of the hub.
- Insert the fixing buckle into the corresponding fixing hole.
- Carefully insert your M.2 NVMe PCIe or SATA SSD into the slot and snap it into the fixing buckle.
- Tear off the protective film from the heat dissipation silicone and stick it onto the SSD.
- Tighten the screw to fix the cover.
- Important Note:
- DO NOT support SSDs with a heatsink.
- Please format your new SSD in exFat format before use for proper recognition by your iMac.
Operating Instructions
1. 4K HDMI HD Output
The HDMI port supports video output up to 4K@60Hz, allowing you to mirror or extend your iMac's display to a larger HDTV, monitor, or projector. This feature is ideal for presentations, gaming, or enhancing your workspace with multiple screens.

Image: An iMac connected to an external display through the hub's HDMI port, demonstrating 4K@60Hz video output in both mirror and extended display modes.
- Connect an HDMI cable from the hub's HDMI port to your external display.
- Adjust display settings on your iMac (System Settings > Displays) to configure mirror or extend mode.
2. 2.5G Wired Gigabit Ethernet
Experience fast and stable network connectivity with the 2.5 Gigabit Ethernet port, supporting speeds up to 2.5 Gbps. This is perfect for high-bandwidth activities like streaming 4K/8K content, online gaming, and large file transfers.

Image: A close-up of the hub's 2.5G LAN port with an Ethernet cable connected, emphasizing the high-speed network capability.
- Connect an Ethernet cable from your router or modem to the 2.5G LAN port on the hub.
- Your iMac should automatically detect the wired connection.
3. USB Data Transfer and Charging Ports
The hub provides a variety of USB ports for data transfer and charging:

Image: An overview of the hub's USB ports, including USB C 3.2 Gen2, USB A 3.2 Gen2, USB C 2.0 with charging, and USB A 2.0, detailing their respective data transfer speeds and charging capabilities.
- 1x USB C 3.2 Gen2 (10Gbps): For high-speed data transfer, ideal for external SSDs or fast peripherals.
- 1x USB A 3.2 Gen2 (10Gbps): Similar to the USB C 3.2 Gen2, offering rapid data transfer for compatible USB-A devices.
- 1x USB C 2.0 with BC1.2 (7.5W Charging): Provides simultaneous charging for your phone or other USB-C devices while also supporting data transfer at 480Mbps.
- 2x USB A 2.0: Standard USB ports for connecting peripherals like keyboards, mice, and printers.
Connect your devices to the appropriate ports. The 10Gbps ports can transfer 1GB files in seconds, while the USB C 2.0 port offers convenient charging.
4. SD/TF Card Reader
The integrated SD/TF card reader supports simultaneous reading and writing of two cards, with speeds up to 104Mbps. This is highly beneficial for photographers, videographers, and content creators needing quick access to media files.

Image: A close-up of the hub's SD and TF card slots, showing various types of compatible memory cards and highlighting the 104Mbps reading and writing speed.
- Insert your SD or TF (Micro SD) card into the corresponding slot.
- The card will appear as a removable drive on your iMac.
5. 3.5mm Audio/Mic Jack
Connect your headphones, speakers, or microphone to the 3.5mm audio jack for convenient audio input and output.
- Plug your audio device into the 3.5mm port.
- Ensure your iMac's sound output/input settings are configured to use the hub's audio jack if needed.
Maintenance
To ensure the longevity and optimal performance of your PULWTOP USB C Hub, follow these maintenance guidelines:
- Cleaning: Use a soft, dry, lint-free cloth to wipe the surface of the hub. Avoid using abrasive cleaners, solvents, or aerosol sprays that may damage the aluminum alloy finish.
- Heat Dissipation: The aluminum alloy material is designed for good heat dissipation. Ensure the hub's vents (if any) are not obstructed to allow for proper airflow.
- Storage: When not in use for extended periods, store the hub in a cool, dry place away from direct sunlight and extreme temperatures.
- Cable Care: Avoid bending or crimping the integrated USB-C cables excessively, as this can damage the internal wiring.
Troubleshooting
If you encounter issues with your PULWTOP USB C Hub, please refer to the following common solutions:
| Problem | Possible Cause / Solution |
|---|---|
| External display not working via HDMI. |
|
| M.2 SSD not recognized or showing up. |
|
| Ethernet connection is unstable or not working. |
|
| USB devices are not detected or frequently disconnect. |
|
| Audio jack not producing sound or microphone not working. |
|
Specifications
| Feature | Detail |
|---|---|
| Model Number | BD182C-B |
| Product Dimensions | 2.88 x 2.8 x 0.67 inches (7.32 x 7.1 x 1.7 cm) |
| Item Weight | 12.7 ounces (360 Grams) |
| Color | Blue |
| Hardware Interface | MicroSD, USB Type C, Ethernet, HDMI, USB 2.0 |
| Compatible Devices | iMac 24 inch 2021, 2023, 2024 (M1, M3, M4) |
| Total USB Ports | 5 (1x USB C 3.2 Gen2, 1x USB A 3.2 Gen2, 1x USB C 2.0, 2x USB A 2.0) |
| Total HDMI Ports | 1 (4K@60Hz) |
| Ethernet Port | 1 (2.5G Gigabit Ethernet) |
| M.2 SSD Enclosure | Supports up to 4TB M.2 NVMe PCIe or SATA SSD (2230/2242/2260/2280) |
| Card Reader | SD/TF (Micro SD) 3.0, 104Mbps |
| Audio Jack | 3.5mm Audio/Mic |
| Manufacturer | PULWTOP |
| Country of Origin | China |
Warranty Information
PULWTOP products are designed for reliability and performance. For specific warranty terms and conditions applicable to your 11-in-1 USB C Hub, please refer to the warranty documentation included with your purchase or contact PULWTOP customer support directly. Extended protection plans may be available for purchase separately.
Customer Support
For technical assistance, product inquiries, or support, please visit the official PULWTOP brand store or contact their customer service team:
- PULWTOP Brand Store: Visit PULWTOP Store on Amazon
- Refer to the product packaging or included documentation for additional contact methods.
When contacting support, please have your product model number (BD182C-B) and purchase details ready.
Ask a question about this manual
Ask about setup, troubleshooting, compatibility, parts, safety, or missing instructions. Manuals+ will review the question and use this page’s manual context to help answer it.