Introduction
The JAXWQ 5-in-1 Stud Finder Wall Scanner is an advanced detection tool designed to accurately locate wood studs, metal objects (such as pipes and rebar), and live unshielded AC wires behind various wall surfaces. Equipped with a high-sensitivity microprocessor chip and a clear HD LCD display, this device provides precise indications of object edges and centers, enhancing safety and efficiency for all your home improvement and DIY projects.

Image: The JAXWQ 5-in-1 Stud Finder, an orange and black handheld device, shown alongside a 9V alkaline battery.
Safety Information
- Always read and understand this instruction manual before operating the device.
- Wear appropriate personal protective equipment, such as safety glasses, when performing tasks that involve drilling or cutting into walls.
- The AC Scan mode detects live unshielded AC wires. Always exercise extreme caution when working near detected electrical wiring. If possible, turn off the main power to the area before drilling or cutting.
- Do not rely solely on the stud finder for safety. Always verify findings with other methods if uncertainty exists.
- Keep the device away from water and extreme temperatures.
- This device is intended for indoor use on common building materials. Its accuracy may vary on irregular or highly textured surfaces.

Image: A person is shown using the JAXWQ stud finder on a wall, with a drill in their other hand, illustrating the importance of detecting live AC wires to prevent accidents during drilling.
Product Overview
Key Features:
- Intelligent Microprocessor Chip: Ensures accurate and rapid detection of various materials.
- HD LCD Display: Provides clear visual indications of detected objects, battery status, and scanning mode.
- Audio Alerts: Supplements visual cues with distinct beeps to indicate detection.
- 5-in-1 Scanning Modes: Offers versatility for different detection needs and depths.
- Ergonomic Design: Comfortable to hold and easy to operate.
Detection Capabilities:
The JAXWQ Stud Finder is capable of detecting the following hidden objects:
- Wood Studs (edges and center)
- Metal Studs (edges and center)
- Metal Pipes (e.g., copper, iron)
- Rebar
- Live Unshielded AC Wires

Image: An illustration highlighting the intelligent microprocessor chip within the stud finder, surrounded by visual examples of objects it can detect: metal pipes, AC wires, wooden beams, and rebar.

Image: A visual guide to the five scanning modes of the JAXWQ stud finder, detailing their respective maximum detection depths: Stud Scan (0.5", 1", 1.5"), AC Scan (2"), and Metal Scan (2.36").
Setup
1. Battery Installation:
The JAXWQ Stud Finder requires one 9V alkaline battery (included). Open the battery compartment cover on the back of the device, insert the 9V battery, ensuring correct polarity (+/-), and close the cover securely.
2. Calibration:
Proper calibration is crucial for accurate detection. The device must be calibrated before each use and whenever you move it to a new scanning location.
- Power On: Press the ON/OFF button to turn on the device.
- Select Mode: Use the mode selection button (usually the right arrow button) to choose the desired scanning mode (Stud Scan, Metal Scan, or AC Scan).
- Place on Wall: Place the device flat against the wall surface where you intend to scan. Ensure there are no known studs, metal, or wires directly beneath the device at this calibration point. An ideal calibration spot is a clear, empty section of the wall.
- Calibrate: Press and hold the Scan button (usually the left button, often labeled ON/OFF or Scan) until you hear a short beep sound and the LCD display indicates calibration is complete (e.g., bars disappear or stabilize).
- Release: Release the Scan button. The device is now calibrated and ready for use in the selected mode.
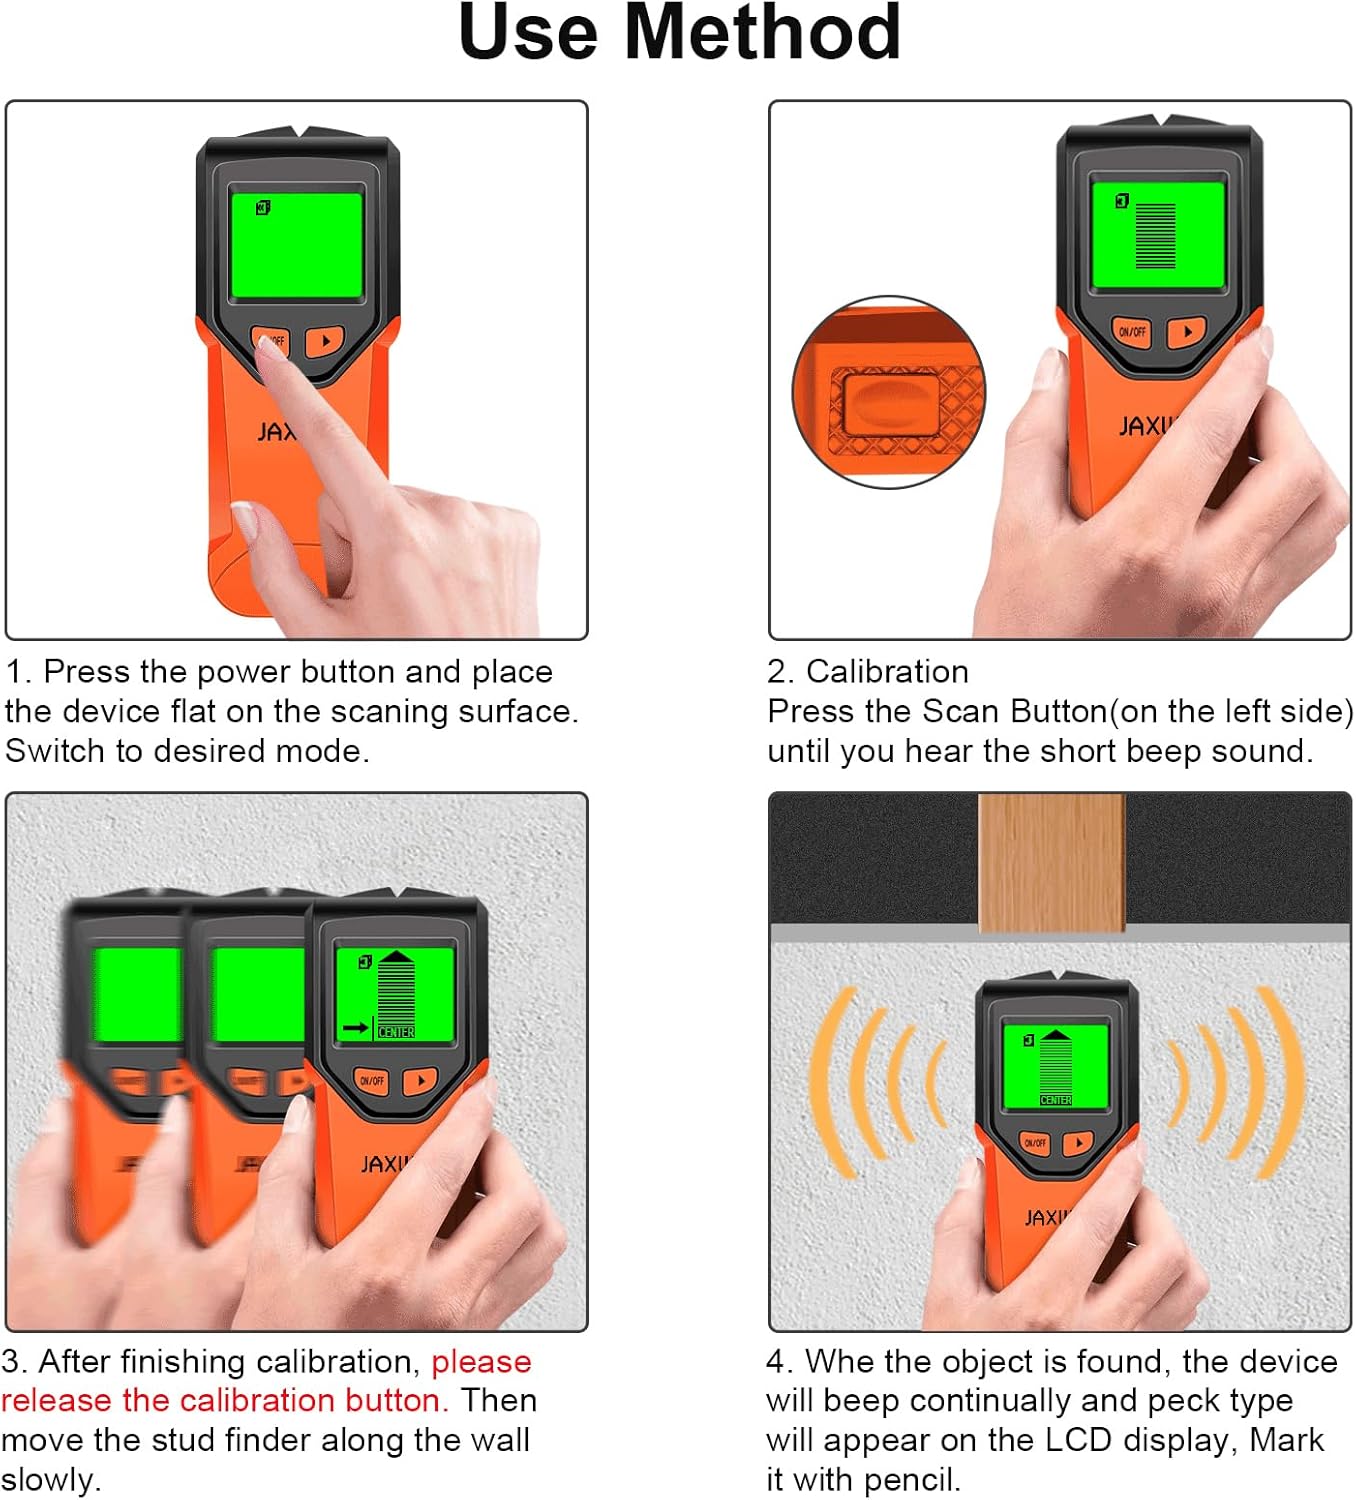
Image: A step-by-step visual guide demonstrating the proper use of the stud finder, including powering on, calibration, and scanning techniques.

Image: A close-up of the stud finder being held flat against a wall, illustrating the correct position for calibration. The LCD screen shows a neutral state, indicating no immediate detection.
Operating Instructions
Once calibrated, slowly slide the stud finder horizontally across the wall surface. Maintain firm, even pressure. The LCD display will show indicators as it approaches a hidden object, and an audio alert will sound. The display will typically show bars that increase in height as you get closer to the center of the object.
Scanning Modes:
1. Stud Scan Mode (0.5", 1", 1.5" deep)
This mode is designed to locate the edges and center of wood and metal studs. It offers three depth settings for varying wall thicknesses.
- Detection: Identifies wood and metal studs.
- Display: Shows increasing bars as you approach the stud, with a "CENTER" indicator and an arrow pointing towards the stud.
- Audio: Beeps when an edge or center is detected.

Image: The LCD screen of the stud finder displaying the Stud Scan mode, showing detection bars and the "CENTER" icon, indicating a stud has been located.

Image: The stud finder is shown directly over the center of a hidden stud, with the LCD screen displaying full detection bars and an audio alert symbol, confirming the precise location.

Image: A two-panel image demonstrating the stud finder's functionality: the left panel shows the device detecting the edge of a stud, and the right panel shows it pinpointing the exact center with an audio alarm.
2. Metal Scan Mode (2.36" deep)
This mode is used to detect various metal objects, including metal pipes, rebar, and metal studs, hidden behind walls.
- Detection: Identifies ferrous and non-ferrous metals.
- Display: Shows a metal icon and increasing bars.
- Audio: Beeps upon metal detection.

Image: The LCD screen of the stud finder displaying the Metal Scan mode, showing detection bars and a metal icon, indicating metal has been located.
3. AC Scan Mode (2" deep)
This mode detects live unshielded AC wires. It is crucial for safety before drilling or cutting into walls.
- Detection: Identifies live unshielded AC wires.
- Display: Shows a lightning bolt icon and increasing bars.
- Audio: Provides a distinct alert when a live wire is detected.

Image: The LCD screen of the stud finder displaying the AC Scan mode, showing detection bars and a lightning bolt icon, indicating a live AC wire has been located.
Important Note: The device indicates the presence of live AC wires in all modes to help avoid potentially serious mishaps. However, for precise location of AC wires, always switch to the dedicated AC Scan mode.

Image: A visual representation of the stud finder's ability to detect multiple hidden elements within a wall, including wood, AC wires, copper pipes, and rebar, emphasizing its role in safe drilling.
Maintenance
- Cleaning: Wipe the device with a soft, damp cloth. Do not use abrasive cleaners or solvents.
- Storage: Store the stud finder in a cool, dry place, away from direct sunlight and extreme temperatures. If storing for extended periods, remove the battery to prevent leakage.
- Battery Replacement: Replace the 9V battery when the low battery indicator appears on the LCD display to ensure optimal performance.
Troubleshooting
| Problem | Possible Cause | Solution |
|---|---|---|
| Inaccurate or inconsistent readings | Improper calibration; device lifted during scan; scanning over highly textured or damp surfaces; presence of multiple objects close together. | Ensure proper calibration on a clear section of the wall before each scan. Maintain firm, even pressure and slow, consistent movement. Avoid scanning over wallpaper with metallic fibers or damp areas. Try scanning from multiple directions. |
| Device does not turn on or display is dim | Low or dead battery; incorrect battery installation. | Replace the 9V battery with a new alkaline battery. Check battery polarity. |
| No detection or weak signal | Incorrect mode selected; object too deep; calibration error. | Ensure the correct scanning mode is selected for the target object and depth. Re-calibrate the device. For deeper objects, ensure you are using the deep scan setting if available within the stud scan mode. |
| False positives (detects objects where none exist) | Improper calibration; interference from nearby electronics or metal objects outside the wall. | Re-calibrate the device on a truly clear section of the wall. Move away from large metal objects or active electronics during scanning. |
Specifications
| Feature | Detail |
|---|---|
| Manufacturer | JAXWQ |
| Model Number | TH410 |
| Item Weight | 8.1 ounces |
| Package Dimensions | 7.64 x 3.27 x 1.81 inches |
| Color | Sunset (Orange/Black) |
| Power Source | Battery Powered |
| Battery Type | 9V Alkaline (1 included) |
| Stud Scan Depth | Up to 1.5 inches (38mm) |
| Metal Scan Depth | Up to 2.36 inches (60mm) |
| AC Scan Depth | Up to 2 inches (51mm) |
| Display | HD LCD with backlight |
| Included Components | Stud Finder, 9V Battery |
Warranty and Support
For warranty information, technical support, or any inquiries regarding your JAXWQ 5-in-1 Stud Finder, please refer to the contact information provided with your product packaging or visit the official JAXWQ website. Keep your purchase receipt as proof of purchase for warranty claims.

Image: A composite image showcasing various practical applications of the stud finder, including electrical wiring installation, hanging pictures, general home decoration, and assembling DIY furniture.