SANGMUCEN HBF033W01
SANGMUCEN Floating Queen Bed Frame Instruction Manual
Model: HBF033W01
Introduction
This manual provides detailed instructions for the assembly, operation, maintenance, and troubleshooting of your SANGMUCEN Floating Queen Bed Frame (Model HBF033W01). This bed frame features an adjustable headboard, integrated LED lighting, and a convenient charging station. Please read this manual thoroughly before assembly and use to ensure proper function and safety.
Safety Information
Careful around sharp edges and ensure proper assembly to avoid instability. Always follow the assembly instructions precisely. Do not exceed the recommended weight capacity of 1100 lbs. Keep children and pets away from the assembly area. Ensure all connections for the charging station and LED lights are secure before use. Disconnect power before cleaning or maintenance.
Package Contents
Before beginning assembly, verify that all parts are present and undamaged. Refer to the parts list provided in your physical instruction manual. Key components include:
- Headboard (Upholstered, Beige)
- Bed Frame Metal Components (Side rails, support beams, legs)
- Wooden Slats
- Charging Station (2 AC outlets, USB-A/C ports)
- LED Light Strips
- Remote Control for LED Lights
- Assembly Hardware (Screws, Allen wrench)
- Installation Manual (this document)
Setup and Assembly
Follow these steps carefully for proper assembly. It is recommended to have two people for assembly.
Step 1: Assemble the Side Rails
Connect the various metal components to form the long side rails of the bed frame. Ensure all screws are tightened securely using the provided Allen wrench.
Video: Floating Bed Assembly (0:08 - 0:57) - Shows assembly of the side rails.
Step 2: Connect the Frame Sections
Join the assembled side rails and end pieces to form the complete rectangular bed frame. Secure all connections with the appropriate screws.
Video: Floating Bed Assembly (1:40 - 2:34) - Demonstrates connecting the frame sections.
Step 3: Install Center Support Beams
Place and secure the center support beams across the width of the bed frame. These beams provide crucial support for the mattress.
Video: Floating Bed Assembly (2:52 - 3:39) - Shows installation of the center support beams.
Step 4: Attach the Headboard
Carefully align the headboard with the designated attachment points on the bed frame and secure it using the provided hardware. The headboard is adjustable in height.
Video: Floating Bed Assembly (4:11 - 4:36) - Illustrates attaching the headboard.

Image: The beige upholstered headboard features a built-in charging station with 2 AC outlets and USB-A/C ports.
Step 5: Install the Charging Station
Insert the charging station into the designated slot on the headboard and secure it with the provided screws. Connect the power cord.
Video: Floating Bed Assembly (5:08 - 5:16) - Shows installation of the charging station.

Image: Detail of the charging station, featuring 2 AC outlets, 1 USB-A, and 1 USB-C port.
Step 6: Place Wooden Slats
Lay the wooden slats across the bed frame, ensuring they are evenly spaced and securely seated in their designated holders. The snap-lock slats are designed to reduce noise.
Video: Floating Bed Assembly (4:37 - 5:07) - Shows placement of the wooden slats.

Image: The bed frame features a robust metal structure with 10 heavy-duty wooden slats and 8 thick legs, supporting up to 1100 lbs.
Step 7: Install LED Light Strips
Attach the LED light strips to the underside of the bed frame using the integrated Velcro design. Ensure the strips are firmly fixed. Connect the power supply for the LED lights.

Image: The light strip is firmly fixed to the metal frame using a Velcro design.
Operating Instructions
LED Lights Operation
The integrated RGB LED lights can be controlled via a remote control or a dedicated smartphone application. They offer multiple colors, brightness adjustment, timing functions, music sync mode, and dynamic modes.
- Remote Control: Use the provided remote to switch colors, adjust brightness, and select modes.
- Smartphone App: Download the specified app (refer to the physical manual for QR code or app name) to access advanced features like music synchronization and custom color settings.
- Modes: Explore various modes including static colors, dynamic color cycles, and music-reactive lighting.

Image: The upholstered headboard and base feature LED strips with multiple colors and modes, controllable via remote.

Image: Smart RGB LED lights can be controlled via app, remote, or switch, offering over 60,000 colors, brightness adjustment, timing, music, mic, and dynamic modes.
Charging Station Usage
The headboard includes a built-in charging station with 2 AC outlets, 1 USB-A port, and 1 USB-C port. Simply plug your devices into the appropriate ports for convenient charging. Ensure the bed frame is connected to a power source for the charging station to function.
Maintenance
- Cleaning: For the upholstered parts, gently wipe with a damp cloth. For spills or pet hair, use a mild fabric cleaner and follow its instructions. Avoid harsh chemicals.
- Frame: Wipe metal parts with a dry cloth to remove dust.
- Connections: Periodically check all screws and connections to ensure they remain tight. Retighten if necessary.
- Electrical Components: Keep the charging station and LED lights dry. Do not attempt to repair electrical components yourself.
Troubleshooting
| Problem | Possible Cause | Solution |
|---|---|---|
| Bed frame is unstable or squeaks. | Loose screws or incorrect assembly. | Check all screws and connections; tighten as needed. Ensure all parts are assembled according to the manual. |
| LED lights are not working. | Power not connected, remote battery low, or light strip disconnected. | Ensure the LED power adapter is plugged in. Replace remote battery. Check the connection of the LED strip to the controller. |
| Charging station is not providing power. | Power cord not plugged in, or device not compatible. | Verify the charging station's power cord is securely plugged into a wall outlet. Ensure your device is compatible with the USB or AC ports. |
| Headboard is wobbly. | Loose attachment screws. | Tighten the screws connecting the headboard to the bed frame. |
Specifications
- Brand: SANGMUCEN
- Model Number: HBF033W01
- Size: Queen
- Color: Beige
- Material: Alloy Steel, Corduroy Upholstered
- Product Dimensions: 200 x 159 x 30 cm (approx. 78.7 x 62.6 x 11.8 inches)
- Item Weight: 33 kg (approx. 72.7 lbs)
- Weight Capacity: Up to 1100 lbs (approx.)
- Special Features: Adjustable Headboard, Charging Station (2 AC outlets, USB-A/C), LED Lighting, No Box Spring Needed, Remote Control
- Compatible Mattress Size: Queen
- Recommended Mattress Height: 10-12.5 inches
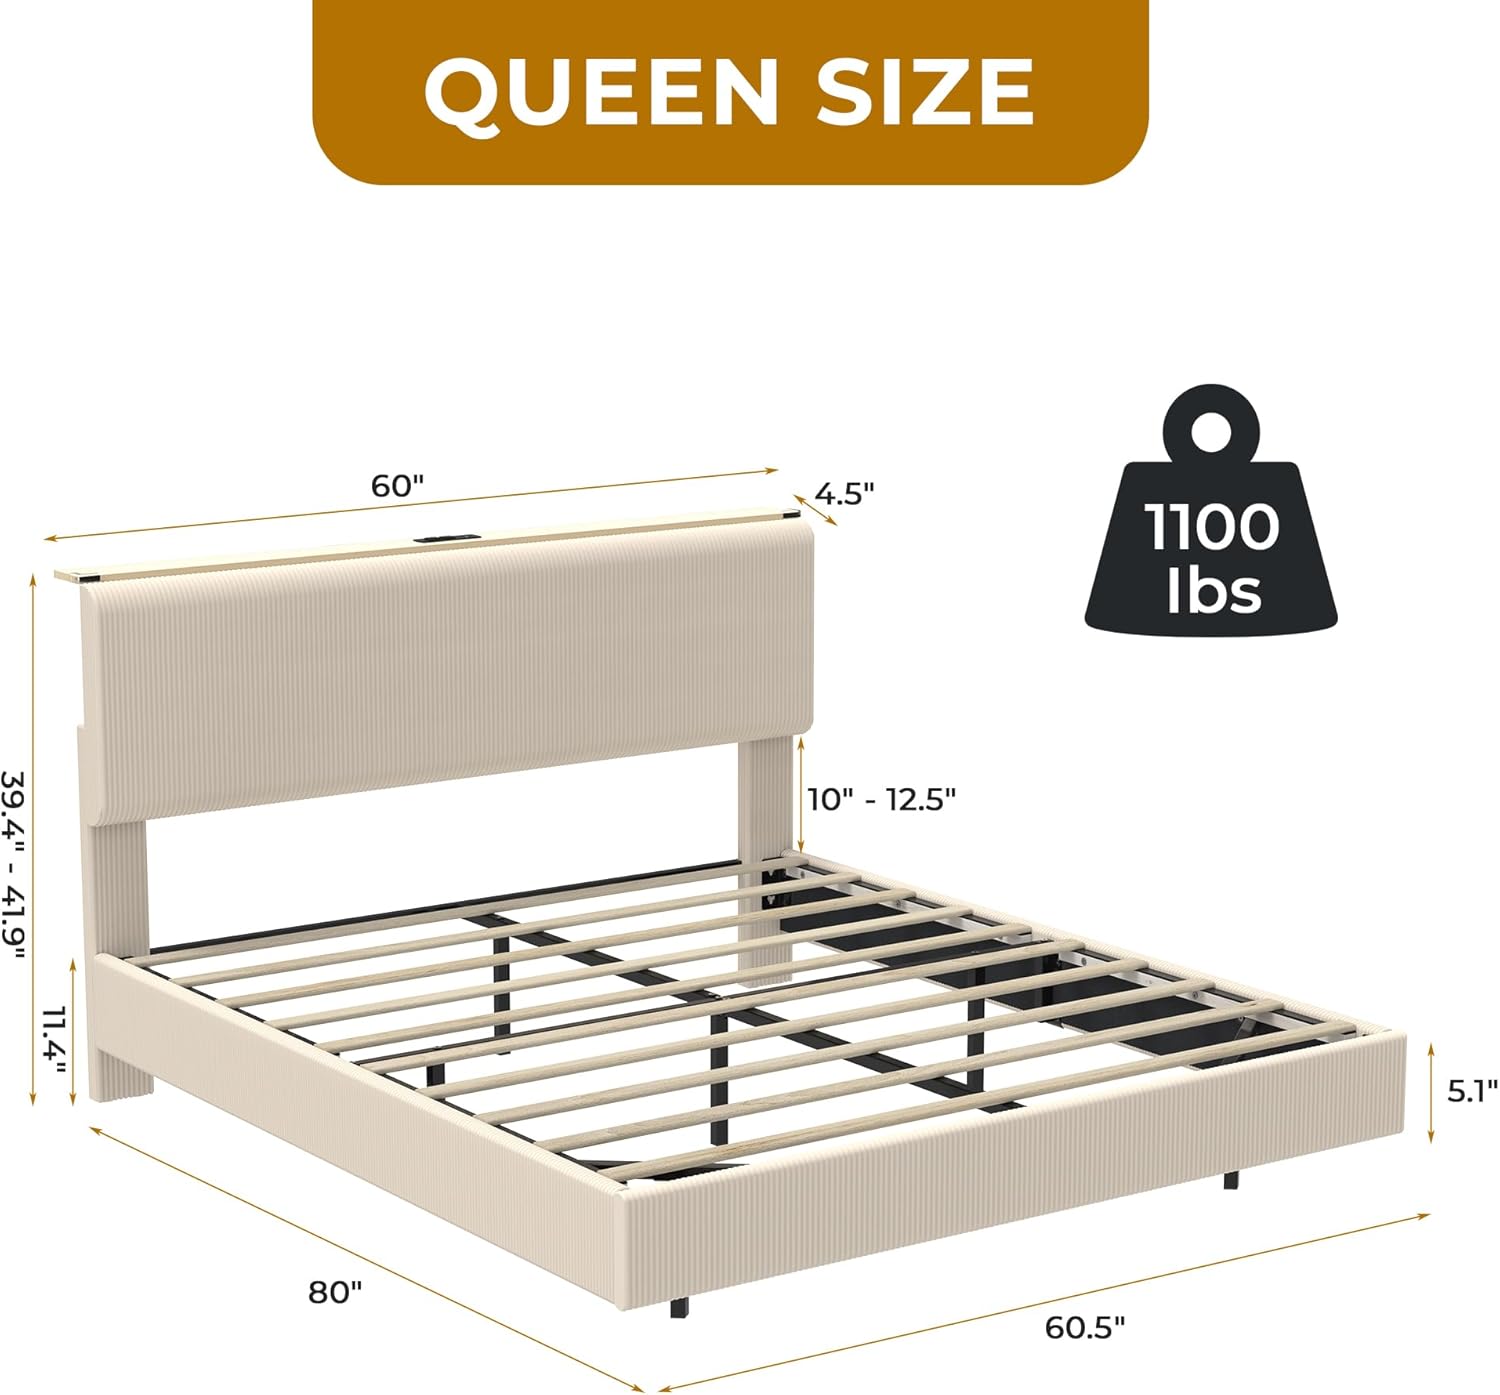
Image: Queen size bed frame dimensions: 80" length, 60.5" width, headboard height adjustable from 39.4" to 41.9". Weight capacity 1100 lbs.

Image: Recommended mattress height is 10-12.5 inches for optimal fit with the adjustable headboard.
Warranty and Support
SANGMUCEN offers excellent service. If your bed frame arrives damaged, scratched, or with missing parts, or if you encounter any other issues, please contact SANGMUCEN customer support directly. We are committed to assisting you.
For customer support, please refer to the contact information provided with your purchase or visit the SANGMUCEN store on Amazon.
Ask a question about this manual
Ask about setup, troubleshooting, compatibility, parts, safety, or missing instructions. Manuals+ will review the question and use this page’s manual context to help answer it.