
Prexiso P1LM
PREXISO 2-in-1 Line Laser Level with Magnetic Stud Finder User Manual
Model: P1LM
Introduction
The PREXISO 2-in-1 Line Laser Level with Magnetic Stud Finder is a versatile tool designed for accurate markings and detection of wood and metal studs. This compact device integrates a precise line laser with a magnetic stud finder, making it ideal for various indoor applications such as hanging pictures, mounting frames, and general home improvement tasks. It features built-in bubble vials for leveling and a hands-free attachment mechanism for convenience.
Safety Information
WARNING: This is a Class II laser product. Maximum laser output is less than 1mW.
- Do not stare directly into the laser beam.
- Avoid direct eye exposure to the laser beam.
- Do not disassemble the device. Repairs should only be performed by qualified personnel.
- Keep the device out of reach of children.
- Use the device only as described in this manual.
Product Components
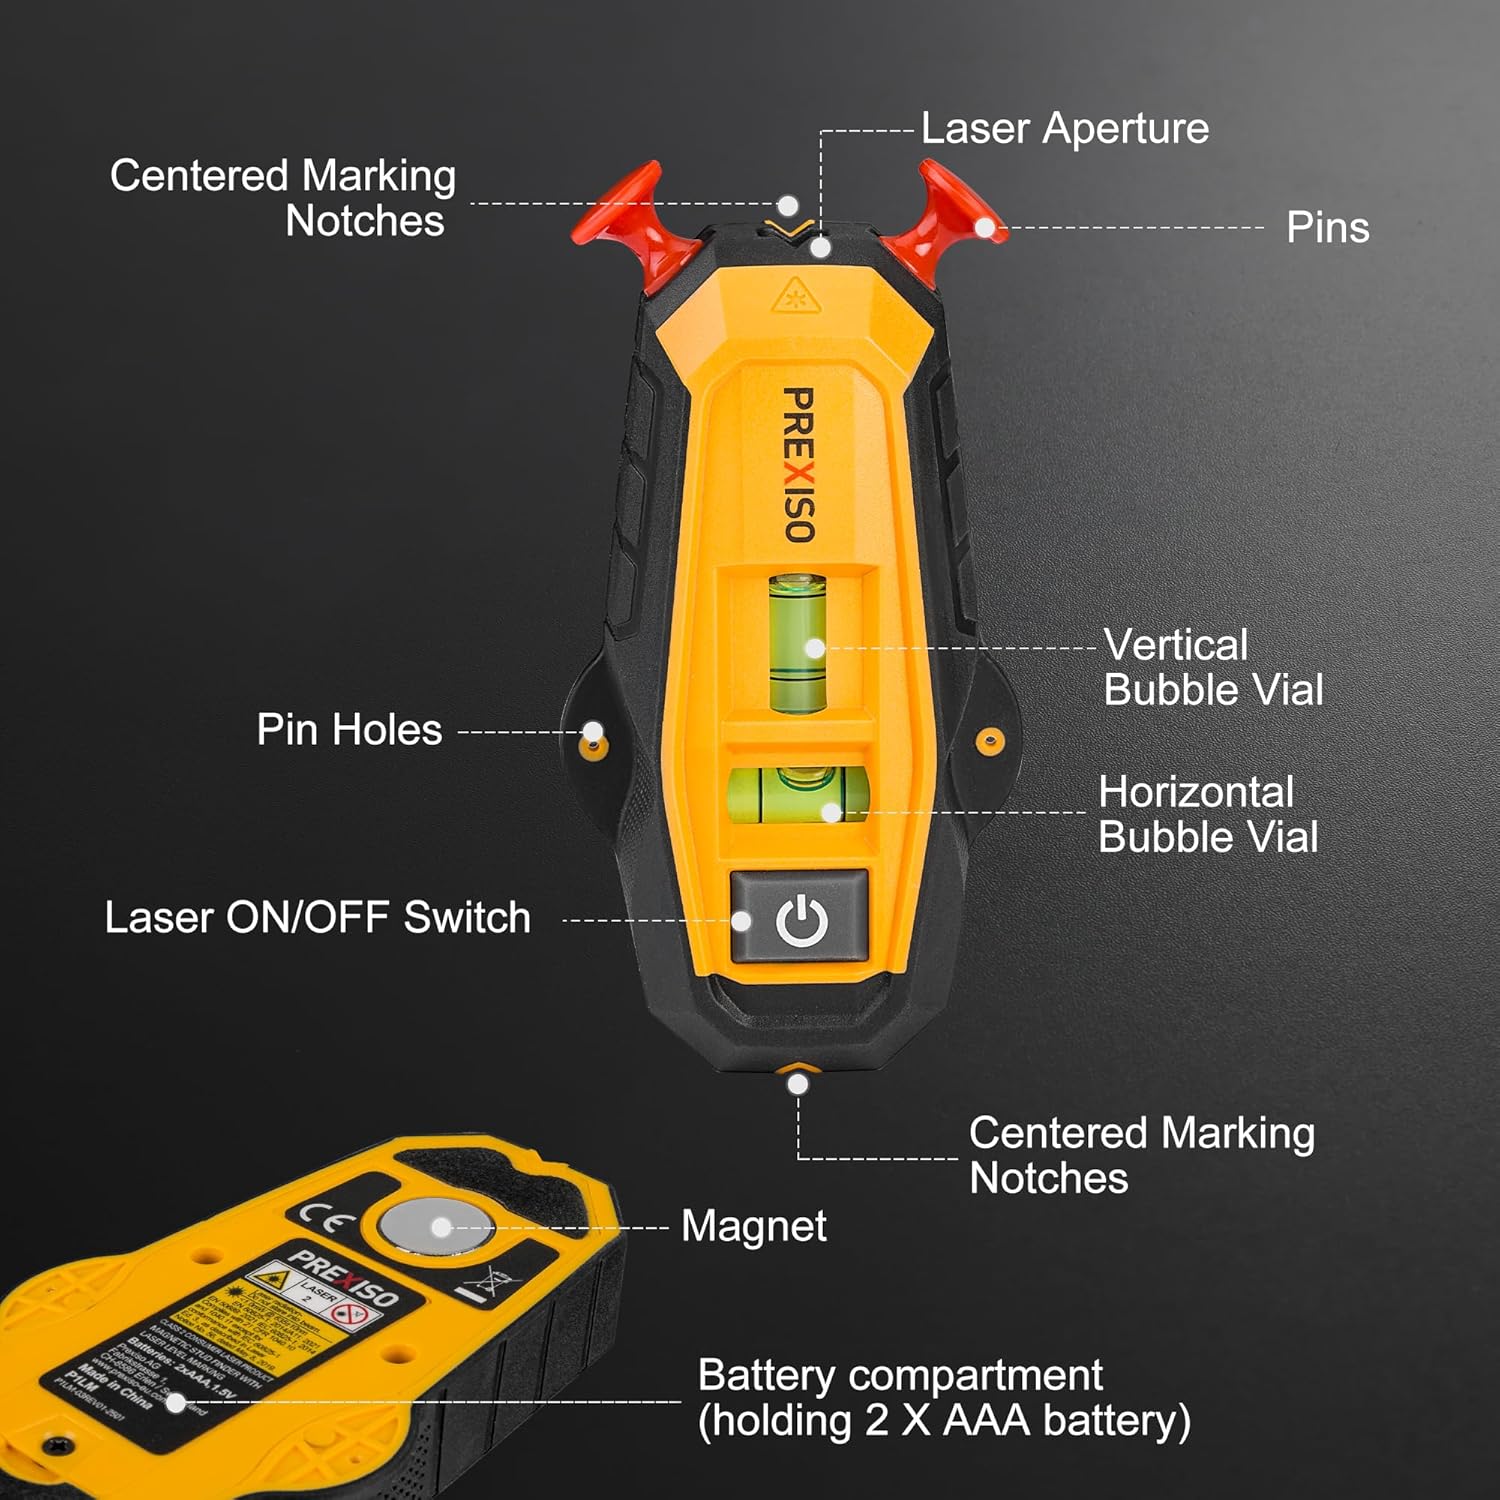
Image: Labeled diagram of the PREXISO 2-in-1 Line Laser Level, showing key components such as the laser aperture, pins, vertical and horizontal bubble vials, laser ON/OFF switch, centered marking notches, magnet, and battery compartment.
Familiarize yourself with the main components of your PREXISO 2-in-1 tool:
- Laser Aperture: Emits the laser line.
- Pins: Two red pins at the top for securing the device to rough surfaces.
- Vertical Bubble Vial: For vertical leveling.
- Horizontal Bubble Vial: For horizontal leveling.
- Laser ON/OFF Switch: Powers the laser function.
- Centered Marking Notches: Guides for precise marking.
- Magnet: Located on the back for magnetic stud detection.
- Battery Compartment: Holds 2 AAA batteries.
Setup
Battery Installation
The laser function of your PREXISO tool requires 2 AAA batteries. These are included with the product.
- Locate the battery compartment on the back of the device.
- Open the battery compartment cover.
- Insert 2 AAA alkaline batteries, ensuring correct polarity (+/-).
- Close the battery compartment cover securely.
Note: The stud detection function does not require batteries to operate.
Operating Instructions
1. Using the Magnetic Stud Finder

Image: The PREXISO tool being used to detect a screw in a wall, illustrating its magnetic stud finding capability. A magnet icon indicates the detection mechanism.
The magnetic stud finder is designed to detect nails and screws within wood and metal studs. It operates without batteries.
- Place the device flat against the wall surface.
- Slowly move the device across the surface in a sweeping "Z" pattern. This method helps to cover a wider area and increase the likelihood of detection.
- When the magnet encounters a metal fastener (nail or screw) in a stud, you will feel a magnetic pull, and the device may slightly adhere to the wall.
- Mark the detected location.
Important Notes for Stud Finder:
- This stud finder cannot be magnetically attracted by the metal stud itself, only by metal fasteners (screws, nails) within the stud.
- This tool is not an electronic stud edge detector and cannot detect pipes, wiring, or other hidden objects in the wall.
- It is NOT designed for use on lath and plaster walls. It works best on drywall and wood walls.
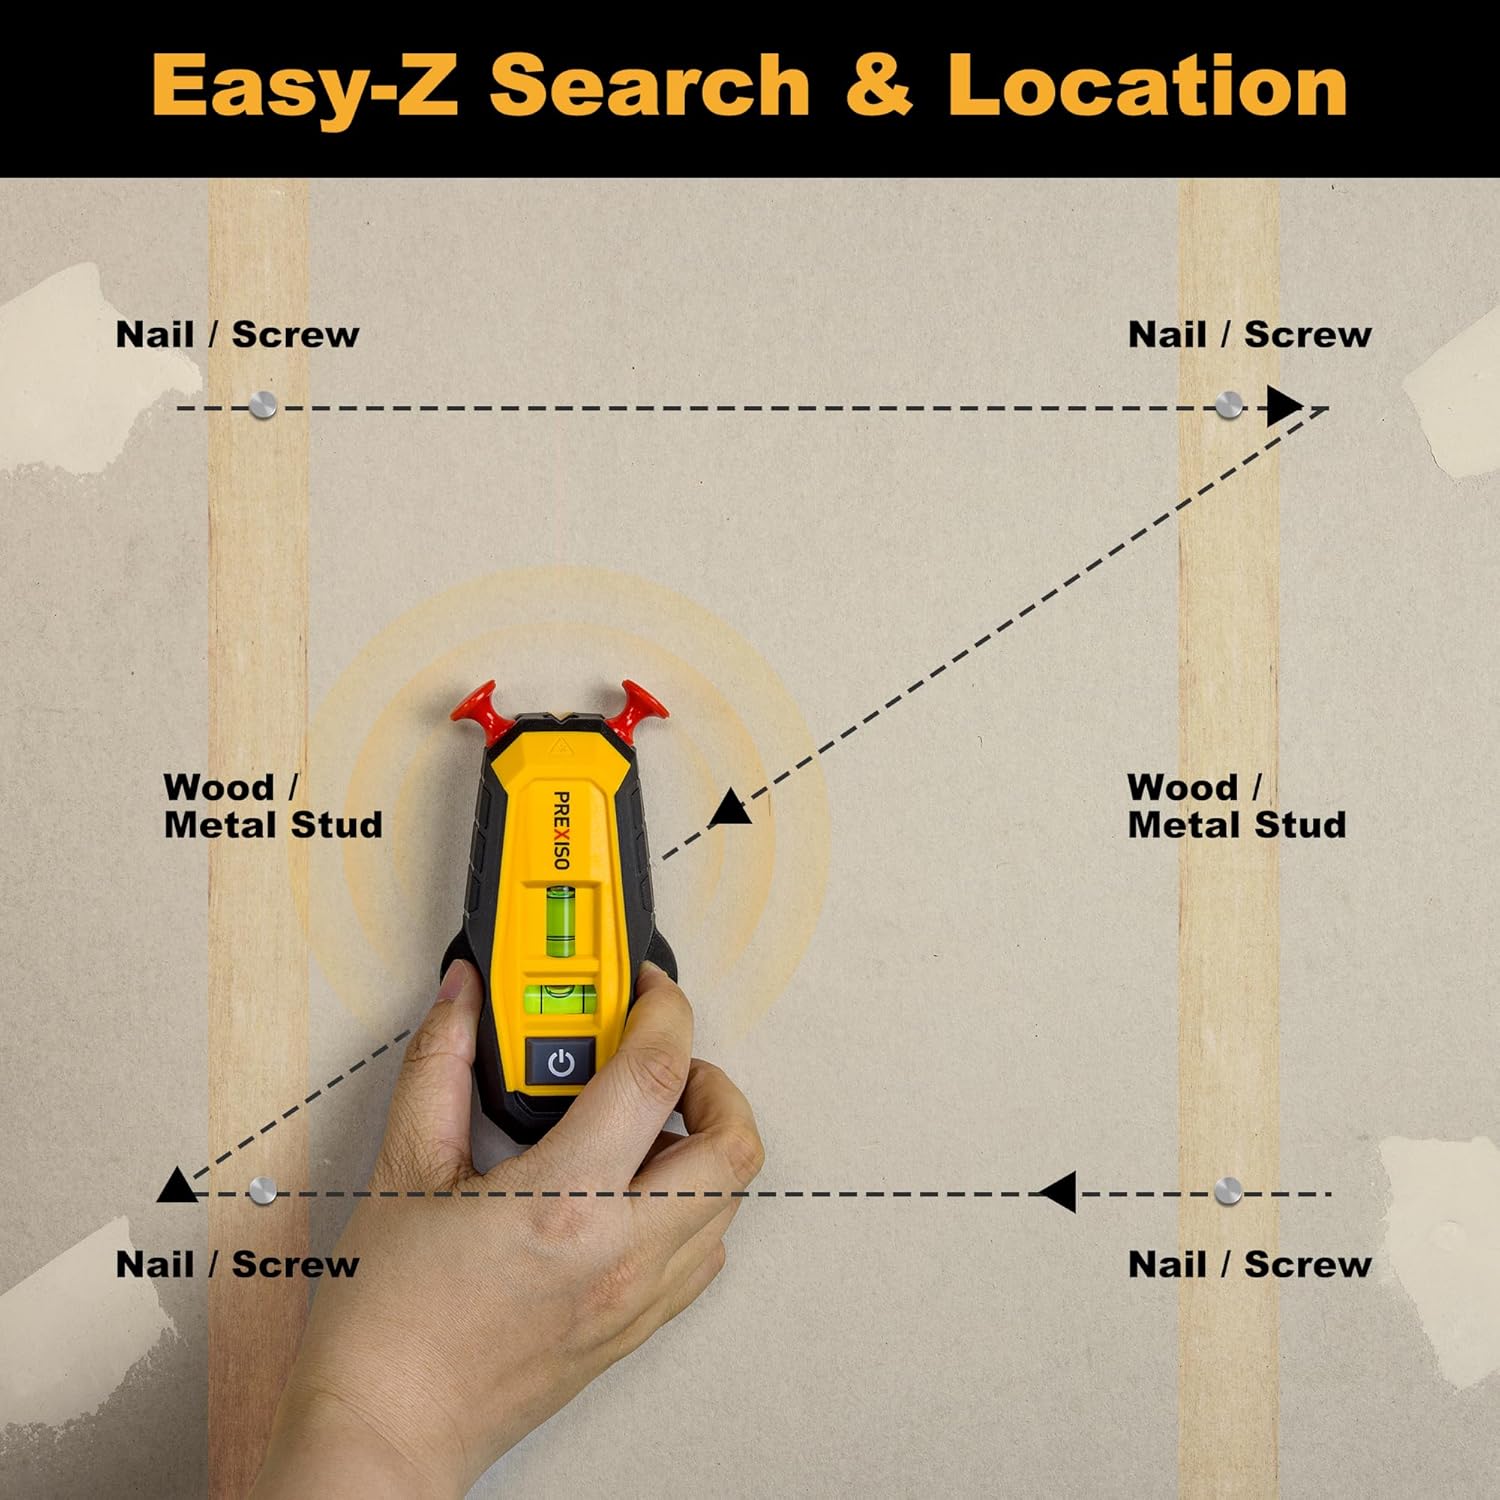
Image: An illustration demonstrating the "Easy-Z Search & Location" method for finding nails and screws within wood or metal studs by sweeping the device in a Z-pattern across the wall.
2. Using the Line Laser and Bubble Vials

Image: The PREXISO tool projecting a horizontal laser line for aligning a picture frame and a vertical laser line for aligning a cabinet, showcasing its horizontal and vertical alignment capabilities.
The integrated line laser projects a precise vertical line up to 30 feet, aiding in alignment tasks. The bubble vials ensure accurate leveling.
- Press the Laser ON/OFF Switch to activate the laser line.
- Position the device to project the laser line onto your desired surface.
- Use the built-in horizontal and vertical bubble vials to ensure the device is perfectly level or plumb. Adjust the device until the bubbles are centered within their respective vials.
- Utilize the centered marking notches at the top and bottom of the device for precise marking along the laser line.

Image: The PREXISO tool attached to a wall, demonstrating its hands-free operation for marking. The laser line is visible, extending downwards, and the bubble vial indicates levelness.
3. Fixing on Rough Surfaces

Image: The PREXISO tool showing its red pins used for fixing to rough surfaces like drywall, wallpaper, and wooden walls. A clear indication that it is not suitable for tile walls is also provided.
The two red pins at the top of the device allow for hands-free operation by securely attaching the tool to rough wall surfaces.
- Gently press the red pins into the wall surface until the device is stable.
- This feature is suitable for drywall, wallpaper, and wooden walls.
- Note: The pins are not suitable for smooth, glossy surfaces such as tile walls, as they will not provide a secure hold.
Maintenance
- Cleaning: Wipe the device with a soft, damp cloth. Do not use abrasive cleaners or solvents.
- Battery Replacement: Replace batteries when the laser light dims or fails to activate. Always use new AAA alkaline batteries. Remove batteries if the device will not be used for an extended period to prevent leakage.
- Storage: Store the device in a cool, dry place, away from direct sunlight and extreme temperatures.
Troubleshooting
| Problem | Possible Cause | Solution |
|---|---|---|
| Laser does not turn on. | Low or dead batteries; incorrect battery polarity. | Replace batteries with new AAA alkaline batteries, ensuring correct polarity. |
| Stud finder is not detecting studs accurately. | Attempting to detect metal studs magnetically; wall material is lath and plaster; not sweeping in "Z" pattern. | Remember it detects metal fasteners, not the stud itself. Not suitable for lath and plaster. Ensure proper "Z" pattern sweep. |
| Pins do not hold the device on the wall. | Wall surface is too smooth (e.g., tile). | Pins are designed for rough surfaces like drywall, wallpaper, or wood. Do not use on smooth surfaces. |
Specifications
| Feature | Detail |
|---|---|
| Brand | Prexiso |
| Model Number | P1LM |
| Material | Plastic |
| Color | Black & Yellow |
| Item Weight | 5.6 ounces (0.16 Kilograms) |
| Operation Mode | Manual |
| UPC | 840128502808 |
| Product Dimensions | 6.61 x 3.54 x 1.69 inches |
| Batteries | 2 AAA batteries required (included) |
| Power Source | Battery Powered |
| Battery Cell Type | Alkaline |
| Laser Class | Class II |
| Max Laser Output | < 1mW |
| Laser Line Range | Up to 30 feet |
Warranty and Support
Specific warranty details are not provided in this manual. For warranty information, technical support, or service inquiries, please visit the official Prexiso website or contact their customer service department.
You can often find support resources, FAQs, and contact information on the manufacturer's website:
Ask a question about this manual
Ask about setup, troubleshooting, compatibility, parts, safety, or missing instructions. Manuals+ will review the question and use this page’s manual context to help answer it.