Zalman CHRONIX
Zalman CHRONIX Mid Tower ATX Gaming PC Case User Manual
Model: CHRONIX
1. Introduction
The Zalman CHRONIX Mid Tower ATX Gaming PC Case is designed for enthusiasts seeking both style and performance. Featuring panoramic tempered glass panels and optimized airflow, this case provides an excellent foundation for high-end PC builds. This manual provides essential information for setting up, operating, maintaining, and troubleshooting your CHRONIX PC case.
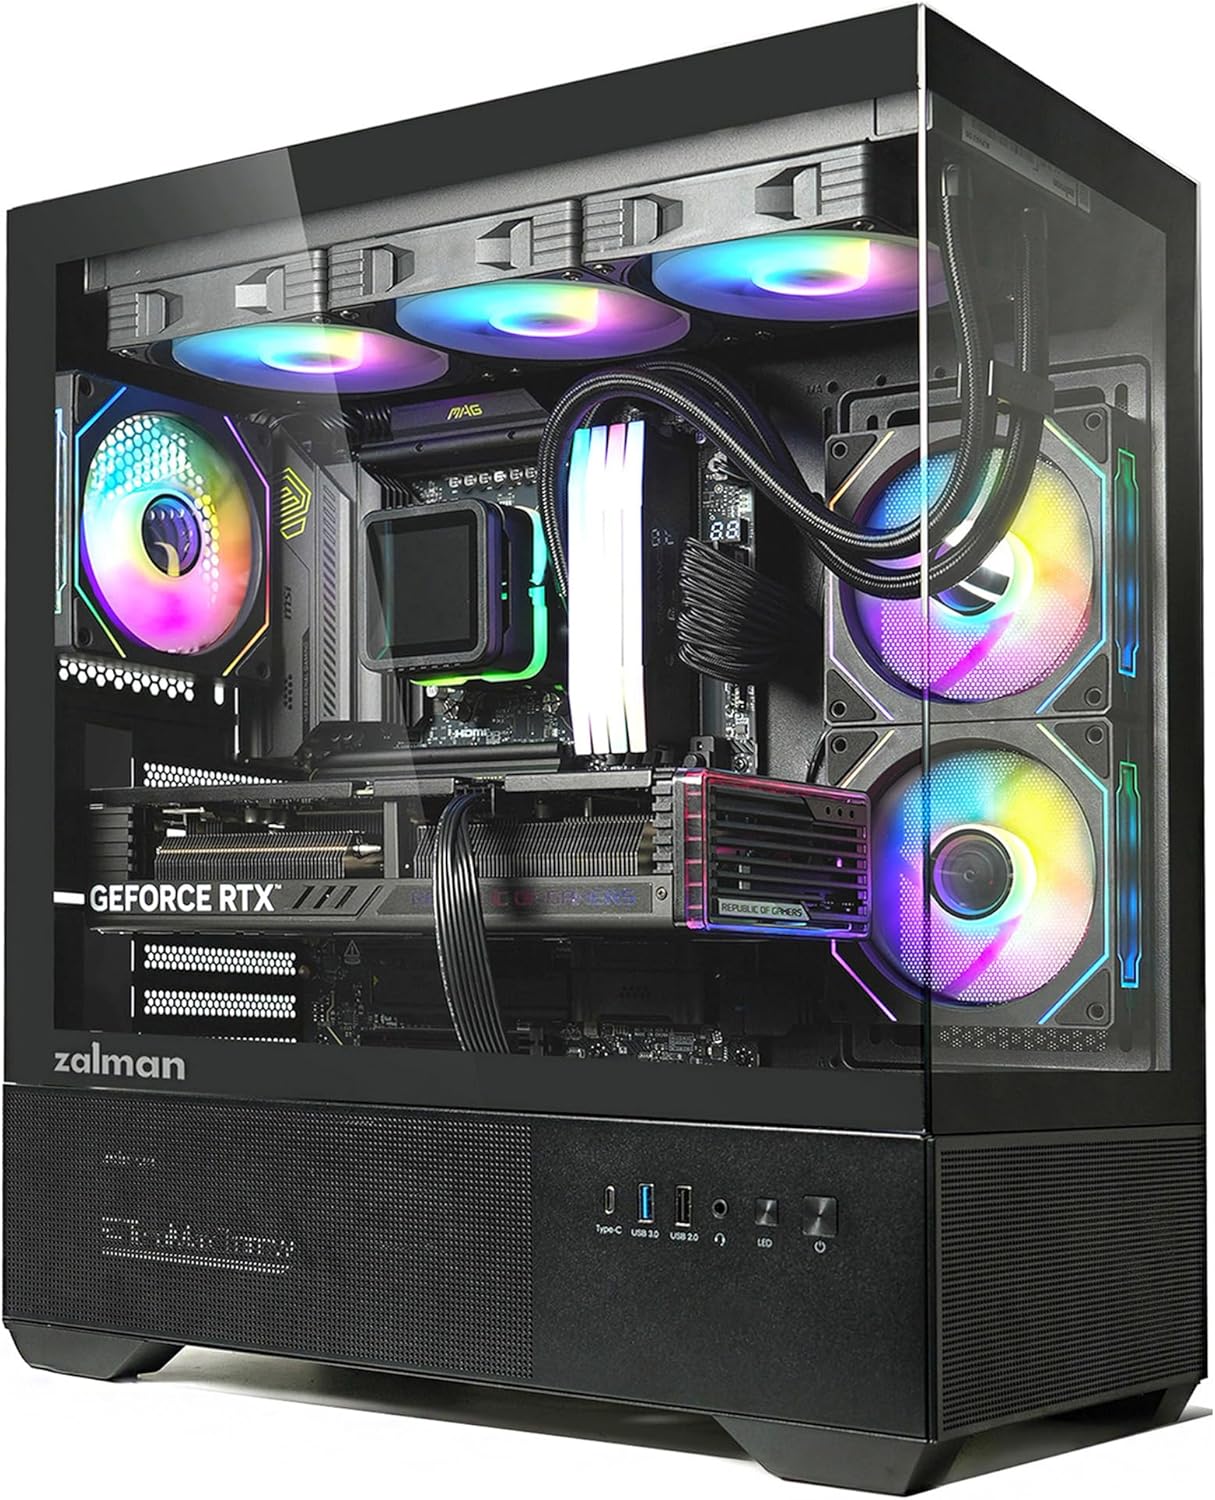
Image 1.1: The Zalman CHRONIX PC case showcasing its panoramic tempered glass and internal components with vibrant ARGB lighting.
2. Key Features
- Premium Design & Aesthetics: Features panoramic tempered glass front and side panels for a sleek, modern look.
- Optimized Airflow with ARGB Fans: Includes 3 preinstalled Prism ARGB fans (2 reverse blade for side intake, 1 standard blade rear exhaust) for enhanced cooling and illumination.
- High-Performance Cooling Support: Supports up to a 360mm radiator on top and 240mm on the side, ensuring efficient thermal management.
- Spacious Interior for High-End Components: Accommodates graphics cards up to 410mm long and CPU coolers up to 165mm in height.
- Modern Connectivity & Convenience: Equipped with USB Type-C 3.2 (5Gb) for fast data transfer and easy device connections.

Image 2.1: Overview of the CHRONIX ATX Mid-Tower case highlighting its features including 3 Prism ARGB fans, 360mm AIO support, 410mm GPU length, 7 PCI expansion slots, and USB Type-C 3.2.

Image 2.2: An illustration demonstrating the optimized airflow path within the CHRONIX case, with cool air intake from the side and bottom, and hot air exhaust from the top and rear.
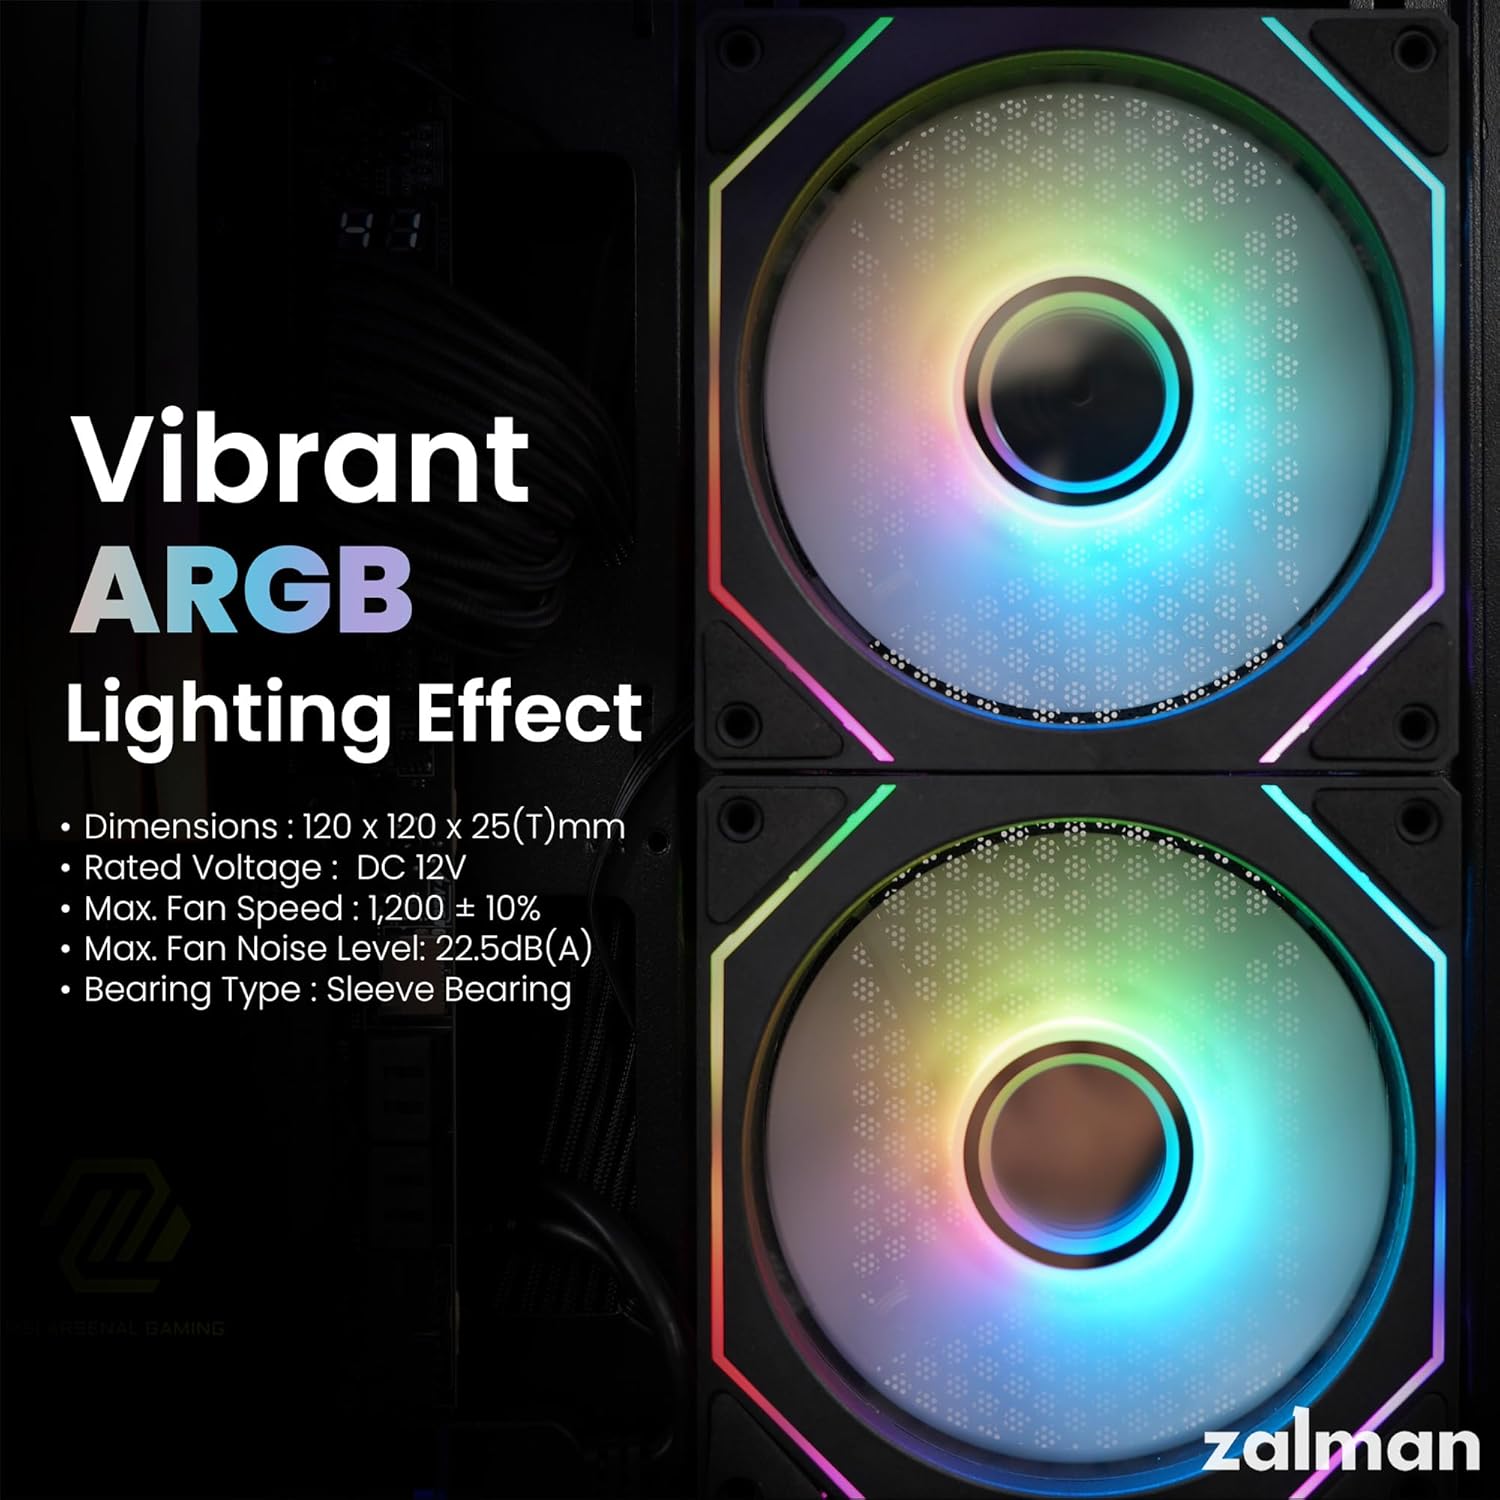
Image 2.3: A close-up view of the vibrant ARGB lighting effect produced by the pre-installed fans, along with their technical specifications.
3. Setup and Installation
Follow these general steps for installing your components into the Zalman CHRONIX case. Always refer to your component manuals for specific installation instructions.
3.1. Preparing the Case
- Remove Side Panels: The CHRONIX features tool-less tempered glass panels. Gently pull the front and side glass panels to detach them from the case.
- Access Rear Panel: Unscrew the tool-less thumbscrews on the rear panel to access the cable management area.

Image 3.1: An exploded view illustrating the tool-less removal of the full view tempered glass front and side panels for easy access during PC building.
3.2. Component Installation
- Motherboard Installation: Install your ATX, Micro ATX, or Mini-ITX motherboard onto the standoffs.
- CPU Cooler Installation: Install your CPU cooler. The case supports CPU air coolers up to 165mm in height.
- Graphics Card Installation: Install your graphics card. The case accommodates GPUs up to 410mm in length. Note that the GPU cutouts on the rear I/O panel are break-off type.
- Storage Drive Installation: Install your 2.5" SSDs or 3.5" HDDs in the designated bays.
- Power Supply Installation: Install your ATX power supply in the dedicated compartment.
- Radiator/Fan Installation: Install additional radiators or fans as needed. The case supports up to a 360mm radiator on top and 240mm on the side.

Image 3.2: A diagram illustrating the wide compatibility of the CHRONIX case, showing support for various motherboard sizes (Mini-ITX, Micro ATX, ATX), maximum GPU length, and radiator/fan placements.
3.3. Cable Management
Utilize the ample space and cable routing cutouts behind the motherboard tray for clean cable management. This improves airflow and aesthetics.
4. Operating Instructions
4.1. Front Panel I/O
The front panel provides convenient access to essential ports and controls:
- USB Type-C: For fast data transfer (USB 3.2, 5Gb).
- USB 3.0 Ports: For high-speed peripheral connections.
- USB 2.0 Ports: For standard peripheral connections.
- 3.5mm Stereo Jacks: For audio input (microphone) and output (headphones).
- Power Button: To power on/off your system.
- ARGB Control Button (LED): To control the lighting effects of the pre-installed ARGB fans.

Image 4.1: A detailed view of the front panel I/O, showing the USB Type-C, USB 3.0, USB 2.0, 3.5mm stereo jacks, power button, and ARGB control button.
4.2. ARGB Lighting Control
The pre-installed Prism ARGB fans can be controlled via the dedicated ARGB Control Button on the front panel or synchronized with your motherboard's ARGB software.
- Changing Colors: Tap the ARGB Control Button to cycle through various lighting modes and colors.
- Motherboard Sync: To synchronize the ARGB lighting with your motherboard's software (e.g., ASUS Aura Sync, MSI Mystic Light, Gigabyte RGB Fusion), hold the ARGB Control Button for 5 seconds. Ensure the ARGB cable from the fan hub is connected to your motherboard's 3-pin ARGB header.

Image 4.2: Visual instruction for ARGB synchronization, showing the 3-pin ARGB connector and the action to tap or hold the control button for color change or motherboard sync.
5. Maintenance
Regular maintenance helps ensure optimal performance and longevity of your PC case and components.
- Dust Filter Cleaning: The case includes magnetic dust filters for the top and side intake. Periodically remove and clean these filters to prevent dust buildup and maintain good airflow. Use a soft brush or vacuum cleaner.
- Tempered Glass Cleaning: Use a soft, lint-free cloth and a non-abrasive glass cleaner to clean the tempered glass panels. Avoid harsh chemicals that could damage the surface.
- Internal Dust Removal: Every few months, open the case and use compressed air to remove dust from internal components, especially fan blades and heatsinks. Ensure the system is powered off and unplugged before cleaning.
6. Troubleshooting
6.1. Fans Still Spinning After Shutdown (Gigabyte Motherboards)
If you are using a Gigabyte motherboard and experience the case fans still spinning after system shutdown, this may be due to reverse current from the power design.
- Solution: Enable the "ErP" setting in your motherboard's BIOS. This setting helps to reduce power consumption in off-mode and can resolve the issue.
6.2. Intake Fans Not Lighting Up
The pre-installed intake fans may not light up if they are not properly daisy-chained to the exhaust fan's ARGB hub.
- Solution: Ensure that the 4-pin power cables from the intake fans are daisy-chained together and connected to the exhaust fan's 4-pin power cable. The exhaust fan contains the main ARGB hub and SATA power connection for all pre-installed fans.
7. Specifications
| Feature | Specification |
|---|---|
| Brand | Zalman |
| Model Name | CHRONIX |
| Case Type | Mid Tower |
| Color | Black |
| Material | Tempered Glass, Alloy Steel, Plastic |
| Product Dimensions (LxWxH) | 17.17 x 8.46 x 19.17 inches (436 x 215 x 487 mm) |
| Item Weight | 13.42 pounds (6.1 kg) |
| Motherboard Support | ATX, Micro ATX, Mini-ITX |
| Pre-installed Fans | 3 x 120mm Prism ARGB Fans (2 side intake, 1 rear exhaust) |
| Radiator Support (Top) | Up to 360mm |
| Radiator Support (Side) | Up to 240mm |
| Max. GPU Length | 410mm |
| Max. CPU Cooler Height | 165mm |
| Front I/O Ports | 1 x USB Type-C 3.2 (5Gb), 2 x USB 3.0, 1 x USB 2.0, 3.5mm Audio Jacks, Power Button, ARGB Control Button |
| Cooling Method | Air |
| Light Color | RGB |
8. Warranty and Support
Zalman products are manufactured with high-quality standards. For information regarding warranty coverage, terms, and conditions, please refer to the warranty card included with your product or visit the official Zalman website. For technical support, product inquiries, or assistance with troubleshooting beyond this manual, please contact Zalman customer service through their official channels.
Note: Keep your proof of purchase for warranty claims.
Related Documents - CHRONIX
 |
Zalman CHRONIX ATX Mid Tower Computer Case User's Manual User's manual for the Zalman CHRONIX ATX Mid Tower Computer Case, providing installation precautions, specifications, and component details. |
 |
ZALMAN i3 NEO ATX Mid Tower Computer Case User Manual User manual for the ZALMAN i3 NEO ATX Mid Tower Computer Case, providing detailed installation instructions, safety precautions, specifications, and accessory information. |
 |
ZALMAN Z1 Iceberg ATX Mid Tower Computer Case User Manual Comprehensive user manual for the ZALMAN Z1 Iceberg ATX Mid Tower computer case, detailing installation, specifications, precautions, and included accessories. Learn how to assemble your PC with this guide. |
 |
Zalman I3 Neo TG ATX PC Case User Manual Comprehensive user manual for the Zalman I3 Neo TG ATX PC Case. This guide details specifications, features, and installation instructions for the white tempered glass chassis equipped with RGB lighting, multiple drive bays, and front USB 3.0 connectivity. |
 |
ZALMAN CHRONIX ATX Mid Tower Computer Case User Manual This user manual provides detailed instructions and safety precautions for installing and using the ZALMAN CHRONIX ATX Mid Tower Computer Case. It includes specifications, accessory lists, and step-by-step installation guides. |
 |
Zalman P40 Prism PLUS and P40 Prism ATX Mid-Tower Computer Case User Manual User manual for the Zalman P40 Prism PLUS and P40 Prism ATX Mid-Tower Computer Case, providing installation instructions, precautions, specifications, and warranty information. |