1. Introduction
Thank you for purchasing the Patikuin Large 6 Drawers Dresser. This manual provides essential information for the safe assembly, operation, and maintenance of your new dresser. Please read these instructions carefully before beginning assembly and retain them for future reference.

Image 1.1: The Patikuin Large 6 Drawers Dresser, showcasing its rustic finish and six spacious drawers, with an open shelf area above.
2. Safety Information
To ensure safe use of this product, please adhere to the following guidelines:
- Anti-Tip Device: It is crucial to install the included anti-tip device to prevent the dresser from tipping over, especially in households with children or pets. Securely fasten the dresser to the wall as instructed.
- Weight Capacity: Do not exceed the maximum weight capacity of 22 pounds per drawer. The top surface should also not be overloaded.
- Placement: Place the dresser on a level, stable surface. Avoid placing it near heat sources or in direct sunlight to prevent material damage.
- Electrical Safety: When using the built-in power outlet, ensure all connected devices are within the specified voltage and current limits. Do not overload the outlets.

Image 2.1: Illustration demonstrating the correct installation of the anti-tip device to secure the dresser to a wall, preventing accidental tipping.
3. Package Contents
Before assembly, verify that all components are present and undamaged. Each part is labeled for easy identification. If any parts are missing or damaged, please contact customer service.

Image 3.1: An exploded view diagram detailing all components, hardware, and tools required for assembling the dresser.
4. Assembly Instructions
Follow these steps carefully for proper assembly. It is recommended to assemble the dresser on a soft, clean surface to prevent scratches. Two people are recommended for assembly.
- Step 1: Prepare Components. Unpack all parts and lay them out. Identify each component using the provided labels and the parts diagram.
- Step 2: Assemble the Main Frame. Connect the side panels to the base and back panel according to the instructions. Ensure all connections are secure.

Image 4.1: Visual guide for the initial assembly phase, illustrating how to connect the main structural panels of the dresser.
- Step 3: Install Drawer Slides. Attach the drawer slides to the interior side panels of the dresser frame. Ensure they are level and correctly oriented for smooth drawer operation.

Image 4.2: Detailed diagram for installing the drawer slides onto the dresser's internal structure.
- Step 4: Assemble Drawers. Construct each of the six drawers by connecting the front, back, and side panels, then inserting the bottom panel. Attach the drawer handles.

Image 4.3: Step-by-step illustration for assembling one of the dresser's drawers, including attaching the handle.
- Step 5: Insert Drawers and Finalize. Carefully slide the assembled drawers into the dresser frame. Ensure they open and close smoothly.
- Step 6: Install Anti-Tip Device. Follow the instructions in Section 2 to securely attach the anti-tip device to the dresser and the wall.

Image 4.4: The completed dresser with all six drawers properly installed and aligned.
5. Operating Instructions
5.1 Built-in Power Outlet
The dresser includes a convenient charging station with 2 AC outlets and 2 USB ports, powered by a 6.56-foot cord. To use:
- Plug the dresser's power cord into a standard wall outlet.
- Connect your electronic devices to the AC outlets or USB ports as needed.
- Ensure devices are compatible with 125V/12A AC and 5V/2A USB specifications.

Image 5.1: A detailed view of the integrated charging station on the dresser's top surface, showing two AC outlets and two USB ports in use.
5.2 LED Light Bar
The dresser features a multi-color LED light bar with 16 colors and 21 dynamic modes. The LED light can be controlled via an app.
- Connect the LED light bar to one of the USB ports on the charging station.
- Download the designated control app (refer to the separate LED light instructions if provided, or scan a QR code on the light strip packaging).
- Pair your smartphone with the LED light bar via Bluetooth.
- Use the app to select colors, adjust brightness, choose dynamic modes, or set timing functions.

Image 5.2: The dresser illuminated by its adjustable RGB LED light strips, demonstrating various color options and the smartphone app interface for control.
6. Maintenance
Proper care will extend the life and appearance of your dresser:
- Cleaning: Wipe surfaces with a soft, damp cloth. Avoid harsh chemicals or abrasive cleaners, which can damage the finish.
- Spills: Clean spills immediately with a dry cloth to prevent staining or water damage.
- Drawer Slides: Periodically check drawer slides for smooth operation. If a drawer becomes stiff, ensure it is properly aligned and free of obstructions. Lubrication is generally not required for modern drawer slides.
- Hardware: Periodically check and tighten all screws and fasteners to ensure stability.
7. Troubleshooting
If you encounter issues with your dresser, refer to the following common problems and solutions:
- Drawers do not slide smoothly:
- Ensure the drawer slides are correctly installed and aligned on both the drawer and the dresser frame.
- Check for any obstructions within the drawer tracks.
- Verify that the dresser is placed on a level surface.
- LED lights are not working:
- Confirm the LED light bar is securely plugged into a functional USB port.
- Check if the dresser's main power cord is plugged into a live wall outlet.
- Ensure the control app is correctly paired and functioning.
- Power outlets are not providing power:
- Verify the dresser's main power cord is securely plugged into a working wall outlet.
- Test the wall outlet with another device to confirm it has power.
- Ensure the connected devices are not exceeding the specified electrical load (125V/12A AC, 5V/2A USB).
If these steps do not resolve the issue, please contact customer service for further assistance.
8. Specifications
| Brand | Patikuin |
| Model Name | Large 6 Drawers Dresser |
| Product Dimensions | 15.66"D x 55.11"W x 32.2"H |
| Item Weight | 125.7 Pounds |
| Color | Rustic |
| Material | MDF (Medium-Density Fiberboard) |
| Drawer Capacity | Up to 22 pounds per drawer |
| Power Outlet | 2 AC Outlets (125V/12A), 2 USB Ports (5V/2A) |
| Power Cord Length | 6.56 feet |
| LED Light | Multi-color (16 colors), 21 dynamic modes, App control |
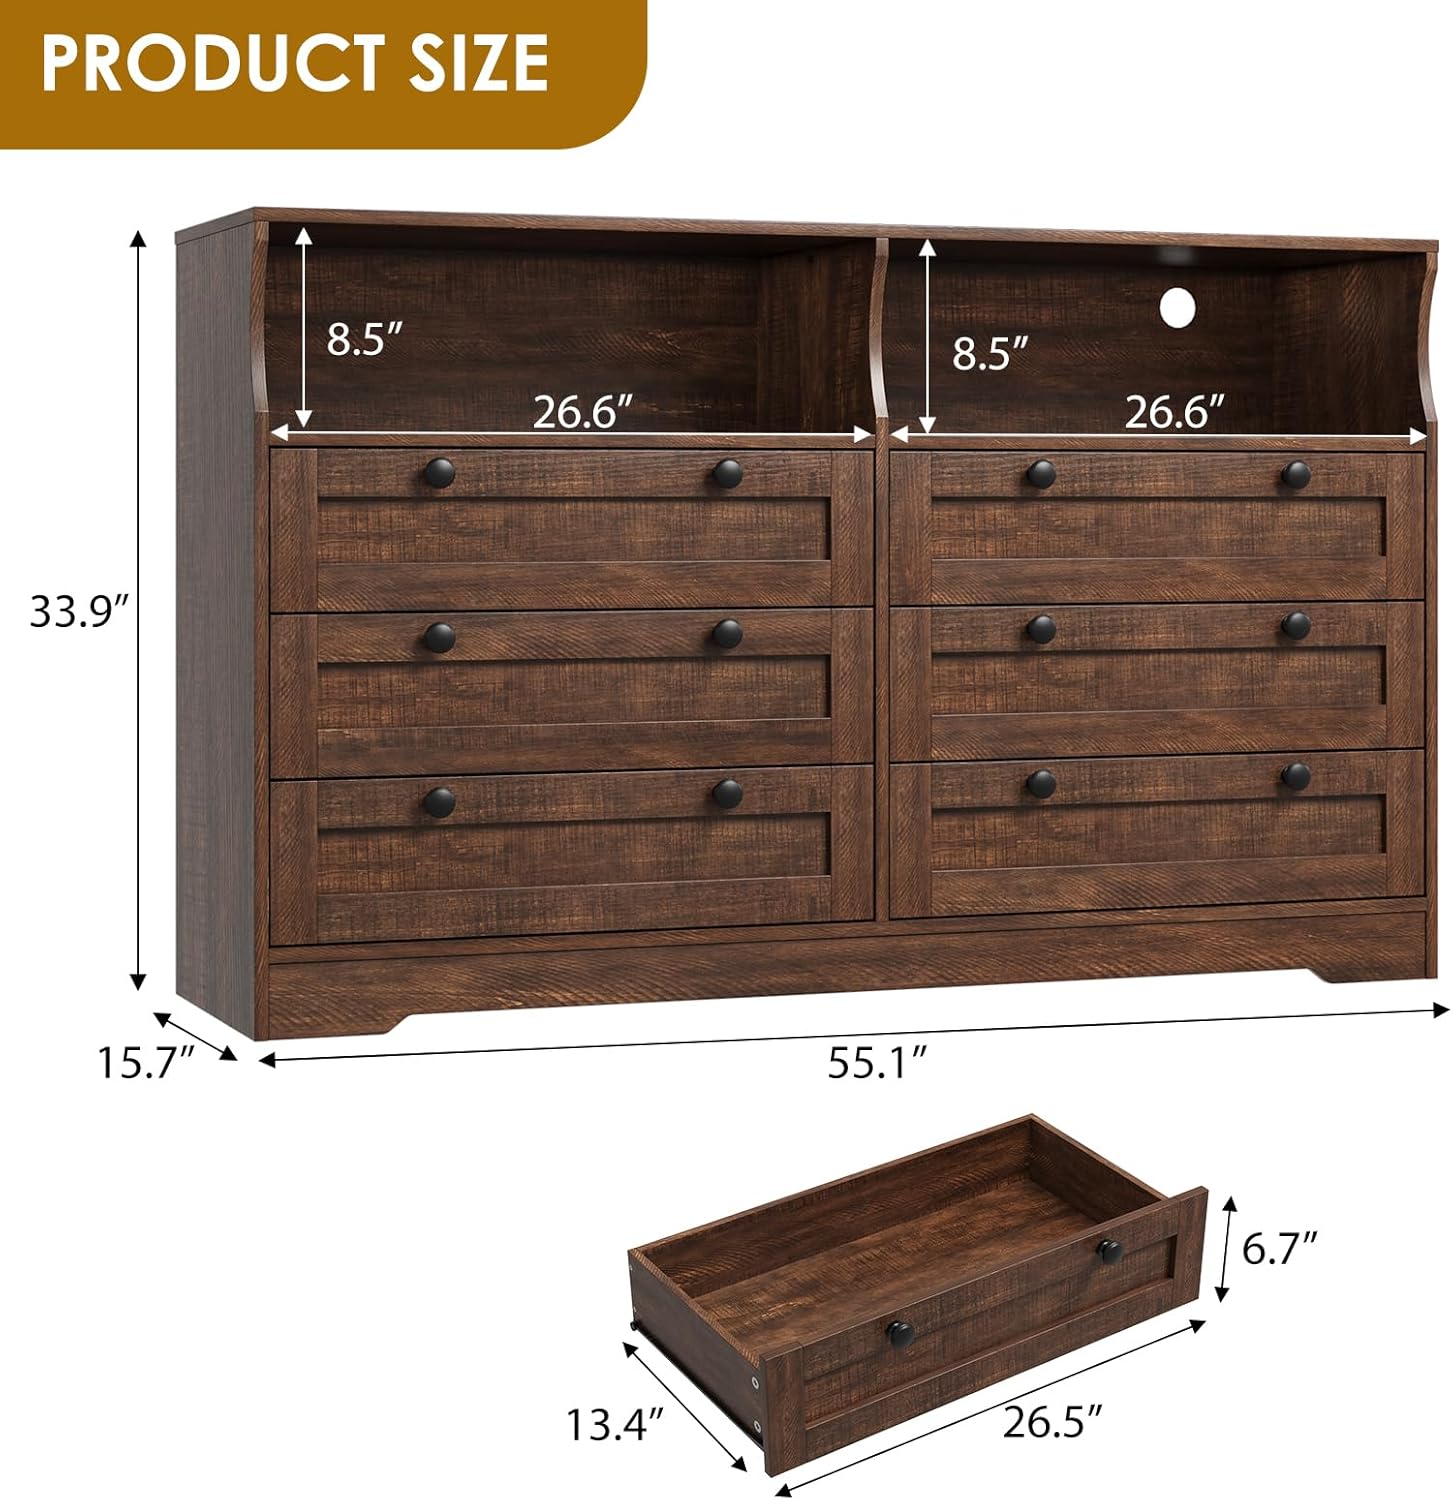
Image 8.1: Detailed dimensional drawing of the dresser, including overall height, width, depth, and individual drawer dimensions.
9. Warranty and Customer Support
Patikuin is committed to providing quality products and customer satisfaction. While specific warranty details are not provided in this manual, we offer 24-hour customer service to assist with any issues or questions you may have regarding your product.
For assistance, please contact our customer service team through the retailer's platform or via the contact information provided with your purchase documentation.