Introduction
This manual provides detailed instructions for the installation, operation, and maintenance of your KKnoon Wireless Ultrasonic Water Level Monitor. This device is designed to accurately measure and display water levels and temperatures in tanks, offering convenient monitoring and alarm functions.

Image: The KKnoon Wireless Ultrasonic Water Level Monitor, showing the receiver display unit and the solar-powered transmitter unit.
Features
- Comprehensive Monitoring: Tracks minimum and maximum liquid levels, with support for high/low level and empty tank alarms to prevent overflows and ensure efficient water management.
- Temperature Display: Measures both indoor ambient temperature and water tank temperature, providing critical data for system performance.
- Solar Charging: The transmitter features a solar panel for power assistance and charging of rechargeable NiMH batteries, reducing the need for frequent battery replacement.
- Versatile Installation: The receiver can be placed on a desk or mounted on a wall, offering flexible placement options.
- Ultrasonic Level Gauge: Utilizes ultrasonic technology for accurate, non-contact liquid level measurement in various containers.
- Wireless Transmission: Operates on 433MHz wireless frequency with an open distance range of 100 meters and an effective distance of 30 meters.
- IP65 Waterproof Transmitter: The transmitter unit is rated IP65 for water and dust resistance, suitable for outdoor installation.

Image: Overview of the ultrasonic level meter's features, including solar charging, water level monitoring, low water level alarm, tank temperature, indoor temperature, and time alarm.

Image: Detailed explanation of solar charging (transmitter uses rechargeable nickel-metal hydride batteries) and water level monitoring (dynamic bar display and low water level alert).
Package Contents
Verify that all items listed below are included in your package:
- 1 x Receiver Unit
- 1 x Transmitter Unit
- 2 x Installation Screws
- 1 x USB to Type-C Wire
- 1 x User Manual (English)
Specifications
| Component | Parameter | Value |
|---|---|---|
| Receiver | Indoor Temperature Range | 0℃~50℃ / 32℉~122℉ |
| Temperature Resolution | 0.1℃ | |
| Temperature Accuracy | ±1℃ | |
| Alarm Duration | 120 seconds | |
| Transmitter | Water Tank Temperature Range | -40℃~60℃ / -40℉~140℉ |
| Temperature Resolution | 0.1℃ | |
| Temperature Accuracy | ±1℃ | |
| Water Level Resolution | 0.01m | |
| Water Level Accuracy | ±0.05m | |
| General | Water Level Measurement Range | 1~5m |
| Receiver Power | USB to Type-C Wire / 3 * AAA batteries (Not included) | |
| Transmitter Power | 6 * AAA 1.2V NiMH 900mAh batteries (Included) | |
| Receiver Screen Size | 112mm / 4.4in | |
| Receiver Dimensions | 135 * 84 * 26mm / 5.31 * 3.31 * 1.02in | |
| Transmitter Dimensions | 167 * 109 * 68mm / 6.57 * 4.29 * 2.67in | |
| Receiver Weight | 184g / 6.49oz | |
| Transmitter Weight | 216g / 7.62oz | |
| Wireless Frequency | 433MHz | |
| Wireless Range (Open) | 100 meters | |
| Wireless Range (Effective) | 30 meters | |
| Transmitter Waterproof Rating | IP65 |

Image: The receiver display unit, highlighting indoor temperature, time alarm, water level, backlight, and high/low water level alarm features, along with temperature measurement ranges.
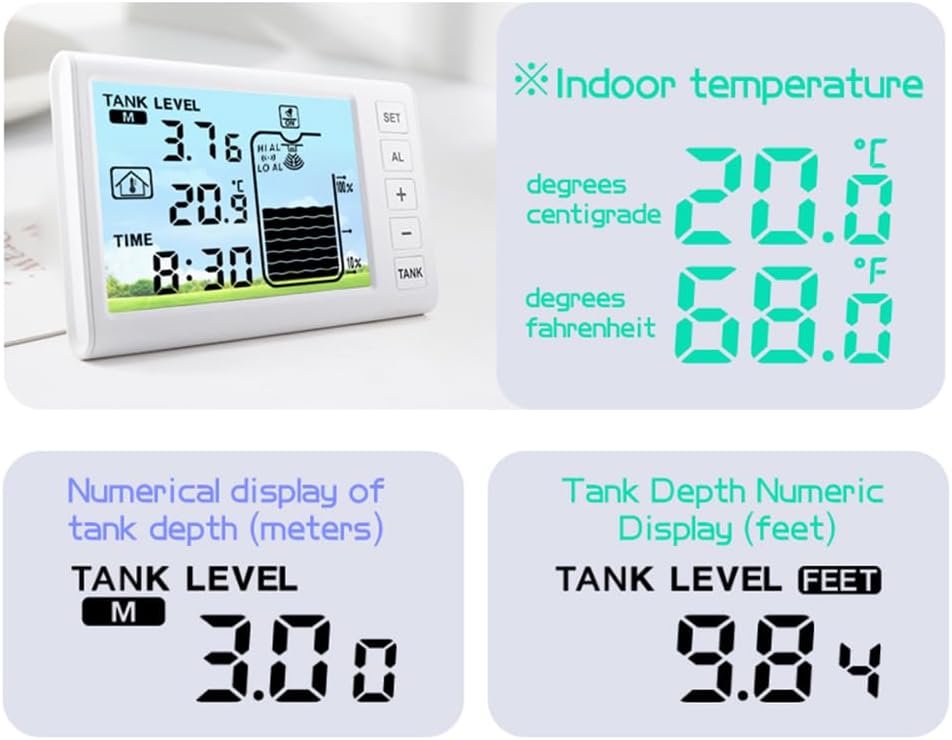
Image: Examples of how indoor temperature is displayed in Celsius and Fahrenheit, and tank depth is shown numerically in meters and feet on the receiver.
Setup Instructions
Follow these steps to set up your water level monitor:
- Receiver Power-On and Initial Settings:
- Power the receiver unit using either the provided USB to Type-C cable or by inserting 3 AAA batteries (not included).
- The receiver will enter tank depth setting mode. The setting range is 0.5m to 5m (1.64ft to 16.4ft). Adjust as needed.
- Set Air Gap Value:
- Press the "SET" button on the receiver to configure the air gap value. The default display is "0.50".
- The setting range for the air gap is 0.5m to 5m (1.64ft to 16.4ft). Adjust this value to match the distance from the top of your tank to the maximum water level.
- Set Automatic Water Filling Level (Optional):
- Press the "SET" button again to set the value for automatic water filling level.
- The setting range is 10% to 50%. This feature can be used to trigger an alert or action when the water level drops below a certain percentage.
- Transmitter Power-On and Installation:
- Ensure the transmitter unit has 6 AAA 1.2V NiMH 900mAh rechargeable batteries installed (included).
- Install the transmitter on top of your water tank. For optimal solar charging, position the solar panel on the sunny side of the tank.
- Ensure the transmitter is installed correctly, with the ultrasonic sensor facing downwards into the tank and clear of obstructions. Avoid faulty installations where the sensor is submerged or obstructed.

Image: Step One of the setup procedure, showing how to power the receiver and enter the tank depth setting mode.

Image: Steps Two and Three for setting the air gap and automatic water filling level on the receiver. Step Four illustrates correct and faulty transmitter installation methods on a tank, emphasizing solar panel orientation and sensor placement.

Image: Details of the transmitter, including its 433MHz wireless transmission, solar charging panel, surveyor's level, IP65 waterproof rating, and a reminder to install the solar panel on the sunny side.
Operating Instructions
Once set up, the monitor will continuously display the water level and temperature. Here are key operational aspects:
- Water Level Display: The receiver shows the current water level numerically and with a dynamic bar graph.
- Temperature Display: Both indoor ambient temperature and water tank temperature are displayed.
- High/Low Level Alarms: The device will sound an alarm for 120 seconds if the water level reaches predefined high or low thresholds, or if the tank is empty.
- Time Alarm: A configurable time alarm function is available.
- Backlight: The receiver display includes a backlight for improved visibility in low light conditions.
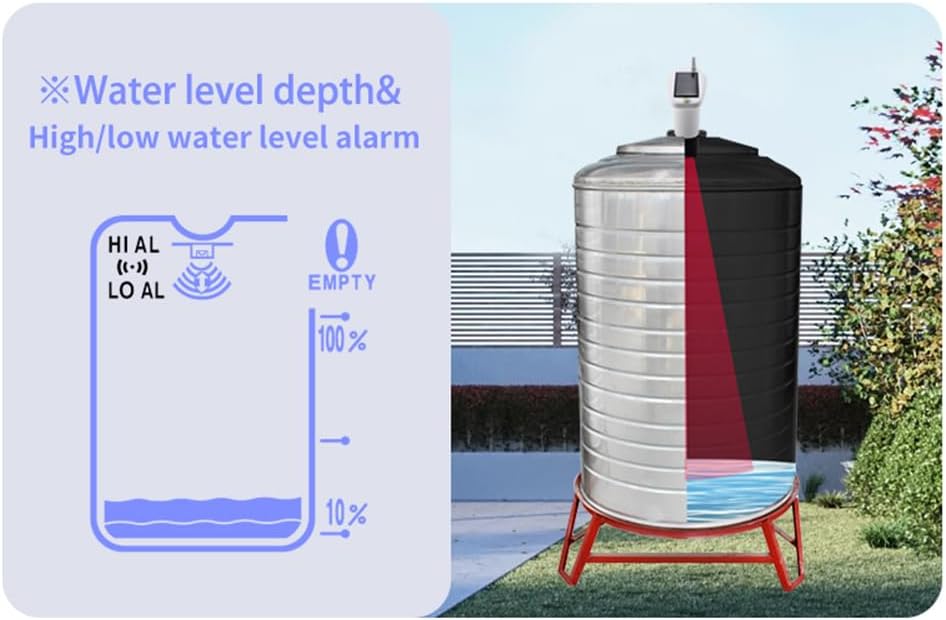
Image: A visual representation of water level depth measurement and the high/low water level alarm indicators on the receiver, alongside a cross-section of a tank showing the sensor's operation.
Maintenance
- Battery Management: The transmitter's NiMH batteries are charged by the solar panel. Ensure the solar panel is clean and exposed to sunlight for optimal charging. Replace batteries if they no longer hold a charge.
- Cleaning: Periodically clean the solar panel on the transmitter and the display screen of the receiver with a soft, dry cloth. Do not use abrasive cleaners or solvents.
- Transmitter Placement: Regularly check the transmitter's mounting to ensure it remains secure and correctly positioned over the tank.
- Environmental Conditions: While the transmitter is IP65 waterproof, avoid prolonged exposure to extreme weather conditions if possible to extend product lifespan.
Troubleshooting
If you encounter issues with your device, refer to the following common problems and solutions:
| Problem | Possible Cause | Solution |
|---|---|---|
| Receiver displays "EER" or no tank level. | No signal from transmitter, transmitter batteries low/dead, or incorrect setup. | Check transmitter batteries and solar panel exposure. Ensure transmitter is powered on. Verify receiver and transmitter are within effective wireless range (30m). Re-check setup steps, especially tank depth and air gap settings. |
| Inaccurate water level readings. | Incorrect air gap setting, obstructions in tank, or sensor not level. | Recalibrate the air gap setting. Ensure there are no objects directly below the transmitter's sensor that could interfere with ultrasonic waves. Verify the transmitter is installed level using its built-in surveyor's level. |
| Solar panel not charging transmitter. | Insufficient sunlight, dirty solar panel, or faulty rechargeable batteries. | Relocate the transmitter to an area with more direct sunlight. Clean the solar panel surface. Replace the NiMH rechargeable batteries if they are old or damaged. |
| No alarm sound. | Alarm function disabled or volume too low. | Check receiver settings to ensure high/low level alarms are enabled. |
Warranty and Support
Specific warranty information is not provided in this manual. For warranty claims, technical support, or further assistance, please refer to the product packaging or contact KKnoon customer service directly through their official channels or the retailer where the product was purchased.