1. Introduction
This manual provides instructions for the RPNB Deluxe Home Safe (1.52 Cuft) and the RPNB 4-Pistol High Capacity Handgun Safe with Biometric Fingerprint. This bundle offers secure storage solutions for your valuables and firearms. Please read this manual thoroughly before setup and operation to ensure proper use and safety.

Image 1.1: RPNB Deluxe Home Safe in a home setting, demonstrating its discreet design.
2. Safety Information
Your safety and the safety of others are paramount. Always follow these guidelines:
- Keep all keys, digital codes, and registered fingerprints confidential and out of reach of children or unauthorized individuals.
- Never store loaded firearms in the handgun safe. Always ensure firearms are unloaded before storage.
- Do not store the safe keys inside the safe.
- Ensure the safe is securely mounted to prevent unauthorized removal or tipping.
- Regularly check battery levels to ensure continuous operation.
- This safe is designed to deter theft and unauthorized access. It is not fireproof or waterproof unless explicitly stated.
3. Package Contents
Upon unpacking, please verify that all items listed below are present:
- RPNB Deluxe Home Safe (1.52 Cuft)
- RPNB 4-Pistol High Capacity Handgun Safe
- Emergency Keys (for both safes, typically 2 sets)
- Removable Shelf (for Deluxe Home Safe)
- 4-Pistol Foam Rack (for Handgun Safe)
- Mounting Hardware (screws, anchors)
- User Manual (this document)
4. Product Overview and Features
4.1 General Features (Both Safes)
- Robust Construction: Both safes are constructed from reinforced solid steel, providing physical protection against forced entry.
- Secure Locking Mechanism: Features double-cylinder latches and 20mm live-action bolts for enhanced security.
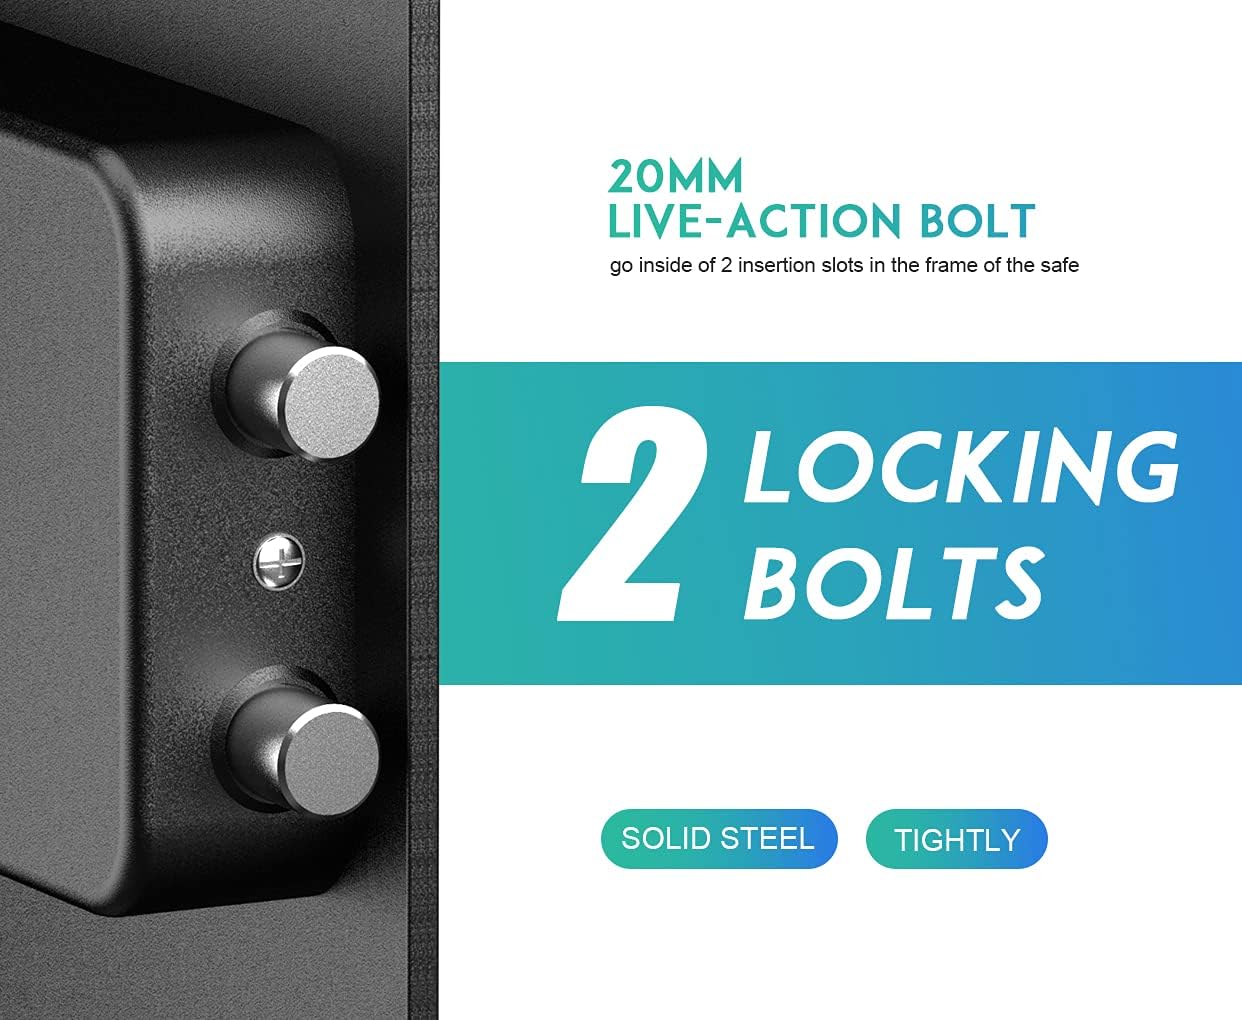
Image 4.1: Detail of the 20mm live-action locking bolts, indicating solid steel construction for security.
4.2 Deluxe Home Safe Features
- Capacity: 1.52 cubic feet interior space.
- Removable Shelf: Allows for flexible storage organization.
- Entry Methods: Digital keypad and emergency key access.
- Indicator Lights: Three different colored lights to indicate operational status and battery level.
4.3 4-Pistol Handgun Safe Features
- High Capacity: Designed to store up to 4 pistols with a foam rack.
- Multiple Entry Methods: Biometric fingerprint, digital keypad, and emergency key access.
- Emergency Power: Built-in USB Type-C port for emergency power supply (cable not included).
- Interior Lighting: Provides visibility in low-light conditions.

Image 4.2: Interior view of the 4-Pistol Handgun Safe, highlighting the removable foam rack, indicator light, emergency USB-C port, and magnetic key cover.
5. Setup
5.1 Battery Installation (Both Safes)
Both safes require 4 AA alkaline batteries for operation. Batteries are not included.
- Locate the battery compartment, typically on the inside of the safe door or a panel.
- Insert 4 new AA alkaline batteries, ensuring correct polarity (+/-).
- Close the battery compartment cover securely.
Important: Do not mix old and new batteries, or different types of batteries. Use only new AA alkaline batteries.

Image 5.1: Illustration of the emergency USB Type-C port and a reminder to use 4 new AA alkaline batteries.
5.2 Mounting Instructions
For optimal security, it is recommended to securely mount your safe to a floor, wall, or other fixed structure. Mounting hardware is provided.
- Choose a suitable location that is discreet and provides a solid mounting surface.
- Open the safe door and locate the pre-drilled mounting holes on the back or bottom panel.
- Mark the drilling points on your chosen surface through the holes.
- Drill pilot holes using an appropriate drill bit for your surface type (wood, concrete, etc.).
- Align the safe with the drilled holes and secure it using the provided mounting hardware. Ensure all bolts are tightened firmly.
6. Operating the Deluxe Home Safe
6.1 Opening with Emergency Key
The emergency key provides immediate access to the safe, bypassing the digital keypad. This is useful for initial setup, forgotten codes, or dead batteries.
- Locate the keyhole, usually concealed behind a removable cover on the keypad.
- Insert the emergency key and turn it clockwise.
- Simultaneously turn the knob clockwise to open the safe door.
6.2 Setting/Changing Digital Code
You can program a 3 to 8 digit personal identification number (PIN).
- With the safe door open, press the red reset button located on the inside of the door. The indicator light will flash.
- Enter your desired 3-8 digit code on the keypad.
- Press the '#' or 'E' button to confirm. The indicator light will confirm successful programming.
- Test the new code with the door open before closing it.
6.3 Opening with Digital Code
- Enter your programmed 3-8 digit code on the keypad.
- Press the '#' or 'E' button to confirm. The indicator light will turn green.
- Within 5 seconds, turn the knob clockwise to open the safe door.

Image 6.1: Visual guide for opening the safe using either the key or a digital password, followed by turning the knob.
6.4 Indicator Lights
The safe features three indicator lights (red, yellow, green) to communicate different states:
- Green Light: Indicates successful code entry or safe is open.
- Red Light: Indicates incorrect code entry, low battery, or programming mode.
- Yellow Light: Typically indicates programming mode or a warning state.
7. Operating the 4-Pistol Biometric Handgun Safe
7.1 Opening with Emergency Key
Similar to the Deluxe Home Safe, the handgun safe also has an emergency key override.
- Locate the keyhole, often discreetly placed.
- Insert the emergency key and turn it to unlock.
- Lift the lid to open the safe.
7.2 Setting/Changing Digital Code
The handgun safe also supports a digital code for access.
- With the safe lid open, press the programming button (refer to specific safe model for exact location, usually inside).
- Enter your desired 3-8 digit code.
- Press the '#' or 'E' button to confirm.
- Test the new code with the lid open.
7.3 Opening with Digital Code
- Enter your programmed 3-8 digit code.
- Press the '#' or 'E' button. The safe will unlock.
- Lift the lid to open.
7.4 Registering/Using Fingerprints
The handgun safe features a biometric fingerprint scanner for quick access.
- To Register: With the lid open, press the programming button. Place your finger on the scanner. The indicator light will flash. Lift and place your finger multiple times (typically 3-5 times) until the light confirms successful registration. Repeat for additional fingerprints.
- To Open: Place a registered finger firmly on the scanner. The safe will unlock.
- Lift the lid to open.

Image 7.1: The 4-Pistol Handgun Safe offers three reliable entry methods: biometric fingerprint, digital code, and emergency key.
7.5 Emergency USB Type-C Power
If the batteries are completely drained and you do not have the emergency key, you can use a USB Type-C cable (not included) to provide temporary power.
- Locate the USB Type-C port on the side of the handgun safe.
- Connect a USB Type-C cable to the port and to a power source (e.g., power bank, wall adapter).
- Once powered, you can use your digital code or registered fingerprint to open the safe.
- This port is for emergency use only and not intended for long-term power supply. Replace batteries immediately after gaining access.
8. Maintenance
- Cleaning: Wipe the exterior surfaces with a soft, damp cloth. Avoid abrasive cleaners or solvents.
- Battery Replacement: Replace all batteries in both safes annually, or when the low battery indicator activates. Always use new AA alkaline batteries.
- Keypad/Scanner Care: Keep the keypad and fingerprint scanner clean and dry for optimal performance.
9. Troubleshooting
| Problem | Possible Cause | Solution |
|---|---|---|
| Safe does not open with digital code/fingerprint. | Incorrect code/fingerprint, low batteries, or system error. | Re-enter code carefully. Try another registered fingerprint. Replace batteries. Use emergency key or USB-C power (handgun safe). |
| Indicator lights are not working. | Dead batteries. | Replace all batteries with new AA alkaline batteries. |
| Safe beeps continuously. | Low battery warning. | Replace all batteries immediately. |
| Cannot program new code/fingerprint. | Incorrect procedure, batteries too low. | Ensure batteries are fresh. Follow programming steps precisely. |
10. Specifications
10.1 Deluxe Home Safe (1.52 Cuft)
- Exterior Dimensions (H*W*D): 16.51" × 13.76" × 12.97"
- Interior Dimensions (H*W*D): 16.42" × 13.66" × 10.63"
- Capacity: 1.52 Cuft
- Door Thickness: 8 Gauge Solid Steel
- Body Thickness: 16 Gauge Solid Steel
- Entry Methods: Digital Keypad, Emergency Key

Image 10.1: Size comparison guide for RPNB electronic security home safes, including the RP42ESA model which corresponds to the Deluxe Home Safe.
10.2 4-Pistol Biometric Handgun Safe
- Item Name: 4-Pistol Fingerprint Safe
- Exterior Dimensions (L*W*H): 13.78" × 12.20" × 6.30" (35cm × 31cm × 16cm)
- Interior Dimensions (L*W*H): 11.61" × 10.55" × 5.35" (29.5cm × 26.8cm × 13.6cm)
- Net Weight: 6.75kg / 14.88lbs
- Entry Methods: Biometric Fingerprint, Digital Keypad, Emergency Key, Emergency USB Type-C Power

Image 10.2: Detailed dimensions and specifications for the 4-Pistol Fingerprint Safe.
11. Warranty and Support
RPNB is committed to providing quality products and customer satisfaction. If you encounter any questions or difficulties with your RPNB Deluxe Home Safe or 4-Pistol Biometric Handgun Safe, please do not hesitate to contact our customer service team.
For assistance, please refer to the contact information provided with your purchase or visit the official RPNB website.