Introduction
This manual provides essential instructions for the safe and efficient operation, maintenance, and troubleshooting of your Generic 1500W Steam Cleaner Mop. Please read this manual thoroughly before first use and retain it for future reference.
Important Safety Instructions
Always follow basic safety precautions when using electrical appliances to reduce the risk of fire, electric shock, or injury. This appliance is for household use only.
- Do not immerse the appliance in water or other liquids.
- Do not leave the steam mop unattended while powered on.
- Keep out of reach of children and pets.
- Use only tap water or demineralized water. Do not add essential oils, detergents, or other chemicals to the water tank.
- Ensure the power cord is not damaged and avoid kinking or stretching it.
- Always unplug the appliance before filling, emptying, or cleaning.
- Do not direct steam at people, animals, or electrical appliances.
- Allow the appliance to cool completely before storing.
Product Components
Familiarize yourself with the parts of your steam cleaner mop:

Figure 1: Product Components and Dimensions
This image illustrates the main parts of the steam mop: the main unit with handle, water tank, flow control switch, mop head, and the included accessories such as the carpet glider, microfibre mop pad, and measuring cup. Key dimensions are also indicated.
- Main Unit: Contains the heating element, water tank, and controls.
- Handle: Ergonomic handle for comfortable operation.
- Water Tank: 400ml capacity for water.
- Flow Control Switch: Adjusts steam output (2-speed).
- Mop Head: Base where the microfibre pad attaches.
- Microfibre Mop Pads (x2): Reusable and washable pads for cleaning.
- Carpet Glider: Attachment for refreshing carpets.
- Measuring Cup: For accurate water filling.
- Power Cord: 4.8m (15.75ft) long for extended reach.
Setup
- Attach Mop Pad: Place a clean microfibre mop pad onto the mop head. Ensure it is securely attached.
- Fill Water Tank:
- Ensure the appliance is unplugged.
- Open the water tank stopper.
- Using the provided measuring cup, fill the 400ml water tank with clean tap water or demineralized water. Do not overfill.
- Close the water tank stopper securely.

Figure 2: Filling the Water Tank
This image demonstrates the correct method for filling the 400ml water tank using the provided measuring cup. Only use water or demineralized water. - Connect Power: Plug the power cord into a suitable electrical outlet.
Operating Instructions
- Power On: Press the power switch located on the main unit. The indicator light will illuminate.
- Preheating: The steam mop will heat up in approximately 20 seconds. Once ready, steam will begin to generate.
- Adjust Steam Level: Use the 2-speed adjustment switch to select the desired steam level:
- Level 1: Recommended for daily cleaning and delicate surfaces.
- Level 2: Recommended for deep cleaning and stubborn stains.
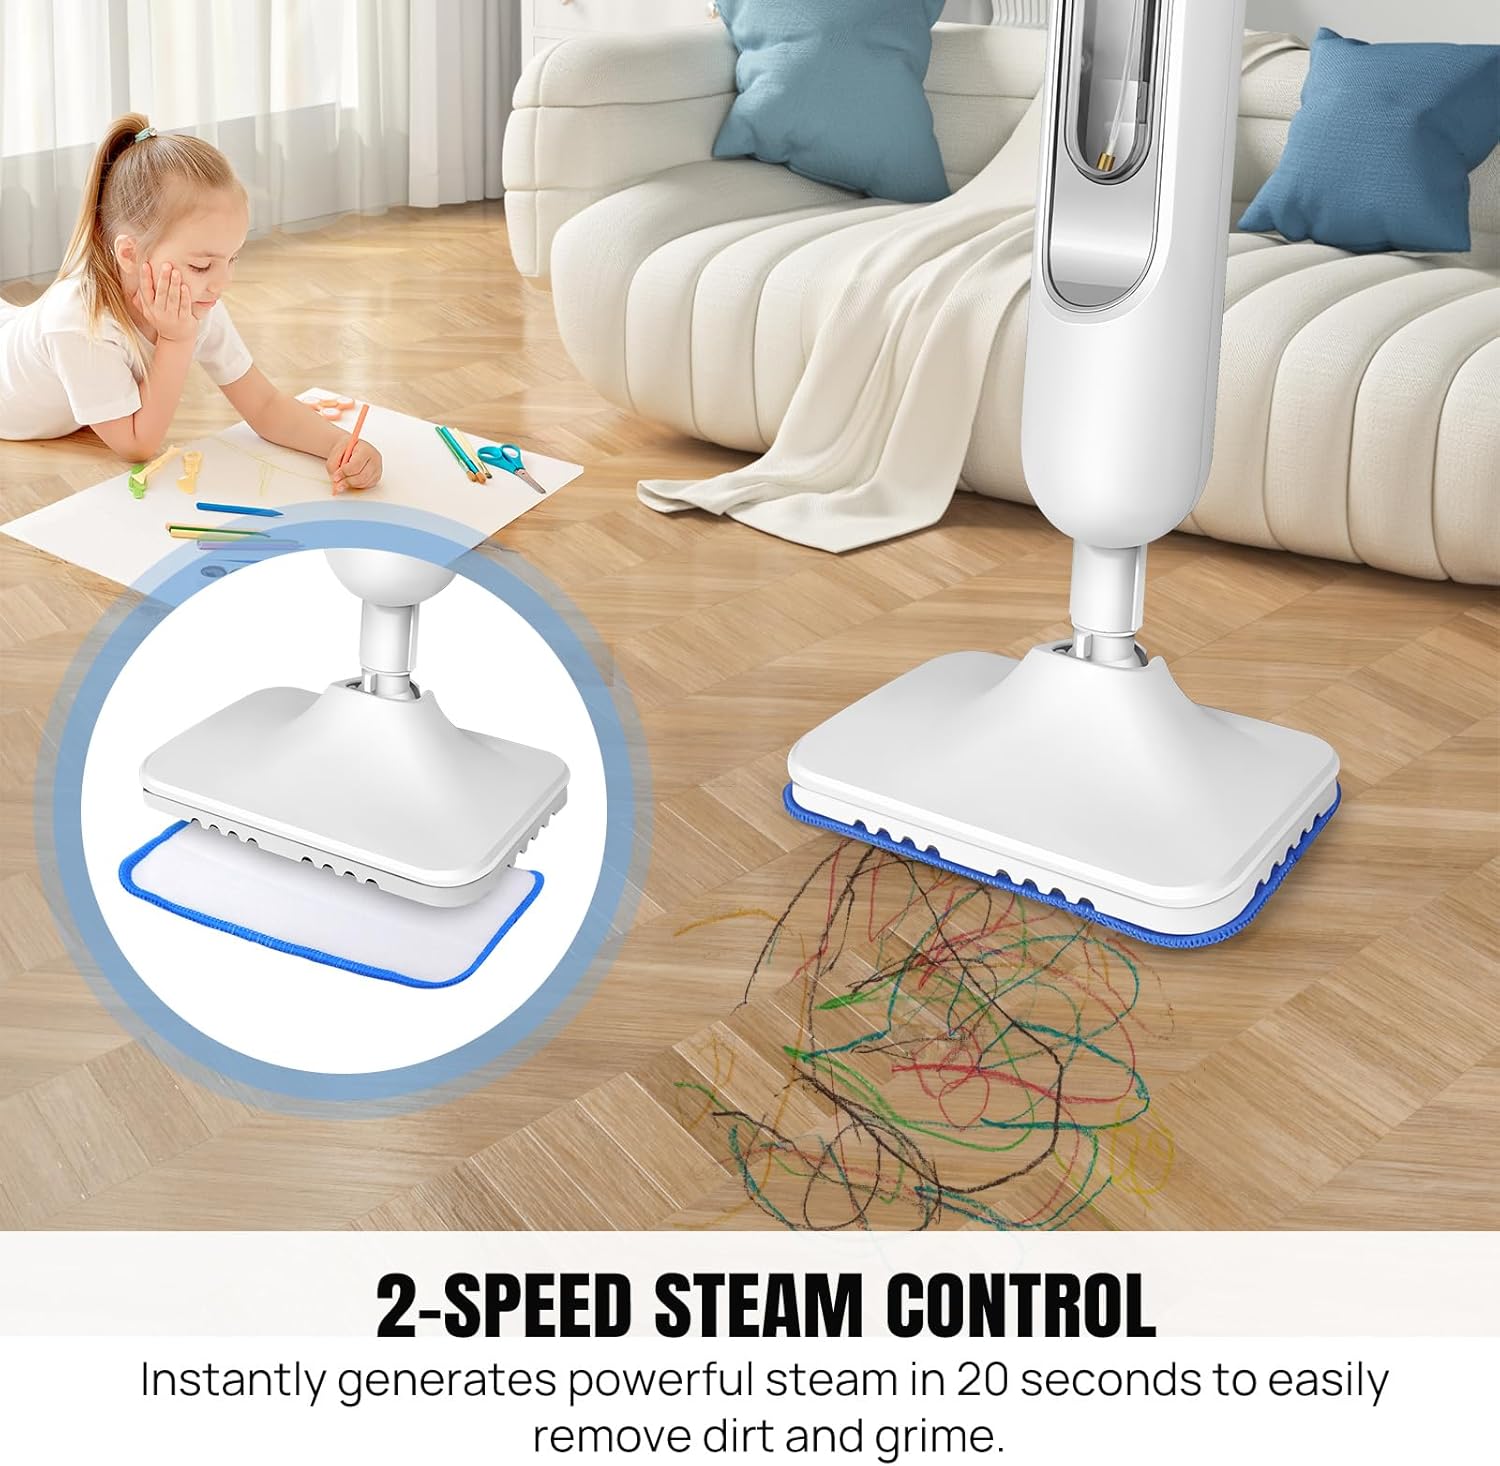
Figure 3: 2-Speed Steam Control
This image highlights the steam mop's ability to generate powerful steam in 20 seconds and offers two adjustable steam levels for different cleaning needs. - Cleaning Floors:
- Move the mop head slowly and steadily over the floor surface. The steam will clean and sanitize.
- For heavily soiled areas, hold the mop over the spot for a few seconds to allow the steam to penetrate.
- The mop head is flexible, allowing you to reach under furniture and into corners.

Figure 4: High-Temperature Steam Cleaning
This image demonstrates the steam mop's effectiveness in removing various types of floor dirt using high-temperature steam for deep, chemical-free cleaning.
Figure 5: Cleaning Various Surfaces
This image shows the versatility of the steam mop for cleaning different floor types such as wood, marble, ceramic, carpet (with glider), and granite, providing high-temperature cleaning and quick-drying results. - Carpet Refreshing: Attach the carpet glider over the mop head and microfibre pad. Move the mop over carpets to refresh and deodorize. This is not for deep carpet cleaning.
- Refilling Water Tank: If the water tank runs empty during use, unplug the appliance, allow it to cool slightly, and refill as described in the "Setup" section.
- Power Off: When finished cleaning, press the power switch to turn off the appliance and unplug it from the electrical outlet.
Maintenance
- Cleaning Microfibre Pads:
- After each use, remove the microfibre mop pad from the mop head.
- The pads are machine washable. Wash with similar colors in warm water. Do not use bleach or fabric softener.
- Air dry or tumble dry on low heat.
- Emptying Water Tank: After each use, unplug the appliance and allow it to cool. Empty any remaining water from the tank.
- Cleaning the Appliance: Wipe the exterior of the steam mop with a damp cloth. Do not use abrasive cleaners.
- Storage:
- Ensure the appliance is cool and dry before storing.
- Wrap the power cord neatly around the integrated cord hooks for easy storage.
- Store the steam mop in a cool, dry place, away from direct sunlight and out of reach of children.

Figure 6: Easy Cord Storage
This image demonstrates how to easily store the 4.8m (15.75ft) power cord using the integrated hooks on the steam mop, ensuring neatness and preventing tangles.
Troubleshooting
| Problem | Possible Cause | Solution |
|---|---|---|
| No steam produced. |
|
|
| Steam output is weak. |
|
|
| Mop pad not cleaning effectively. |
|
|
| Water leaking from mop head. |
|
|
Specifications
| Feature | Detail |
|---|---|
| Model Name | Steam Mop for Floor Cleaning |
| Brand | Generic |
| Power | 1500W |
| Voltage | 220-240V 50/60Hz |
| Water Tank Capacity | 400ml (13.53 oz) |
| Preheating Time | Approx. 20 seconds |
| Steam Adjustment | 2-speed |
| Power Cord Length | 4.8m (15.75ft) |
| Product Dimensions (L x W x H) | 25cm x 15cm x 107.5cm (9.8"D x 5.9"W x 42.3"H) |
| Weight | 2.2kg |
| Included Components | 1x Electric mop, 2x reusable washable microfibre pads, 1x measuring cup, 1x instruction manual |
| Surface Recommendation | Hardwood, Tile, Laminate, Sealed Stone, Marble, Carpet (with glider) |
Warranty and Support
This product is manufactured by Treasuretool. For warranty information or technical support, please refer to the contact details provided with your purchase documentation or contact the retailer directly. Specific warranty terms may vary by region and retailer.