
1. Important Safety Information
WARNING: Welding can be dangerous. Always follow safety precautions to prevent injury or death.
- Always wear appropriate personal protective equipment (PPE), including a welding helmet with proper shade, flame-resistant clothing, welding gloves, and safety shoes.
- Ensure adequate ventilation to avoid inhaling welding fumes.
- Protect bystanders from arc rays and hot metal.
- Never weld near flammable materials.
- Ensure the welding machine is properly grounded.
- Disconnect power before performing any maintenance or changing accessories.
- Read and understand all instructions before operating the machine.
2. Product Overview
The HONE FC135 is a versatile 3-in-1 welding machine designed for Flux-Cored MIG, Stick (MMA), and Lift TIG welding processes. It operates on a 110V power supply and offers up to 135 Amps of output, suitable for various welding tasks on mild steel up to 1/4 inch thickness.

Figure 2.1: HONE FC135 3-in-1 MIG Welder Machine with accessories.
Key Features:
- 3-in-1 Welding Capability: Supports Flux MIG, Stick (MMA), and Lift TIG welding.
- Synergic Control: Simplifies settings for Flux MIG welding, making it easier for beginners.
- Digital Display: Large LED display for clear and easy operation.
- Advanced IGBT Inverter Technology: Provides stable welding current and smooth arc.
- Built-in Protections: Includes over-current, over-voltage, over-heat, and overload protection.
- Portable Design: Lightweight (approx. 9.7 lbs) with a handle and shoulder strap for easy transport.
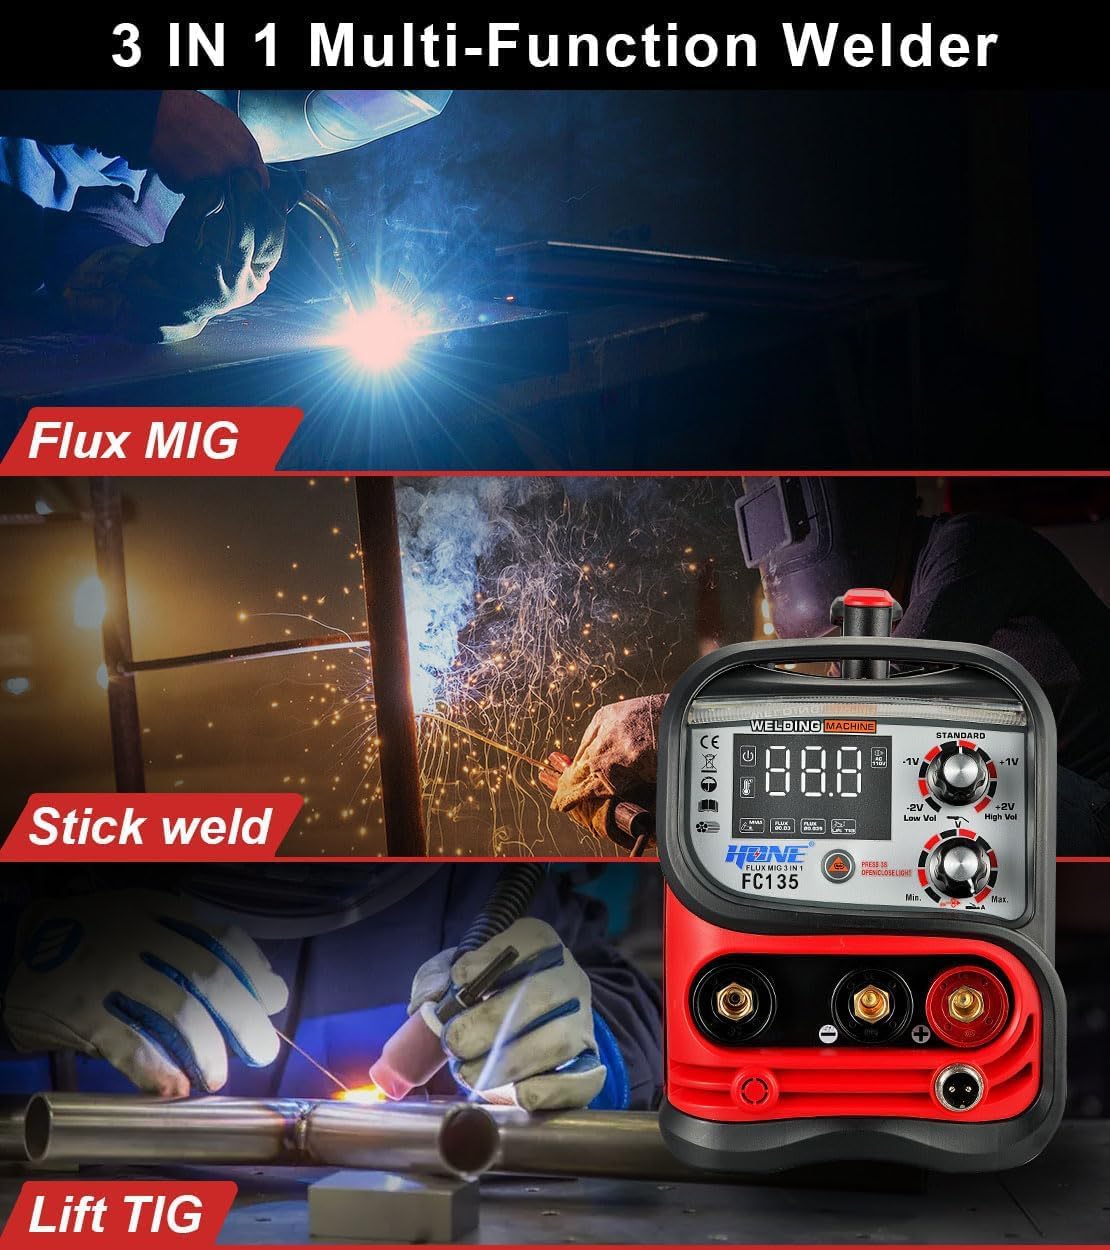
Figure 2.2: Illustration of the FC135's three welding functions: Flux MIG, Stick, and Lift TIG.
3. Package Contents
Verify that all items listed below are included in your package:
- HONE FC135 3-in-1 Gasless MIG Welder/Stick Welder/Lift TIG Synergic Welding Machine (1 pc)
- Welding Gun (MIG Torch) 8.2 ft (2.5 m) (1 pc)
- Electrode Holder with welding cable and cable joint 6.6 ft (2 m) (1 pc)
- Earth Clamp with welding cable and cable joint 6.6 ft (2 m) (1 pc)
- Brush Hammer (1 pc)
- Adjustable Shoulder Strap (1 pc)
- Contact Tip .030-inch (2 pcs)
- Contact Tip .035-inch (2 pcs)
- Flux-cored wire 0.030 inch 1LB (1 pc)
- User Manuals (1 pc)

Figure 3.1: All components included with the HONE FC135 welding machine.
4. Setup and Connections
4.1 Front Panel Controls and Connections
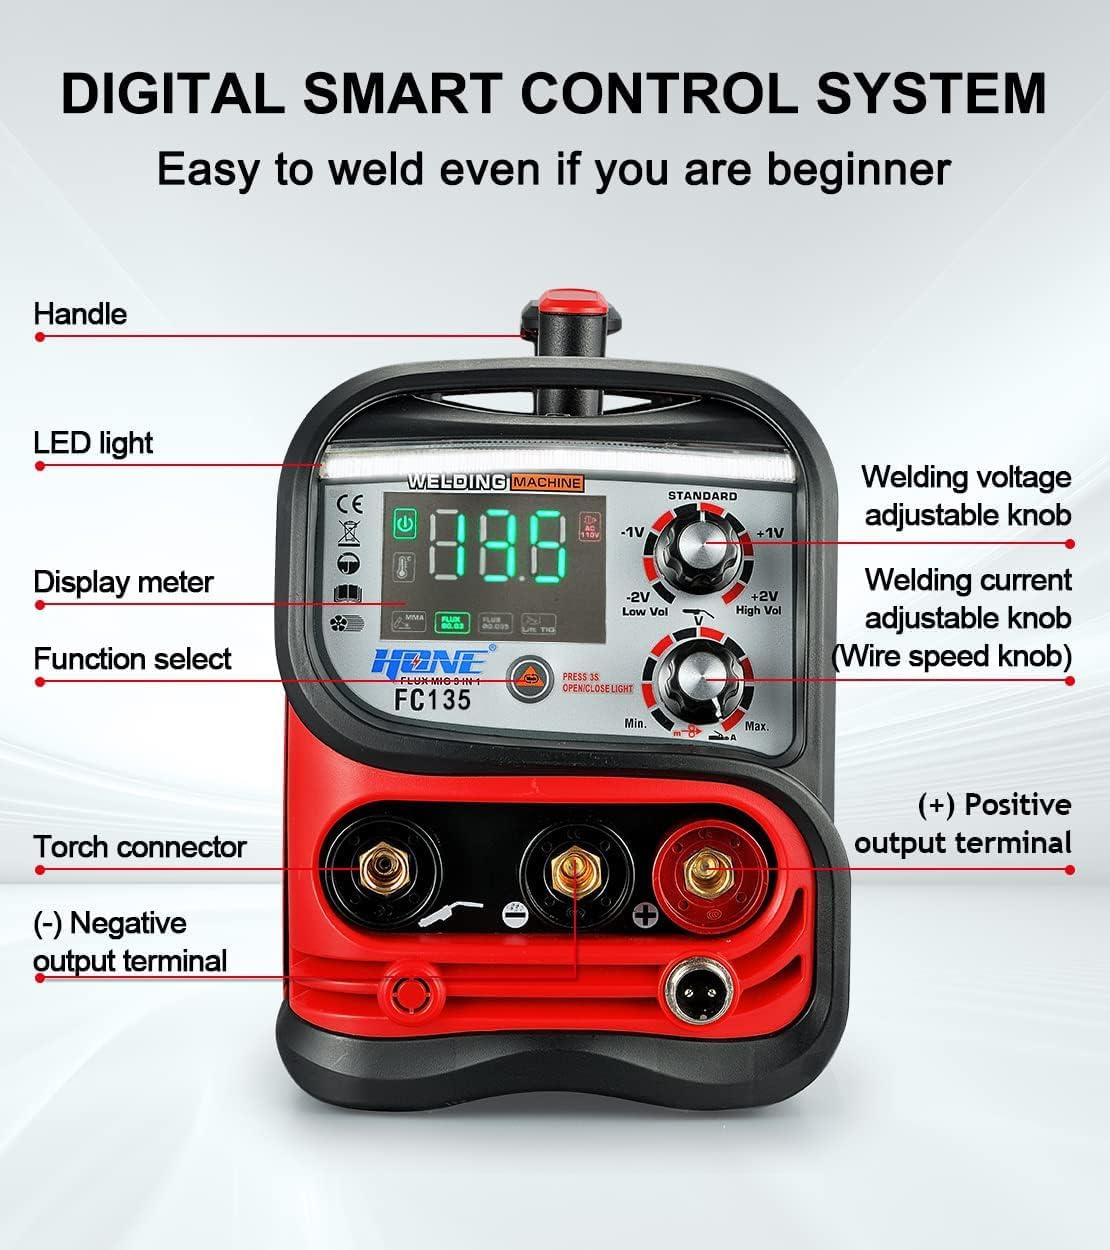
Figure 4.1: Front panel layout and controls of the HONE FC135.
- Handle: For carrying the machine.
- LED Light: Illuminates the work area.
- Display Meter: Shows welding parameters.
- Function Select: Button to choose between MIG, Stick, and Lift TIG modes.
- Welding Voltage Adjustable Knob: Adjusts welding voltage.
- Welding Current Adjustable Knob (Wire Speed Knob): Adjusts welding current and wire speed in MIG mode.
- Torch Connector: Connection point for the MIG torch.
- (-) Negative Output Terminal: Connects to the ground clamp or electrode holder depending on the process.
- (+) Positive Output Terminal: Connects to the ground clamp or electrode holder depending on the process.
4.2 Power Connection
Connect the machine to a standard 110V AC power outlet. Ensure the outlet can provide sufficient current for welding operations (refer to specifications).
4.3 Flux MIG Welding Setup
- Install the flux-cored wire spool into the wire feeder compartment. Ensure the wire size matches the contact tip (.030" or .035").
- Feed the wire through the liner and out of the MIG torch.
- Connect the MIG torch to the Torch Connector.
- Connect the ground clamp to the (-) Negative Output Terminal.
- Attach the ground clamp securely to the workpiece.
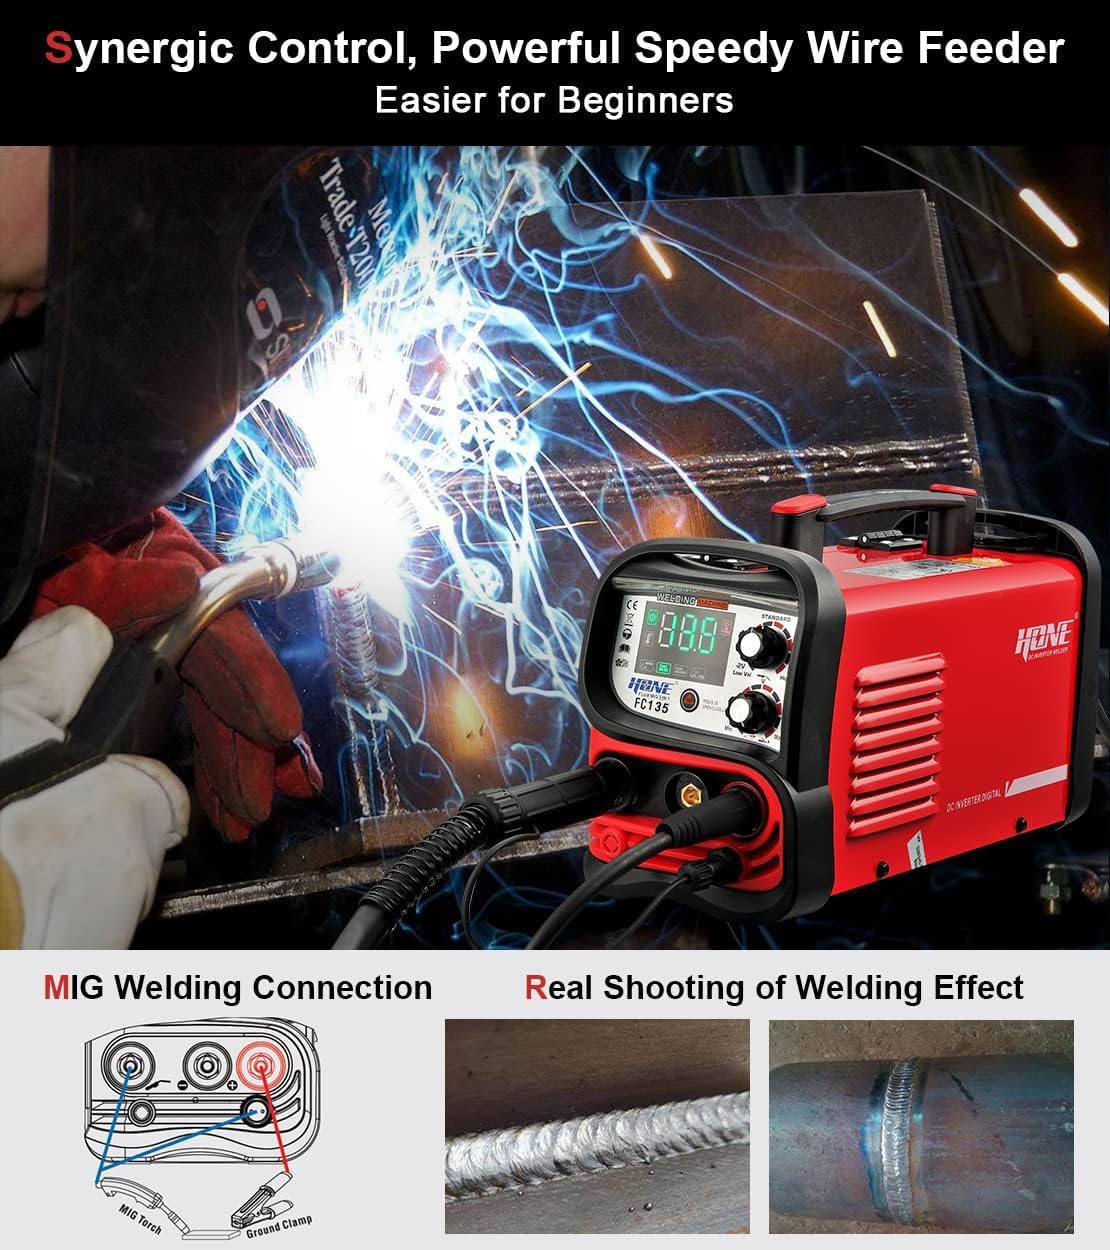
Figure 4.2: MIG welding connection diagram and examples of welding results.
4.4 Stick (MMA) Welding Setup
- Connect the electrode holder to the (+) Positive Output Terminal.
- Connect the ground clamp to the (-) Negative Output Terminal.
- Insert the appropriate welding electrode (e.g., E6013, E7018) into the electrode holder.
- Attach the ground clamp securely to the workpiece.
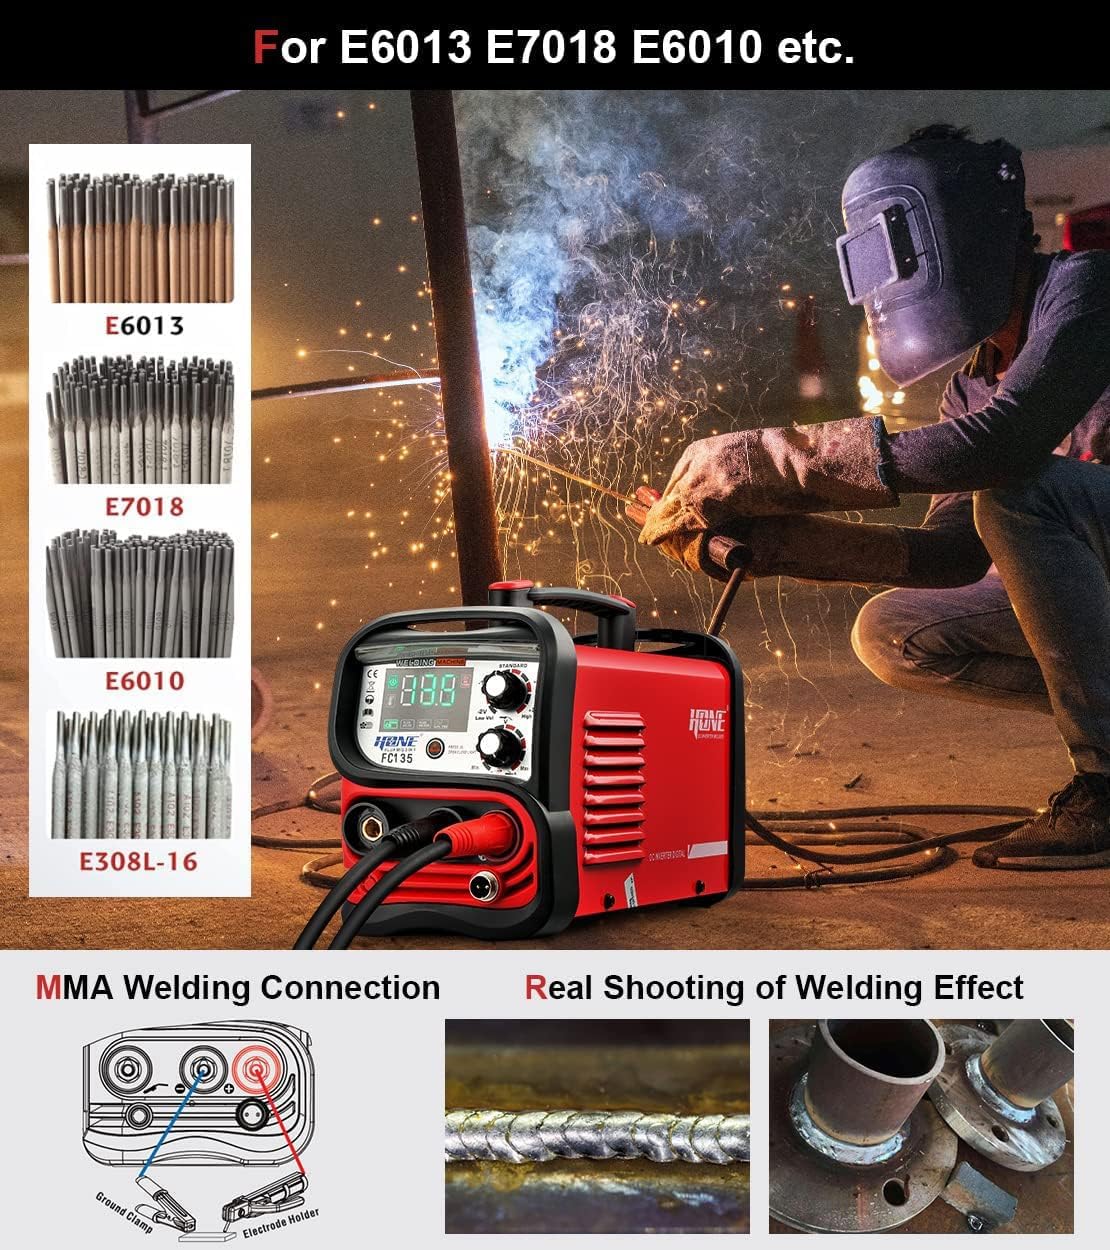
Figure 4.3: MMA welding connection diagram and common electrode types.
4.5 Lift TIG Welding Setup
Note: A TIG torch is not included with this machine and must be purchased separately.
- Connect the TIG torch to the (-) Negative Output Terminal.
- Connect the ground clamp to the (+) Positive Output Terminal.
- Ensure the TIG torch has a suitable tungsten electrode installed.
- Attach the ground clamp securely to the workpiece.
5. Operating Instructions
5.1 Selecting Welding Mode
Press the 'Function Select' button on the front panel to cycle through the available welding modes: Flux MIG, Stick (MMA), and Lift TIG. The selected mode will be indicated on the digital display.
5.2 Adjusting Parameters
Use the 'Welding Voltage Adjustable Knob' and 'Welding Current Adjustable Knob' to set the desired welding parameters. For Flux MIG, the current knob also controls wire speed. The digital display will show the current settings.


Figure 5.1: Recommended settings for minimum (1/32 inch, 20A) and maximum (1/4 inch, 135A) workpiece thicknesses.
5.3 Welding Process
- Flux MIG: Position the MIG torch nozzle close to the workpiece. Press the trigger to initiate the arc and feed wire. Maintain a consistent travel speed and arc length for optimal results.
- Stick (MMA): Strike the electrode against the workpiece to initiate the arc, then maintain a steady arc length and travel speed. The machine's Hot-start, Arc-force, and Anti-stick features assist in easier arc striking and smoother welding.
- Lift TIG: Gently touch the tungsten electrode to the workpiece, then lift it slightly to initiate the arc. Maintain a small arc gap and feed filler rod manually if required.

Figure 5.2: Examples of quality welding beads achieved with Flux Core MIG, Stick, and Lift TIG processes.
6. Maintenance
Regular maintenance ensures the longevity and optimal performance of your welding machine.
- Cleaning: Periodically clean the machine's exterior with a dry cloth. Ensure cooling vents are free from dust and debris.
- Consumables: Regularly inspect and replace MIG contact tips, nozzles, and TIG tungsten electrodes as they wear out. Check the electrode holder and ground clamp for damage.
- Wire Feeder: Keep the wire feeder mechanism clean and free of dust or wire shavings. Ensure the drive rollers are correctly tensioned for smooth wire feeding.
- Cables: Inspect all welding cables for cuts, cracks, or loose connections. Replace damaged cables immediately.
- Cooling System: The machine features a fast air cooling system. Ensure the fan intake and exhaust are not obstructed to prevent overheating.
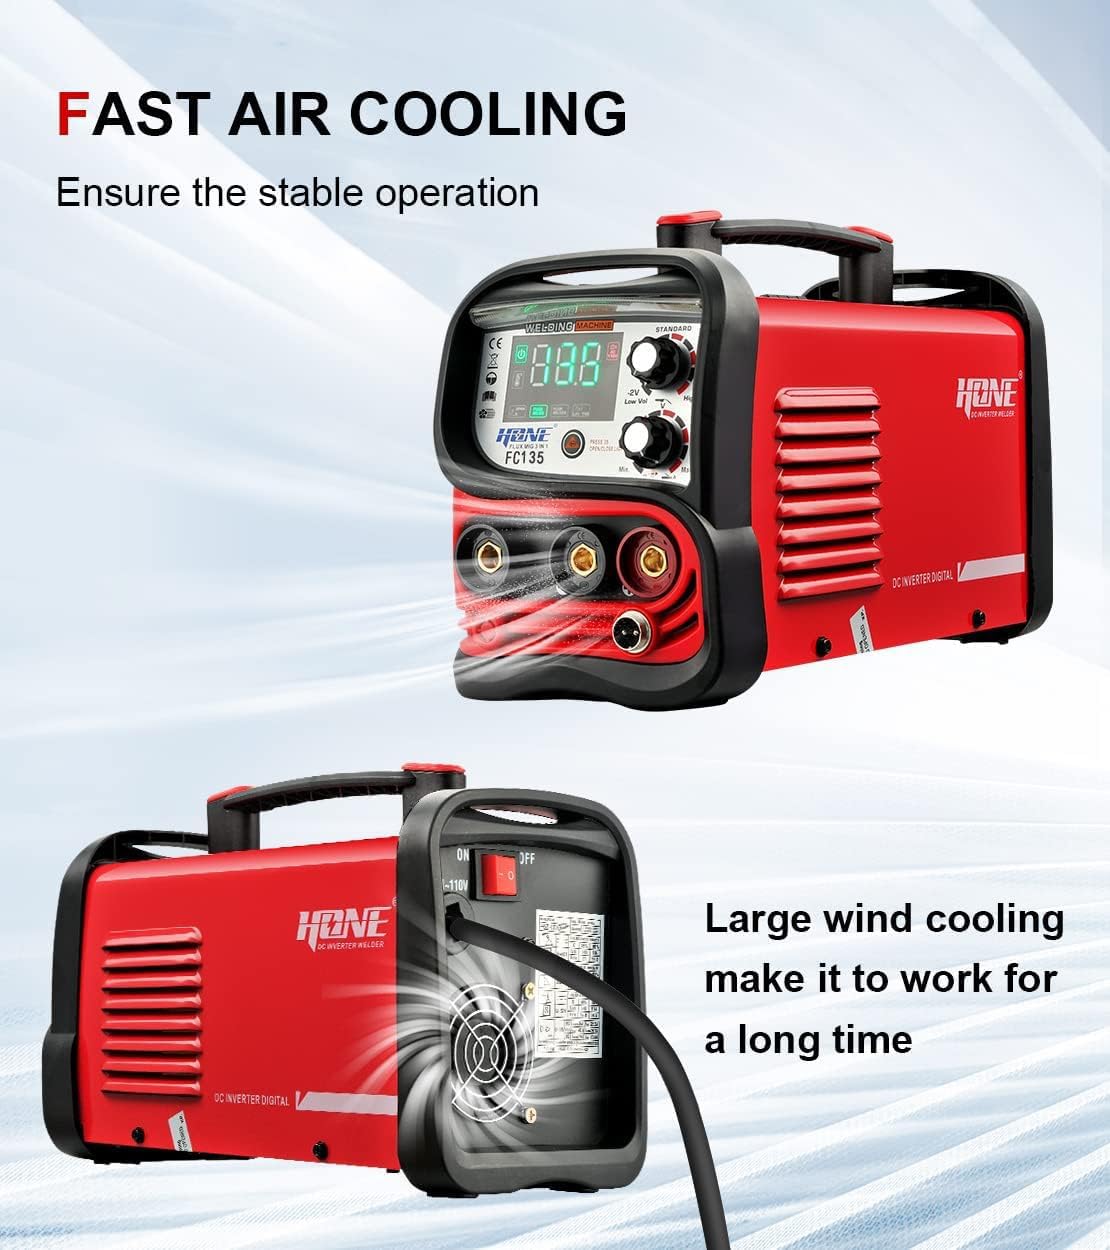
Figure 6.1: Illustration of the FC135's fast air cooling system for stable operation.
7. Troubleshooting
If you encounter issues with your HONE FC135 welder, refer to the following common problems and solutions:
| Problem | Possible Cause | Solution |
|---|---|---|
| No power to machine | Power cord unplugged, circuit breaker tripped, faulty power outlet. | Check power connections, reset circuit breaker, try a different outlet. |
| No arc / Weak arc | Poor ground connection, incorrect settings, worn consumables, wrong polarity. | Ensure ground clamp is on clean metal, adjust voltage/current, replace contact tip/electrode, verify polarity for process. |
| Wire feeding issues (MIG) | Incorrect wire tension, clogged liner, wrong drive roller size, tangled wire. | Adjust wire tension, clean or replace liner, ensure correct drive roller, untangle wire spool. |
| Overheat protection activated | Exceeded duty cycle, obstructed cooling vents. | Allow machine to cool down, ensure proper ventilation, clear any obstructions from vents. |
| Poor weld quality | Incorrect settings, improper technique, contaminated workpiece. | Adjust voltage/current, practice technique, clean workpiece thoroughly before welding. |
If the problem persists after attempting these solutions, please contact HONE customer service for further assistance.
8. Specifications
| Feature | Specification |
|---|---|
| Model | FC135 |
| Input Voltage | AC110V (90 ~ 135V) |
| Rated Input Current (A) | 34A (MIG) / 41A (MMA) / 26A (TIG) |
| No Load Voltage | 25V (Flux-cored) / 55V (MMA) / 12V (Lift-TIG) |
| Welding Current (A) | 20 ~ 140A (MIG & MMA) / 10 ~ 140A (TIG) |
| Duty Cycle (%) | 35% MIG / 30% MMA / 40% TIG |
| Compatible Flux Core Wire | Mild Steel E71TGS .030 / .035 inch, 2-Pound Spool |
| Compatible Electrode Diameter | 1/16 inch ~ 1/8 inch (1.6mm ~ 3.2mm) |
| Compatible Electrode Type | AWS E6013, E7018, E6011, E6010, E308L etc |
| Protection Grade | IP21S |
| Insulation Grade | H |
| Item Weight | 9.7 lbs (approx.) |
| Product Dimensions | 14.2 x 5.9 x 7.8 inches |
9. Warranty and Support
HONE offers a one-year warranty and lifetime technical support for every customer. If you have any questions or concerns regarding the use or performance of your HONE FC135 welder, please feel free to contact HONE customer service via email. Our customer service center aims to reply within 24 hours.
For support, please refer to the contact information provided with your product packaging or visit the official HONE website.