1. Introduction
Thank you for choosing the HZLIMJDQ Car DVR Dash Cam. This manual provides essential information for the proper installation, operation, and maintenance of your new dash camera. Designed for Land Rover Discovery Sport models from 2020 to 2022, this device offers high-resolution video recording to enhance your driving safety and provide evidence in case of incidents. Please read this manual thoroughly before use to ensure optimal performance and longevity of your device.
2. Product Overview and Components
The HZLIMJDQ Dash Cam is a compact and discreet recording device designed to integrate seamlessly into your vehicle's interior. It features a high-resolution front camera and supports various recording modes.

Figure 2.1: Main Components. This image displays the primary dash camera unit, the necessary wiring harness for power connection, and a plastic pry tool to assist with installation.

Figure 2.2: Product Views. Multiple views of the dash camera unit, highlighting its compact design and various ports and vents.
Package Contents:
- HZLIMJDQ Dash Cam Unit (Front Camera)
- Vehicle-specific Wiring Harness
- Plastic Pry Tool
- User Manual (this document)
- 128GB TF Card (pre-installed or included separately)
3. Setup and Installation
The dash cam is designed for a hidden, plug-and-play installation, specifically compatible with Land Rover Discovery Sport L550 models from 2015 to 2022. It connects directly to the vehicle's wiper power for easy setup.

Figure 3.1: Plug & Play Installation. This image illustrates the "before" and "after" appearance of the dash cam installation, emphasizing its seamless integration and plug-and-play wiring.
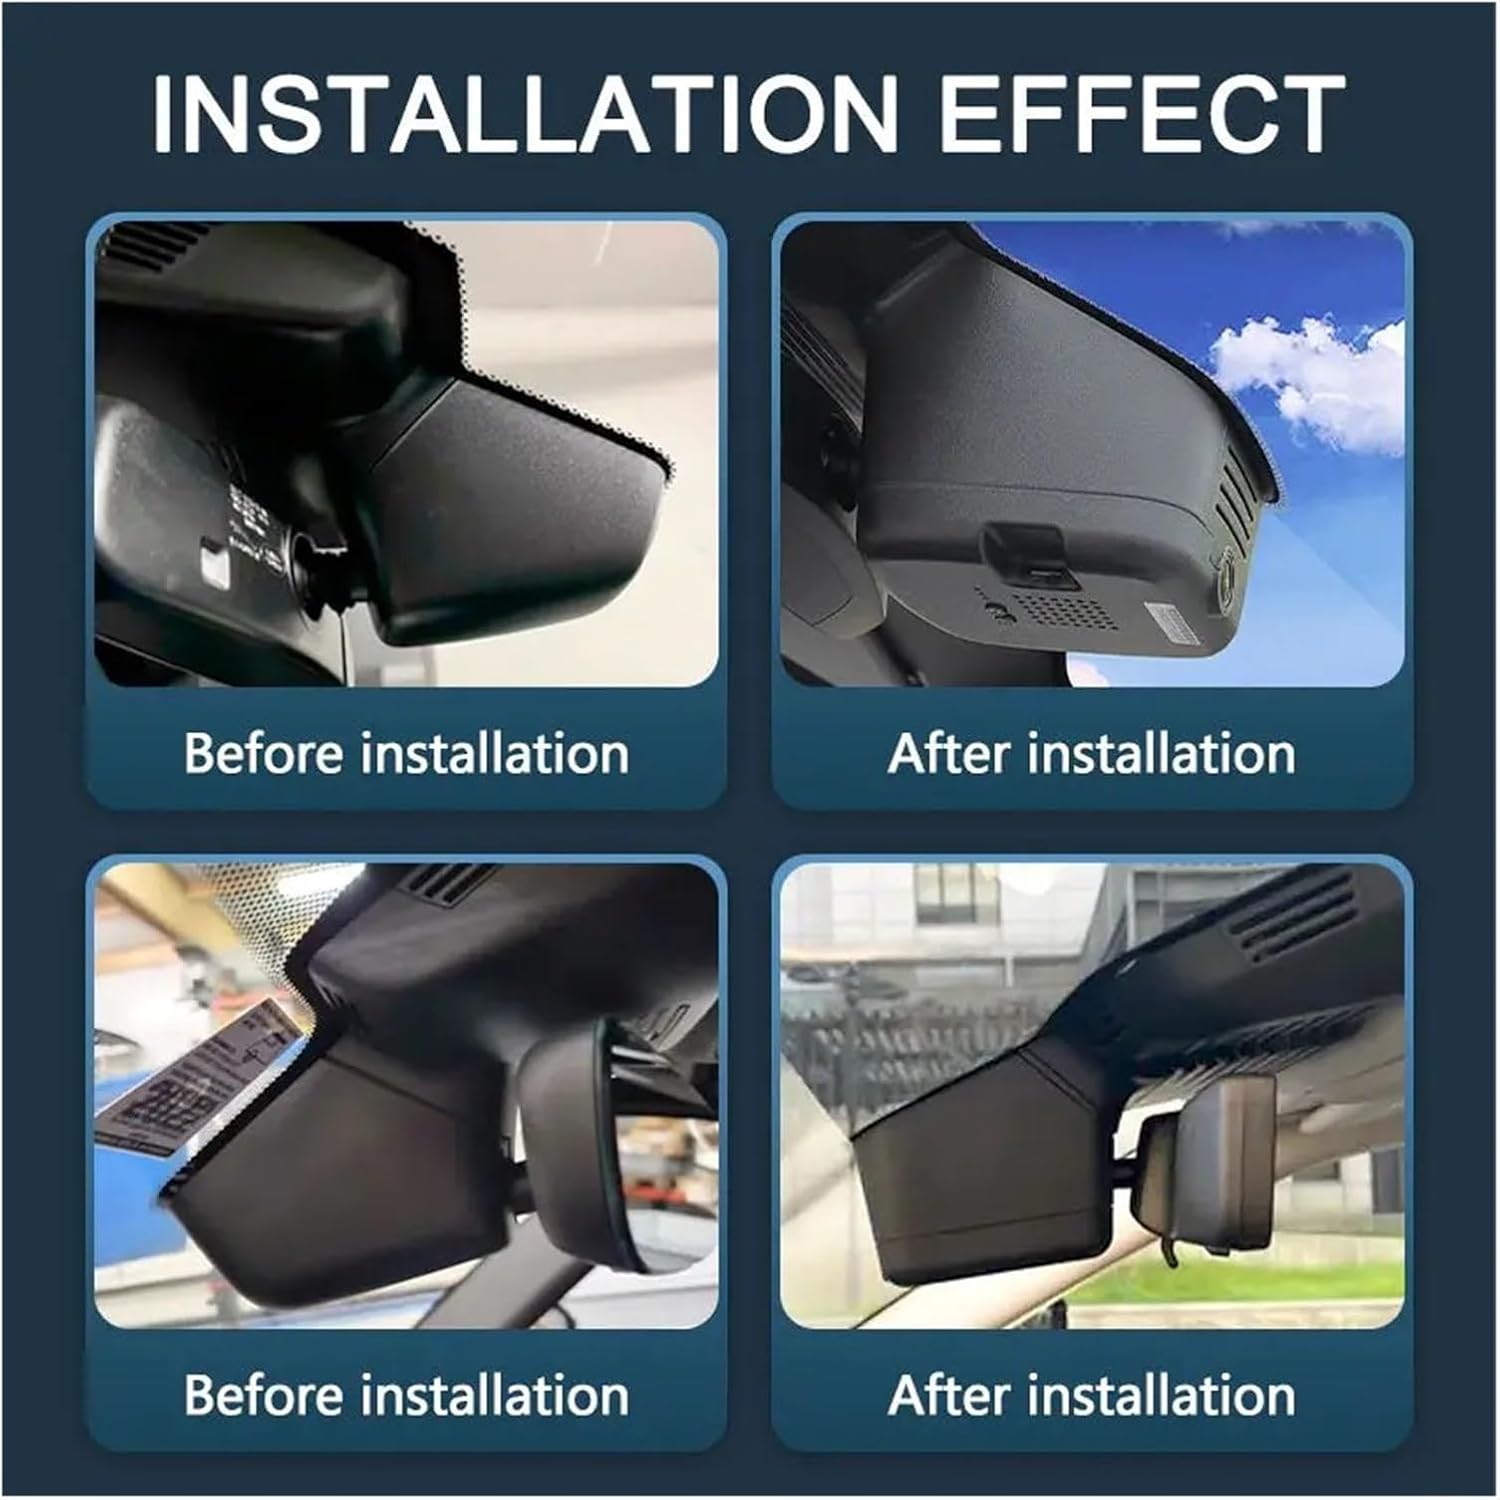
Figure 3.2: Integrated Installation. This image provides a closer look at the dash cam after installation, demonstrating how it blends with the vehicle's interior, specifically near the rearview mirror housing.
Installation Steps:
- Prepare the Area: Ensure your vehicle's ignition is off. Locate the area around your rearview mirror or the existing dash cam housing.
- Remove Existing Cover (if applicable): Carefully use the provided plastic pry tool to gently remove any existing plastic covers or trim pieces that conceal the wiring or mounting area.
- Connect Wiring Harness: Identify the vehicle's wiper power connection. Connect the provided wiring harness to this power source. The design ensures a direct, non-invasive connection.
- Mount the Dash Cam: Securely attach the HZLIMJDQ Dash Cam unit into its designated position. The hidden design ensures it does not obstruct your view.
- Route Cables: Neatly tuck any excess cables behind the trim using the pry tool to ensure a clean and professional installation.
- Test Functionality: Turn on your vehicle's ignition. The dash cam should automatically power on and begin recording. Verify proper operation.
Note: For optimal performance, ensure the TF card is properly inserted before powering on the device.
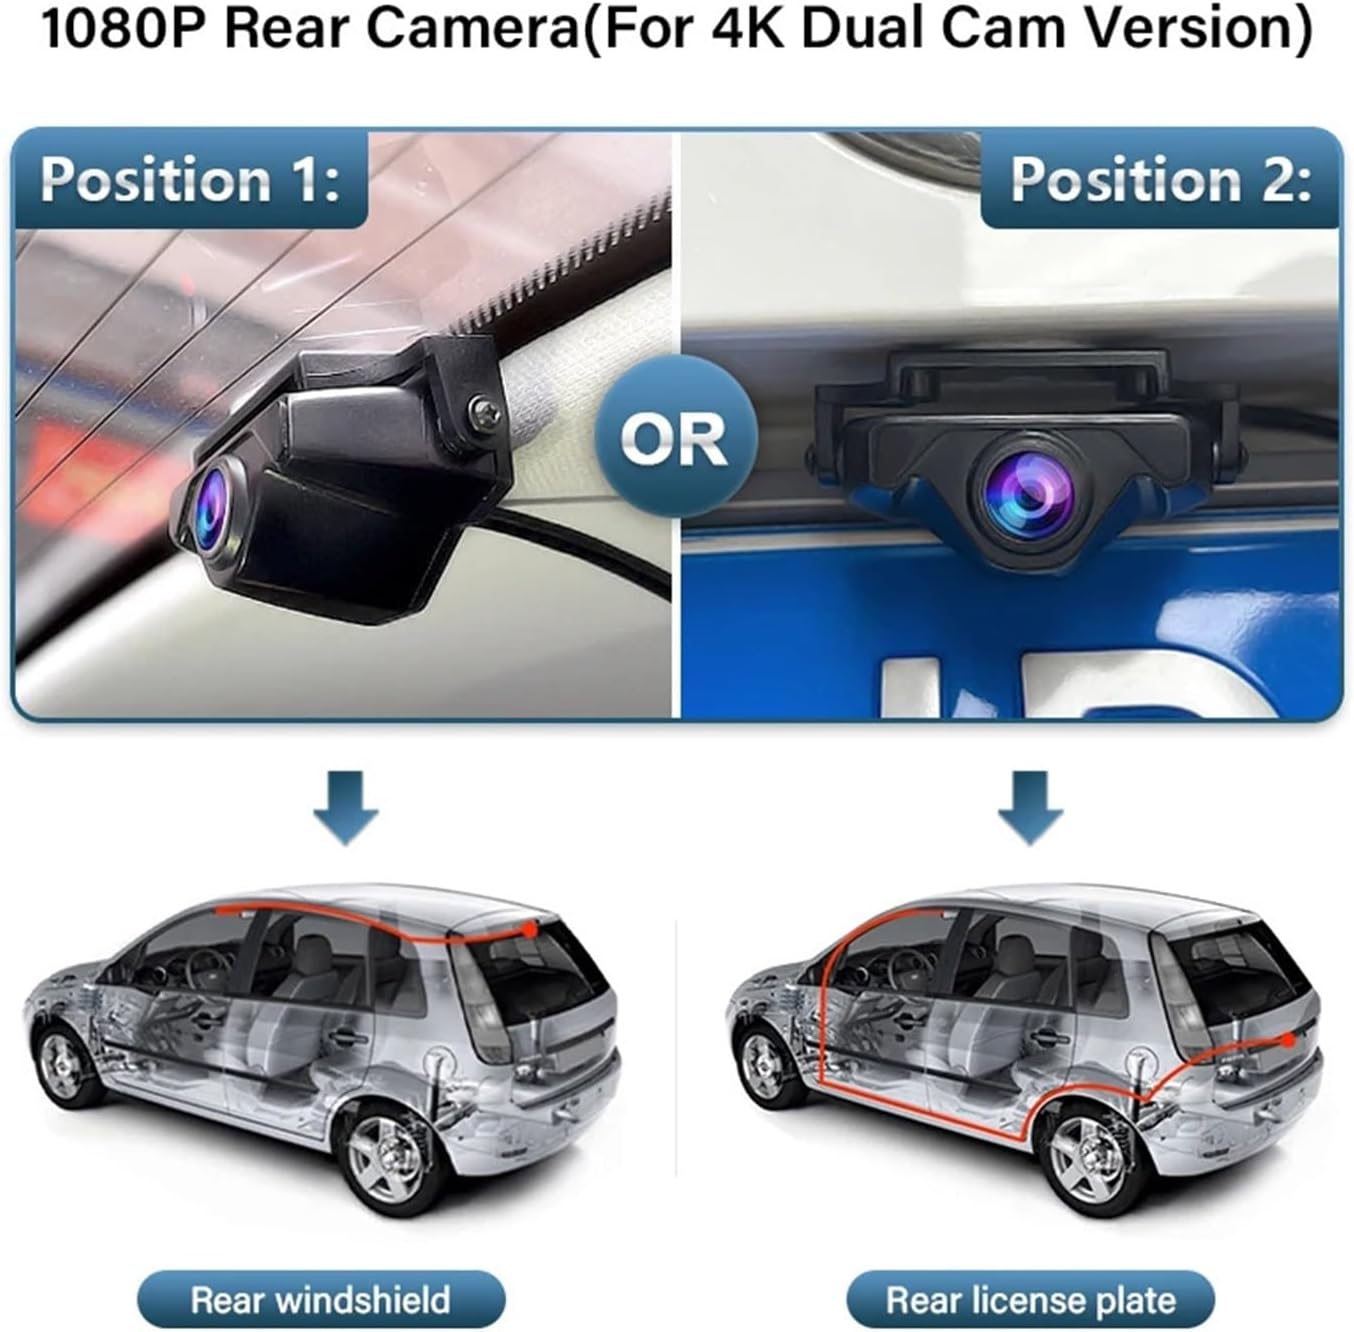
Figure 3.3: Rear Camera Installation Options (for Dual Cam Versions). This diagram illustrates two common mounting positions for a rear camera: either on the rear windshield or near the license plate. Note: This specific product variant is a 2K Front Camera. Rear camera installation is only applicable for dual camera versions of this product.
4. Operating Instructions
Automatic Recording:
Once installed and powered, the dash cam will automatically begin recording when your vehicle's ignition is turned on. Recording will stop when the ignition is turned off.
Loop-Cycle Recording:
The device features loop-cycle recording. Videos are recorded in 3-minute segments. When the TF card is full, the oldest videos will be automatically overwritten to make space for new recordings. This ensures continuous recording without manual intervention.
G-Sensor (Emergency Recording):
The built-in sensitivity G-sensor automatically detects sudden shakes or collisions. In such an event, the current video footage will be locked and protected from being overwritten by loop recording. These emergency videos are stored in a separate folder on the TF card.
24-Hour Parking Mode:
When your vehicle is parked and the engine is off, the dash cam automatically switches to parking mode. This function provides continuous surveillance with low power consumption and a low frame rate (time-lapse recording) to protect your vehicle around the clock.
Viewing and Managing Recordings (App Integration):
To view, download, or manage your recordings, you can connect the dash cam to your smartphone via Wi-Fi using a dedicated mobile application. The app allows for real-time viewing and playback of recorded footage.

Figure 4.1: App Connection Guide. This image illustrates the process of connecting your smartphone to the dash cam via Wi-Fi and using the dedicated application to view live footage or recorded videos. Common default passwords like "12345678" or "88888888" are often used for initial Wi-Fi connection.
Daytime Recording Quality:
The dash cam captures clear and detailed footage during daytime conditions, ensuring license plates and other critical details are visible.

Figure 4.2: Daytime Recording Example. This image displays a sample of video footage captured by the dash cam during daytime, demonstrating its clarity and wide field of view.
5. Maintenance
- TF Card Management: Regularly format the TF card (at least once a month) to prevent data corruption and ensure optimal recording performance. Back up any important videos before formatting.
- Lens Cleaning: Keep the camera lens clean from dust, fingerprints, or smudges. Use a soft, lint-free cloth specifically designed for optics.
- Firmware Updates: Check the manufacturer's website or the companion app periodically for firmware updates. Keeping the firmware updated can improve performance and add new features.
- Temperature Considerations: Avoid exposing the dash cam to extreme temperatures for prolonged periods, as this can affect battery life and electronic components.
- Cable Inspection: Periodically inspect the power cable and connections for any signs of wear or damage.
6. Troubleshooting
| Problem | Possible Cause | Solution |
|---|---|---|
| Dash cam does not power on. | No power supply; loose connection; faulty wiring. | Check all power connections. Ensure vehicle ignition is on. Verify the vehicle's wiper power source is active. |
| Recording stops or freezes. | TF card full or corrupted; low-quality TF card; firmware issue. | Format the TF card. Try a different, high-speed (Class 10 or U3) TF card. Check for firmware updates. |
| Video quality is poor/blurry. | Dirty lens; protective film still on lens; incorrect resolution settings. | Clean the lens. Remove any protective film. Check settings via the app to ensure high resolution is selected. |
| Wi-Fi connection issues. | Incorrect Wi-Fi password; too far from device; app issues. | Ensure correct Wi-Fi password (e.g., "12345678" or "88888888"). Move closer to the dash cam. Restart the app and dash cam. |
| G-sensor is too sensitive/not sensitive enough. | G-sensor sensitivity setting is too high/low. | Adjust G-sensor sensitivity via the mobile application settings. |
7. Specifications
| Feature | Detail |
|---|---|
| Model | maifengling |
| Brand | HZLIMJDQ |
| Camera Resolution | 3840x2160 (4K, though this variant is 2K Front Camera) |
| Pixels | 1600Mega |
| View Angle | 170° |
| Aperture | F1.6 |
| Video Code | H.265 |
| Video Format | AVI, MP4 |
| Frames Per Second | 30 |
| Imaging Sensor | IMX335 |
| Max External Memory | 256G (128G TF card included with this variant) |
| Memory Card Required Reading Speed | Class 2 (Note: Class 10 or U3 recommended for optimal performance) |
| Interface | WI-FI |
| Power Source | Corded Electric (Wiper power installation) |
| Built-in Screen | No |
| Loop-Cycle Recording | Yes |
| Audio Recorded | Yes |
| NightShot Function | Yes |
| Rear Camera Support | Yes (for dual camera versions) |
| Touch Screen | Yes (via connected smartphone app) |
| Assembly Mode | Hidden Type |
| Compatibility | Compatible for Land Rover Discovery Sport L550 2015 to 2022 |
8. Warranty and Support
For warranty information and technical support, please refer to the product packaging or contact HZLIMJDQ customer service directly. Keep your purchase receipt as proof of purchase for any warranty claims.
For further assistance, you may visit the official HZLIMJDQ website or contact their support team through the contact information provided with your product.