
1. Important Safety Instructions
Please read this operating manual completely before using the appliance. Pay particular attention to all safety instructions provided to ensure safe operation and prevent injury or damage.
- Ensure the sewage outlet is properly sealed during operation and cleaned frequently to prevent blockages and maintain hygiene.
- Do not overtighten the water inlet hose during installation to avoid damage.
- Turn off the water inlet faucet when the dispenser is not in use for extended periods, such as during non-business hours.
- For optimal water quality and to extend the boiler's lifespan, consider using this product in conjunction with a water purifier (not included).
- The dispenser features multiple safety protections, including leakage protection and anti-dry burning protection.
- The faucet is designed with a splash-proof feature for safer dispensing.
- When connecting to tap water, it is recommended to add a carbon filter (not included) to remove chlorine.
2. Product Overview
The LOYALHEARTDY 30L Commercial Hot Water Dispenser is a high-capacity electric water boiler designed for commercial use, providing hot water efficiently and safely.
Key Features:
- Large Capacity: 30L (7.93 Gallons) for continuous hot water supply.
- Stepping Heating Technology: Heats water layer by layer for an uninterrupted supply of boiled water, preventing repeated reheating.
- Intelligent Control System: LED display shows real-time water temperature. Adjustable temperature range (86-206.6 ℉) and 0-24 hour timer function.
- Durable Construction: Made with food-grade 304 stainless steel inner liner, PU foam interlayer, and 201 stainless steel housing for effective heat retention and healthier drinking water.
- Multiple Safety Protections: Includes leakage protection, anti-dry burning protection, and a splash-proof faucet.

Figure 2.1: The LOYALHEARTDY 30L Commercial Hot Water Dispenser actively dispensing hot water.
3. Setup and Installation
This hot water dispenser is designed for tabletop or floor mount installation. Follow these steps for proper setup:
- Unpacking: Carefully remove all packaging materials and inspect the dispenser for any damage. Ensure all accessories, including the drip tray and inlet pipe, are present.
- Placement: Place the dispenser on a stable, level surface suitable for its weight and dimensions (17.5*24*65cm / 6.89*9.45*25.59in). The anti-slip rubber feet will help keep the machine stable and protect surfaces.
- Water Inlet Connection: Connect the provided inlet pipe (1m/3.28 ft length) to the water inlet port at the back of the dispenser. Connect the other end to a clean water source. Do not overtighten the hose.
- Pressure Relief Port: Ensure the pressure relief port is clear and unobstructed.
- Sewage Outlet: Verify that the sewage outlet is properly sealed.
- Power Connection: Plug the 3.94-ft long power cord into a standard 110V-50Hz electrical outlet. Ensure the power source is appropriate for the 3000W rated power.
- Optional Filter: If desired, install a carbon filter (not included) between the water source and the dispenser's inlet to improve water quality and protect the unit.

Figure 3.1: Rear view of the dispenser, highlighting the water inlet and pressure relief port.
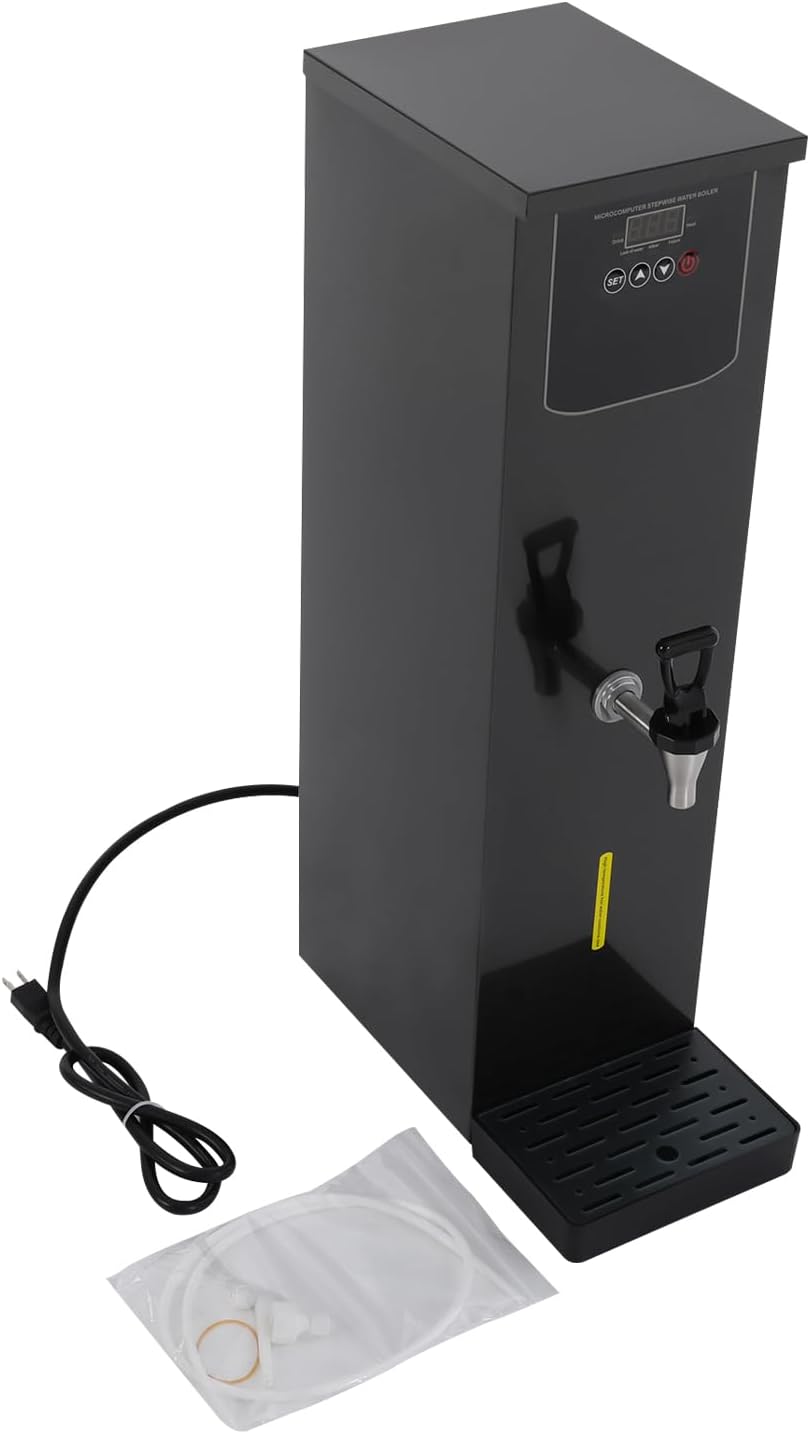
Figure 3.2: Side view showing the power cord and water inlet pipe connection.
4. Operating Instructions
The dispenser features an intuitive control panel for easy operation.
Control Panel Overview:

Figure 4.1: The control panel with LED display and function buttons.
- LED Display: Shows the real-time water temperature and operational status.
- SET Button: Used to enter settings mode for temperature and timer adjustments.
- Up/Down Arrows: Adjust temperature or timer values.
- Power Button: Turns the unit on or off.
Initial Use and Heating:
- Ensure the dispenser is properly connected to water and power.
- Press the Power button to turn on the unit. The LED display will illuminate.
- The dispenser will begin heating water using its stepping heating technology. This process typically takes 12-18 minutes to reach 206.6℉ for a full 20L capacity.
- The display will show the current water temperature.
Adjusting Temperature:
- Press the SET button to enter temperature adjustment mode.
- Use the Up/Down arrow buttons to set your desired water temperature between 86℉ and 206.6℉.
- Press SET again or wait a few seconds for the setting to be saved.
Setting the Timer:
- Press the SET button multiple times until the timer setting appears on the display.
- Use the Up/Down arrow buttons to set the desired on/off time within a 0-24 hour range.
- Press SET again or wait for the setting to be saved. The dispenser will automatically turn on or off at the programmed times.
Dispensing Hot Water:
- Place a cup or container under the faucet.
- Push the faucet lever to dispense hot water. Release the lever to stop.

Figure 4.2: User adjusting settings on the control panel while the dispenser is in operation.
5. Maintenance
Regular maintenance ensures the longevity and optimal performance of your hot water dispenser.
- Frequent Cleaning of Sewage Outlet: Regularly clean the sewage outlet to prevent accumulation and ensure proper drainage.
- Inlet Filter Cleaning: Periodically check and clean the inlet filter to prevent debris from entering the machine, which can affect performance and water quality.
- Exterior Cleaning: Wipe the exterior of the dispenser with a damp cloth. Do not use abrasive cleaners or solvents.
- Descaling: Depending on water hardness, descaling may be required periodically. Consult a professional or refer to specific descaling instructions for stainless steel appliances.
- Power Off During Non-Use: Turn off the water inlet faucet and power during non-business hours or when the dispenser will not be used for an extended period.
6. Troubleshooting
If you encounter any issues with your LOYALHEARTDY hot water dispenser, please refer to the following common troubleshooting tips. If the problem persists, contact customer support.
- No Power: Check if the power cord is securely plugged into a working outlet. Verify the circuit breaker.
- No Water Dispensing: Ensure the water inlet faucet is open and there is sufficient water pressure. Check if the water inlet hose is kinked or blocked.
- Water Not Heating: Confirm the unit is powered on and the temperature setting is correct. Check for any error codes on the LED display.
- Leakage: Inspect all connections, especially the water inlet hose and sewage outlet, for proper sealing.
- Unusual Noises: Ensure the unit is placed on a stable surface. If unusual noises persist, discontinue use and contact support.
7. Specifications
| Attribute | Specification |
|---|---|
| Brand | LOYALHEARTDY |
| Model Number | YUKRGI2E89PQW0 |
| Material | 304 Stainless Steel, Stainless Steel, Rubber, 201 Stainless Steel, PU Foam |
| Color | Black |
| Installation Type | Tabletop, Floor Mount |
| Heating Method | Stepping Type |
| Rated Power | 3000W |
| Capacity | 30L / 7.93 Gallons |
| Rated Voltage | 110V-50Hz |
| Water Discharge | 50L / 13.2 Gallons per hour |
| Inlet Pressure | 300-600KPa |
| Waterproof Grade | IPX 3 |
| Power Cord Length | 1.2m / 3.94 ft |
| Inlet Pipe Length | 1m / 3.28 ft |
| Temperature Range | 30-97 ℃ / 86-206.6 ℉ |
| Timer Range | 0-24 Hours |
| Product Size (W*D*H) | 17.5*24*65cm / 6.89*9.45*25.59in |
| Net Weight | 6.37kg / 14.04 lbs |
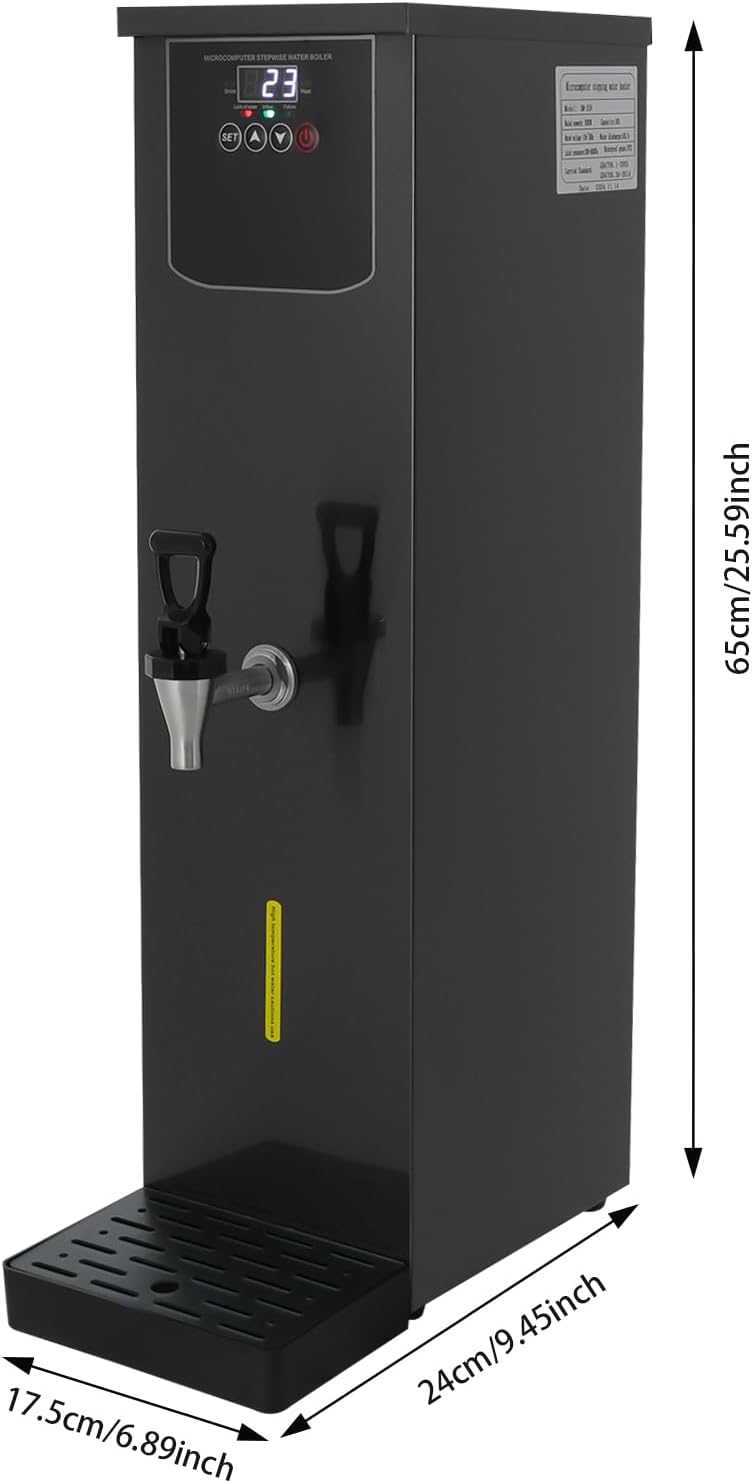
Figure 7.1: Product dimensions for installation planning.
8. Warranty and Support
For warranty information, please refer to the documentation provided at the time of purchase or contact your retailer. For technical support or service inquiries, please reach out to the manufacturer or seller directly.