1. Introduction
This user manual provides comprehensive instructions for the NiPoGi Hyper H1 Mini PC. Please read this manual thoroughly before operating the device to ensure proper usage and to maximize its performance and lifespan. Keep this manual for future reference.
2. Safety Information
- Use only the power adapter provided with the device.
- Do not expose the device to water, moisture, or extreme temperatures.
- Avoid placing the device near heat sources or in direct sunlight.
- Ensure proper ventilation to prevent overheating. Do not block ventilation openings.
- Do not attempt to disassemble or repair the device yourself. Contact technical support for assistance.
- Keep the device away from strong magnetic fields.
3. Package Contents
Verify that all items are present in the package:
- NiPoGi Hyper H1 Mini PC
- Power Adapter
- HDMI Cable
- VESA Mount Bracket and Screws
- User Manual
4. Product Overview
The NiPoGi Hyper H1 is a compact Mini PC designed for various applications, from office work to multimedia entertainment. It features an AMD Ryzen 7 6800H processor, DDR5 memory, and M.2 NVMe SSD storage.
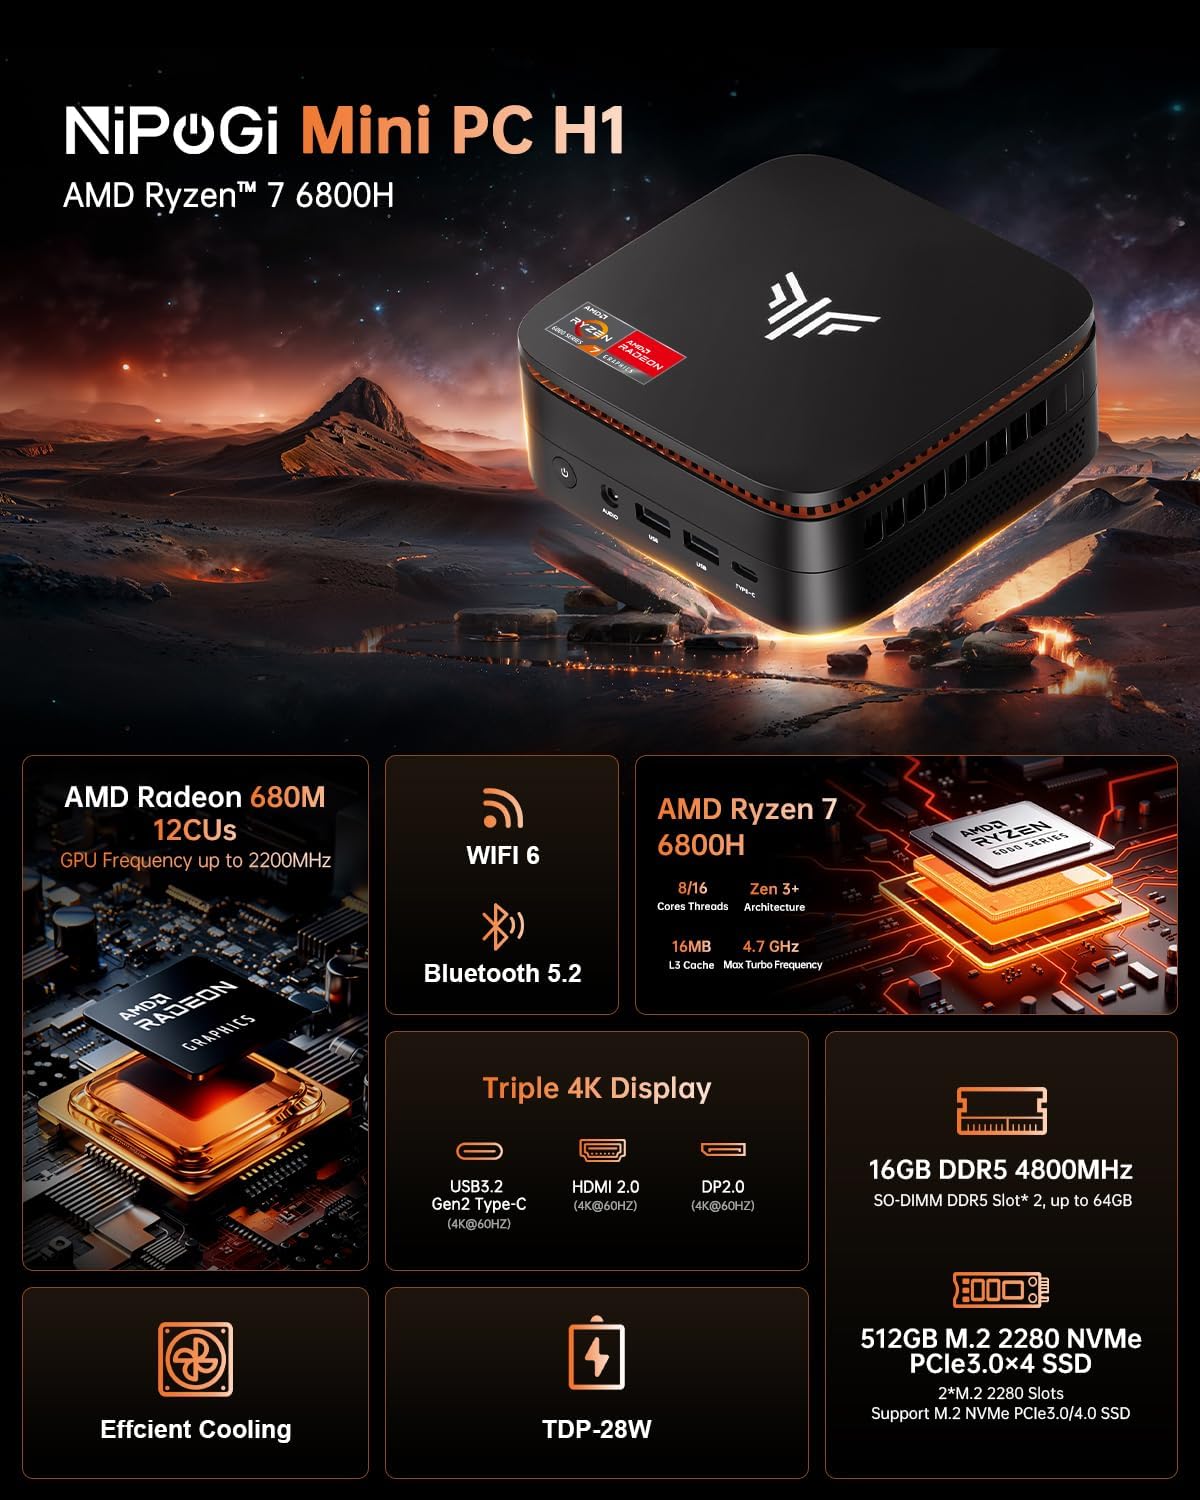
Image 1: NiPoGi Hyper H1 Mini PC with an overview of its main features including AMD Radeon 680M, WiFi 6, Bluetooth 5.2, AMD Ryzen 7 6800H, Triple 4K Display support, DDR5 memory, M.2 NVMe SSD, Efficient Cooling, and TDP-28W.
4.1. Interfaces and Ports
The Mini PC is equipped with multiple ports for connectivity. Familiarize yourself with the front and back panel interfaces:

Image 2: Detailed view of the front and back ports of the NiPoGi Hyper H1 Mini PC. The front includes a power button, 3.5mm audio jack, two USB 3.2 Gen2 Type-A ports, and one USB 3.2 Gen2 Type-C port. The back features four USB 3.2 Gen1 Type-A ports, a 2.5Gbps LAN port, a DP2.0 port, an HDMI 2.0 port, and a DC IN port.
Front Panel:
- Power Button: To turn the device on/off.
- 3.5mm Audio Jack: For headphones or speakers.
- USB 3.2 Gen2 Type-A (x2): High-speed data transfer (10Gbps).
- USB 3.2 Gen2 Type-C (x1): High-speed data transfer and 4K@60Hz display output.
Back Panel:
- USB 3.2 Gen1 Type-A (x4): Standard data transfer (5Gbps).
- LAN (RJ45): 2.5Gbps Ethernet port for wired network connection.
- DP 2.0: DisplayPort for video output (4K@60Hz).
- HDMI 2.0: HDMI port for video output (4K@60Hz).
- DC IN: Power input port.
5. Setup
- Connect Power: Plug the power adapter into the DC IN port on the back of the Mini PC, then connect it to a power outlet.
- Connect Display: Connect your monitor(s) to the Mini PC using the HDMI 2.0, DP 2.0, or USB 3.2 Gen2 Type-C ports.
- Connect Peripherals: Connect your USB keyboard and mouse to any available USB Type-A ports.
- Power On: Press the power button on the front panel. The system will boot up.
- Initial Setup: Follow the on-screen instructions to complete the operating system setup (e.g., Windows 11 Pro).
6. Operating Instructions
6.1. Triple Display Setup
The NiPoGi Hyper H1 Mini PC supports connecting up to three monitors simultaneously, enhancing productivity and entertainment experiences. Use the HDMI 2.0, DP 2.0, and USB 3.2 Gen2 Type-C ports for this configuration.

Image 3: An illustration of the NiPoGi Hyper H1 Mini PC connected to three monitors, demonstrating its triple 4K display capability via USB3.2 Gen2 Type-C, HDMI 2.0, and DP2.0 ports, all supporting 4K resolution at 60Hz.
6.2. Wireless Connectivity
The Mini PC is equipped with advanced wireless technologies for stable and fast connections.

Image 4: Visual representation of Wi-Fi 6 and Bluetooth 5.2 capabilities. It highlights Wi-Fi 6's faster upload and download rates compared to Wi-Fi 5, ensuring stable performance.
- Wi-Fi 6 (802.11ax): Provides a more stable and faster wireless network connection, with speeds up to 2400 Mbps/s, approximately 3 times faster than Wi-Fi 5.
- Bluetooth 5.2: Allows for seamless connection with various Bluetooth-enabled devices such as keyboards, mice, headphones, and speakers.
7. Storage and Memory Expansion
The NiPoGi Hyper H1 Mini PC offers flexible options for upgrading its memory and storage to meet your evolving needs.
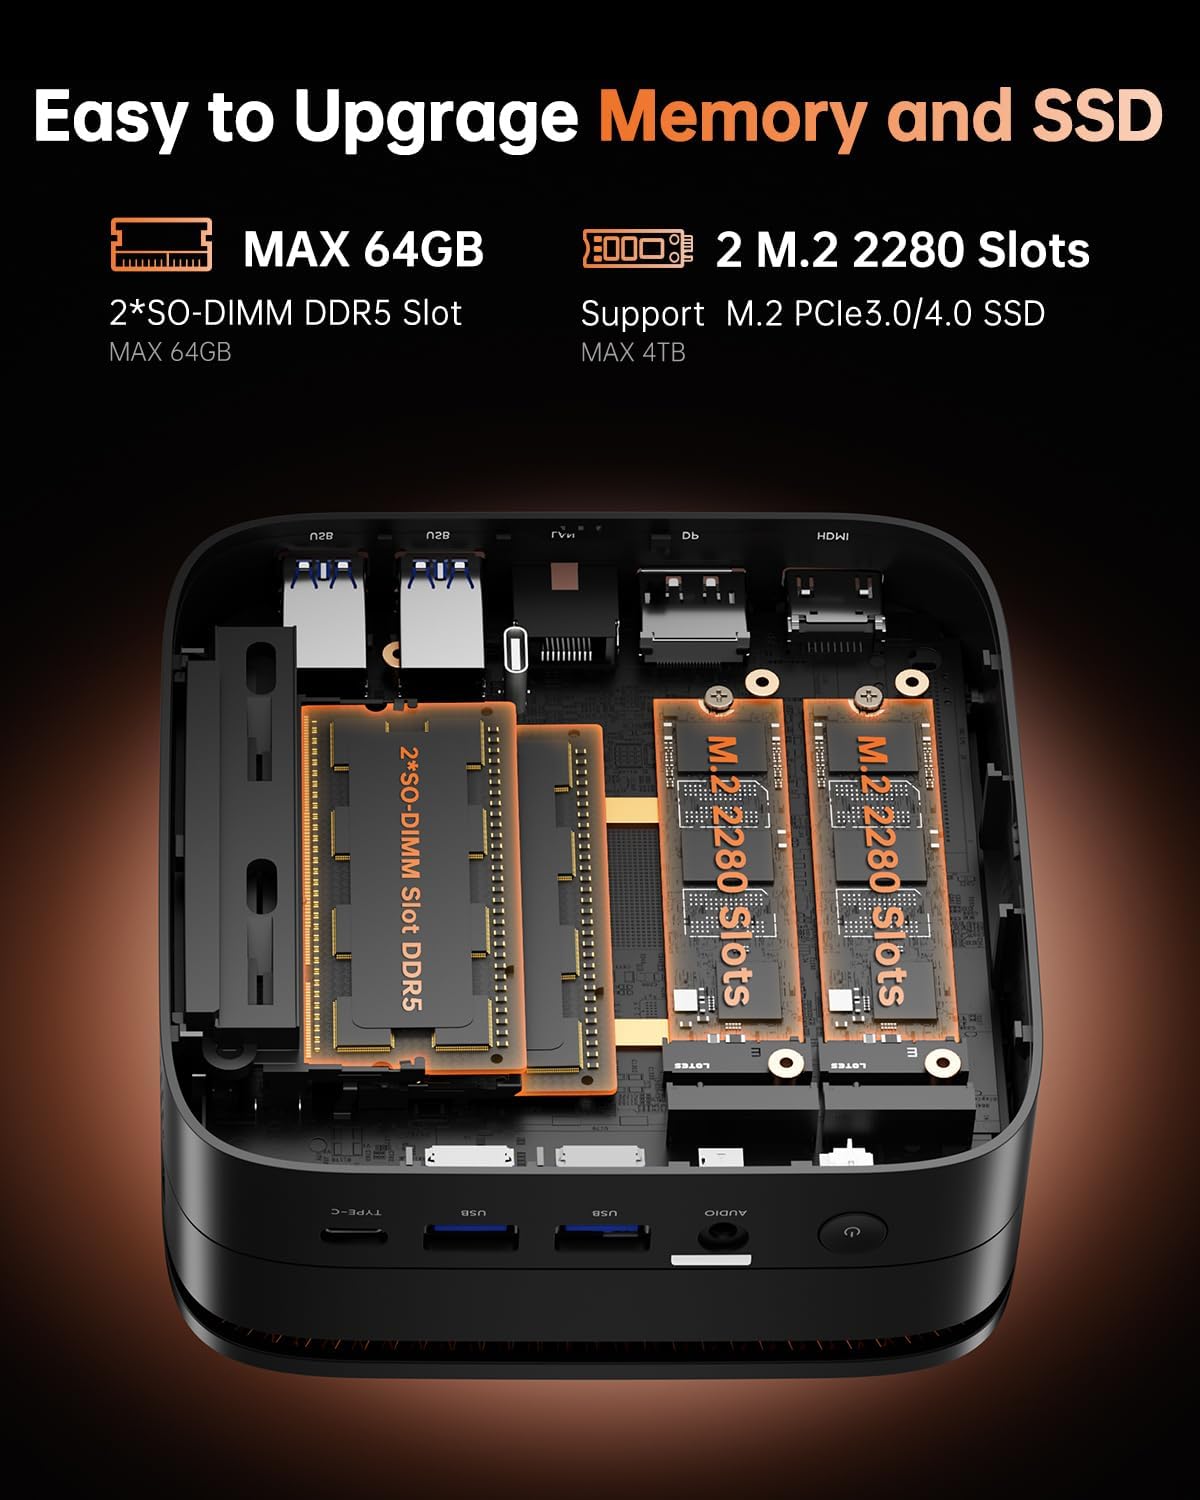
Image 5: An internal view of the NiPoGi Hyper H1 Mini PC, illustrating the two SO-DIMM DDR5 slots for memory expansion up to 64GB and two M.2 2280 slots for SSD expansion up to 4TB, supporting PCIe3.0/4.0 SSDs.
7.1. RAM Expansion
- The Mini PC comes with 16GB DDR5 memory.
- It features 2 SO-DIMM slots, allowing for expansion up to a maximum of 64GB DDR5 RAM.
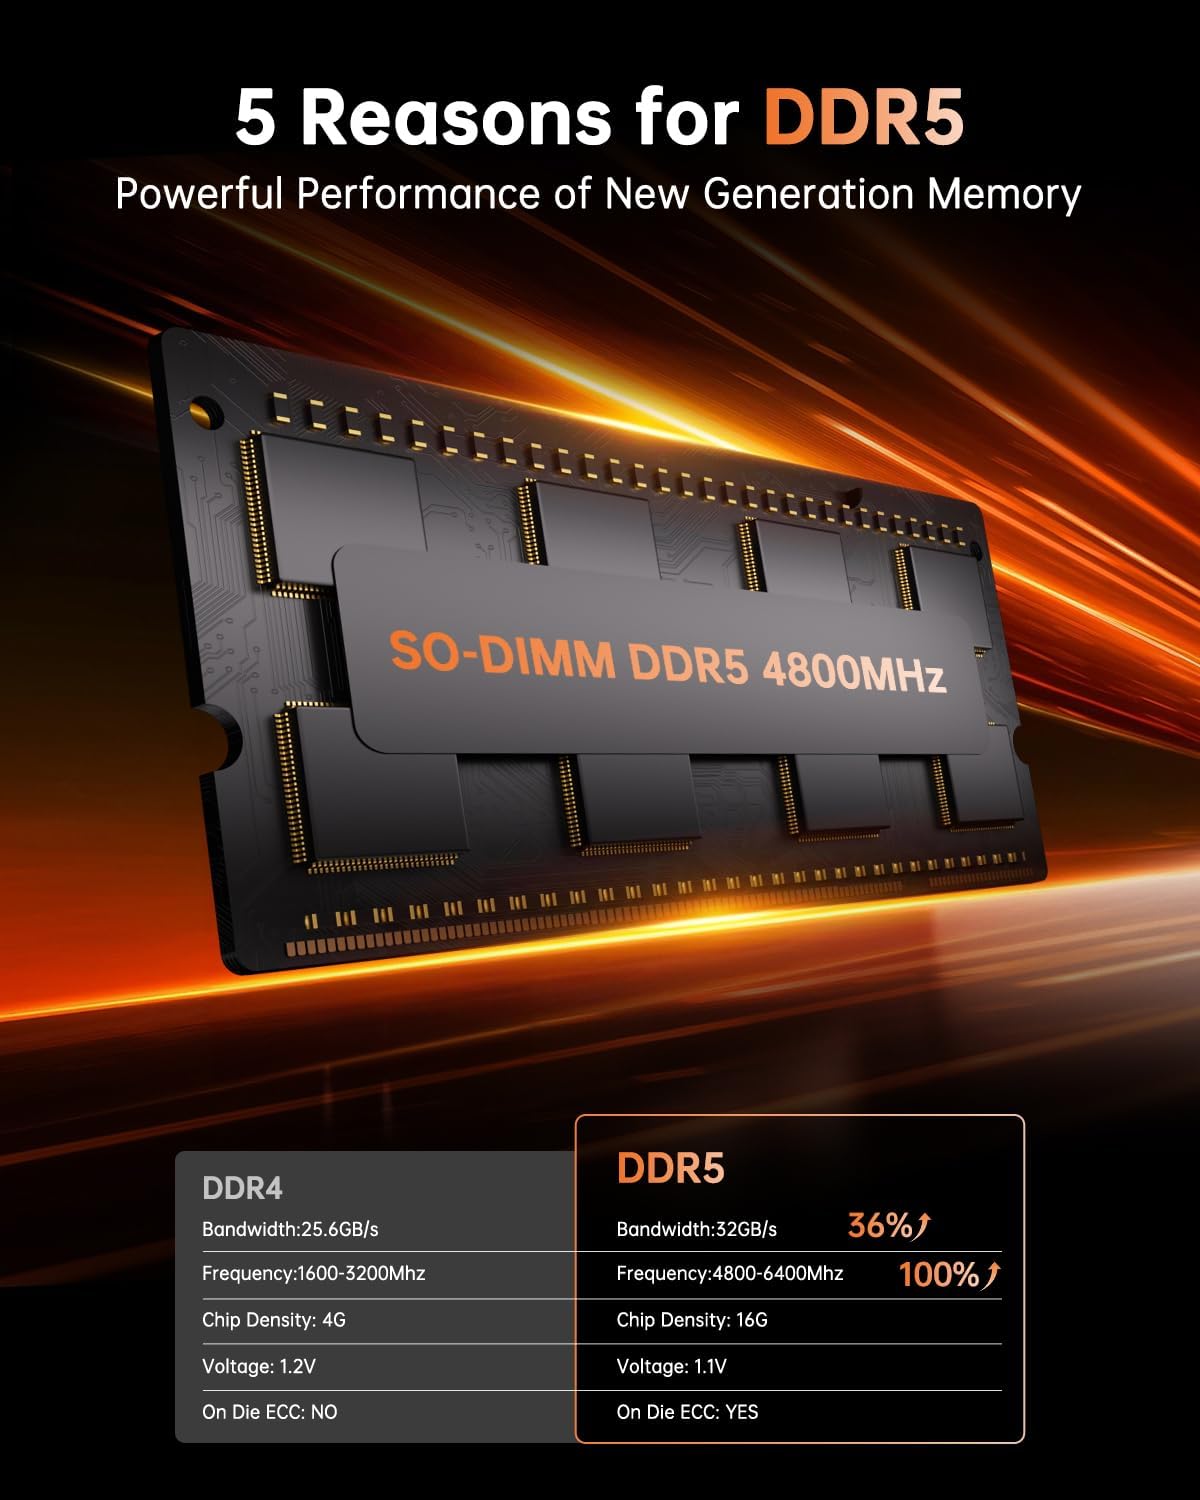
Image 6: A close-up of a SO-DIMM DDR5 4800MHz memory module, alongside a comparison table highlighting the performance advantages of DDR5 over DDR4, including higher bandwidth, frequency, and the presence of On Die ECC.
7.2. SSD Expansion
- The Mini PC includes a 512GB M.2 2280 NVMe PCIe3.0 SSD.
- It has 2 M.2 2280 slots, supporting M.2 NVMe PCIe3.0 or PCIe4.0 SSDs, allowing for storage expansion up to 4TB.
8. VESA Mounting
The NiPoGi Hyper H1 Mini PC supports VESA mounting, allowing you to attach it to the back of a compatible monitor or to a wall mount. This helps in creating a tidy and space-saving workspace.
- Attach the VESA mount bracket to the back of your monitor or desired surface using the provided screws.
- Slide the Mini PC onto the bracket until it clicks securely into place.
9. Troubleshooting
If you encounter issues with your NiPoGi Hyper H1 Mini PC, refer to the following common troubleshooting steps:
- No Power: Ensure the power adapter is securely connected to both the Mini PC and a working power outlet. Try a different outlet.
- No Display: Verify that the monitor is powered on and the display cable (HDMI, DP, or Type-C) is securely connected to both the Mini PC and the monitor. Try a different display cable or port.
- No Internet Connection: For wired connection, check the Ethernet cable and router. For Wi-Fi, ensure Wi-Fi is enabled in the operating system and you are connected to the correct network with the correct password.
- Peripheral Not Detected: Ensure USB devices are properly connected. Try connecting them to a different USB port.
- System Slowdown: Check for background applications consuming resources. Ensure sufficient free storage space. Consider upgrading RAM or SSD if performance issues persist.
For persistent issues, please contact NiPoGi technical support.
10. Specifications
Detailed technical specifications for the NiPoGi Hyper H1 Mini PC:
| Feature | Specification |
|---|---|
| Brand | NiPoGi |
| Model Number | H1 |
| Processor | AMD Ryzen 7 6800H (8 Cores, 16 Threads, Base 3.2 GHz, Max Turbo 4.7 GHz) |
| Graphics | Integrated AMD Radeon 680M (12 CUs, up to 2200 MHz) |
| RAM | 16GB DDR5 4800MHz (Expandable up to 64GB via 2 SO-DIMM slots) |
| Storage | 512GB M.2 2280 NVMe PCIe3.0 SSD (Expandable up to 4TB via 2 M.2 2280 slots, supports PCIe3.0/4.0) |
| Operating System | Windows 11 Pro (or Linux compatible) |
| Video Output | 1x HDMI 2.0, 1x DP 2.0, 1x USB 3.2 Gen2 Type-C (Supports Triple 4K@60Hz Display) |
| Wireless Connectivity | Wi-Fi 6 (802.11ax), Bluetooth 5.2 |
| Wired Connectivity | 1x 2.5Gbps RJ45 LAN Port |
| USB Ports | 2x USB 3.2 Gen2 Type-A, 1x USB 3.2 Gen2 Type-C, 4x USB 3.2 Gen1 Type-A |
| Audio Port | 1x 3.5mm Audio Jack |
| Dimensions (L x W x H) | 12.9 x 12.9 x 5.1 cm (5.08 x 5.08 x 2.01 inches) |
| Weight | 568 grams (1.25 lbs) |
11. Maintenance
- Cleaning: Use a soft, dry cloth to clean the exterior of the Mini PC. Do not use liquid cleaners or aerosols.
- Ventilation: Regularly check that the ventilation openings are clear of dust and debris to ensure optimal airflow and prevent overheating.
- Software Updates: Keep your operating system and drivers updated to ensure system stability and security.
12. Warranty and Support
NiPoGi is committed to providing excellent customer service. The NiPoGi Hyper H1 Mini PC comes with:
- 24-hour after-sales service.
- Lifetime technical support.
If you have any questions, require technical assistance, or need to claim warranty service, please do not hesitate to contact NiPoGi customer support through the official channels or your point of purchase.


