Introduction
This manual provides detailed instructions for the installation, operation, and maintenance of your VORGUT Solar Camera Outdoor Wireless (Model: VRUS-SQ01). This advanced security camera features a dual-lens system, solar power, 2.4G WiFi connectivity, PIR human detection, auto-tracking, and color night vision capabilities for comprehensive outdoor surveillance.
1. Setup
1.1. What's in the Box
Before beginning installation, please verify that all components are present:
- 1x VORGUT Solar Camera
- 1x Solar Panel
- 1x Mounting Bracket for Camera
- 1x Mounting Bracket for Solar Panel
- 1x USB Charging Cable
- Mounting Screws and Wall Plugs
- 1x User Manual (this document)
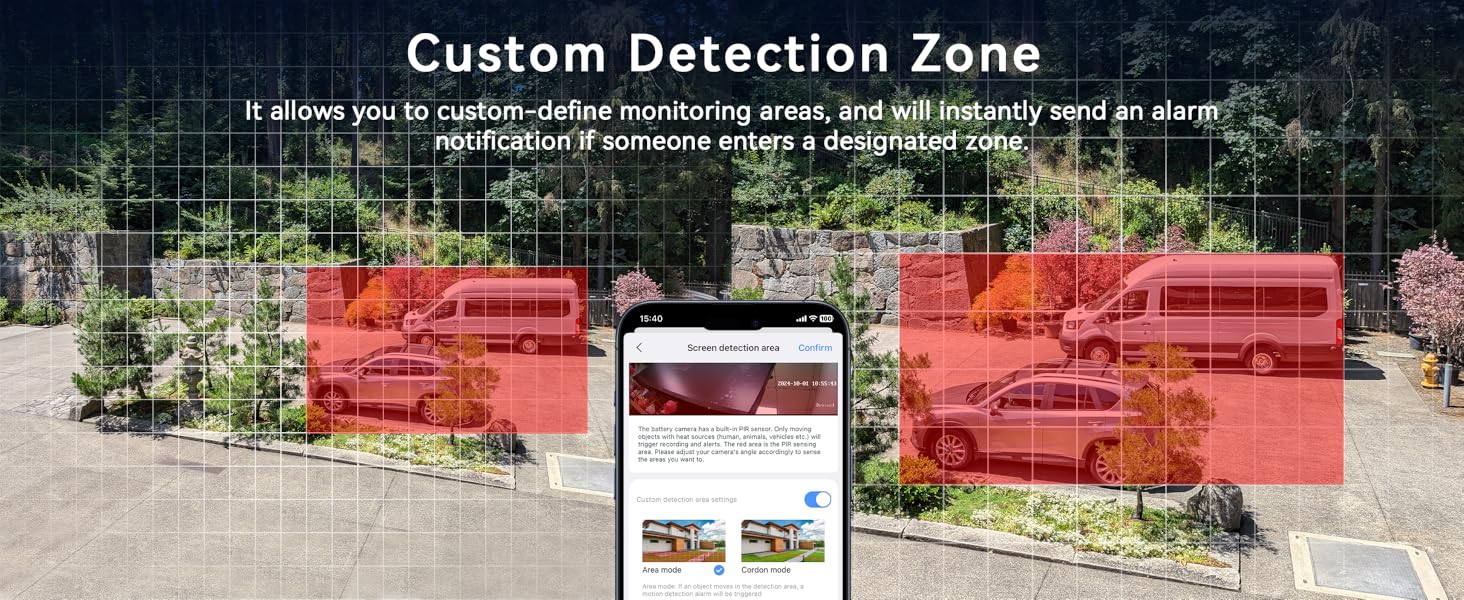
Image: Contents of the VORGUT Solar Camera package, showing the camera unit, solar panel, mounting accessories, and charging cable.
1.2. Physical Installation
The VORGUT Solar Camera is designed for outdoor use and can be mounted on walls or ceilings. Ensure the solar panel receives adequate direct sunlight for optimal charging.
- Choose a Location: Select a location that provides the desired surveillance coverage and allows the solar panel to receive maximum direct sunlight throughout the day.
- Mount the Solar Panel: Attach the solar panel mounting bracket to a suitable surface using the provided screws. Adjust the angle of the solar panel to face the sun.
- Mount the Camera: Secure the camera's mounting bracket to the desired location (wall or ceiling).
- Connect Solar Panel to Camera: Connect the USB cable from the solar panel to the charging port on the camera. Ensure the connection is secure and the waterproof cover is properly sealed.

Image: The VORGUT solar camera installed on an exterior wall with its solar panel positioned to capture sunlight.

Image: Illustration of flexible mounting options for the camera, including wall and ceiling installations.
1.3. App Installation and Camera Pairing
Download the recommended mobile application (e.g., Eseecloud App) from your smartphone's app store. Follow the in-app instructions to pair your camera.
- Power On: Ensure the camera is powered on.
- Launch App: Open the mobile application on your smartphone.
- Add Device: Select the option to "Add Device" or scan the QR code located on the camera (do not scan the QR code on the NVR if applicable).
- Connect to Wi-Fi: Follow the prompts to connect the camera to your 2.4Ghz Wi-Fi network. (5Ghz Wi-Fi is not supported).
- Complete Setup: Once connected, name your device and complete the setup process.

Image: A smartphone displaying the app interface for adding the camera, with a QR code scanning option.
Video: A step-by-step guide on how to set up the Sansco dual lens solar security camera, including app connection and initial configuration.
2. Operating Instructions
2.1. Key Features
- Dual-Lens, Dual-View: Combines a fixed lens for panoramic view and a rotating PTZ lens for detailed monitoring.
- 355° Pan & 75° Tilt: Control the camera's movement remotely via the app for comprehensive coverage.
- PIR Human Detection: Advanced technology detects human shapes, reducing false alarms and sending instant notifications.
- Auto-Tracking: The camera intelligently follows detected human movement.
- Smart Night Vision: Automatically switches between infrared (black & white) and full-color night vision upon human detection.
- Two-Way Talk: Communicate with visitors or deter intruders using the built-in microphone and speaker.
- Local & Cloud Storage: Supports Micro SD card (up to 128GB, not included) and optional cloud storage subscription.

Image: Visual representation of the dual-lens functionality, offering both a wide panoramic view and a detailed PTZ view simultaneously.
2.2. App Usage
Once the camera is paired, you can access live view, control PTZ functions, receive alerts, and manage settings through the mobile app.
- Live View: Tap on the camera feed to view real-time footage. The dual-lens design allows for split-screen viewing.
- PTZ Control: Use the directional controls within the app to pan (355° horizontally) and tilt (75° vertically) the lower camera lens.
- Two-Way Talk: Press and hold the microphone icon to speak through the camera's speaker.
- Motion Alerts: Enable PIR human detection to receive instant notifications on your phone when human movement is detected.
- Night Vision Modes: Adjust night vision settings (Infrared, Full-Color, Smart Night Vision) as needed. Smart Night Vision activates color mode only when motion is detected.
- Playback: Access recorded footage from your SD card or cloud storage.

Image: A smartphone displaying a motion detection alert from the camera, indicating detected movement.

Image: Demonstrates the two-way talk feature and the ability for multiple users to view the camera feed simultaneously.
2.3. Storage Options
The camera supports two storage methods:
- Micro SD Card: Insert a Micro SD card (up to 128GB) into the designated slot on the camera for local storage of recordings.
- Cloud Storage: An optional cloud storage subscription is available for remote backup and access to your video footage.

Image: The camera unit highlighting its support for both Micro SD card and cloud storage solutions.
3. Maintenance
- Cleaning: Periodically clean the camera lenses and solar panel with a soft, damp cloth to ensure clear image quality and efficient solar charging.
- Weather Protection: The camera is IP66 weatherproof. Ensure all ports are properly sealed after installation or maintenance to maintain water and dust resistance.
- Battery Health: Ensure the solar panel is positioned to receive maximum sunlight daily to maintain optimal battery charge.
- Firmware Updates: Check the mobile app regularly for firmware updates to ensure your camera has the latest features and security enhancements.

Image: The camera and solar panel enduring rain, highlighting their robust weatherproof construction.
Video: A demonstration of the ESCANU outdoor camera's waterproof capabilities, showing it being sprayed with water.
4. Troubleshooting
- Camera Offline:
- Check Wi-Fi signal strength at the camera's location.
- Ensure the camera is connected to a 2.4Ghz Wi-Fi network.
- Verify the camera's battery level.
- Restart the camera by turning it off and on.
- Poor Image Quality:
- Clean the camera lenses.
- Ensure there are no obstructions in the camera's field of view.
- Check network connection stability.
- Solar Panel Not Charging:
- Ensure the solar panel is receiving direct sunlight for several hours daily.
- Clean the surface of the solar panel.
- Check the connection cable between the solar panel and the camera.
- False Motion Alerts:
- Adjust PIR sensitivity settings in the app.
- Define specific detection zones to exclude high-traffic areas or moving objects like trees.
5. Specifications
| Model Name | VRUS-SQ01 |
| Indoor/Outdoor Usage | Outdoor |
| Power Source | Solar Powered (1 Lithium Ion battery included) |
| Connectivity Protocol | Wi-Fi (2.4Ghz only) |
| Video Capture Resolution | 1440p (2K 3MP) |
| Special Features | HD Resolution, Local Recording, Motion Sensor, Night Vision, PTZ Technology, Dual Lens, Auto Tracking, Two-Way Talk |
| Weatherproof Rating | IP66 |
| Operating Temperature | -40°C to 50°C |
| Storage | Micro SD Card (up to 128GB), Cloud Storage (subscription required) |
| Item Weight | 2.31 pounds |
| Product Dimensions | 5 x 5 x 0.01 inches |
6. Warranty Information
VORGUT products typically come with a manufacturer's warranty covering defects in materials and workmanship. Please refer to the product packaging or contact VORGUT customer support for specific warranty terms and conditions. Keep your purchase receipt as proof of purchase.
7. Customer Support
For technical assistance, troubleshooting, or any questions regarding your VORGUT Solar Camera, please contact our customer support team. You can find contact information on the product packaging or through the VORGUT brand store on Amazon.
Online Resources:
- VORGUT Amazon Store
- Refer to the Eseecloud App for in-app support and FAQs.


